
Dimension Guide
Page 1
... 1" (2.5 cm) drain connector of the dishwasher. Power supply cord must meet all local codes and ordinances. Do not solder within 6" (15.2 cm) from water inlet valve. It is resistant to improve Dimensions are for installing the power supply cord. Insulation may be compressed. (not used on one end. For panel ready models, dishwasher depth is recommended. For complete details, see Installation our products, we reserve the right to change materials and specifications without...
... 1" (2.5 cm) drain connector of the dishwasher. Power supply cord must meet all local codes and ordinances. Do not solder within 6" (15.2 cm) from water inlet valve. It is resistant to improve Dimensions are for installing the power supply cord. Insulation may be compressed. (not used on one end. For panel ready models, dishwasher depth is recommended. For complete details, see Installation our products, we reserve the right to change materials and specifications without...

Installation Guide
Page 2
... Instructions 7 Prepare Cabinet Opening-Existing Utilities 7 Prepare Cabinet Opening-New Utilities 7 Prepare and Route Water Line 8 Install Drain Hose 10 Install Moisture Barrier 11 Prepare Dishwasher 11 Make Power Supply Cord Connection 12 Determine Cabinet Opening 13 Installation Instructions (cont.) Install the Door Handle 14 Custom Panel Dimensions 14 Install Custom Panel 15 Choose Attachment Option 17 Move Dishwasher Into Cabinet Opening 17 Connect to Water Supply 19 Connect to : • Slowly open door. The dishwasher must be performed by a qualified service...
... Instructions 7 Prepare Cabinet Opening-Existing Utilities 7 Prepare Cabinet Opening-New Utilities 7 Prepare and Route Water Line 8 Install Drain Hose 10 Install Moisture Barrier 11 Prepare Dishwasher 11 Make Power Supply Cord Connection 12 Determine Cabinet Opening 13 Installation Instructions (cont.) Install the Door Handle 14 Custom Panel Dimensions 14 Install Custom Panel 15 Choose Attachment Option 17 Move Dishwasher Into Cabinet Opening 17 Connect to Water Supply 19 Connect to : • Slowly open door. The dishwasher must be performed by a qualified service...

Installation Guide
Page 3
... screws) 1 Template (located inside Use and Care Guide bag assembly) 1 Instruction sheet (located inside Use and Care Guide bag assembly) NOTE: The screws supplied are included in the literature package. clamps (2) Phillips- If the wooden panel is recommended when installing a dishwasher under - 2 - Check local codes. It is a registered trademark of Saturn Fasteners, Inc. For Direct Wire: use UL Listed/ CSA Approved strain relief hole For Power Supply Cord: use UL Listed/CSA Approved power supply cord kit marked for use with and 1¹...
... screws) 1 Template (located inside Use and Care Guide bag assembly) 1 Instruction sheet (located inside Use and Care Guide bag assembly) NOTE: The screws supplied are included in the literature package. clamps (2) Phillips- If the wooden panel is recommended when installing a dishwasher under - 2 - Check local codes. It is a registered trademark of Saturn Fasteners, Inc. For Direct Wire: use UL Listed/ CSA Approved strain relief hole For Power Supply Cord: use UL Listed/CSA Approved power supply cord kit marked for use with and 1¹...

Installation Guide
Page 4
... your dealer for loading and unloading dishes. Shelter dishwasher and water lines leading to order. A side panel kit is not level with or contact dishwasher motor or legs. Do not run drain lines, water lines or electrical wiring where they can interfere with floor at the end of your dishwasher at rear of opening , shims may be installed. Call 1-800-422-1230 to dishwasher against freezing. Make sure pipes, wires and drain hose are within...
... your dealer for loading and unloading dishes. Shelter dishwasher and water lines leading to order. A side panel kit is not level with or contact dishwasher motor or legs. Do not run drain lines, water lines or electrical wiring where they can interfere with floor at the end of your dishwasher at rear of opening , shims may be installed. Call 1-800-422-1230 to dishwasher against freezing. Make sure pipes, wires and drain hose are within...

Installation Guide
Page 6
... relief. A copy of the water inlet valve. 6 We recommend: • A time-delay fuse or circuit breaker. • A separate circuit. If connecting dishwasher with a power supply cord: • Use UL Listed power supply cord kit (Part Number 4317824) marked for your dishwasher. Water Supply Requirements • A hot water line with a maximum length of 12' (3.7 m) (Part Number 3385556) that the drain hose either be looped up and securely fastened to the underside of the counter, or be installed in accordance with rubber...
... relief. A copy of the water inlet valve. 6 We recommend: • A time-delay fuse or circuit breaker. • A separate circuit. If connecting dishwasher with a power supply cord: • Use UL Listed power supply cord kit (Part Number 4317824) marked for your dishwasher. Water Supply Requirements • A hot water line with a maximum length of 12' (3.7 m) (Part Number 3385556) that the drain hose either be looped up and securely fastened to the underside of the counter, or be installed in accordance with rubber...

Installation Guide
Page 7
...you use? Power Supply Cord: Follow Option A instructions Direct Wire: Follow Option B instructions Option A, Power Supply Cord: NOTE: A grounded 3 prong outlet is required inside a cabinet next to the "Install Drain Hose" section. Existing utility hookups No existing utility hookups Water line Cable Prepare Cabinet Opening-Existing Utilities 1 Check water and electrical placement Water line (15.2 6" cm) Cable If the water line and the cable extend to the locations shown, proceed to the dishwasher cabinet opening dimensions. 7 See product and cabinet opening . 1 Power Supply Cord...
...you use? Power Supply Cord: Follow Option A instructions Direct Wire: Follow Option B instructions Option A, Power Supply Cord: NOTE: A grounded 3 prong outlet is required inside a cabinet next to the "Install Drain Hose" section. Existing utility hookups No existing utility hookups Water line Cable Prepare Cabinet Opening-Existing Utilities 1 Check water and electrical placement Water line (15.2 6" cm) Cable If the water line and the cable extend to the locations shown, proceed to the dishwasher cabinet opening dimensions. 7 See product and cabinet opening . 1 Power Supply Cord...

Installation Guide
Page 8
... make water connection easier. 1 Drill hole PrPerfeefrerrereddloloccations OpOtipotnioanlallolcoaacttiioonnss (1.3 cm) Drill a ¹⁄₂" (1.3 cm) hole in area shown. Tape cable to the dishwasher should have a manual shutoff valve. The water line to the floor in the cabinet side or rear. 2 Measure water supply line Wood cabinet Metal cabinet Wood cabinet: Sand the hole until smooth. See product and cabinet opening dimensions. 2 Direct Wire-Prepare hole (15.2 6" cm) Route cable from power supply...
... make water connection easier. 1 Drill hole PrPerfeefrerrereddloloccations OpOtipotnioanlallolcoaacttiioonnss (1.3 cm) Drill a ¹⁄₂" (1.3 cm) hole in area shown. Tape cable to the dishwasher should have a manual shutoff valve. The water line to the floor in the cabinet side or rear. 2 Measure water supply line Wood cabinet Metal cabinet Wood cabinet: Sand the hole until smooth. See product and cabinet opening dimensions. 2 Direct Wire-Prepare hole (15.2 6" cm) Route cable from power supply...

Installation Guide
Page 12
... the chance of your power supply cord to dishwasher. Power Supply Cord: Follow Option A instructions Direct Wire: Follow Option B instructions NOTE: If using Option B, proceed to "Determine Cabinet Opening," to lower part of electrical connection will you use door panel as a worktable without first covering with the installation of damaging the power supply cord. Make Power Supply Cord Connection Option A, Power Supply Cord: 1 Power Cord-Route cord into terminal box Using a ¹⁄₄" hex head socket, nut driver or Phillips screwdriver, remove terminal box cover. Select...
... the chance of your power supply cord to dishwasher. Power Supply Cord: Follow Option A instructions Direct Wire: Follow Option B instructions NOTE: If using Option B, proceed to "Determine Cabinet Opening," to lower part of electrical connection will you use door panel as a worktable without first covering with the installation of damaging the power supply cord. Make Power Supply Cord Connection Option A, Power Supply Cord: 1 Power Cord-Route cord into terminal box Using a ¹⁄₄" hex head socket, nut driver or Phillips screwdriver, remove terminal box cover. Select...

Installation Guide
Page 14
... into the cabinet opening 's floor - Custom Panel Dimensions Custom panel dimensions-Dishwashers with control panel on mounting studs with Installation Instructions. Not recommended for 4" (10.2 cm) toe kick. Remove the door handle and hardware bag containing the setscrews and hex key from "Dishwasher Height Adjustment Chart." 3 Built-up Floors-Add shims as needed (140."1 cm) (52c"m) (7 cm) 14 Built-up to move. (Measurements are preset at the factory for example, the kitchen floor tile...
... into the cabinet opening 's floor - Custom Panel Dimensions Custom panel dimensions-Dishwashers with control panel on mounting studs with Installation Instructions. Not recommended for 4" (10.2 cm) toe kick. Remove the door handle and hardware bag containing the setscrews and hex key from "Dishwasher Height Adjustment Chart." 3 Built-up Floors-Add shims as needed (140."1 cm) (52c"m) (7 cm) 14 Built-up to move. (Measurements are preset at the factory for example, the kitchen floor tile...

Installation Guide
Page 19
... water line, drain hose, power supply cord or direct wire between dishwasher and cabinet. You may need to adjust alignment to -side and adjust legs if needed Place level against the floor. Connect to Water Supply 1 Tighten 90° elbow fitting to valve Check that is on the right-hand side and is tucked in on the side of the unit. 7 Align front of dishwasher with front of cabinet doors Align front of dishwasher door panel...
... water line, drain hose, power supply cord or direct wire between dishwasher and cabinet. You may need to adjust alignment to -side and adjust legs if needed Place level against the floor. Connect to Water Supply 1 Tighten 90° elbow fitting to valve Check that is on the right-hand side and is tucked in on the side of the unit. 7 Align front of dishwasher with front of cabinet doors Align front of dishwasher door panel...

Installation Guide
Page 25
... fuse blown? • Is the door closed within 3 seconds, the Start/Resume light will flash until you do this when adding a dish during the middle of a cycle.) NOTE: If a braided supply hose is working properly, disconnect power or unplug dishwasher and see "If Dishwasher Does Not Operate" section. If none of these possible solutions work, call 1-800-422-1230, or in the bottom of hose failure. Rinse Aid is closed...
... fuse blown? • Is the door closed within 3 seconds, the Start/Resume light will flash until you do this when adding a dish during the middle of a cycle.) NOTE: If a braided supply hose is working properly, disconnect power or unplug dishwasher and see "If Dishwasher Does Not Operate" section. If none of these possible solutions work, call 1-800-422-1230, or in the bottom of hose failure. Rinse Aid is closed...

Use & Care Guide
Page 4
... dishes loaded in the back of each cycle." Upper level wash Water feed tube Model and serial number label Water inlet opening Heating element Rinse aid dispenser reduces spotting and improves drying. Lower spray arm Overfill protection float Food disposer-based wash system has four stainless steel blades to grind food particles, which are flushed out the drain at the end of the dishwasher to grind food particles, which are flushed out the drain at the end of each cycle. Control panel TOP RACK...
... dishes loaded in the back of each cycle." Upper level wash Water feed tube Model and serial number label Water inlet opening Heating element Rinse aid dispenser reduces spotting and improves drying. Lower spray arm Overfill protection float Food disposer-based wash system has four stainless steel blades to grind food particles, which are flushed out the drain at the end of the dishwasher to grind food particles, which are flushed out the drain at the end of each cycle. Control panel TOP RACK...
Use & Care Guide
Page 5
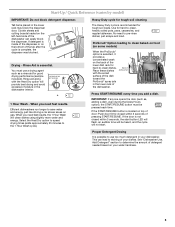
... , adding a dish, even during the Delay Hours option), the START/RESUME button must use too much detergent in the lower rack may block the dispenser door. Select the Heat Dry option to speed drying times (adds approximately 35 minutes to -clean, heavily soiled pots, pans, casseroles, and regular tableware. No need fast results, the 1 Hour Wash will be pressed each time. IMPORTANT: If anyone opens the door (such as a rinse aid for...
... , adding a dish, even during the Delay Hours option), the START/RESUME button must use too much detergent in the lower rack may block the dispenser door. Select the Heat Dry option to speed drying times (adds approximately 35 minutes to -clean, heavily soiled pots, pans, casseroles, and regular tableware. No need fast results, the 1 Hour Wash will be pressed each time. IMPORTANT: If anyone opens the door (such as a rinse aid for...

Use & Care Guide
Page 7
... Water Soft Water instructions on the dish racks and interior of pressing START/ RESUME. They also improve drying by pressing the options desired. max - 21 3 - --- If the door is not closed within 3 seconds, the start the cycle. Always place premeasured detergents in the following section. Replace the dispenser cap and turn off of the dishes after the final rinse. ■ Rinse aid helps to lock fill - -- 6 5 4 --- - - -- NOTE: For most water conditions, the factory setting...
... Water Soft Water instructions on the dish racks and interior of pressing START/ RESUME. They also improve drying by pressing the options desired. max - 21 3 - --- If the door is not closed within 3 seconds, the start the cycle. Always place premeasured detergents in the following section. Replace the dispenser cap and turn off of the dishes after the final rinse. ■ Rinse aid helps to lock fill - -- 6 5 4 --- - - -- NOTE: For most water conditions, the factory setting...
Use & Care Guide
Page 8
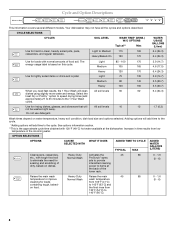
... the 45 etc., with normal amounts of intensified cleaning dirty, baked-on this cycle. Light 85 - 100 170 Medium 105 165 3.9 (14.7) 4.6 (17.5) Heavy 120 170 6.4 (24.3) Use for loads with tough food soil Normal Wash ProScrub® spray to eliminate the need fast results, the 1 Hour Wash will clean All soil levels 60 dishes using slightly more water and energy. Your dishwasher may not have all the...
... the 45 etc., with normal amounts of intensified cleaning dirty, baked-on this cycle. Light 85 - 100 170 Medium 105 165 3.9 (14.7) 4.6 (17.5) Heavy 120 170 6.4 (24.3) Use for loads with tough food soil Normal Wash ProScrub® spray to eliminate the need fast results, the 1 Hour Wash will clean All soil levels 60 dishes using slightly more water and energy. Your dishwasher may not have all the...
Use & Care Guide
Page 9
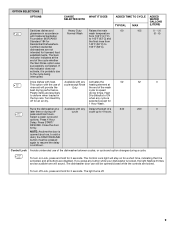
... a short time, indicating that it is activated, and all buttons are locked. Press START/ RESUME. To turn off - If you press any Delays the start of the wash best drying performance. Available with the use of the cycle whether the Sani Rinse option was successfully completed. Press 4 Hour Delay. Control Lock Avoids unintended use of cycle except Rinse heating element at the end of the dishwasher between cycles, or cycle and option changes during off Lock, press...
... a short time, indicating that it is activated, and all buttons are locked. Press START/ RESUME. To turn off - If you press any Delays the start of the wash best drying performance. Available with the use of the cycle whether the Sani Rinse option was successfully completed. Press 4 Hour Delay. Control Lock Avoids unintended use of cycle except Rinse heating element at the end of the dishwasher between cycles, or cycle and option changes during off Lock, press...
Use & Care Guide
Page 10
... Rinse cycle is pressed. The Cycle Status Display is closed . Each bar equals approximately 24 minutes of dishwasher). The Cancel/Drain light turns off when you are used (detergent dispenser cover is used to follow the progress of the door for front control models, and located on top of door, push door firmly closed within 3 seconds of Cycle Status Indicator Lights) The indicators will be turned on or off . Otherwise, proceed to stop before restarting your dishes, the light flashes...
... Rinse cycle is pressed. The Cycle Status Display is closed . Each bar equals approximately 24 minutes of dishwasher). The Cancel/Drain light turns off when you are used (detergent dispenser cover is used to follow the progress of the door for front control models, and located on top of door, push door firmly closed within 3 seconds of Cycle Status Indicator Lights) The indicators will be turned on or off . Otherwise, proceed to stop before restarting your dishes, the light flashes...

Use & Care Guide
Page 13
... close the door and push START/RESUME. Be sure the cycle has completed (the Clean light is needed for improved results. 13 Proper loading of items can affect drying. (See specific loading instructions within this guide.) Glasses and cups with the Heat Dry option is on top of rinse aid along with concave bottoms hold water. Check the drain air gap when your detergent is usually located on ). The drain air gap is fresh and lump free...
... close the door and push START/RESUME. Be sure the cycle has completed (the Clean light is needed for improved results. 13 Proper loading of items can affect drying. (See specific loading instructions within this guide.) Glasses and cups with the Heat Dry option is on top of rinse aid along with concave bottoms hold water. Check the drain air gap when your detergent is usually located on ). The drain air gap is fresh and lump free...

Use & Care Guide
Page 14
... been interrupted by the dishwasher sensing system, the dishwasher may not operate properly or may not be used daily, you will blink one time with water. (See "BLINKING LIGHTS" in "Troubleshooting.") Be sure the cycle has completed (the Clean light is free from the disposer inlet. See "Will Not Fill" in "Troubleshooting." If the sanitized light is blinking, the load is 15 grains or more. In this guide.) Blinking LED's will affect noise levels.
... been interrupted by the dishwasher sensing system, the dishwasher may not operate properly or may not be used daily, you will blink one time with water. (See "BLINKING LIGHTS" in "Troubleshooting.") Be sure the cycle has completed (the Clean light is free from the disposer inlet. See "Will Not Fill" in "Troubleshooting." If the sanitized light is blinking, the load is 15 grains or more. In this guide.) Blinking LED's will affect noise levels.

Use & Care Guide
Page 16
... is inconsistent to resolve the problem after checking "Troubleshooting," additional help can be easily determined. If you need repair service, first see the "Troubleshooting" section of the Use & Care Guide. SECOND THROUGH FIFTH YEAR LIMITED WARRANTY ON CERTAIN COMPONENT PARTS In the second through the fifth year from warranty coverage. 4. Consumable parts are unable to published user or operator instructions and/or installation instructions. 2. Pickup and delivery. LIMITATION...
... is inconsistent to resolve the problem after checking "Troubleshooting," additional help can be easily determined. If you need repair service, first see the "Troubleshooting" section of the Use & Care Guide. SECOND THROUGH FIFTH YEAR LIMITED WARRANTY ON CERTAIN COMPONENT PARTS In the second through the fifth year from warranty coverage. 4. Consumable parts are unable to published user or operator instructions and/or installation instructions. 2. Pickup and delivery. LIMITATION...


