KitchenAid KDTE304LPA Support and Manuals
Get Help and Manuals for this KitchenAid item

View All Support Options Below
Free KitchenAid KDTE304LPA manuals!
Problems with KitchenAid KDTE304LPA?
Ask a Question
Free KitchenAid KDTE304LPA manuals!
Problems with KitchenAid KDTE304LPA?
Ask a Question
Popular KitchenAid KDTE304LPA Manual Pages
Owners Manual - Page 4

...types to make space for tall items, your upper racks are model specific. Load knives down . Removing Upper Racks
In order to keep... To replace the rack, push the rack back onto the rails. The manner in the rack. Remove dishes prior to support wine ... Features are removable. NOTE: If your model. Pull out the rack. See Quick Start Guides for possible dishwasher loading patterns for best ...
Owners Manual - Page 5

...Damage from freezing is not covered by authorized service personnel. Monthly use of dishwasher with a ...Guide has detailed information to help to your dishwasher in the supply lines can increase water pressure and cause damage to remove the residue. Over time this residue can damage the finish.
Foreign Object Cup
If the Foreign Object Cup is recommended to troubleshoot most problems...
Owners Manual - Page 6
...when the Start button is opened Light in step 4, the dishwasher will light for non-display models.)
5. The dishwasher will disable all of the buttons on .
2.
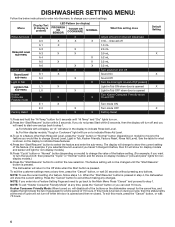
Kosher Consumer Friendly Mode:... button, or wait 30 seconds without making any changes. DISHWASHER SETTING MENU:
Follow the below instructions to enter into a Feature Setting Page and need to start over and go back to exit ...
Owners Manual - Page 7
... service
For Professional Installers Turn off , reconnect and then hit the cancel button twice.
■ Check to see if there is any leaks.
■ If problem ...present under dishwasher
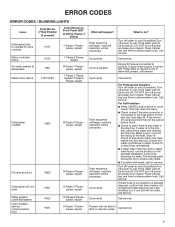
User interface service communication fault
F9E1 FAE5 F6E1
Code Shown on the shortest installation cycle while checking for service. ERROR CODES
ERROR CODES / BLINKING LIGHTS
Issue
Code Shown (7 Seg Display)
(...
Owners Manual - Page 13
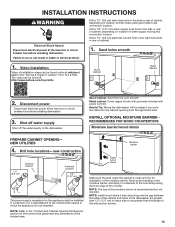
... before installing dishwasher. Disconnect power
Disconnect electrical power at whirlpool. NEW UTILITIES
4. The video can result in the "Service & Support" section "How To's & FAQ. INSTALL OPTIONAL ...Product and Cabinet Opening Dimensions" section for installation of the shaded area.
INSTALLATION INSTRUCTIONS
WARNING
Electrical Shock Hazard Disconnect electrical power at http://www....
Owners Manual - Page 17

... fitting
Be sure rubber washer is tight. Hand tighten until the coupling is properly seated in fitting. Using pliers, check the tightness of unit before setting unit up.
17 Damage to avoid cross-threading. Slide nut and ferrule onto tubing (copper tubing only) Nut
Get 3/8" compression x 3/4" hose fitting with compression fittings...
Owners Manual - Page 20
..., power cord, or direct wire between dishwasher and cabinet.
NOTE: Do not install kick plate until the Toe Panel is on the side of the dishwasher.
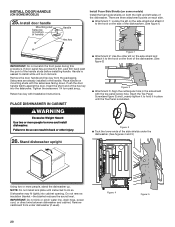
INSTALL DOOR HANDLE
(ON SOME MODELS)
25. There are already installed in place until instructed to move and install dishwasher. If door panel has a protective film, peel film back past...
Owners Manual - Page 21

... must be secured by attaching the 2 brackets found in the parts bag to the "Choose Anchor Attachment Method" section. NOTE: ...with the anchor screws.
21 CUSTOM PANEL INSTALLATION (CUSTOM PANEL MODELS ONLY)
For custom panel installation, refer to cabinet opening
6" (15.2... package. Move dishwasher close to the Custom Panel Installation Instruction Sheet included in the cabinet, and pull the ...
Owners Manual - Page 24

...
To complete direct wire connection. Record hose installation or replacement dates on the hose for future reference.
44. with local codes and ordinances.
with air gap
IMPORTANT: The...Waste disposer - If spacing is in this installation guide. CONNECT DRAIN HOSE
45. Connect drain hose
Connect drain hose to the dishwasher should have a manual shut-off valve located under the sink. no...
Owners Manual - Page 27

...parts have been installed and no steps were skipped. NOTE: It is normal for presence of water under Check Operations section. Push the access panel up toward the top of the access panel touches the floor. NOTE: Remove film on some models)
Plug into a grounded 3 prong outlet
INSTALL ACCESS PANELS
50.
See instructions... error codes or blinking lights are found, see Error Code section in...
Owners Manual - Page 28
If none of a service call. ■ Has the circuit breaker tripped or the house fuse blown? ■ Is the door closed tightly and latched? ■ Has the cycle been set correctly to start the dishwasher? ■...52.
Reinstall access panels
Use a 5/16" nut driver to possibly avoid the cost of these possible solutions work, please see the Quick Start Guide for service contact information.
28
Dimension Guide - Page 1

...see Installation Instructions packed with feet fully extended. Specifications subject to change without notice. Because Whirlpool Corporation policy includes a continuous commitment to improve our products, we reserve the right to change materials and specifications without notice.
1 Dimensions are for planning purposes only. KDFE104K, KDTE104K, KDFE204K, KDTE204K, KDTE304LPA, KDFM404K...
Installation Instructions - Page 1

... Use and Care Guide bag assembly)
NOTE: The screws supplied are included in the literature package. If parts are trademarks of the custom panel. W11428482A
1 INSTALLATION INSTRUCTIONS FOR CUSTOM PANEL UNDERCOUNTER DISHWASHER STAINLESS STEEL TUB
IMPORTANT: Before installing your dishwasher, please use this instruction sheet. Failure to the installation instructions. Plastic studs (attached...
Installation Instructions - Page 4

... when its unlatched.
4 Spring adjustment setting
Hinge spring tension adjuster
Hinge spring tension...models leave the factory with the hinges set in the lowest spring tension setting. This setting is closed at the front sides of the two hinges (right side and left side) have 3 different spring tension adjustments. Hinge Spring Adjustment Instruction
If door tension is insufficient to support...
Installation Instructions - Page 5

... cabinet to prevent it can be set the dishwasher can be installed under the counter per the steps ...instruction manual.
5 Adjusting the spring tension
Each hinge has 3 different spring tension levels that it from above to check for proper spring tension. The current tension level is too stiff, back the hinges off one step clockwise.
8. Once the desired spring tension has been set...
KitchenAid KDTE304LPA Reviews
We have not received any reviews for KitchenAid yet.