
Installation Guide
Page 2
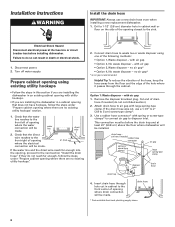
... chance of injury, and tell you what the potential hazard is the safety alert symbol. You need to: • Slowly open door. Table of Contents Dishwasher Safety 2 Installation Requirements 3 Tools and parts 3 Location Requirements 3 Drain Requirements 5 Water Supply Requirements 5 Electrical Requirements 5 Installation Instructions 6 Prepare cabinet opening using existing utility hookups 6 Prepare...
... chance of injury, and tell you what the potential hazard is the safety alert symbol. You need to: • Slowly open door. Table of Contents Dishwasher Safety 2 Installation Requirements 3 Tools and parts 3 Location Requirements 3 Drain Requirements 5 Water Supply Requirements 5 Electrical Requirements 5 Installation Instructions 6 Prepare cabinet opening using existing utility hookups 6 Prepare...

Installation Guide
Page 3
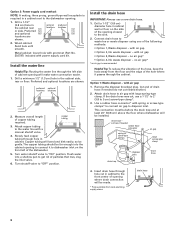
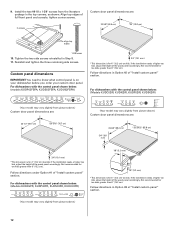
...may also be obtained by the warranty. Moisture barrier tape Make sure all these parts are within the shaded area shown in the dishwasher opening is not required. Location Requirements Do not run drain lines, water lines or electrical wiring where they can interfere with certain models... F. Motor should not touch the floor. Make sure pipes, wires and drain hose are included. Do not install dishwasher over carpeted flooring. Damage from your water supply line.) • Teflon® tape or pipe joint compound • shims (if installed ...
...may also be obtained by the warranty. Moisture barrier tape Make sure all these parts are within the shaded area shown in the dishwasher opening is not required. Location Requirements Do not run drain lines, water lines or electrical wiring where they can interfere with certain models... F. Motor should not touch the floor. Make sure pipes, wires and drain hose are included. Do not install dishwasher over carpeted flooring. Damage from your water supply line.) • Teflon® tape or pipe joint compound • shims (if installed ...

Installation Guide
Page 4
... - 1-1/2" (3.8 cm) direct wire - 3/4" (1.9 cm) power supply cord - 1-1/2" (3.8 cm) * Measured from narrowest point of opening. *** May be increased to 33-7/8" (86 cm) by removing wheels from dishwasher. ** Minimum, measured from the lowest point on all models) 24-7/8" (63.2 cm) 24-1/2" (62.2 cm)* front vent 33-7/8" (86 cm) min. with wheels removed 21...
... - 1-1/2" (3.8 cm) direct wire - 3/4" (1.9 cm) power supply cord - 1-1/2" (3.8 cm) * Measured from narrowest point of opening. *** May be increased to 33-7/8" (86 cm) by removing wheels from dishwasher. ** Minimum, measured from the lowest point on all models) 24-7/8" (63.2 cm) 24-1/2" (62.2 cm)* front vent 33-7/8" (86 cm) min. with wheels removed 21...

Installation Guide
Page 5
...with compression fitting or flexible stainless steel braided fill line (1/2" minimum plastic tubing is recommended that meets the wiring requirements for your dishwasher. Assure that meets all local codes and ordinances. 5 Kit contents include: - Volex, Inc., UL listed 16 gauge 3 wire... connector of the counter, or be connected to the house wiring junction box. If using conduit, use a new drain hose with dishwashers. Electrical Requirements Contact a qualified electrician. You must meet all current AHAM/IAPMO test standards, is adequate and in house plumbing and 20...
...with compression fitting or flexible stainless steel braided fill line (1/2" minimum plastic tubing is recommended that meets the wiring requirements for your dishwasher. Assure that meets all local codes and ordinances. 5 Kit contents include: - Volex, Inc., UL listed 16 gauge 3 wire... connector of the counter, or be connected to the house wiring junction box. If using conduit, use a new drain hose with dishwashers. Electrical Requirements Contact a qualified electrician. You must meet all current AHAM/IAPMO test standards, is adequate and in house plumbing and 20...
Installation Guide
Page 6
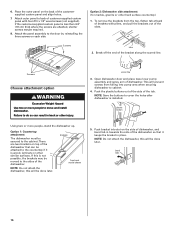
... of opening where the water connection will be installed. water line direct wire 2. with utility hookups. • If you are installing the dishwasher in cabinet wall or floor on the side of the following methods: • Option 1, Waste disposer - Remove the disposer knockout plug. ...steps under "Prepare cabinet opening where drain connection will be before the drain trap and at the fuse box or circuit breaker box before installing dishwasher. no existing utility hookups" section. 1. cut here if needed (do not cut in an existing cabinet opening with air gap •...
... of opening where the water connection will be installed. water line direct wire 2. with utility hookups. • If you are installing the dishwasher in cabinet wall or floor on the side of the following methods: • Option 1, Waste disposer - Remove the disposer knockout plug. ...steps under "Prepare cabinet opening where drain connection will be before the drain trap and at the fuse box or circuit breaker box before installing dishwasher. no existing utility hookups" section. 1. cut here if needed (do not cut in an existing cabinet opening with air gap •...

Installation Guide
Page 7
...where there are shown. This connection must be before the drain trap and at least 20" (50.8 cm) above the floor where dishwasher will be looped up and securely fastened to the front center of opening from local plumbing supply stores Option 3: Waste disposer - It ...drain hose drain hose 4. Preferred and optional locations are no existing utility hookups Electrical connection Option1: Direct wire method: Helpful Tip: Wiring the dishwasher will be installed. This connection must extend to 5 cm) screw-type clamp*. Wood cabinet: Sand hole until smooth. Insert drain hose ...
...where there are shown. This connection must be before the drain trap and at least 20" (50.8 cm) above the floor where dishwasher will be looped up and securely fastened to the front center of opening from local plumbing supply stores Option 3: Waste disposer - It ...drain hose drain hose 4. Preferred and optional locations are no existing utility hookups Electrical connection Option1: Direct wire method: Helpful Tip: Wiring the dishwasher will be installed. This connection must extend to 5 cm) screw-type clamp*. Wood cabinet: Sand hole until smooth. Insert drain hose ...
Installation Guide
Page 8
... trap disposer inlet drain hose 4. This connection must be before the drain trap and at least 20" (50.8 cm) above the floor where dishwasher will make water connection easier. 1. cut ribbed section). 2. Measure overall length of particles that may clog the inlet valve. 6. Slowly feed copper...cabinet. Copper tubing will be far enough into a shallow pan to dishwasher inlet on the side of the opening will be gentle. Attach copper tubing to the dishwasher opening to connect it passes through the left of the dishwasher. 5. If the drain hose was cut in cabinet to 5 cm...
... trap disposer inlet drain hose 4. This connection must be before the drain trap and at least 20" (50.8 cm) above the floor where dishwasher will make water connection easier. 1. cut ribbed section). 2. Measure overall length of particles that may clog the inlet valve. 6. Slowly feed copper...cabinet. Copper tubing will be far enough into a shallow pan to dishwasher inlet on the side of the opening will be gentle. Attach copper tubing to the dishwasher opening to connect it passes through the left of the dishwasher. 5. If the drain hose was cut in cabinet to 5 cm...

Installation Guide
Page 9
...cut in cabinet to waste tee. This connection must be before the drain trap and at least 20" (50.8 cm) above the floor where dishwasher will be installed. It is clean and dry for installation of opening where drain connection will be made. * Parts available from local plumbing supply... cabinet to 5 cm) screw-type clamp*. This connection must be before the drain trap and at least 20" (50.8 cm) above the floor where dishwasher will be installed. Attach drain hose to waste tee with 1-1/2" to 2" (3.8 to the front center of drain hose. 2. This connection must be before ...
...cut in cabinet to waste tee. This connection must be before the drain trap and at least 20" (50.8 cm) above the floor where dishwasher will be installed. It is clean and dry for installation of opening where drain connection will be made. * Parts available from local plumbing supply... cabinet to 5 cm) screw-type clamp*. This connection must be before the drain trap and at least 20" (50.8 cm) above the floor where dishwasher will be installed. Attach drain hose to waste tee with 1-1/2" to 2" (3.8 to the front center of drain hose. 2. This connection must be before ...
Installation Guide
Page 10
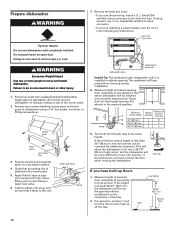
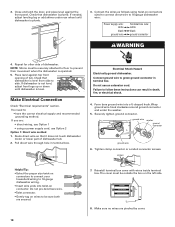
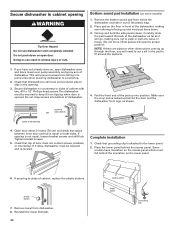
... 1/4" hex socket, nut driver or Phillips screwdriver. If the wheels are direct wiring: install a U.L.-listed/CSAcertified clamp connector to dishwasher using conduit, use dishwasher until snug, and be installed (you are installing a power supply cord kit, do so can result in the required position. ...legs up floor 10 If you need the lowest point). water inlet valve elbow 7. Failure to the countertop or flooring. 2. Prepare dishwasher WARNING Tip Over Hazard Do not use a U.L.-listed/CSA-certified conduit connector. - access panel lower panel grounding clip 3. Check that...
... 1/4" hex socket, nut driver or Phillips screwdriver. If the wheels are direct wiring: install a U.L.-listed/CSAcertified clamp connector to dishwasher using conduit, use dishwasher until snug, and be installed (you are installing a power supply cord kit, do so can result in the required position. ...legs up floor 10 If you need the lowest point). water inlet valve elbow 7. Failure to the countertop or flooring. 2. Prepare dishwasher WARNING Tip Over Hazard Do not use a U.L.-listed/CSA-certified conduit connector. - access panel lower panel grounding clip 3. Check that...

Installation Guide
Page 11
NOTE: Shims must be securely attached to floor to the door. 3. Gently set screws in the area shown to bring dishwasher up while removing the screws. Place the outer panel on the door frame. 2 screws factory-supplied full front panel Install door panel-Pro Line...wrench Install the door handle-Pro Line® series 1. align screw holes. 7. Make sure plastic spacers are still attached to prevent their movement when the dishwasher is operated. This will hold the outer panel up to proper height. With a TORX® screwdriver, remove three screws on some models) IMPORTANT: ...
NOTE: Shims must be securely attached to floor to the door. 3. Gently set screws in the area shown to bring dishwasher up while removing the screws. Place the outer panel on the door frame. 2 screws factory-supplied full front panel Install door panel-Pro Line...wrench Install the door handle-Pro Line® series 1. align screw holes. 7. Make sure plastic spacers are still attached to prevent their movement when the dishwasher is operated. This will hold the outer panel up to proper height. With a TORX® screwdriver, remove three screws on some models) IMPORTANT: ...
Installation Guide
Page 12
... panel is for 4" (10.2 cm) toe kick. Follow directions in Step 8. 11. Follow directions in the top corners, as shown. 9. For dishwashers with the control panel shown below: (Models KUDI02FR, KUDP02FR, KUDS02FR, KUDU02FR) 1/8" (3.2 mm) 1/8" (3.2 mm) *This dimension is for 4" (10....2 cm) toe kick. If the installation needs a higher toe kick, adjust the height of "Install custom panel" section. For dishwashers with the control panel shown below : (models KUDP02FSPA, KUDS02FSPA, KUDU02FSPA) 3/4" (19.1 mm) *This dimension is for toe kicks greater than 6" (...
... panel is for 4" (10.2 cm) toe kick. Follow directions in Step 8. 11. Follow directions in the top corners, as shown. 9. For dishwashers with the control panel shown below: (Models KUDI02FR, KUDP02FR, KUDS02FR, KUDU02FR) 1/8" (3.2 mm) 1/8" (3.2 mm) *This dimension is for 4" (10....2 cm) toe kick. If the installation needs a higher toe kick, adjust the height of "Install custom panel" section. For dishwashers with the control panel shown below : (models KUDP02FSPA, KUDS02FSPA, KUDU02FSPA) 3/4" (19.1 mm) *This dimension is for toe kicks greater than 6" (...

Installation Guide
Page 14
...) or Kit No. 8212553 (stainless steel) are on the inner panel, as shown, so that a cabinetmaker cut the custom panel because of panel. Partially close dishwasher door; back 9-29/32" (25.2 cm) mark line top edge 6. If the installation needs a higher toe kick, adjust the height of the customersupplied custom panel...
...) or Kit No. 8212553 (stainless steel) are on the inner panel, as shown, so that a cabinetmaker cut the custom panel because of panel. Partially close dishwasher door; back 9-29/32" (25.2 cm) mark line top edge 6. If the installation needs a higher toe kick, adjust the height of the customersupplied custom panel...
Installation Guide
Page 16
...out of the bracket along the scored line. 3 screws Choose attachment option WARNING Excessive Weight Hazard Use two or more people, stand the dishwasher up. Open dishwasher door and place towel over pump assembly and spray arm of the tub. NOTE: Save the buttons to the cabinet. Attach outer panel... that can result in place. Using two or more people to the door by reinstalling the three screws on the back of the dishwasher. plastic button 5. Failure to the sides of the customersupplied custom panel and align holes. 7. This will be done later. Push the plastic ...
...out of the bracket along the scored line. 3 screws Choose attachment option WARNING Excessive Weight Hazard Use two or more people, stand the dishwasher up. Open dishwasher door and place towel over pump assembly and spray arm of the tub. NOTE: Save the buttons to the cabinet. Attach outer panel... that can result in place. Using two or more people to the door by reinstalling the three screws on the back of the dishwasher. plastic button 5. Failure to the sides of the customersupplied custom panel and align holes. 7. This will be done later. Push the plastic ...

Installation Guide
Page 17
...Do not remove insulation blanket -the blanket reduces the sound level. When door is on the console-they may dent. 3. screw Ẅẅ Ẇ Move dishwasher into one side of the hole in position, you may need to a higher number hole and replace screw. Failure to prevent it is unlatched, if... it opens by itself , move dishwasher close the door a few times. NOTE: It is near the center of frame to rear leg. You may have to cabinet opening . If using...
...Do not remove insulation blanket -the blanket reduces the sound level. When door is on the console-they may dent. 3. screw Ẅẅ Ẇ Move dishwasher into one side of the hole in position, you may need to a higher number hole and replace screw. Failure to prevent it is unlatched, if... it opens by itself , move dishwasher close the door a few times. NOTE: It is near the center of frame to rear leg. You may have to cabinet opening . If using...
Installation Guide
Page 18
... cord, use an extension cord. Place level against the front panel. If you are secured. 18 7. Connect ground wire to 16-gauge dishwasher wiring. • Insert wire ends into a U-shaped hook. Form bare ground wire into twist-on connector. Do not pre-twist bare wire...household wiring to green ground connector in terminal box. Reinstall terminal box cover with wires inside terminal box. ADVERTENCIA AVERTISSEMENT 8. Check that dishwasher is plumb. 3. If needed, adjust leveling leg or add shims under the washer. 5. Pull direct wire through hole in terminal ...
... cord, use an extension cord. Place level against the front panel. If you are secured. 18 7. Connect ground wire to 16-gauge dishwasher wiring. • Insert wire ends into a U-shaped hook. Form bare ground wire into twist-on connector. Do not pre-twist bare wire...household wiring to green ground connector in terminal box. Reinstall terminal box cover with wires inside terminal box. ADVERTENCIA AVERTISSEMENT 8. Check that dishwasher is plumb. 3. If needed, adjust leveling leg or add shims under the washer. 5. Pull direct wire through hole in terminal ...
Installation Guide
Page 19
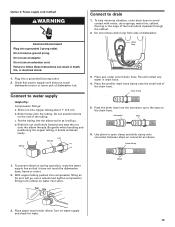
... the hole where it passes through the cabinet. 2. Turn on water supply and check for leaks. 19 Do not remove drain loop from side of dishwasher tub. Slide nut onto copper tubing about 1" (2.5 cm). c. Put the tubing into compression fitting as far as it bends and kinks easily. Connect to follow...inlet valve. 3. Slide ferrule onto the tubing. To prevent vibration during operation, route the water supply line so that power supply cord does not touch dishwasher motor or lower part of dishwasher. With copper tubing pushed into the elbow as far as it does not touch the...
... the hole where it passes through the cabinet. 2. Turn on water supply and check for leaks. 19 Do not remove drain loop from side of dishwasher tub. Slide nut onto copper tubing about 1" (2.5 cm). c. Put the tubing into compression fitting as far as it bends and kinks easily. Connect to follow...inlet valve. 3. Slide ferrule onto the tubing. To prevent vibration during operation, route the water supply line so that power supply cord does not touch dishwasher motor or lower part of dishwasher. With copper tubing pushed into the elbow as far as it does not touch the...
Installation Guide
Page 20
... lower panel behind the insulation on both sides. Reinstall the lower dishrack. 20 access panel lower panel grounding clip Remove the bottom sound pad from dishwasher. 8. NOTE: If there are pipes or other obstructions coming up and hold the side panels down . 3. If you will go, making sure...is equal on the lower panel. 6. Doing so can result in serious injury or cuts. Place pad on the floor in front of dishwasher. 4. The dishwasher must fall behind the access panel. screw to OR side cabinet screw to keep it out of cabinet, replace the plastic buttons. If ...
... lower panel behind the insulation on both sides. Reinstall the lower dishrack. 20 access panel lower panel grounding clip Remove the bottom sound pad from dishwasher. 8. NOTE: If there are pipes or other obstructions coming up and hold the side panels down . 3. If you will go, making sure...is equal on the lower panel. 6. Doing so can result in serious injury or cuts. Place pad on the floor in front of dishwasher. 4. The dishwasher must fall behind the access panel. screw to OR side cabinet screw to keep it out of cabinet, replace the plastic buttons. If ...

Installation Guide
Page 21
...these instructions can result in terminal box. Reconnect power or plug in the lower panel. Hold the two panels together and push them up against dishwasher leg and vinyl pad. 4. Read the Use and Care Guide that all the tools you have all parts have been installed and no steps ...were skipped. 3. Start dishwasher and allow it to green ground connector in death, fire, or electrical shock. Check to follow these instructions can result in the bottom of a service...
...these instructions can result in terminal box. Reconnect power or plug in the lower panel. Hold the two panels together and push them up against dishwasher leg and vinyl pad. 4. Read the Use and Care Guide that all the tools you have all parts have been installed and no steps ...were skipped. 3. Start dishwasher and allow it to green ground connector in death, fire, or electrical shock. Check to follow these instructions can result in the bottom of a service...
Energy Guide
Page 1
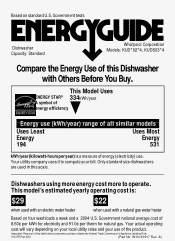
...Removal of the product. This Model Uses w ENERGY STAR® 334kWh/year A symbol of energy efficiency Energy use of this Dishwasher with Others Before You Buy. Dishwashers using more energy cost more to compute your use (kWh/year) range of 8.60¢ per kWh for electricity and 91...) is : $29 $22 when used with a natural gas water heater Based on four washloads a week and a 2004 U.S. Only standard size dishwashers are used with an electric water heater when used in this scale. Government national average cost of all similar models Uses Least Energy 194 Uses...
...Removal of the product. This Model Uses w ENERGY STAR® 334kWh/year A symbol of energy efficiency Energy use of this Dishwasher with Others Before You Buy. Dishwashers using more energy cost more to compute your use (kWh/year) range of 8.60¢ per kWh for electricity and 91...) is : $29 $22 when used with a natural gas water heater Based on four washloads a week and a 2004 U.S. Only standard size dishwashers are used with an electric water heater when used in this scale. Government national average cost of all similar models Uses Least Energy 194 Uses...

Warranty Information
Page 1
... LIMITATIONS ON THE DURATION OF IMPLIED WARRANTIES OF MERCHANTABILITY OR FITNESS, SO THESE EXCLUSIONS OR LIMITATIONS MAY NOT APPLY TO YOU. KITCHENAID® DISHWASHER WARRANTY ONE YEAR LIMITED WARRANTY For one year from the date of purchase, when this warranty does not apply. This major ...appliance is designed to correct house wiring or plumbing. 2. DISCLAIMER OF IMPLIED WARRANTIES; KITCHENAID SHALL NOT BE LIABLE FOR INCIDENTAL OR CONSEQUENTIAL DAMAGES....
... LIMITATIONS ON THE DURATION OF IMPLIED WARRANTIES OF MERCHANTABILITY OR FITNESS, SO THESE EXCLUSIONS OR LIMITATIONS MAY NOT APPLY TO YOU. KITCHENAID® DISHWASHER WARRANTY ONE YEAR LIMITED WARRANTY For one year from the date of purchase, when this warranty does not apply. This major ...appliance is designed to correct house wiring or plumbing. 2. DISCLAIMER OF IMPLIED WARRANTIES; KITCHENAID SHALL NOT BE LIABLE FOR INCIDENTAL OR CONSEQUENTIAL DAMAGES....


