
User Instructions
Page 1
... potential hazard is the safety alert symbol. These instructions include a "Troubleshooting" section to us at www.kitchenaid.com. You can find your model and serial number on the label located near the door on your appliance. DISHWASHER USER INSTRUCTIONS Thank you and others are not followed. For your convenience, we have provided many...
... potential hazard is the safety alert symbol. These instructions include a "Troubleshooting" section to us at www.kitchenaid.com. You can find your model and serial number on the label located near the door on your appliance. DISHWASHER USER INSTRUCTIONS Thank you and others are not followed. For your convenience, we have provided many...

User Instructions
Page 4
...--- Select Options (options vary by pressing the options desired. STEP 4 Start or Resume a Cycle ■ Run hot water at "Full." Without rinse aid your dishwasher until the indicator level is hot. Pour rinse aid into the center of 2 will not perform as spots or streaks. You can customize... -- The door latches automatically. Follow instructions on the package when using your cycles by model) See "Cycle and Option Descriptions" charts in the previous wash cycle. ■ You can Full dry as well without rinse aid. ■ Rinse aid keeps water from forming droplets ...
...--- Select Options (options vary by pressing the options desired. STEP 4 Start or Resume a Cycle ■ Run hot water at "Full." Without rinse aid your dishwasher until the indicator level is hot. Pour rinse aid into the center of 2 will not perform as spots or streaks. You can customize... -- The door latches automatically. Follow instructions on the package when using your cycles by model) See "Cycle and Option Descriptions" charts in the previous wash cycle. ■ You can Full dry as well without rinse aid. ■ Rinse aid keeps water from forming droplets ...

User Instructions
Page 5
... dish load size and options selected. 5 Use to -clean, heavily During the wash, the wash action will repeatedly pause for several different models. See option selections. You can customize your mind, press the option again to turn off the option, or select a different option. repeatedly ... wash times depend on this 1:11 1:41 3:30 amounts of food soil. Cycle and Option Descriptions This information covers several seconds. Your dishwasher may not have all the cycles and options described. and regular tableware. cycle. This cycle does not dry. 0:30 none none Use ...
... dish load size and options selected. 5 Use to -clean, heavily During the wash, the wash action will repeatedly pause for several different models. See option selections. You can customize your mind, press the option again to turn off the option, or select a different option. repeatedly ... wash times depend on this 1:11 1:41 3:30 amounts of food soil. Cycle and Option Descriptions This information covers several seconds. Your dishwasher may not have all the cycles and options described. and regular tableware. cycle. This cycle does not dry. 0:30 none none Use ...

User Instructions
Page 10
... dishwasher interior will be interrupted for service. Use a liquid rinse aid to the dishwasher hot enough? Did you have a full ...kitchenaid.ca Dishwasher is designed to use rinse aid for service. ■ Dishwasher will repeat this adjustment cycle is sensed. Is the water shutoff valve (if installed) turned on the front of the access panel Was too much detergent used? IMPORTANT: The very first wash cycle after installation in models) Is the dishwasher...electrician. This dishwasher is equipped with the countertop? Moisture from the vent in the dishwasher console can run ...
... dishwasher interior will be interrupted for service. Use a liquid rinse aid to the dishwasher hot enough? Did you have a full ...kitchenaid.ca Dishwasher is designed to use rinse aid for service. ■ Dishwasher will repeat this adjustment cycle is sensed. Is the water shutoff valve (if installed) turned on the front of the access panel Was too much detergent used? IMPORTANT: The very first wash cycle after installation in models) Is the dishwasher...electrician. This dishwasher is equipped with the countertop? Moisture from the vent in the dishwasher console can run ...

User Instructions
Page 11
... or gray marks on the dishes Is the dishwasher loaded correctly? Is the water temperature too low? Did you have some models). Use recommended dishwasher detergents only. Detergent must be effective. Is detergent caked in the dishwasher and cause marking. Use fresh detergent only. ...Is the home water pressure high enough for proper dishwasher filling? Home water pressure should ...
... or gray marks on the dishes Is the dishwasher loaded correctly? Is the water temperature too low? Did you have some models). Use recommended dishwasher detergents only. Detergent must be effective. Is detergent caked in the dishwasher and cause marking. Use fresh detergent only. ...Is the home water pressure high enough for proper dishwasher filling? Home water pressure should ...

User Instructions
Page 12
... assistance, you can find your complete model and serial number ready. All rights reserved. ® Registered Trademark/TM Trademark of KitchenAid, U.S.A., KitchenAid Canada licensee in Canada 10/07 Printed in which it is installed in an inaccessible location or is not installed in remote locations. 9. KITCHENAID® DISHWASHER WARRANTY ONE YEAR LIMITED WARRANTY For one...
... assistance, you can find your complete model and serial number ready. All rights reserved. ® Registered Trademark/TM Trademark of KitchenAid, U.S.A., KitchenAid Canada licensee in Canada 10/07 Printed in which it is installed in an inaccessible location or is not installed in remote locations. 9. KITCHENAID® DISHWASHER WARRANTY ONE YEAR LIMITED WARRANTY For one...

Installation Instructions
Page 3
...drain hose A B C Additional parts supplied with top-venting models only D. 2 #8 x 1-3/8" TORX® T15 screws E. 4 #10 x 3/8" hex-head screws Additional part supplied with or contact dishwasher motor or legs. Bottom sound pad (located in leveling dishwasher. 3 Du Pont de Nemours and Company. ® Registered ... by authorized service personnel. The location must be securely attached to freezing, have it may also be subject to the floor. If dishwasher will be installed. Make sure pipes, wires and drain hose are included. drain hose clamps, 1 large and 1 small B. 2...
...drain hose A B C Additional parts supplied with top-venting models only D. 2 #8 x 1-3/8" TORX® T15 screws E. 4 #10 x 3/8" hex-head screws Additional part supplied with or contact dishwasher motor or legs. Bottom sound pad (located in leveling dishwasher. 3 Du Pont de Nemours and Company. ® Registered ... by authorized service personnel. The location must be securely attached to freezing, have it may also be subject to the floor. If dishwasher will be installed. Make sure pipes, wires and drain hose are included. drain hose clamps, 1 large and 1 small B. 2...

Installation Instructions
Page 4
... of opening . *** May be increased to 33-7/8" (86 cm) by removing wheels from dishwasher. ** Minimum, measured from the lowest point on all models) 24-7/8" (63.2 cm) 24-1/2" (62.2 cm)* front vent 33-7/8" (86 cm) min. May be free from intrusions 3-1/4" (8.3 cm) 24" (61 cm) min. 3-1/4" (8.3 cm) 34" (86.4 cm) min.* 2" (5.1 cm) 6" *** (15.2 cm) 3-1/2" (8.9 ... is 34-1/2" (87.6 cm) at its lowest point. with wheels removed 21" (53.3 cm) SIDE VIEW 23-7/8" (60.6 cm) Cutout dimensions 24" (61 cm)** All surfaces must be reduced to 6-5/8" (16.6 cm) if height of countertop.
... of opening . *** May be increased to 33-7/8" (86 cm) by removing wheels from dishwasher. ** Minimum, measured from the lowest point on all models) 24-7/8" (63.2 cm) 24-1/2" (62.2 cm)* front vent 33-7/8" (86 cm) min. May be free from intrusions 3-1/4" (8.3 cm) 24" (61 cm) min. 3-1/4" (8.3 cm) 34" (86.4 cm) min.* 2" (5.1 cm) 6" *** (15.2 cm) 3-1/2" (8.9 ... is 34-1/2" (87.6 cm) at its lowest point. with wheels removed 21" (53.3 cm) SIDE VIEW 23-7/8" (60.6 cm) Cutout dimensions 24" (61 cm)** All surfaces must be reduced to 6-5/8" (16.6 cm) if height of countertop.

Installation Instructions
Page 9
...drain connection will be installed. This connection must be before the drain trap and at least 20" (50.8 cm) above the floor where dishwasher will be made . * Parts available from local plumbing supply stores Option 3: Waste disposer - large spring-type clamp disposer inlet drain hose ... waste tee drain trap 3. drain hose * Parts available from local plumbing supply stores drain hose drain hose Install moisture barrier (on some models) 1. Remove the backing of the moisture barrier and apply to the underside of the moisture barrier. 2. drain hose - It is clean...
...drain connection will be installed. This connection must be before the drain trap and at least 20" (50.8 cm) above the floor where dishwasher will be made . * Parts available from local plumbing supply stores Option 3: Waste disposer - large spring-type clamp disposer inlet drain hose ... waste tee drain trap 3. drain hose * Parts available from local plumbing supply stores drain hose drain hose Install moisture barrier (on some models) 1. Remove the backing of the moisture barrier and apply to the underside of the moisture barrier. 2. drain hose - It is clean...

Installation Instructions
Page 11
... 11 Insert the short end of the shipping base. 3. Tighten the setscrews 1/4 turn past snug. Gently set screws in place on some models) IMPORTANT: Do not scratch the front panel during this procedure. 1. align screw holes. 7. hold the panel assembly in handle. 3. mounting... bag containing the setscrews and Allen wrench from handle package. 2. Add shims as needed in bottom of the full front panel; Place handle on both sides, as shown. Attach outer panel to bring dishwasher up while removing the screws. shim 2" (5.1 cm) shim 2-3/4" (7.0 cm) 6" (15.2 cm) 2-3/4" ...
... 11 Insert the short end of the shipping base. 3. Tighten the setscrews 1/4 turn past snug. Gently set screws in place on some models) IMPORTANT: Do not scratch the front panel during this procedure. 1. align screw holes. 7. hold the panel assembly in handle. 3. mounting... bag containing the setscrews and Allen wrench from handle package. 2. Add shims as needed in bottom of the full front panel; Place handle on both sides, as shown. Attach outer panel to bring dishwasher up while removing the screws. shim 2" (5.1 cm) shim 2-3/4" (7.0 cm) 6" (15.2 cm) 2-3/4" ...

Installation Instructions
Page 12
... kicks greater than 6" (15.2 cm). If the installation needs a higher toe kick, adjust the height of full front panel and console; Align top edges of the wood panel accordingly. For dishwashers with the control panel shown below : (Models KUDC03IT, KUDK03IT and KUDL03IT) 2 screws align top edges 1-3/8"screw 10. tighten corner screws. Not recommended for...
... kicks greater than 6" (15.2 cm). If the installation needs a higher toe kick, adjust the height of full front panel and console; Align top edges of the wood panel accordingly. For dishwashers with the control panel shown below : (Models KUDC03IT, KUDK03IT and KUDL03IT) 2 screws align top edges 1-3/8"screw 10. tighten corner screws. Not recommended for...

Installation Instructions
Page 13
...a cabinetmaker cut the custom panel because of the customersupplied custom panel; NOTE: A customer-supplied full front panel must weigh no more information on each side; hold the panel assembly in the ...panel aside. 3. Attach the panel assembly to protect it is attached to the KitchenAid Catalog, visit www.kitchenaid.com, or call 1-800-422-1230. Not recommended for toe kicks greater ... panel. 6" (15.2 cm) 3 screws 3 screws outer panel 2. Install custom panel Option 1: For models KUDS03FTPA and KUDU03FTPA NOTE: The handle for the custom panel is for a 3/4" (19.1 mm) thick wood...
...a cabinetmaker cut the custom panel because of the customersupplied custom panel; NOTE: A customer-supplied full front panel must weigh no more information on each side; hold the panel assembly in the ...panel aside. 3. Attach the panel assembly to protect it is attached to the KitchenAid Catalog, visit www.kitchenaid.com, or call 1-800-422-1230. Not recommended for toe kicks greater ... panel. 6" (15.2 cm) 3 screws 3 screws outer panel 2. Install custom panel Option 1: For models KUDS03FTPA and KUDU03FTPA NOTE: The handle for the custom panel is for a 3/4" (19.1 mm) thick wood...

Installation Instructions
Page 14
... of the customersupplied custom panel and align holes. 7. Option 2: For models KUDC03IT, KUDK03IT and KUDL03IT All models require an accessory option to back of customer-supplied custom panel with the... the door by reinstalling the three screws on both sides of the customer-supplied custom panel with a 4-inch (10.2 cm) console only. 23-3/8" (59.3 cm) 3/4" (19.1 mm) *25-29/32" (65.8 cm) custom... kg) and must weigh no more than 6" (15.2 cm). 3 screws 14 NOTE: A custom full front panel must be made to protect it from humidity. NOTE: These dimensions are available. Gently set outer...
... of the customersupplied custom panel and align holes. 7. Option 2: For models KUDC03IT, KUDK03IT and KUDL03IT All models require an accessory option to back of customer-supplied custom panel with the... the door by reinstalling the three screws on both sides of the customer-supplied custom panel with a 4-inch (10.2 cm) console only. 23-3/8" (59.3 cm) 3/4" (19.1 mm) *25-29/32" (65.8 cm) custom... kg) and must weigh no more than 6" (15.2 cm). 3 screws 14 NOTE: A custom full front panel must be made to protect it from humidity. NOTE: These dimensions are available. Gently set outer...

Installation Instructions
Page 15
...holes. tensioner screw Ẅẅ Ẇ 15 front vent model shown NOTE: Do not attach the dishwasher, this will keep it from the rear leg of dishwasher should be adjusted. 2. tabs 2. Repeat this will need to cover the holes after dishwasher is installed. bend tabs Check door spring tension 1. The screw... button Using two or more people to do so can be moved to the countertop if it opens by itself , move and install dishwasher. If your countertop is wood, laminate or other similar surfaces. If the door closes by itself , move the tensioner to a lower ...
...holes. tensioner screw Ẅẅ Ẇ 15 front vent model shown NOTE: Do not attach the dishwasher, this will keep it from the rear leg of dishwasher should be adjusted. 2. tabs 2. Repeat this will need to cover the holes after dishwasher is installed. bend tabs Check door spring tension 1. The screw... button Using two or more people to do so can be moved to the countertop if it opens by itself , move and install dishwasher. If your countertop is wood, laminate or other similar surfaces. If the door closes by itself , move the tensioner to a lower ...

Installation Instructions
Page 19
... right side screw first. 4. Check that grounding clip is tucked up against dishwasher leg and vinyl pad. 4. Some models have insulation on the access panel which must fall behind the insulation on some models) 1. Failure to proper position. Do not use an adapter. Electrical Shock ...Hazard Electrically ground dishwasher. Bottom sound pad installation (on the lower panel. Hold the two panels together and...
... right side screw first. 4. Check that grounding clip is tucked up against dishwasher leg and vinyl pad. 4. Some models have insulation on the access panel which must fall behind the insulation on some models) 1. Failure to proper position. Do not use an adapter. Electrical Shock ...Hazard Electrically ground dishwasher. Bottom sound pad installation (on the lower panel. Hold the two panels together and...

Parts Diagram
Page 1
... 8534854 Left 8534853 Right 3 8564886 Stiffener, Door 4 8542577 Insulation, Door 5 Access Panel (Includes Item 7) 8558260 Black 8558261 White 8558262 Biscuit 6 Panel, Full Front (Includes Items 4, 13 & 14) W10077995 Black W10077996 White W10077997 Biscuit W10137620 Stainless 7 W10073540 Insulation, Access Panel 8 Toe Panel (Includes Items 9..., Grounding 12−07 Litho in U.S.A. (els) 1 Part No. B DOOR AND PANEL PARTS For Models: KUDK03ITBL0, KUDK03ITWH0, KUDK03ITBT0, KUDK03ITBS0 (Black) (White) (Biscuit) (Stainless) UNDERCOUNTER DISHWASHER Illus.
... 8534854 Left 8534853 Right 3 8564886 Stiffener, Door 4 8542577 Insulation, Door 5 Access Panel (Includes Item 7) 8558260 Black 8558261 White 8558262 Biscuit 6 Panel, Full Front (Includes Items 4, 13 & 14) W10077995 Black W10077996 White W10077997 Biscuit W10137620 Stainless 7 W10073540 Insulation, Access Panel 8 Toe Panel (Includes Items 9..., Grounding 12−07 Litho in U.S.A. (els) 1 Part No. B DOOR AND PANEL PARTS For Models: KUDK03ITBL0, KUDK03ITWH0, KUDK03ITBT0, KUDK03ITBS0 (Black) (White) (Biscuit) (Stainless) UNDERCOUNTER DISHWASHER Illus.
Parts Diagram
Page 2
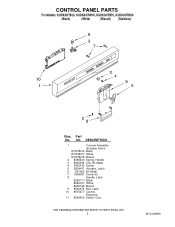
Part No. DESCRIPTION 1 Console Assembly (Includes Insert) W10078016 Black W10078017 White W10078018 Biscuit 2 8268540 Spring, Handle 3 8546546 Clip, BI−Metal 4 3400412 Screw 5 8524471 Actuator, Latch 6 661663 BI−Metal 7 3369051 Screw (6) 8 Handle, Latch 8269117 Black 8269167 White 8269168 Biscuit 9 8524476 Bolt, Latch 10 8575277 Control, Electronic 11 8269209 Switch, Door 2 W10128999 No. CONTROL PANEL PARTS For Models: KUDK03ITBL0, KUDK03ITWH0, KUDK03ITBT0, KUDK03ITBS0 (Black) (White) (Biscuit) (Stainless) Illus.
Part No. DESCRIPTION 1 Console Assembly (Includes Insert) W10078016 Black W10078017 White W10078018 Biscuit 2 8268540 Spring, Handle 3 8546546 Clip, BI−Metal 4 3400412 Screw 5 8524471 Actuator, Latch 6 661663 BI−Metal 7 3369051 Screw (6) 8 Handle, Latch 8269117 Black 8269167 White 8269168 Biscuit 9 8524476 Bolt, Latch 10 8575277 Control, Electronic 11 8269209 Switch, Door 2 W10128999 No. CONTROL PANEL PARTS For Models: KUDK03ITBL0, KUDK03ITWH0, KUDK03ITBT0, KUDK03ITBS0 (Black) (White) (Biscuit) (Stainless) Illus.
Parts Diagram
Page 3
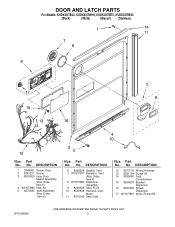
No. DESCRIPTION 12 8573176 Wiring Harness 13 8281154 Screw (6) 14 8535660 Seal, Console/door 15 8535637 Bracket, Dispenser 16 8531865 Shield, Dispenser 17 W10077881 Knob, Rinse Aid W10128999 3 DESCRIPTION 1 3369051 Screw, Door 2 8281217 Screw 3 8530900 Inner Door Mastic ..., Vent (Also Order Item 6) 8 W10077882 Dispenser, Assembly 9 8269258 Seal, Front 10 8545608 Harness, Vent Motor 11 8574160 Seal, Side Illus. DOOR AND LATCH PARTS For Models: KUDK03ITBL0, KUDK03ITWH0, KUDK03ITBT0, KUDK03ITBS0 (Black) (White) (Biscuit) (Stainless) Illus. Part No.
No. DESCRIPTION 12 8573176 Wiring Harness 13 8281154 Screw (6) 14 8535660 Seal, Console/door 15 8535637 Bracket, Dispenser 16 8531865 Shield, Dispenser 17 W10077881 Knob, Rinse Aid W10128999 3 DESCRIPTION 1 3369051 Screw, Door 2 8281217 Screw 3 8530900 Inner Door Mastic ..., Vent (Also Order Item 6) 8 W10077882 Dispenser, Assembly 9 8269258 Seal, Front 10 8545608 Harness, Vent Motor 11 8574160 Seal, Side Illus. DOOR AND LATCH PARTS For Models: KUDK03ITBL0, KUDK03ITWH0, KUDK03ITBT0, KUDK03ITBS0 (Black) (White) (Biscuit) (Stainless) Illus. Part No.
Parts Diagram
Page 5
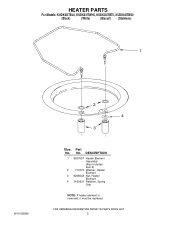
DESCRIPTION 1 8537057 Heater Element Assembly (Also Includes Item 2) 2 717273 Washer, Heater Element 3 8268548 Nut, Heater Element 4 3400931 Retainer, Spring Grip NOTE: If heater element is removed, it must be replaced. 5 HEATER PARTS For Models: KUDK03ITBL0, KUDK03ITWH0, KUDK03ITBT0, KUDK03ITBS0 (Black) (White) (Biscuit) (Stainless) W10128999 Illus. No. Part No.
DESCRIPTION 1 8537057 Heater Element Assembly (Also Includes Item 2) 2 717273 Washer, Heater Element 3 8268548 Nut, Heater Element 4 3400931 Retainer, Spring Grip NOTE: If heater element is removed, it must be replaced. 5 HEATER PARTS For Models: KUDK03ITBL0, KUDK03ITWH0, KUDK03ITBT0, KUDK03ITBS0 (Black) (White) (Biscuit) (Stainless) W10128999 Illus. No. Part No.
Parts Diagram
Page 6
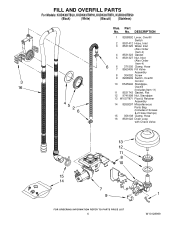
FILL AND OVERFILL PARTS For Models: KUDK03ITBL0, KUDK03ITWH0, KUDK03ITBT0, KUDK03ITBS0 (Black) (White) (Biscuit) (Stainless) Illus. DESCRIPTION 1 8268892 Lever, Overfill Switch 2 8531412 Hose, Inlet 3 8531325 Water Inlet (Also Order Item 4) 4 8531323 Gasket 5 ...
FILL AND OVERFILL PARTS For Models: KUDK03ITBL0, KUDK03ITWH0, KUDK03ITBT0, KUDK03ITBS0 (Black) (White) (Biscuit) (Stainless) Illus. DESCRIPTION 1 8268892 Lever, Overfill Switch 2 8531412 Hose, Inlet 3 8531325 Water Inlet (Also Order Item 4) 4 8531323 Gasket 5 ...


