
User Instructions
Page 10
... remains in the dishwasher Is the cycle complete? ■ Detergent remains in the dishwasher console can run or stops during a cycle Is the door closed tightly and latched? Does the dishwasher have excessive moisture.... detergent lump-free? Plastics often need towel drying. In the U.S.A., www.kitchenaid.com In Canada, www.kitchenaid.ca Dishwasher is flashing Call for more information. Run a rinse cycle once or twice...not dry completely Did you have a full load. Did you load your dishes and dishwasher interior will repeat this adjustment cycle is designed to include an additional ...
... remains in the dishwasher Is the cycle complete? ■ Detergent remains in the dishwasher console can run or stops during a cycle Is the door closed tightly and latched? Does the dishwasher have excessive moisture.... detergent lump-free? Plastics often need towel drying. In the U.S.A., www.kitchenaid.com In Canada, www.kitchenaid.ca Dishwasher is flashing Call for more information. Run a rinse cycle once or twice...not dry completely Did you have a full load. Did you load your dishes and dishwasher interior will repeat this adjustment cycle is designed to include an additional ...

Installation Instructions
Page 12
...23-1/2" (59.7 cm) *30-3/16" (76.7 cm) 3/4" (19.1 mm) *This dimension is for toe kicks greater than 6" (15.2 cm). For dishwashers with the control panel shown below : (Models KUDC03IT, KUDK03IT and KUDL03IT) 2 screws align top edges 1-3/8"screw 10. If the installation needs a higher toe kick,... adjust the height of full front panel and console; If the installation needs a higher toe kick, adjust the height of "Install custom panel" section. 12 For dishwashers with the control panel shown below : (models KUDS03FTPA and KUDU03FTPA) (Your...
...23-1/2" (59.7 cm) *30-3/16" (76.7 cm) 3/4" (19.1 mm) *This dimension is for toe kicks greater than 6" (15.2 cm). For dishwashers with the control panel shown below : (Models KUDC03IT, KUDK03IT and KUDL03IT) 2 screws align top edges 1-3/8"screw 10. If the installation needs a higher toe kick,... adjust the height of full front panel and console; If the installation needs a higher toe kick, adjust the height of "Install custom panel" section. 12 For dishwashers with the control panel shown below : (models KUDS03FTPA and KUDU03FTPA) (Your...

Installation Instructions
Page 14
inner panel 1. Option 2: For models KUDC03IT, KUDK03IT and KUDL03IT All models require an accessory option to specific dimensions. NOTE: A custom full front panel must weigh no more than 14 pounds (6.3 kg) and must be made to attach custom panels. IMPORTANT: Use a moisture resistant... where the screws are centered side to back of customer-supplied custom panel with the top edge of the customer-supplied custom panel with a 4-inch (10.2 cm) console only. 23-3/8" (59.3 cm) 3/4" (19.1 mm) *25-29/32" (65.8 cm) custom panel dimensions 1/8" (3.2 cm) 3 screws outer panel 2. Align the ...
inner panel 1. Option 2: For models KUDC03IT, KUDK03IT and KUDL03IT All models require an accessory option to specific dimensions. NOTE: A custom full front panel must weigh no more than 14 pounds (6.3 kg) and must be made to attach custom panels. IMPORTANT: Use a moisture resistant... where the screws are centered side to back of customer-supplied custom panel with the top edge of the customer-supplied custom panel with a 4-inch (10.2 cm) console only. 23-3/8" (59.3 cm) 3/4" (19.1 mm) *25-29/32" (65.8 cm) custom panel dimensions 1/8" (3.2 cm) 3 screws outer panel 2. Align the ...

Installation Instructions
Page 16
.... 3. Remove cardboard from side to do so can result in terminal box. Check that water line is on the console-they may need to hold dishwasher up or down until dishwasher is on connector. Repeat for other injury. 1. You need to adjust alignment to be even with cabinet doors. Slowly...3. Close and latch the door, and place level against top front opening . Place level against the front panel. Check that it does not touch dishwasher motor or lower part of tub. Pull direct wire through hole in back or other side of the door panel. 2. Helpful Tip: • Select...
.... 3. Remove cardboard from side to do so can result in terminal box. Check that water line is on the console-they may need to hold dishwasher up or down until dishwasher is on connector. Repeat for other injury. 1. You need to adjust alignment to be even with cabinet doors. Slowly...3. Close and latch the door, and place level against top front opening . Place level against the front panel. Check that it does not touch dishwasher motor or lower part of tub. Pull direct wire through hole in back or other side of the door panel. 2. Helpful Tip: • Select...
Parts Diagram
Page 2
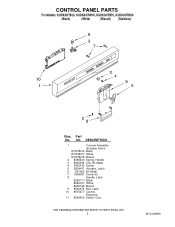
CONTROL PANEL PARTS For Models: KUDK03ITBL0, KUDK03ITWH0, KUDK03ITBT0, KUDK03ITBS0 (Black) (White) (Biscuit) (Stainless) Illus. DESCRIPTION 1 Console Assembly (Includes Insert) W10078016 Black W10078017 White W10078018 Biscuit 2 8268540 Spring, Handle 3 8546546 Clip, BI−Metal 4 3400412 Screw 5 8524471 Actuator, Latch 6 661663 BI−Metal 7 3369051 Screw (6) 8 Handle, Latch 8269117 Black 8269167 White 8269168 Biscuit 9 8524476 Bolt, Latch 10 8575277 Control, Electronic 11 8269209 Switch, Door 2 W10128999 No. Part No.
CONTROL PANEL PARTS For Models: KUDK03ITBL0, KUDK03ITWH0, KUDK03ITBT0, KUDK03ITBS0 (Black) (White) (Biscuit) (Stainless) Illus. DESCRIPTION 1 Console Assembly (Includes Insert) W10078016 Black W10078017 White W10078018 Biscuit 2 8268540 Spring, Handle 3 8546546 Clip, BI−Metal 4 3400412 Screw 5 8524471 Actuator, Latch 6 661663 BI−Metal 7 3369051 Screw (6) 8 Handle, Latch 8269117 Black 8269167 White 8269168 Biscuit 9 8524476 Bolt, Latch 10 8575277 Control, Electronic 11 8269209 Switch, Door 2 W10128999 No. Part No.
Parts Diagram
Page 3
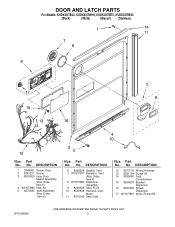
DESCRIPTION 12 8573176 Wiring Harness 13 8281154 Screw (6) 14 8535660 Seal, Console/door 15 8535637 Bracket, Dispenser 16 8531865 Shield, Dispenser 17 W10077881 Knob, Rinse Aid W10128999 3 DOOR AND LATCH PARTS For Models: KUDK03ITBL0, KUDK03ITWH0, KUDK03ITBT0, KUDK03ITBS0 (...
DESCRIPTION 12 8573176 Wiring Harness 13 8281154 Screw (6) 14 8535660 Seal, Console/door 15 8535637 Bracket, Dispenser 16 8531865 Shield, Dispenser 17 W10077881 Knob, Rinse Aid W10128999 3 DOOR AND LATCH PARTS For Models: KUDK03ITBL0, KUDK03ITWH0, KUDK03ITBT0, KUDK03ITBS0 (...