
User Instructions
Page 1
... standards and it is important to follow instructions. For your KitchenAid dishwasher, please contact us that can be killed or seriously injured if you need further assistance using your convenience, we have a positive experience owning a KitchenAid® product. If you don't follow the safety alert ...safety alert symbol. WARNING You can find your model and serial number on the label located near the door on your complete model and serial number ready. All safety messages will follow instructions. In Canada: visit www.kitchenaid.ca or call 1-800-807-6777. We ...
... standards and it is important to follow instructions. For your KitchenAid dishwasher, please contact us that can be killed or seriously injured if you need further assistance using your convenience, we have a positive experience owning a KitchenAid® product. If you don't follow the safety alert ...safety alert symbol. WARNING You can find your model and serial number on the label located near the door on your complete model and serial number ready. All safety messages will follow instructions. In Canada: visit www.kitchenaid.ca or call 1-800-807-6777. We ...

User Instructions
Page 4
...the opening until the water is at the sink nearest your dishwasher. If you have excessive moisture. Turn the arrow adjuster inside the dispenser by either using other dishwasher detergent. STEP 3 Select a Cycle (cycles vary by model) See "Cycle and Option Descriptions" charts in the following section... will have hard water or notice rings or spots, try a higher setting. STEP 4 Start or Resume a Cycle ■ Run hot water at "Full." Replace the dispenser cap and turn to "Lock." max - 21 3 - --- Press START/RESUME. 4 Hard Water Soft Water Main Wash Hard Water ...
...the opening until the water is at the sink nearest your dishwasher. If you have excessive moisture. Turn the arrow adjuster inside the dispenser by either using other dishwasher detergent. STEP 3 Select a Cycle (cycles vary by model) See "Cycle and Option Descriptions" charts in the following section... will have hard water or notice rings or spots, try a higher setting. STEP 4 Start or Resume a Cycle ■ Run hot water at "Full." Replace the dispenser cap and turn to "Lock." max - 21 3 - --- Press START/RESUME. 4 Hard Water Soft Water Main Wash Hard Water ...

User Instructions
Page 5
Your dishwasher may not have all the cycles and options described. Use for several different models. During the wash, the wash action will 1:17 1:47 2:51 china and crystal. Use to -clean, heavily During the wash, the wash action will not ...
Your dishwasher may not have all the cycles and options described. Use for several different models. During the wash, the wash action will 1:17 1:47 2:51 china and crystal. Use to -clean, heavily During the wash, the wash action will not ...

User Instructions
Page 10
...cycle, the next wash cycle will have a full load. Try a different brand to the dishwasher? Moisture from the vent in the dishwasher console can run up and down freely? Dishes do...installation in models) Is the dishwasher aligned with an optical sensor wash that there is designed to 3¹⁄₂ hours depending on the kitchen counter (built-in your dishwasher to allow...drying performance. In the U.S.A., www.kitchenaid.com In Canada, www.kitchenaid.ca Dishwasher is not operating properly ■ Dishwasher does not run too long The dishwasher can form on what is equipped...
...cycle, the next wash cycle will have a full load. Try a different brand to the dishwasher? Moisture from the vent in the dishwasher console can run up and down freely? Dishes do...installation in models) Is the dishwasher aligned with an optical sensor wash that there is designed to 3¹⁄₂ hours depending on the kitchen counter (built-in your dishwasher to allow...drying performance. In the U.S.A., www.kitchenaid.com In Canada, www.kitchenaid.ca Dishwasher is not operating properly ■ Dishwasher does not run too long The dishwasher can form on what is equipped...

User Instructions
Page 11
...your hot water supply. To slow this process use a stain removal product to drink softened water, have the softener installed onto your dishwasher. Follow with a Normal wash cycle with certain types of an iron removal unit is usually caused by labels from washing action. ...the most difficult soil in a wet dispenser. Use recommended dishwasher detergents only. Spots and stains on dishes ■ Spotting and filming on some models). Keep the rinse aid dispenser filled. When the object is present. Use recommended dishwasher detergents only. NOTE: Antiques, feather-edged crystal, and ...
...your hot water supply. To slow this process use a stain removal product to drink softened water, have the softener installed onto your dishwasher. Follow with a Normal wash cycle with certain types of an iron removal unit is usually caused by labels from washing action. ...the most difficult soil in a wet dispenser. Use recommended dishwasher detergents only. Spots and stains on dishes ■ Spotting and filming on some models). Keep the rinse aid dispenser filled. When the object is present. Use recommended dishwasher detergents only. NOTE: Antiques, feather-edged crystal, and ...

User Instructions
Page 12
...In Canada: KitchenAid Brand Home Appliances Customer Interaction Centre 1901 Minnesota Court Mississauga, Ontario L5N 3A7 Please include a daytime phone number in your model and serial number on the label located near the door on the right-hand or left-hand side of the dishwasher interior. THIS... OR FITNESS, SO THESE EXCLUSIONS OR LIMITATIONS MAY NOT APPLY TO YOU. In Canada, call 1-800-422-1230. Pickup and delivery. KITCHENAID® DISHWASHER WARRANTY ONE YEAR LIMITED WARRANTY For one year from accident, alteration, misuse, abuse, fire, flood, acts of God, improper installation, ...
...In Canada: KitchenAid Brand Home Appliances Customer Interaction Centre 1901 Minnesota Court Mississauga, Ontario L5N 3A7 Please include a daytime phone number in your model and serial number on the label located near the door on the right-hand or left-hand side of the dishwasher interior. THIS... OR FITNESS, SO THESE EXCLUSIONS OR LIMITATIONS MAY NOT APPLY TO YOU. In Canada, call 1-800-422-1230. Pickup and delivery. KITCHENAID® DISHWASHER WARRANTY ONE YEAR LIMITED WARRANTY For one year from accident, alteration, misuse, abuse, fire, flood, acts of God, improper installation, ...

Installation Instructions
Page 3
...and in a location where it winterized by authorized service personnel. external threads on wire connectors which are the proper size to connect your dishwasher. ® Teflon is not required. If not included, call 1-800-422-1230. Corner locations require a 2" (5.1 cm) minimum... part supplied with certain models F. Damage from your dealer for proper operation and appearance. • cabinet front perpendicular to floor. • level floor. (If floor at rear of opening for installing your dishwasher at the end of time or in leveling dishwasher. 3 A side panel...
...and in a location where it winterized by authorized service personnel. external threads on wire connectors which are the proper size to connect your dishwasher. ® Teflon is not required. If not included, call 1-800-422-1230. Corner locations require a 2" (5.1 cm) minimum... part supplied with certain models F. Damage from your dealer for proper operation and appearance. • cabinet front perpendicular to floor. • level floor. (If floor at rear of opening for installing your dishwasher at the end of time or in leveling dishwasher. 3 A side panel...

Installation Instructions
Page 4
...(3.8 cm) * Measured from narrowest point of opening. *** May be increased to 33-7/8" (86 cm) by removing wheels from dishwasher. ** Minimum, measured from the lowest point on all models) 24-7/8" (63.2 cm) 24-1/2" (62.2 cm)* front vent 33-7/8" (86 cm) min. with wheels removed 21" (53.3 cm) SIDE VIEW 23-7/8" ...(60.6 cm) Cutout dimensions 24" (61 cm)** All surfaces must be compressed (not used on the underside of...
...(3.8 cm) * Measured from narrowest point of opening. *** May be increased to 33-7/8" (86 cm) by removing wheels from dishwasher. ** Minimum, measured from the lowest point on all models) 24-7/8" (63.2 cm) 24-1/2" (62.2 cm)* front vent 33-7/8" (86 cm) min. with wheels removed 21" (53.3 cm) SIDE VIEW 23-7/8" ...(60.6 cm) Cutout dimensions 24" (61 cm)** All surfaces must be compressed (not used on the underside of...

Installation Instructions
Page 9
... the drain trap and at least 20" (50.8 cm) above the floor where dishwasher will be installed. drain hose * Parts available from local plumbing supply stores drain hose drain hose Install moisture barrier (on some models) 1. Remove the disposer knockout plug. Attach drain hose to waste tee with 1-1/2"... not cut ribbed section). 2. This connection must be before the drain trap and at least 20" (50.8 cm) above the floor where dishwasher will be installed. large spring-type clamp disposer inlet drain hose Option 4: No waste disposer - Cut end of the counter. It is clean...
... the drain trap and at least 20" (50.8 cm) above the floor where dishwasher will be installed. drain hose * Parts available from local plumbing supply stores drain hose drain hose Install moisture barrier (on some models) 1. Remove the disposer knockout plug. Attach drain hose to waste tee with 1-1/2"... not cut ribbed section). 2. This connection must be before the drain trap and at least 20" (50.8 cm) above the floor where dishwasher will be installed. large spring-type clamp disposer inlet drain hose Option 4: No waste disposer - Cut end of the counter. It is clean...

Installation Instructions
Page 11
... Install door panel-Pro Line® series For top vented models with the set screws facing down on some models) IMPORTANT: Do not scratch the front panel during this procedure. 1. hold the panel assembly in bottom of the full front panel; Remove the door handle and hardware bag containing ...panel to proper height. Attach the panel assembly to prevent their movement when the dishwasher is operated. do not tighten screws completely. Place the outer panel on the door frame. 2 screws factory-supplied full front panel 11 Add shims as needed in handle. 3. Remove the carton ...
... Install door panel-Pro Line® series For top vented models with the set screws facing down on some models) IMPORTANT: Do not scratch the front panel during this procedure. 1. hold the panel assembly in bottom of the full front panel; Remove the door handle and hardware bag containing ...panel to proper height. Attach the panel assembly to prevent their movement when the dishwasher is operated. do not tighten screws completely. Place the outer panel on the door frame. 2 screws factory-supplied full front panel 11 Add shims as needed in handle. 3. Remove the carton ...

Installation Instructions
Page 12
...the wood panel accordingly. If the installation needs a higher toe kick, adjust the height of full front panel and console; For dishwashers with the control panel shown below : (Models KUDC03IT, KUDK03IT and KUDL03IT) 2 screws align top edges 1-3/8"screw 10. If the installation needs...kicks greater than 6" (15.2 cm). Tighten the two side screws reinstalled in Step 8. 11. 9. For dishwashers with the control panel shown below : (models KUDS03FTPA and KUDU03FTPA) (Your model may vary slightly from picture above .) Custom door panel dimensions are : 1/8" (3.2 mm) 1/8" (3.2 mm)...
...the wood panel accordingly. If the installation needs a higher toe kick, adjust the height of full front panel and console; For dishwashers with the control panel shown below : (Models KUDC03IT, KUDK03IT and KUDL03IT) 2 screws align top edges 1-3/8"screw 10. If the installation needs...kicks greater than 6" (15.2 cm). Tighten the two side screws reinstalled in Step 8. 11. 9. For dishwashers with the control panel shown below : (models KUDS03FTPA and KUDU03FTPA) (Your model may vary slightly from picture above .) Custom door panel dimensions are : 1/8" (3.2 mm) 1/8" (3.2 mm)...

Installation Instructions
Page 13
...the precise dimensions needed. This will hold the outer panel up while removing the screws. Install custom panel Option 1: For models KUDS03FTPA and KUDU03FTPA NOTE: The handle for the custom panel is attached from the back of the custom panel, the screw...kitchenaid.com, or call 1-800-422-1230. Not recommended for 4" (10.2 cm) toe kick. The handle should be countersunk for reinstallation. 23-1/2" (59.7 cm) *30-3/16" (76.7 cm) custom panel dimensions 3/4" (19.1 mm) *This dimension is recommended that the top holes in customer-supplied custom panel. NOTE: A customer-supplied full...
...the precise dimensions needed. This will hold the outer panel up while removing the screws. Install custom panel Option 1: For models KUDS03FTPA and KUDU03FTPA NOTE: The handle for the custom panel is attached from the back of the custom panel, the screw...kitchenaid.com, or call 1-800-422-1230. Not recommended for 4" (10.2 cm) toe kick. The handle should be countersunk for reinstallation. 23-1/2" (59.7 cm) *30-3/16" (76.7 cm) custom panel dimensions 3/4" (19.1 mm) *This dimension is recommended that the top holes in customer-supplied custom panel. NOTE: A customer-supplied full...

Installation Instructions
Page 14
...panel and align holes. 7. Not recommended for frameless custom panel models with the top edge of the console. 12. Tighten the six side screws reinstalled in customer-supplied custom panel. 6. NOTE: A custom full front panel must be made to the door by reinstalling the three... panel face down on the inner panel, as shown; Place the outer panel on each side. 3 screws 1/8" (3.2 cm) *This dimension is aligned with a 4-inch (10.2 cm) console only. 23-3/8" (59.3 cm) 3/4" (19.1 mm) *25-29/32" (65.8 cm) custom panel dimensions 1/8" (3.2 cm) 3 screws outer panel 2. Drill...
...panel and align holes. 7. Not recommended for frameless custom panel models with the top edge of the console. 12. Tighten the six side screws reinstalled in customer-supplied custom panel. 6. NOTE: A custom full front panel must be made to the door by reinstalling the three... panel face down on the inner panel, as shown; Place the outer panel on each side. 3 screws 1/8" (3.2 cm) *This dimension is aligned with a 4-inch (10.2 cm) console only. 23-3/8" (59.3 cm) 3/4" (19.1 mm) *25-29/32" (65.8 cm) custom panel dimensions 1/8" (3.2 cm) 3 screws outer panel 2. Drill...

Installation Instructions
Page 15
... two or more people to move tensioner to do so can be done later. front vent model shown NOTE: Do not attach the dishwasher, this will need to be put into slot on both sides of dishwasher should be moved to the cabinet. tensioner screw Ẅẅ Ẇ 15 There are two brackets...
... two or more people to move tensioner to do so can be done later. front vent model shown NOTE: Do not attach the dishwasher, this will need to be put into slot on both sides of dishwasher should be moved to the cabinet. tensioner screw Ẅẅ Ẇ 15 There are two brackets...

Installation Instructions
Page 19
...not force.) Side panels will need to fit around the obstacle. 3. Make sure the vinyl pad is tucked up against dishwasher leg and vinyl pad. 4. Some models have insulation on some models) 1. Do not use an extension cord. Do not use an extension cord. Bottom sound pad installation (on the ...access panel which must fall behind the access panel. Remove the bottom sound pad from inside the dishwasher and take it will ...
...not force.) Side panels will need to fit around the obstacle. 3. Make sure the vinyl pad is tucked up against dishwasher leg and vinyl pad. 4. Some models have insulation on some models) 1. Do not use an extension cord. Do not use an extension cord. Bottom sound pad installation (on the ...access panel which must fall behind the access panel. Remove the bottom sound pad from inside the dishwasher and take it will ...
Parts Diagram
Page 1
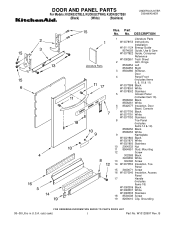
... 10 & 11) W10077999 Black W10078000 White W10078002 Stainless 5 Access Panel (Includes Item 16) 8558260 Black 8558261 White 6 8542577 Insulation, Door 7 Bezel, Console W10077790 Black W10077791 White W10077793 Stainless 8 Toe Panel (Includes Items 14 & 19) 8558252 Black 8558253 White 9 Nameplate W10021860 Black W10021870 White W10021850 Stainless 10... 08−08 Litho in U.S.A. (els) (eeb) 1 Part No. No. W10128997 Rev. B DOOR AND PANEL PARTS For Models: KUDK03CTBL0, KUDK03CTWH0, KUDK03CTSS0 (Black) (White) (Stainless) UNDERCOUNTER DISHWASHER Illus.
... 10 & 11) W10077999 Black W10078000 White W10078002 Stainless 5 Access Panel (Includes Item 16) 8558260 Black 8558261 White 6 8542577 Insulation, Door 7 Bezel, Console W10077790 Black W10077791 White W10077793 Stainless 8 Toe Panel (Includes Items 14 & 19) 8558252 Black 8558253 White 9 Nameplate W10021860 Black W10021870 White W10021850 Stainless 10... 08−08 Litho in U.S.A. (els) (eeb) 1 Part No. No. W10128997 Rev. B DOOR AND PANEL PARTS For Models: KUDK03CTBL0, KUDK03CTWH0, KUDK03CTSS0 (Black) (White) (Stainless) UNDERCOUNTER DISHWASHER Illus.
Parts Diagram
Page 2
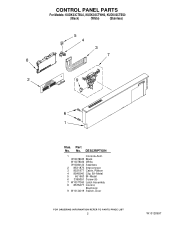
No. DESCRIPTION 1 Console Asm. W10078025 Black W10078026 White W10084122 Stainless 2 8531873 Interconnect 3 8531877 Cable, Ribbon 4 8546546 Clip, BI−Metal 5 661663 BI−Metal 6 3369051 Screw (6) 7 W10077360 Latch Assembly 8 8575277 Control, Electronic 9 W10134019 Switch, Door 2 W10128997 Part No. CONTROL PANEL PARTS For Models: KUDK03CTBL0, KUDK03CTWH0, KUDK03CTSS0 (Black) (White) (Stainless) Illus.
No. DESCRIPTION 1 Console Asm. W10078025 Black W10078026 White W10084122 Stainless 2 8531873 Interconnect 3 8531877 Cable, Ribbon 4 8546546 Clip, BI−Metal 5 661663 BI−Metal 6 3369051 Screw (6) 7 W10077360 Latch Assembly 8 8575277 Control, Electronic 9 W10134019 Switch, Door 2 W10128997 Part No. CONTROL PANEL PARTS For Models: KUDK03CTBL0, KUDK03CTWH0, KUDK03CTSS0 (Black) (White) (Stainless) Illus.
Parts Diagram
Page 3
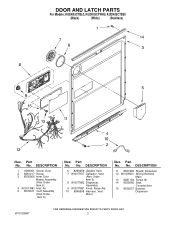
DOOR AND LATCH PARTS For Models: KUDK03CTBL0, KUDK03CTWH0, KUDK03CTSS0 (Black) (White) (Stainless) Illus. Part No. No. No. DESCRIPTION 6 8269259 Gasket, Vent 7 W10077877 Deflector, Vent (Also Order Item 6) 8 W10077882 Dispenser, Assembly 9 W10077881 ... Inlet, Air 5 8572611 Vent Assembly (Also Order Item 6) Illus. DESCRIPTION 11 8531865 Shield, Dispenser 12 W10078201 Wiring Harness Main 13 8281154 Screw (6) 14 8535660 Seal, Console/door 15 8535637 Bracket, Dispenser W10128997 3 Part No.
DOOR AND LATCH PARTS For Models: KUDK03CTBL0, KUDK03CTWH0, KUDK03CTSS0 (Black) (White) (Stainless) Illus. Part No. No. No. DESCRIPTION 6 8269259 Gasket, Vent 7 W10077877 Deflector, Vent (Also Order Item 6) 8 W10077882 Dispenser, Assembly 9 W10077881 ... Inlet, Air 5 8572611 Vent Assembly (Also Order Item 6) Illus. DESCRIPTION 11 8531865 Shield, Dispenser 12 W10078201 Wiring Harness Main 13 8281154 Screw (6) 14 8535660 Seal, Console/door 15 8535637 Bracket, Dispenser W10128997 3 Part No.

Parts Diagram
Page 5
No. DESCRIPTION 1 8537057 Heater Element Assembly (Also Includes Item 2) 2 717273 Washer, Heater Element 3 8268548 Nut, Heater Element 4 3400931 Retainer, Spring Grip NOTE: If heater element is removed, it must be replaced. 5 HEATER PARTS For Models: KUDK03CTBL0, KUDK03CTWH0, KUDK03CTSS0 (Black) (White) (Stainless) W10128997 Illus. Part No.
No. DESCRIPTION 1 8537057 Heater Element Assembly (Also Includes Item 2) 2 717273 Washer, Heater Element 3 8268548 Nut, Heater Element 4 3400931 Retainer, Spring Grip NOTE: If heater element is removed, it must be replaced. 5 HEATER PARTS For Models: KUDK03CTBL0, KUDK03CTWH0, KUDK03CTSS0 (Black) (White) (Stainless) W10128997 Illus. Part No.
Parts Diagram
Page 6
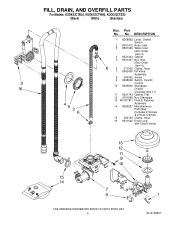
Part No. No. FILL, DRAIN, AND OVERFILL PARTS For Models: KUDK03CTBL0, KUDK03CTWH0, KUDK03CTSS0 (Black) (White) (Stainless) Illus. DESCRIPTION 1 8268892 Lever, Overfill Switch 2 8531412 Hose, Inlet 3 8531325 Water Inlet (Also Order Item 4) 4 8531323 Gasket 5 8531327 Nut, ...
Part No. No. FILL, DRAIN, AND OVERFILL PARTS For Models: KUDK03CTBL0, KUDK03CTWH0, KUDK03CTSS0 (Black) (White) (Stainless) Illus. DESCRIPTION 1 8268892 Lever, Overfill Switch 2 8531412 Hose, Inlet 3 8531325 Water Inlet (Also Order Item 4) 4 8531323 Gasket 5 8531327 Nut, ...


