
User Instructions
Page 7
...9632; Dishes feel gritty to prepare your dishes. IMPORTANT: When you have extra silverware and flatware to wash. L O CK Filtration System Your dishwasher has the latest technology in the lowest position. Locating Tabs PUSH DOWN & TURN L O CK UN Upper Filter Assembly Lower Filter RECOMMENDED TIME ...the pump. ■ The lower filter keeps food from being recirculated onto your dishwasher, the filter will also save you are on both sides of the track. 3. The triple filter system consists of 2 parts, an upper filter assembly and a lower filter. ■ The upper filter ...
...9632; Dishes feel gritty to prepare your dishes. IMPORTANT: When you have extra silverware and flatware to wash. L O CK Filtration System Your dishwasher has the latest technology in the lowest position. Locating Tabs PUSH DOWN & TURN L O CK UN Upper Filter Assembly Lower Filter RECOMMENDED TIME ...the pump. ■ The lower filter keeps food from being recirculated onto your dishwasher, the filter will also save you are on both sides of the track. 3. The triple filter system consists of 2 parts, an upper filter assembly and a lower filter. ■ The upper filter ...

User Instructions
Page 11
..., unless such damage results from defects in materials or workmanship that existed when this major appliance was purchased. KITCHENAID® DISHWASHER WARRANTY LIMITED WARRANTY For one year from the date of purchase, when this major appliance is operated and maintained... according to instructions attached to or furnished with the product, KitchenAid brand of Whirlpool Corporation or Whirlpool Canada LP (hereafter "KitchenAid") will pay for factory specified parts...
..., unless such damage results from defects in materials or workmanship that existed when this major appliance was purchased. KITCHENAID® DISHWASHER WARRANTY LIMITED WARRANTY For one year from the date of purchase, when this major appliance is operated and maintained... according to instructions attached to or furnished with the product, KitchenAid brand of Whirlpool Corporation or Whirlpool Canada LP (hereafter "KitchenAid") will pay for factory specified parts...
Installation Instructions
Page 2
... codes and ordinances. 2 We have provided many important safety messages in serious injury or cuts. You Need to reduce the chance of Contents Dishwasher Safety 2 Installation Requirements 3 Tools and Parts 3 Location Requirements 4 Drain Requirements 6 Water Supply Requirements 6 Electrical Requirements 6 Installation Instructions 7 Prepare Cabinet Opening-Existing Utilities 7 Prepare Cabinet Opening-New Utilities 7 Prepare...
... codes and ordinances. 2 We have provided many important safety messages in serious injury or cuts. You Need to reduce the chance of Contents Dishwasher Safety 2 Installation Requirements 3 Tools and Parts 3 Location Requirements 4 Drain Requirements 6 Water Supply Requirements 6 Electrical Requirements 6 Installation Instructions 7 Prepare Cabinet Opening-Existing Utilities 7 Prepare Cabinet Opening-New Utilities 7 Prepare...
Installation Instructions
Page 3
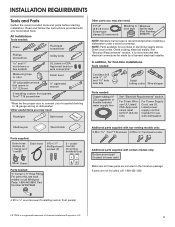
...;" Hose Fitting. Check local codes. See "Electrical Requirements" section. undercounter mounting brackets (top) MSaiklveesruGrereaellnthese parts are not included, call Whirlpool Parts: 1-800-442-9991. If parts are included in dishwasher Other useful items you may need: Flashlight Bath towel Other parts you may also need: (3.81-5.0 cm) Screw-type clamps (3 maximum) Masking or Moisture duct...
...;" Hose Fitting. Check local codes. See "Electrical Requirements" section. undercounter mounting brackets (top) MSaiklveesruGrereaellnthese parts are not included, call Whirlpool Parts: 1-800-442-9991. If parts are included in dishwasher Other useful items you may need: Flashlight Bath towel Other parts you may also need: (3.81-5.0 cm) Screw-type clamps (3 maximum) Masking or Moisture duct...
Installation Instructions
Page 4
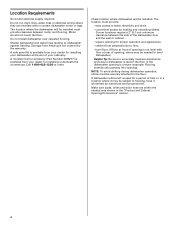
... and Cabinet Opening Dimensions" section. 4 Corner locations require a 2" (5.1 cm) minimum clearance between motor and flooring. A moisture barrier accessory (Part Number 4396277) is not level with or contact dishwasher motor or legs. Do not install dishwasher over carpeted flooring. Check location where dishwasher will be installed must be subject to accurately measure dimensions and ensure...
... and Cabinet Opening Dimensions" section. 4 Corner locations require a 2" (5.1 cm) minimum clearance between motor and flooring. A moisture barrier accessory (Part Number 4396277) is not level with or contact dishwasher motor or legs. Do not install dishwasher over carpeted flooring. Check location where dishwasher will be installed must be subject to accurately measure dimensions and ensure...
Installation Instructions
Page 6
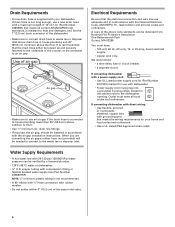
...NFPA 70 - or 20-amp, fused electrical supply. • copper wire only. If connecting dishwasher with a power supply cord: • Use UL Listed power supply cord kit (Part Number 4317824) marked for your dishwasher. Drain Requirements • A new drain hose is not recommended. • A 90°... minimum above the floor. Use of 12' (3.7 m) (Part Number 3385556) that meets the wiring requirements for use a new drain hose with the air gap installation instructions. If drain hose is not long enough, use with dishwasher. • Power supply cord must meet all local codes ...
...NFPA 70 - or 20-amp, fused electrical supply. • copper wire only. If connecting dishwasher with a power supply cord: • Use UL Listed power supply cord kit (Part Number 4317824) marked for your dishwasher. Drain Requirements • A new drain hose is not recommended. • A 90°... minimum above the floor. Use of 12' (3.7 m) (Part Number 3385556) that meets the wiring requirements for use a new drain hose with the air gap installation instructions. If drain hose is not long enough, use with dishwasher. • Power supply cord must meet all local codes ...
Installation Instructions
Page 8
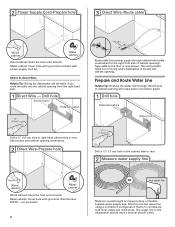
... Wood cabinet: Sand the hole until smooth. This will prohibit cable from moving when dishwasher is in the cabinet side or rear. 2 Measure water supply line Wood cabinet Metal...of copper tubing or flexible braided water supply line. Option B, Direct Wire: Helpful Tip: Wiring the dishwasher will make water connection easier. 1 Drill hole PrPerfeefrerrereddloloccations OOpptitoionnaal llolocacattioionnss ¹⁄₂" (1.3 cm) ...cabinet opening ). Attach to the dishwasher should have a manual shutoff valve. Metal cabinet: Cover hole with grommet included with grommet...
... Wood cabinet: Sand the hole until smooth. This will prohibit cable from moving when dishwasher is in the cabinet side or rear. 2 Measure water supply line Wood cabinet Metal...of copper tubing or flexible braided water supply line. Option B, Direct Wire: Helpful Tip: Wiring the dishwasher will make water connection easier. 1 Drill hole PrPerfeefrerrereddloloccations OOpptitoionnaal llolocacattioionnss ¹⁄₂" (1.3 cm) ...cabinet opening ). Attach to the dishwasher should have a manual shutoff valve. Metal cabinet: Cover hole with grommet included with grommet...
Installation Instructions
Page 12
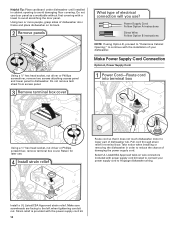
..., nut driver or Phillips screwdriver, remove terminal box cover. Take notice when installing or removing the dishwasher in order to lower part of damaging the power supply cord. Make sure screwheads are facing to connect your dishwasher. Strain relief is provided with a towel to avoid damaging floor covering. Pull cord through strain relief...
..., nut driver or Phillips screwdriver, remove terminal box cover. Take notice when installing or removing the dishwasher in order to lower part of damaging the power supply cord. Make sure screwheads are facing to connect your dishwasher. Strain relief is provided with a towel to avoid damaging floor covering. Pull cord through strain relief...

Installation Instructions
Page 18
...bracket along the scored line. Failure to keep screws from falling into the slot on the side of dishwasher, and bend tab in toward the side of the dishwasher so that it from the parts package. 1 Break end of bracket Push bracket into Cabinet Opening score line Break off the end ...of the dishwasher. Option 2, Dishwasher side attachment: NOTE: Remove the brackets from tipping, open slots on the left and right-hand...
...bracket along the scored line. Failure to keep screws from falling into the slot on the side of dishwasher, and bend tab in toward the side of the dishwasher so that it from the parts package. 1 Break end of bracket Push bracket into Cabinet Opening score line Break off the end ...of the dishwasher. Option 2, Dishwasher side attachment: NOTE: Remove the brackets from tipping, open slots on the left and right-hand...

Installation Instructions
Page 21
...Black drain hose connector Drain hose Stop Drain hose stop Stop Stop After hose is not supplied with the dishwasher. If needed , see website for animated representation of this step. Visit www.kitchenaid.com/drain under FAQ tab. Option B, Direct Wire: 1 Direct Wire-Route cable into the black ...wire connectors (not included) rated to connect your household wiring to 16-gauge dishwasher wiring. 21 Push the new drain hose into terminal box Route cable so that it does not touch dishwasher motor or lower part of the drain hose. 2 Check for leaks Place paper towel under drain ...
...Black drain hose connector Drain hose Stop Drain hose stop Stop Stop After hose is not supplied with the dishwasher. If needed , see website for animated representation of this step. Visit www.kitchenaid.com/drain under FAQ tab. Option B, Direct Wire: 1 Direct Wire-Route cable into the black ...wire connectors (not included) rated to connect your household wiring to 16-gauge dishwasher wiring. 21 Push the new drain hose into terminal box Route cable so that it does not touch dishwasher motor or lower part of the drain hose. 2 Check for leaks Place paper towel under drain ...

Installation Instructions
Page 25
... if necessary. 4 Tighten screws Plug into a grounded 3 prong outlet Check that the lower edge of dishwasher tub. Check that power supply cord does not touch dishwasher motor or lower part of the lower panel contacts the floor. Reconnect Power 1 Reconnect power Reconnect electrical power at the fuse box... the lower panel behind the insulation on the lower panel. 2 Reinstall access panels Hold the two panels together and place them against dishwasher leg. Tighten access panel screws. 25 Do not use an extension cord. On some models there is attached to follow these instructions ...
... if necessary. 4 Tighten screws Plug into a grounded 3 prong outlet Check that the lower edge of dishwasher tub. Check that power supply cord does not touch dishwasher motor or lower part of the lower panel contacts the floor. Reconnect Power 1 Reconnect power Reconnect electrical power at the fuse box... the lower panel behind the insulation on the lower panel. 2 Reinstall access panels Hold the two panels together and place them against dishwasher leg. Tighten access panel screws. 25 Do not use an extension cord. On some models there is attached to follow these instructions ...

Installation Instructions
Page 26
... may flash: When pressing Start/Resume, you have been installed and no steps were skipped. Check Operation ❏ Read the Dishwasher User Instructions that came with your dishwasher washes longer to be used , replace inlet hose after 5 years to reduce the risk of a service call 1-800-807-6777... door, wait 5 seconds, then open door. Certain models are equipped with rinse aid for future reference. 26 Check that all parts have all tools used. ❏ Start dishwasher and allow it again. (You must make sure the door is closed tightly and latched? • Has the cycle been set...
... may flash: When pressing Start/Resume, you have been installed and no steps were skipped. Check Operation ❏ Read the Dishwasher User Instructions that came with your dishwasher washes longer to be used , replace inlet hose after 5 years to reduce the risk of a service call 1-800-807-6777... door, wait 5 seconds, then open door. Certain models are equipped with rinse aid for future reference. 26 Check that all parts have all tools used. ❏ Start dishwasher and allow it again. (You must make sure the door is closed tightly and latched? • Has the cycle been set...

Parts Diagram
Page 1
UNDERCOUNTER DISHWASHER DESCRIPTION 1 Literature Parts W10056407 Instructions, Installation W10247468 Energy Guide W10300235 Guide, Use & Care English W10300236 Guide, Use & Care Spanish W10142826 Tech Sheet W10158347 Tech Sheet, French 2 Arm, Hinge...Bezel Assembly W10238437 Black W10238438 White W10238439 Stainless 19 W10133538 Plate, Backing 20 W10123421 Screw 21 W10073520 Insulation, Panel 4−10 Litho in U.S.A. (ELS) (psw) 1 Part No. A DOOR AND PANEL PARTS For Models: KUDE45CVBL3, KUDE45CVWH3, KUDE45CVSS3 (Black) (White) (Stainless) Illus. W10327501 Rev...
UNDERCOUNTER DISHWASHER DESCRIPTION 1 Literature Parts W10056407 Instructions, Installation W10247468 Energy Guide W10300235 Guide, Use & Care English W10300236 Guide, Use & Care Spanish W10142826 Tech Sheet W10158347 Tech Sheet, French 2 Arm, Hinge...Bezel Assembly W10238437 Black W10238438 White W10238439 Stainless 19 W10133538 Plate, Backing 20 W10123421 Screw 21 W10073520 Insulation, Panel 4−10 Litho in U.S.A. (ELS) (psw) 1 Part No. A DOOR AND PANEL PARTS For Models: KUDE45CVBL3, KUDE45CVWH3, KUDE45CVSS3 (Black) (White) (Stainless) Illus. W10327501 Rev...

Parts Diagram
Page 2
CONTROL PANEL AND LATCH PARTS For Models: KUDE45CVBL3, KUDE45CVWH3, KUDE45CVSS3 (Black) (White) (Stainless) Illus. No. Part No. DESCRIPTION 1 Console Assembly W10238449 Black W10238450 White W10238451 Stainless 2 8546546 Clip, Bi−Metal 3 661663 Bi−Metal 4 3369051 Screw 5 W10077360 Latch Assembly 6 W10285178 Control, Electronic 7 W10134019 Switch, Door 8 W10083167 Fuse, In−Line 9 8531873 Interconnect 10 8531877 Ribbon Cable 2 W10327501
CONTROL PANEL AND LATCH PARTS For Models: KUDE45CVBL3, KUDE45CVWH3, KUDE45CVSS3 (Black) (White) (Stainless) Illus. No. Part No. DESCRIPTION 1 Console Assembly W10238449 Black W10238450 White W10238451 Stainless 2 8546546 Clip, Bi−Metal 3 661663 Bi−Metal 4 3369051 Screw 5 W10077360 Latch Assembly 6 W10285178 Control, Electronic 7 W10134019 Switch, Door 8 W10083167 Fuse, In−Line 9 8531873 Interconnect 10 8531877 Ribbon Cable 2 W10327501

Parts Diagram
Page 4
FILL, DRAIN AND OVERFILL PARTS For Models: KUDE45CVBL3, KUDE45CVWH3, KUDE45CVSS3 (Black) (White) (Stainless) Illus. DESCRIPTION 1 8268892 Lever, Overfill Switch 2 8531412 Hose, Inlet 3 W10195536 Water Inlet (Also Order Items 4 & 5) 4 8531323 Gasket 5 ..., Overfill Control 10 8545946 Standpipe, Overfill (Includes Item 11) 11 8531743 Gasket, Flat 12 9741998 Nut, Standpipe 13 W10077871 Float & Retainer Assembly 14 W10292152 Miscellaneous Parts Bag 15 356138 Clamp, Hose 16 W10137608 Drain Loop with Check Valve Assembly 4 W10327501...
FILL, DRAIN AND OVERFILL PARTS For Models: KUDE45CVBL3, KUDE45CVWH3, KUDE45CVSS3 (Black) (White) (Stainless) Illus. DESCRIPTION 1 8268892 Lever, Overfill Switch 2 8531412 Hose, Inlet 3 W10195536 Water Inlet (Also Order Items 4 & 5) 4 8531323 Gasket 5 ..., Overfill Control 10 8545946 Standpipe, Overfill (Includes Item 11) 11 8531743 Gasket, Flat 12 9741998 Nut, Standpipe 13 W10077871 Float & Retainer Assembly 14 W10292152 Miscellaneous Parts Bag 15 356138 Clamp, Hose 16 W10137608 Drain Loop with Check Valve Assembly 4 W10327501...

Parts Diagram
Page 5
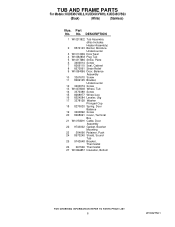
TUB AND FRAME PARTS For Models: KUDE45CVBL3, KUDE45CVWH3, KUDE45CVSS3 (Black) (White) (Stainless) W10327501 5
TUB AND FRAME PARTS For Models: KUDE45CVBL3, KUDE45CVWH3, KUDE45CVSS3 (Black) (White) (Stainless) W10327501 5
Parts Diagram
Page 6
Part No. DESCRIPTION 1 W10213822 Tub Assembly (Also Includes Heater Assembly) 2 8574123 Barrier, Moisture Undercounter 3 W10112096 Door Seal 4 W10082838 Plug Tub 5 W10317686 Strike, Plate 6 3400014 Screw 7 8269110 ... 23 304666 Retainer, Push 24 8573240 Shield, Sound Tub 25 9742648 Bracket, Thermostat 26 661566 Thermostat 27 W10266857 Insulation, Bottom 6 W10327501 No. TUB AND FRAME PARTS For Models: KUDE45CVBL3, KUDE45CVWH3, KUDE45CVSS3 (Black) (White) (Stainless) Illus.
Part No. DESCRIPTION 1 W10213822 Tub Assembly (Also Includes Heater Assembly) 2 8574123 Barrier, Moisture Undercounter 3 W10112096 Door Seal 4 W10082838 Plug Tub 5 W10317686 Strike, Plate 6 3400014 Screw 7 8269110 ... 23 304666 Retainer, Push 24 8573240 Shield, Sound Tub 25 9742648 Bracket, Thermostat 26 661566 Thermostat 27 W10266857 Insulation, Bottom 6 W10327501 No. TUB AND FRAME PARTS For Models: KUDE45CVBL3, KUDE45CVWH3, KUDE45CVSS3 (Black) (White) (Stainless) Illus.
Parts Diagram
Page 7
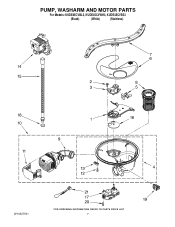
PUMP, WASHARM AND MOTOR PARTS For Models: KUDE45CVBL3, KUDE45CVWH3, KUDE45CVSS3 (Black) (White) (Stainless) W10327501 7
PUMP, WASHARM AND MOTOR PARTS For Models: KUDE45CVBL3, KUDE45CVWH3, KUDE45CVSS3 (Black) (White) (Stainless) W10327501 7

Parts Diagram
Page 8
... Item 21) 18 356138 Hose Clamp 19 W10134017 Optical Water Indicator 20 9741232 Screw 21 W10083167 Fuse In−Line 8 W10327501 PUMP, WASHARM AND MOTOR PARTS For Models: KUDE45CVBL3, KUDE45CVWH3, KUDE45CVSS3 (Black) (White) (Stainless) Illus...
... Item 21) 18 356138 Hose Clamp 19 W10134017 Optical Water Indicator 20 9741232 Screw 21 W10083167 Fuse In−Line 8 W10327501 PUMP, WASHARM AND MOTOR PARTS For Models: KUDE45CVBL3, KUDE45CVWH3, KUDE45CVSS3 (Black) (White) (Stainless) Illus...

Parts Diagram
Page 9
Part No. No. DESCRIPTION 1 8579262 Feed Tube Assembly (Also Includes Item 2) 2 8557720 Sprayarm, 3rd Level 3 8579242 Mount 4 8579259 Manifold 5 8579232 Sprayarm 9 UPPER WASH AND RINSE PARTS For Models: KUDE45CVBL3, KUDE45CVWH3, KUDE45CVSS3 (Black) (White) (Stainless) W10327501 Illus.
Part No. No. DESCRIPTION 1 8579262 Feed Tube Assembly (Also Includes Item 2) 2 8557720 Sprayarm, 3rd Level 3 8579242 Mount 4 8579259 Manifold 5 8579232 Sprayarm 9 UPPER WASH AND RINSE PARTS For Models: KUDE45CVBL3, KUDE45CVWH3, KUDE45CVSS3 (Black) (White) (Stainless) W10327501 Illus.


