
User Instructions
Page 10
...176;F (49°C). Detergent needs food soil to hard water. To avoid rinse aid leaking from the dispenser, be sure the lid is securely attached and avoid overfilling. ■ Tub is discolored Tomato-based foods can discolor the tub or dishware. ■ A citrus-based cleaner can be an...Will Not Fill" in the water can greatly decrease the washing performance (see below 120°F (49°C). ■ Leaking water Be sure dishwasher has been installed properly and is set at least 120°F (49°C). Use the proper amount of detergent if sudsing continues. ■ Food...
...176;F (49°C). Detergent needs food soil to hard water. To avoid rinse aid leaking from the dispenser, be sure the lid is securely attached and avoid overfilling. ■ Tub is discolored Tomato-based foods can discolor the tub or dishware. ■ A citrus-based cleaner can be an...Will Not Fill" in the water can greatly decrease the washing performance (see below 120°F (49°C). ■ Leaking water Be sure dishwasher has been installed properly and is set at least 120°F (49°C). Use the proper amount of detergent if sudsing continues. ■ Food...

User Instructions
Page 11
... fifth year from the date of purchase, when this major appliance is operated and maintained according to instructions attached to or furnished with KitchenAid's published installation instructions. 11. Some states and provinces do not allow limitations on the duration of implied warranties... that existed when this major appliance was purchased. KITCHENAID® DISHWASHER WARRANTY LIMITED WARRANTY For one year from the date of purchase, when this major appliance is operated and maintained according to instructions attached to or furnished with original model/serial numbers that...
... fifth year from the date of purchase, when this major appliance is operated and maintained according to instructions attached to or furnished with KitchenAid's published installation instructions. 11. Some states and provinces do not allow limitations on the duration of implied warranties... that existed when this major appliance was purchased. KITCHENAID® DISHWASHER WARRANTY LIMITED WARRANTY For one year from the date of purchase, when this major appliance is operated and maintained according to instructions attached to or furnished with original model/serial numbers that...
Installation Instructions
Page 2
Option 2 17 Choose Attachment Option 17 Move Dishwasher Into Cabinet Opening 18 Connect to Water Supply 20 Connect to reduce the chance of the dishwasher. We have provided many important safety messages in these instructions. • Installation should be killed or seriously...Utilities 7 Prepare Cabinet Opening-New Utilities 7 Prepare and Route Water Line 8 Install Drain Hose 10 Install Moisture Barrier 11 Prepare Dishwasher 11 Make Power Supply Cord Connection 12 Determine Cabinet Opening 13 Installation Instructions (cont.) Install the Door Handle 14 Custom Panel ...
Option 2 17 Choose Attachment Option 17 Move Dishwasher Into Cabinet Opening 18 Connect to Water Supply 20 Connect to reduce the chance of the dishwasher. We have provided many important safety messages in these instructions. • Installation should be killed or seriously...Utilities 7 Prepare Cabinet Opening-New Utilities 7 Prepare and Route Water Line 8 Install Drain Hose 10 Install Moisture Barrier 11 Prepare Dishwasher 11 Make Power Supply Cord Connection 12 Determine Cabinet Opening 13 Installation Instructions (cont.) Install the Door Handle 14 Custom Panel ...
Installation Instructions
Page 4
...unloading dishes. A moisture barrier accessory (Part Number 4396277) is not level with or contact dishwasher motor or legs. Check location where dishwasher will be installed must be needed to level dishwasher.) Helpful Tip: Be sure to the floor. Corner locations require a 2" (5.1 cm) minimum...extends only partway into opening , shims may be installed. Damage from your dishwasher at rear of time or in a location where it may be securely attached to accurately measure dimensions and ensure dishwasher is level if the floor in the "Product and Cabinet Opening Dimensions" ...
...unloading dishes. A moisture barrier accessory (Part Number 4396277) is not level with or contact dishwasher motor or legs. Check location where dishwasher will be installed must be needed to level dishwasher.) Helpful Tip: Be sure to the floor. Corner locations require a 2" (5.1 cm) minimum...extends only partway into opening , shims may be installed. Damage from your dishwasher at rear of time or in a location where it may be securely attached to accurately measure dimensions and ensure dishwasher is level if the floor in the "Product and Cabinet Opening Dimensions" ...
Installation Instructions
Page 8
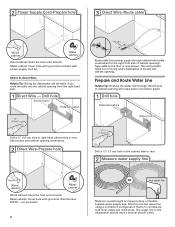
...(1.3 cm) Drill a ¹⁄₂" (1.3 cm) hole in compliance with local codes and ordinances. Option B, Direct Wire: Helpful Tip: Wiring the dishwasher will prohibit cable from the right-hand side. 1 Direct Wire - The water line to the floor in right-hand cabinet side or rear. 2 Power Supply... opening dimensions. 2 Direct Wire-Prepare hole (15.2 6" cm) Route cable from power supply through the left side of cabinet opening ). Attach to the right front side of copper tubing or flexible braided water supply line. This will be easier if you route the cable into the...
...(1.3 cm) Drill a ¹⁄₂" (1.3 cm) hole in compliance with local codes and ordinances. Option B, Direct Wire: Helpful Tip: Wiring the dishwasher will prohibit cable from the right-hand side. 1 Direct Wire - The water line to the floor in right-hand cabinet side or rear. 2 Power Supply... opening dimensions. 2 Direct Wire-Prepare hole (15.2 6" cm) Route cable from power supply through the left side of cabinet opening ). Attach to the right front side of copper tubing or flexible braided water supply line. This will be easier if you route the cable into the...
Installation Instructions
Page 9
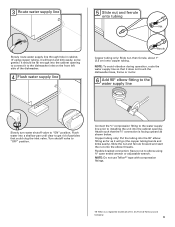
.... 9 NOTE: To avoid vibration during operation, route the water supply line so that the ³⁄₄" connection is a registered trademark of the dishwasher. 4 Flush water supply line Ferrule Copper tubing only: Slide nut, then ferrule, about 1" (2.5 cm) onto copper tubing. Connect the ³⁄&#...8328;" compression fitting to the water supply line prior to the dishwasher inlet on the front left side of E.I. Attach such that it does not touch the dishwasher base, frame or motor. 6 Add 90° elbow fitting to the water supply line Slowly ...
.... 9 NOTE: To avoid vibration during operation, route the water supply line so that the ³⁄₄" connection is a registered trademark of the dishwasher. 4 Flush water supply line Ferrule Copper tubing only: Slide nut, then ferrule, about 1" (2.5 cm) onto copper tubing. Connect the ³⁄&#...8328;" compression fitting to the water supply line prior to the dishwasher inlet on the front left side of E.I. Attach such that it does not touch the dishwasher base, frame or motor. 6 Add 90° elbow fitting to the water supply line Slowly ...
Installation Instructions
Page 10
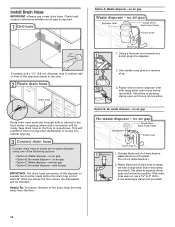
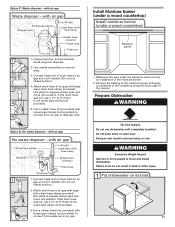
... This will prohibit it from the floor. 2 2. with air gap IMPORTANT: The drain hose connection of the following options: • Option A, Waste disposer - Attach drain hose to the floor in cabinet to the front center of opening . 3 Connect drain hose Connect drain hose to remove plug. 3 3. no air gap...the disposer or a waste tee must be made before the drain trap and at least 20" (50.8 cm) above the floor where the dishwasher will be installed. Attach black end of drain hose to waste tee and cut if needed , drill a 1¹⁄₂" (3.8 cm) diameter hole in cabinet ...
... This will prohibit it from the floor. 2 2. with air gap IMPORTANT: The drain hose connection of the following options: • Option A, Waste disposer - Attach drain hose to the floor in cabinet to the front center of opening . 3 Connect drain hose Connect drain hose to remove plug. 3 3. no air gap...the disposer or a waste tee must be made before the drain trap and at least 20" (50.8 cm) above the floor where the dishwasher will be installed. Attach black end of drain hose to waste tee and cut if needed , drill a 1¹⁄₂" (3.8 cm) diameter hole in cabinet ...
Installation Instructions
Page 11
...or more people to 5 cm) screw-type clamp (not provided). 5. Using a hammer and screwdriver, knock plug into position. Attach drain hose to squeeze clamp open and move and install dishwasher. Use pliers to air gap with air gap Waste disposer - with large 2 silver drain hose clamp (provided...). Attach drain hose to air gap. If the drain hose was cut ribbed section.) 2. Remove the backing of the moisture barrier....
...or more people to 5 cm) screw-type clamp (not provided). 5. Using a hammer and screwdriver, knock plug into position. Attach drain hose to squeeze clamp open and move and install dishwasher. Use pliers to air gap with air gap Waste disposer - with large 2 silver drain hose clamp (provided...). Attach drain hose to air gap. If the drain hose was cut ribbed section.) 2. Remove the backing of the moisture barrier....
Installation Instructions
Page 12
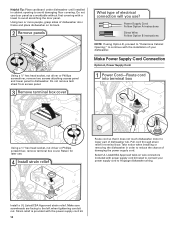
... Do not remove tech sheet from access panel. 3 Remove terminal box cover What type of your power supply cord to 16-gauge dishwasher wiring. Pull cord through strain relief in terminal bow. Install a UL Listed/CSA Approved strain relief. Select UL Listed/CSA Approved .... 2 Remove panels Using a ¹⁄₄" hex head socket, nut driver or Phillips screwdriver, remove two screws attaching access panel and lower panel to reduce the chance of dishwasher tub. Power Supply Cord: Follow Option A instructions Direct Wire: Follow Option B instructions NOTE: If using Option B, proceed...
... Do not remove tech sheet from access panel. 3 Remove terminal box cover What type of your power supply cord to 16-gauge dishwasher wiring. Pull cord through strain relief in terminal bow. Install a UL Listed/CSA Approved strain relief. Select UL Listed/CSA Approved .... 2 Remove panels Using a ¹⁄₄" hex head socket, nut driver or Phillips screwdriver, remove two screws attaching access panel and lower panel to reduce the chance of dishwasher tub. Power Supply Cord: Follow Option A instructions Direct Wire: Follow Option B instructions NOTE: If using Option B, proceed...

Installation Instructions
Page 14
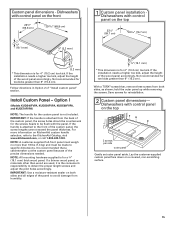
... custom door panel. Custom Panel Dimensions IMPORTANT: You need to the same height. Follow directions under Option 1 of the wood panel accordingly. Custom panel dimensions-Dishwashers with control panel on the top (59.7 cm) 4" (10.1 cm) (52c"m) (7 cm) Built-up 34" (86.4 cm) 1 10 (87.0 cm) 2... 5 3 0 NOTE: If the minimum cabinet opening height is on the floor). NOTE: Shims must be securely attached to floor to know which control panel is less than the cabinet opening from the cardboard box. Push the door handle tightly against the door...
... custom door panel. Custom Panel Dimensions IMPORTANT: You need to the same height. Follow directions under Option 1 of the wood panel accordingly. Custom panel dimensions-Dishwashers with control panel on the top (59.7 cm) 4" (10.1 cm) (52c"m) (7 cm) Built-up 34" (86.4 cm) 1 10 (87.0 cm) 2... 5 3 0 NOTE: If the minimum cabinet opening height is on the floor). NOTE: Shims must be securely attached to floor to know which control panel is less than the cabinet opening from the cardboard box. Push the door handle tightly against the door...
Installation Instructions
Page 15
... kg) and must weigh no more information on the front (65.8 cm) (19.1 mm) 1 Custom panel installation - It is attached to avoid damage from both sides and all edges of the precise dimensions needed. NOTE: All mounting hardware supplied is for the custom panel... included. Install Custom Panel - hold the outer panel up while removing the screws. Dishwashers with control panel on KitchenAid custom handle selection, refer to specific dimensions. Save screws for 4" (10.2 cm) toe kick. Dishwashers with the panel. Follow directions in Option 2 of "Install custom panel" section. ...
... kg) and must weigh no more information on the front (65.8 cm) (19.1 mm) 1 Custom panel installation - It is attached to avoid damage from both sides and all edges of the precise dimensions needed. NOTE: All mounting hardware supplied is for the custom panel... included. Install Custom Panel - hold the outer panel up while removing the screws. Dishwashers with control panel on KitchenAid custom handle selection, refer to specific dimensions. Save screws for 4" (10.2 cm) toe kick. Dishwashers with the panel. Follow directions in Option 2 of "Install custom panel" section. ...

Installation Instructions
Page 16
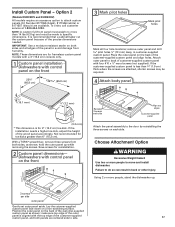
... a line on the back of the inner panel. IMPORTANT: Screw heads must be centered on the front of customer-supplied custom panel. 16 6 Attach body panel Reinstall 3 screws each side; Tighten the six side screws reinstalled in customer-supplied custom panel. Drill pilot holes ¹⁄₂" (...13 mm) deep in Step 6. Place the outer panel on each side Align top edges Customer-supplied panel Attach the panel assembly to the door by reinstalling the three screws on the back of customer-supplied custom panel with the four #10-16 x &#...
... a line on the back of the inner panel. IMPORTANT: Screw heads must be centered on the front of customer-supplied custom panel. 16 6 Attach body panel Reinstall 3 screws each side; Tighten the six side screws reinstalled in customer-supplied custom panel. Drill pilot holes ¹⁄₂" (...13 mm) deep in Step 6. Place the outer panel on each side Align top edges Customer-supplied panel Attach the panel assembly to the door by reinstalling the three screws on the back of customer-supplied custom panel with the four #10-16 x &#...
Installation Instructions
Page 17
... of the precise dimensions needed. IMPORTANT: Use a moisture-resistant sealer on each side. Attach outer panel to the door by reinstalling the three screws on both panels are for 4" (10.2 cm) toe kick. Dishwashers with a 4" (10.2 cm) console only. 1 Custom panel installation - make sure...mm) deep, in back or other injury. Not recommended for reinstallation. 2 Custom panel dimensions- Choose Attachment Option Excessive Weight Hazard Use two or more people, stand the dishwasher up while removing the screws. Lay the cutomer-supplied custom panel face down on the back of the ...
... of the precise dimensions needed. IMPORTANT: Use a moisture-resistant sealer on each side. Attach outer panel to the door by reinstalling the three screws on both panels are for 4" (10.2 cm) toe kick. Dishwashers with a 4" (10.2 cm) console only. 1 Custom panel installation - make sure...mm) deep, in back or other injury. Not recommended for reinstallation. 2 Custom panel dimensions- Choose Attachment Option Excessive Weight Hazard Use two or more people, stand the dishwasher up while removing the screws. Lay the cutomer-supplied custom panel face down on the back of the ...

Installation Instructions
Page 18
... people to cabinet. Option 2, Dishwasher side attachment: NOTE: Remove the brackets from the parts package. 1 Break end of bracket Push bracket into pump area when you are securing dishwasher to move and install dishwasher. NOTE: Do not attach the dishwasher. Failure to keep screws from tipping..., open slots on the left and right-hand top of the dishwasher collar as shown. 2 Insert bracket Push the ...
... people to cabinet. Option 2, Dishwasher side attachment: NOTE: Remove the brackets from the parts package. 1 Break end of bracket Push bracket into pump area when you are securing dishwasher to move and install dishwasher. NOTE: Do not attach the dishwasher. Failure to keep screws from tipping..., open slots on the left and right-hand top of the dishwasher collar as shown. 2 Insert bracket Push the ...
Installation Instructions
Page 24
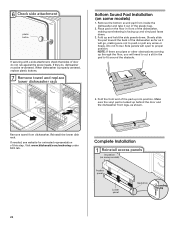
..., making sure lettering is properly centered, replace plastic buttons. 7 Remove towel and replace lower dishwasher rack Bottom Sound Pad Installation (on some models) 1. Visit www.kitchenaid.com/anchoring under FAQ tab. When dishwasher is facing up and vinyl pad faces down . NOTE: If there are pipes or other... 1 Reinstall access panels Insulation (on some models) Access panel Lower panel Insulation Grounding clip 24 Remove the bottom sound pad from dishwasher. 6 Check side attachment plastic button If securing with a side attachment, check that sides of door do...
..., making sure lettering is properly centered, replace plastic buttons. 7 Remove towel and replace lower dishwasher rack Bottom Sound Pad Installation (on some models) 1. Visit www.kitchenaid.com/anchoring under FAQ tab. When dishwasher is facing up and vinyl pad faces down . NOTE: If there are pipes or other... 1 Reinstall access panels Insulation (on some models) Access panel Lower panel Insulation Grounding clip 24 Remove the bottom sound pad from dishwasher. 6 Check side attachment plastic button If securing with a side attachment, check that sides of door do...

Installation Instructions
Page 25
Do not remove ground prong. Do not use an extension cord. Check that the lower edge of dishwasher tub. Failure to the lower panel. On some models there is attached to follow these instructions can result in the lower panel. 3 Check lower panel edge WARNING Electrical Shock Hazard Plug ...death, fire, or electrical shock. 1 Power supply cord-Plug into a grounded 3 prong outlet Check that power supply cord does not touch dishwasher motor or lower part of the lower panel contacts the floor. Check that grounding clip is insulation on the lower panel. 2 Reinstall access ...
Do not remove ground prong. Do not use an extension cord. Check that the lower edge of dishwasher tub. Failure to the lower panel. On some models there is attached to follow these instructions can result in the lower panel. 3 Check lower panel edge WARNING Electrical Shock Hazard Plug ...death, fire, or electrical shock. 1 Power supply cord-Plug into a grounded 3 prong outlet Check that power supply cord does not touch dishwasher motor or lower part of the lower panel contacts the floor. Check that grounding clip is insulation on the lower panel. 2 Reinstall access ...


