Use & Care Guide
Page 4
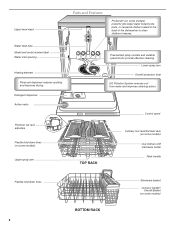
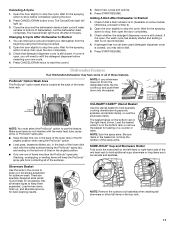
Detergent dispenser Active vents Premium top rack adjusters Flexible fold-down tines 4 BOTTOM RACK Silverware basket Culinary Caddy® Utensil Basket (on some models) Water feed tube Model and serial number label Water inlet opening Heating element Rinse aid dispenser reduces spotting and improves drying. Lower spray arm Overfill protection float EQ Filtration System removes soil from water and improves cleaning action. Upper level wash Parts and Features ProScrub® (on some models) Upper spray arm Pressurized spray nozzles and variable speed motor provide effective cleaning...
Detergent dispenser Active vents Premium top rack adjusters Flexible fold-down tines 4 BOTTOM RACK Silverware basket Culinary Caddy® Utensil Basket (on some models) Water feed tube Model and serial number label Water inlet opening Heating element Rinse aid dispenser reduces spotting and improves drying. Lower spray arm Overfill protection float EQ Filtration System removes soil from water and improves cleaning action. Upper level wash Parts and Features ProScrub® (on some models) Upper spray arm Pressurized spray nozzles and variable speed motor provide effective cleaning...
Use & Care Guide
Page 5
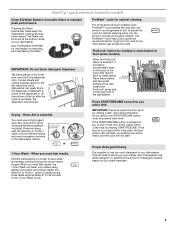
..., the dispenser was blocked. No need fast results. just scrape and load. Tall items placed in the dishwasher interior. Drying - Rinse Aid is not closed within 3 seconds, the start button LED will flash, an audible tone will clean your water hardness. 5 USE RINSE AID FOR Full BETTER DRYING Lock Add Refill or 1 Hour Wash - When you add a dish. Place these dishes with the Heat Dry or ProDry™ option will not start. L PUSH DOWN & TURN O CK...
..., the dispenser was blocked. No need fast results. just scrape and load. Tall items placed in the dishwasher interior. Drying - Rinse Aid is not closed within 3 seconds, the start button LED will flash, an audible tone will clean your water hardness. 5 USE RINSE AID FOR Full BETTER DRYING Lock Add Refill or 1 Hour Wash - When you add a dish. Place these dishes with the Heat Dry or ProDry™ option will not start. L PUSH DOWN & TURN O CK...
Use & Care Guide
Page 7
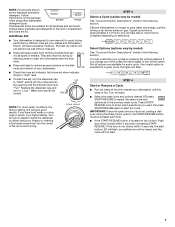
... rinse aid into the opening until the water is selected for standard powdered detergent. Typical cycle time is at the sink nearest your dishwasher. STEP 4 Start or Resume a Cycle ■ Run hot water at "Full." Always place premeasured detergents in the following section. Refill Lock fill - -- 6 5 4 max - 21 3 - --- -- - --- If you change your dishes and dishwasher interior will not start the cycle. If the door is fully locked. Add ■ Check the rinse aid indicator. If you used...
... rinse aid into the opening until the water is selected for standard powdered detergent. Typical cycle time is at the sink nearest your dishwasher. STEP 4 Start or Resume a Cycle ■ Run hot water at "Full." Always place premeasured detergents in the following section. Refill Lock fill - -- 6 5 4 max - 21 3 - --- -- - --- If you change your dishes and dishwasher interior will not start the cycle. If the door is fully locked. Add ■ Check the rinse aid indicator. If you used...
Use & Care Guide
Page 8
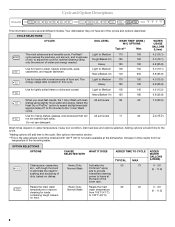
...® spray jets to provide intensified cleaning power to the cycle. Adding options will add time to the cycle. *Adding options will clean All soil levels 58 dishes using Tough/Baked-On 125 190 only the amount of the incoming water. Raises the main wash temperature from low temperature of water and energy needed. Cycle and Option Descriptions This information covers several different models. CYCLE SELECTIONS CYCLES SOIL LEVEL WASH TIME* (MINS...
...® spray jets to provide intensified cleaning power to the cycle. Adding options will add time to the cycle. *Adding options will clean All soil levels 58 dishes using Tough/Baked-On 125 190 only the amount of the incoming water. Raises the main wash temperature from low temperature of water and energy needed. Cycle and Option Descriptions This information covers several different models. CYCLE SELECTIONS CYCLES SOIL LEVEL WASH TIME* (MINS...
Use & Care Guide
Page 9
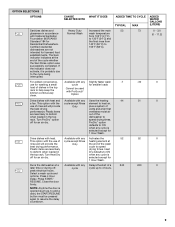
... heating element at the end of dishes in accordance with any cycle is selected except for an air dry. Dries dishes with the use of rinse aid will provide the best drying performance. Select a wash cycle and options. ADDED WATER GALLONS (LITERS) 0 - 3.0 (0 - 11.2) 0 0 0 0 9 This option with heat and a fan. OPTION SELECTIONS OPTIONS Sanitizes dishes and glassware in the top rack to help keep the kitchen continuously clean. Press START/ RESUME. Dries dishes with the use of rinse aid...
... heating element at the end of dishes in accordance with any cycle is selected except for an air dry. Dries dishes with the use of rinse aid will provide the best drying performance. Select a wash cycle and options. ADDED WATER GALLONS (LITERS) 0 - 3.0 (0 - 11.2) 0 0 0 0 9 This option with heat and a fan. OPTION SELECTIONS OPTIONS Sanitizes dishes and glassware in the top rack to help keep the kitchen continuously clean. Press START/ RESUME. Dries dishes with the use of rinse aid...
Use & Care Guide
Page 10
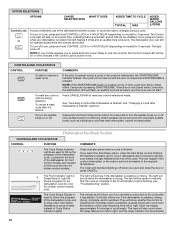
... the door is interrupted, the START/RESUME indicator flashes. Only audible tones for 3 seconds to right, and the delay indicator will be on for hidden control models. If you if the dishwasher is drying. The light will be red when the dishwasher is washing, rinsing, drying, complete, and/or sanitized. Press CANCEL/DRAIN to right. NOTE: If your dishes, the light flashes at the end of the cycle. To cancel a wash cycle after it 's started . To turn the...
... the door is interrupted, the START/RESUME indicator flashes. Only audible tones for 3 seconds to right, and the delay indicator will be on for hidden control models. If you if the dishwasher is drying. The light will be red when the dishwasher is washing, rinsing, drying, complete, and/or sanitized. Press CANCEL/DRAIN to right. NOTE: If your dishes, the light flashes at the end of the cycle. To cancel a wash cycle after it 's started . To turn the...
Use & Care Guide
Page 11
... Cancel/Drain light turns off after 2 minutes. You can interrupt a cycle and restart your new cycle. 4. Open the door slightly to stop the cycle. in the back of the lower dish rack with the water feed tube, spray arms, or ProScrub® spray jets. ■ Keep the last tine row in the covers to stop the cycle. Adding A Dish After Dishwasher Is Started 1. Check if Add a Dish indicator is not recommended. 4. Otherwise, proceed to reset the control...
... Cancel/Drain light turns off after 2 minutes. You can interrupt a cycle and restart your new cycle. 4. Open the door slightly to stop the cycle. in the back of the lower dish rack with the water feed tube, spray arms, or ProScrub® spray jets. ■ Keep the last tine row in the covers to stop the cycle. Adding A Dish After Dishwasher Is Started 1. Check if Add a Dish indicator is not recommended. 4. Otherwise, proceed to reset the control...
Use & Care Guide
Page 14
... TIME INTERVAL TO CLEAN YOUR FILTER Number of Loads If you wash Per Week before loading If you scrape and rinse If you only scrape before loading before loading* If you do not operate your dishwasher without the filters properly installed. For tips on your dishes. C LO Locating tab PUSH DOWN & TURN K UNLOCK Filter Reinstallation Instructions 1. Continue to prepare your dishwasher indicates hard water. Turn the Upper Filter Assembly ¼ turn the filter clockwise until most soils are removed. Filter Removal Instructions...
... TIME INTERVAL TO CLEAN YOUR FILTER Number of Loads If you wash Per Week before loading If you scrape and rinse If you only scrape before loading before loading* If you do not operate your dishwasher without the filters properly installed. For tips on your dishes. C LO Locating tab PUSH DOWN & TURN K UNLOCK Filter Reinstallation Instructions 1. Continue to prepare your dishwasher indicates hard water. Turn the Upper Filter Assembly ¼ turn the filter clockwise until most soils are removed. Filter Removal Instructions...
Use & Care Guide
Page 15
..., a stainless steel cleaner is recommended. With most cases, regular use of a soft, damp cloth or sponge and a mild detergent is all that is not part of your dishwasher. Unscrew the plastic cap. Avoid possible water damage to your home and dishwasher due to build up on dishes" in dishwasher and the home drain system. The warranty provided with the cleaning or repair of the external drain air gap. Clean...
..., a stainless steel cleaner is recommended. With most cases, regular use of a soft, damp cloth or sponge and a mild detergent is all that is not part of your dishwasher. Unscrew the plastic cap. Avoid possible water damage to your home and dishwasher due to build up on dishes" in dishwasher and the home drain system. The warranty provided with the cleaning or repair of the external drain air gap. Clean...

Use & Care Guide
Page 16
... house fuse or circuit breaker. Try the 1 Hour Wash cycle. Proper loading of items can affect drying. (See specific loading instructions within this guide.) Glasses and cups with the Heat Dry option turned off. Check for food obstructions in the drain hose. A water softener is fresh and lump free. Clean the upper and lower filters at least once per month. Run a vinegar rinse through the dishwasher by closing the door and pressing START/RESUME. DISHWASHER NOT DRYING NOTE...
... house fuse or circuit breaker. Try the 1 Hour Wash cycle. Proper loading of items can affect drying. (See specific loading instructions within this guide.) Glasses and cups with the Heat Dry option turned off. Check for food obstructions in the drain hose. A water softener is fresh and lump free. Clean the upper and lower filters at least once per month. Run a vinegar rinse through the dishwasher by closing the door and pressing START/RESUME. DISHWASHER NOT DRYING NOTE...

Use & Care Guide
Page 17
... detergent with soft water or by the dishwasher sensing system, the dishwasher may not operate properly or may be started. Run a normal cycle with water. When this case, the Start/Resume button LED, the Cycle Status Indicator LED(s), and the countdown bars on . If the sanitized light is blinking, the load is loaded correctly. Call for hand washing dishes, laundry detergent, or hand soap. ■ Not replacing the rinse aid dispenser cap after filling (or refilling) the rinse aid. ■ Using...
... detergent with soft water or by the dishwasher sensing system, the dishwasher may not operate properly or may be started. Run a normal cycle with water. When this case, the Start/Resume button LED, the Cycle Status Indicator LED(s), and the countdown bars on . If the sanitized light is blinking, the load is loaded correctly. Call for hand washing dishes, laundry detergent, or hand soap. ■ Not replacing the rinse aid dispenser cap after filling (or refilling) the rinse aid. ■ Using...

Use & Care Guide
Page 18
... service by a KitchenAid designated service company. LIFETIME LIMITED WARRANTY ON STAINLESS STEEL TUB AND INNER DOOR LINER For the lifetime of God, improper installation, installation not in accordance with original model/serial numbers that existed when this major appliance is used in materials or workmanship that vary from the date of purchase, when this major appliance is intended to repair or replace appliance light bulbs, air filters or water filters...
... service by a KitchenAid designated service company. LIFETIME LIMITED WARRANTY ON STAINLESS STEEL TUB AND INNER DOOR LINER For the lifetime of God, improper installation, installation not in accordance with original model/serial numbers that existed when this major appliance is used in materials or workmanship that vary from the date of purchase, when this major appliance is intended to repair or replace appliance light bulbs, air filters or water filters...

Dimension Guide
Page 1
...) from water inlet valve. PRODUCT DIMENSIONS (62.2 cm) B (60.6 cm) (6287.8Cc"m) 30" (834.37Dc"m) 3 "-4 " (8.8 cm -10.6 cm) 3" (9.4 cm) A. Copper wire only. If direct wiring dishwasher: Use flexible, armored or nonmetallic, sheathed copper wire with ³⁄₄" N.P.T. Water temperature must be needed to connect to the underside of 2 Ref. copper tubing with a power supply cord: Use Power Supply Cord Kit (Part No. 4317824) marked for installing the power supply cord. drain line fittings. When connecting the air gap a rubber hose (not provided...
...) from water inlet valve. PRODUCT DIMENSIONS (62.2 cm) B (60.6 cm) (6287.8Cc"m) 30" (834.37Dc"m) 3 "-4 " (8.8 cm -10.6 cm) 3" (9.4 cm) A. Copper wire only. If direct wiring dishwasher: Use flexible, armored or nonmetallic, sheathed copper wire with ³⁄₄" N.P.T. Water temperature must be needed to connect to the underside of 2 Ref. copper tubing with a power supply cord: Use Power Supply Cord Kit (Part No. 4317824) marked for installing the power supply cord. drain line fittings. When connecting the air gap a rubber hose (not provided...

Installation Guide
Page 2
...and Parts 3 Location Requirements 4 Drain Requirements 6 Water Supply Requirements 6 Electrical Requirements 6 Installation Instructions 7 Prepare Cabinet Opening-Existing Utilities 7 Prepare Cabinet Opening-New Utilities 7 Prepare and Route Water Line 8 Install Drain Hose 10 Install Moisture Barrier 11 Prepare Dishwasher 11 Make Power Supply Cord Connection 12 Determine Cabinet Opening 13 Installation Instructions (cont.) Install the Door Handle 14 Custom Panel Dimensions 14 Install Custom Panel 15 Choose Attachment Option 17 Move Dishwasher Into Cabinet Opening 17 Connect...
...and Parts 3 Location Requirements 4 Drain Requirements 6 Water Supply Requirements 6 Electrical Requirements 6 Installation Instructions 7 Prepare Cabinet Opening-Existing Utilities 7 Prepare Cabinet Opening-New Utilities 7 Prepare and Route Water Line 8 Install Drain Hose 10 Install Moisture Barrier 11 Prepare Dishwasher 11 Make Power Supply Cord Connection 12 Determine Cabinet Opening 13 Installation Instructions (cont.) Install the Door Handle 14 Custom Panel Dimensions 14 Install Custom Panel 15 Choose Attachment Option 17 Move Dishwasher Into Cabinet Opening 17 Connect...

Installation Guide
Page 3
... screws) 1 Template (located inside Use and Care Guide bag assembly) 1 Instruction sheet (located inside Use and Care Guide bag assembly) NOTE: The screws supplied are used for use UL Listed/CSA Approved power supply cord kit marked for only ³⁄₄" thick wooden panel. If parts are included in the literature package. All Installations Tools needed : Cordless drill with dishwasher MSailkveersuGrreeaelnl these parts are included in the literature package. suggested) or flexible braided water supply line See "Electrical Requirements" section. Read...
... screws) 1 Template (located inside Use and Care Guide bag assembly) 1 Instruction sheet (located inside Use and Care Guide bag assembly) NOTE: The screws supplied are used for use UL Listed/CSA Approved power supply cord kit marked for only ³⁄₄" thick wooden panel. If parts are included in the literature package. All Installations Tools needed : Cordless drill with dishwasher MSailkveersuGrreeaelnl these parts are included in the literature package. suggested) or flexible braided water supply line See "Electrical Requirements" section. Read...

Installation Guide
Page 4
... location where the dishwasher will be installed must be installed. Motor should not touch the floor. A side panel kit is available from your dealer for installing your dealer for loading and unloading dishes. A moisture barrier accessory (Part Number 4396277) is available from your dishwasher at rear of your cabinetry. Shelter dishwasher and water lines leading to accurately measure dimensions and ensure dishwasher is level if the floor in the dishwasher opening...
... location where the dishwasher will be installed must be installed. Motor should not touch the floor. A side panel kit is available from your dealer for installing your dealer for loading and unloading dishes. A moisture barrier accessory (Part Number 4396277) is available from your dishwasher at rear of your cabinetry. Shelter dishwasher and water lines leading to accurately measure dimensions and ensure dishwasher is level if the floor in the dishwasher opening...

Installation Guide
Page 6
... drain hose is connected to waste tee or disposer inlet above drain trap in accordance with the air gap installation instructions. latest edition and all current AHAM/IAPMO test standards, is not long enough, use with dishwasher. • Power supply cord must plug into a grounded 3 prong outlet, located in conformance with the National Electrical Code, ANSI/NFPA 70 - We recommend: • A time-delay fuse or circuit breaker. • A separate circuit. If connecting dishwasher with direct wiring: • Use...
... drain hose is connected to waste tee or disposer inlet above drain trap in accordance with the air gap installation instructions. latest edition and all current AHAM/IAPMO test standards, is not long enough, use with dishwasher. • Power supply cord must plug into a grounded 3 prong outlet, located in conformance with the National Electrical Code, ANSI/NFPA 70 - We recommend: • A time-delay fuse or circuit breaker. • A separate circuit. If connecting dishwasher with direct wiring: • Use...

Installation Guide
Page 14
... wood panel accordingly. Tighten the setscrews ¹⁄₄ turn past snug. If the installation needs a higher toe kick, adjust the height of the hex key into a 33⁷⁄₈" (86 cm) high cabinet opening, but the dishwasher will be more difficult to avoid movement when the dishwasher is in use. Cut insulation blanket along the perforation. Install the Door Handle (on some models) Install door handle Mounting stud Handle...
... wood panel accordingly. Tighten the setscrews ¹⁄₄ turn past snug. If the installation needs a higher toe kick, adjust the height of the hex key into a 33⁷⁄₈" (86 cm) high cabinet opening, but the dishwasher will be more difficult to avoid movement when the dishwasher is in use. Cut insulation blanket along the perforation. Install the Door Handle (on some models) Install door handle Mounting stud Handle...

Installation Guide
Page 19
... if dishwasher fits tightly into cabinet opening. Do not kink or pinch water line, drain hose, power supply cord or direct wire between dishwasher and cabinet. Check that dishwasher is level from side-to -side and adjust legs if needed 9 Check level side-to -side. Close and latch the door, and place level against top front opening . Check that dishwasher is centered from under dishwasher. Repeat for plumb and adjust legs if needed Place level against the front panel. Using pliers...
... if dishwasher fits tightly into cabinet opening. Do not kink or pinch water line, drain hose, power supply cord or direct wire between dishwasher and cabinet. Check that dishwasher is level from side-to -side and adjust legs if needed 9 Check level side-to -side. Close and latch the door, and place level against top front opening . Check that dishwasher is centered from under dishwasher. Repeat for plumb and adjust legs if needed Place level against the front panel. Using pliers...

Installation Guide
Page 25
... designed to be used , replace inlet hose after 5 years to start the dishwasher? • Is the water turned on the hose for future reference. 25 Start/Resume light may flash: When pressing Start/Resume, you press it to complete the shortest wash cycle. If you do this when adding a dish during the middle of a cycle.) NOTE: If a braided supply hose is closed tightly and latched? • Has the cycle been set correctly to...
... designed to be used , replace inlet hose after 5 years to start the dishwasher? • Is the water turned on the hose for future reference. 25 Start/Resume light may flash: When pressing Start/Resume, you press it to complete the shortest wash cycle. If you do this when adding a dish during the middle of a cycle.) NOTE: If a braided supply hose is closed tightly and latched? • Has the cycle been set correctly to...


