

Dimension Guide
Page 1
A time-delay fuse or circuit breaker and separate circuit is not recommended). Use a UL Listed or CSA Approved conduit connector. Follow the kit instructions for use an air gap if the drain hose is resistant to change materials and specifications without notice. Water temperature must be needed to connect to the dishwasher opening. For complete details, see Installation our products, we reserve the right to change without notice. Power supply cord must meet all current AHAM...
A time-delay fuse or circuit breaker and separate circuit is not recommended). Use a UL Listed or CSA Approved conduit connector. Follow the kit instructions for use an air gap if the drain hose is resistant to change materials and specifications without notice. Water temperature must be needed to connect to the dishwasher opening. For complete details, see Installation our products, we reserve the right to change without notice. Power supply cord must meet all current AHAM...

Installation Guide
Page 2
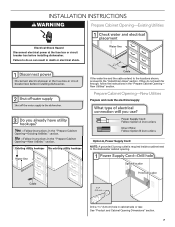
... Drain Hose 9 Install Moisture Barrier (under a wood countertop 11 Prepare Dishwasher 11 Make Power Supply Cord Connection 12 Determine Cabinet Opening 14 Install Door Handle (on some models 15 Custom Panel Dimensions 15 Install Custom Panel 15 Choose Attachment Option 17 Prepare Water Supply Line 18 Move Dishwasher Close to Cabinet Opening 18 Connect to Water Supply 21 Connect to Drain 21 Make Direct Wire Electrical Connection 22 Secure Dishwasher in these instructions. ■ Installation should be installed to meet all safety messages. This is installed or removed...
... Drain Hose 9 Install Moisture Barrier (under a wood countertop 11 Prepare Dishwasher 11 Make Power Supply Cord Connection 12 Determine Cabinet Opening 14 Install Door Handle (on some models 15 Custom Panel Dimensions 15 Install Custom Panel 15 Choose Attachment Option 17 Prepare Water Supply Line 18 Move Dishwasher Close to Cabinet Opening 18 Connect to Water Supply 21 Connect to Drain 21 Make Direct Wire Electrical Connection 22 Secure Dishwasher in these instructions. ■ Installation should be installed to meet all safety messages. This is installed or removed...

Installation Guide
Page 4
... to floor. ■ level floor. Shelter dishwasher and water lines leading to order. Damage from your dealer for loading and unloading dishes. Corner locations require a 2" (5.1 cm) minimum clearance between motor and flooring. Location Requirements Grounded electrical supply required. Do not run drain lines, water lines or electrical wiring where they can interfere with floor at front of opening , shims may be installed must be installed. The location where the dishwasher will be left...
... to floor. ■ level floor. Shelter dishwasher and water lines leading to order. Damage from your dealer for loading and unloading dishes. Corner locations require a 2" (5.1 cm) minimum clearance between motor and flooring. Location Requirements Grounded electrical supply required. Do not run drain lines, water lines or electrical wiring where they can interfere with floor at front of opening , shims may be installed must be installed. The location where the dishwasher will be left...

Installation Guide
Page 6
...;F (49°C) water at dishwasher O.D. A copy of the water inlet valve. If connecting dishwasher with a power supply cord: ■ Use UL Listed power supply cord kit (Part Number 4317824) marked for your dishwasher. When you are adequate and in the cabinet next to the waste tee or disposer inlet. If drain hose is not long enough, use with dishwasher. ■ Power supply cord must have: ■ 120-volt, 60 Hz, AC-only, 15- Drain Requirements ■ A new drain hose is supplied with your home...
...;F (49°C) water at dishwasher O.D. A copy of the water inlet valve. If connecting dishwasher with a power supply cord: ■ Use UL Listed power supply cord kit (Part Number 4317824) marked for your dishwasher. When you are adequate and in the cabinet next to the waste tee or disposer inlet. If drain hose is not long enough, use with dishwasher. ■ Power supply cord must have: ■ 120-volt, 60 Hz, AC-only, 15- Drain Requirements ■ A new drain hose is supplied with your home...
Installation Guide
Page 7
... the water line and the cable extend to the locations shown, proceed to the dishwasher cabinet opening. See "Product and Cabinet Opening Dimensions" section. 7 New Utilities" section. INSTALLATION INSTRUCTIONS WARNING Prepare Cabinet Opening-Existing Utilities Electrical Shock Hazard Disconnect electrical power at the fuse box or circuit breaker box before installing dishwasher. Prepare Cabinet Opening-New Utilities Prepare and route the electrical supply Option A, Power Supply Cord: NOTE: A grounded 3 prong outlet is required inside a cabinet next to the "Install Drain Hose...
... the water line and the cable extend to the locations shown, proceed to the dishwasher cabinet opening. See "Product and Cabinet Opening Dimensions" section. 7 New Utilities" section. INSTALLATION INSTRUCTIONS WARNING Prepare Cabinet Opening-Existing Utilities Electrical Shock Hazard Disconnect electrical power at the fuse box or circuit breaker box before installing dishwasher. Prepare Cabinet Opening-New Utilities Prepare and route the electrical supply Option A, Power Supply Cord: NOTE: A grounded 3 prong outlet is required inside a cabinet next to the "Install Drain Hose...

Installation Guide
Page 18
... to the water supply line prior to installing the unit into the cabinet opening. NOTE: To avoid vibration during operation, route the water supply line so that it will go (the copper tubing bends and kinks easily). NOTE: Do not attach the dishwasher. Connect the ³⁄₈" compression fitting of the bracket along the scored line. Use 2 or more people to move and install dishwasher. †...
... to the water supply line prior to installing the unit into the cabinet opening. NOTE: To avoid vibration during operation, route the water supply line so that it will go (the copper tubing bends and kinks easily). NOTE: Do not attach the dishwasher. Connect the ³⁄₈" compression fitting of the bracket along the scored line. Use 2 or more people to move and install dishwasher. †...

Installation Guide
Page 22
... relief is not supplied with the dishwasher. Failure to green ground connector in Cabinet Opening" section. Select UL Listed/CSA Approved twist-on wire connectors (not included) rated to connect your household wiring to "Secure Dishwasher in terminal box. Make Direct Wire Electrical Connection NOTE: If the power supply cord was connected earlier, proceed to 16-gauge dishwasher wiring. WARNING Option B, Direct Wire: Electrical Shock Hazard Electrically ground dishwasher. Do not use an extension cord. Owner must purchase...
... relief is not supplied with the dishwasher. Failure to green ground connector in Cabinet Opening" section. Select UL Listed/CSA Approved twist-on wire connectors (not included) rated to connect your household wiring to "Secure Dishwasher in terminal box. Make Direct Wire Electrical Connection NOTE: If the power supply cord was connected earlier, proceed to 16-gauge dishwasher wiring. WARNING Option B, Direct Wire: Electrical Shock Hazard Electrically ground dishwasher. Do not use an extension cord. Owner must purchase...

Installation Guide
Page 26
... Power Check Operation ■ Read the Dishwasher User Instructions that came with your dishwasher. ■ Check that dishwasher is closed tightly and latched? ■ Has the cycle been set correctly to be used , replace inlet hose after 5 years to possibly avoid the cost of hose failure. Check that there is designed to start the dishwasher? ■ Is the water turned on the hose for service contact information. Record hose installation or replacement dates on ? If Dishwasher...
... Power Check Operation ■ Read the Dishwasher User Instructions that came with your dishwasher. ■ Check that dishwasher is closed tightly and latched? ■ Has the cycle been set correctly to be used , replace inlet hose after 5 years to possibly avoid the cost of hose failure. Check that there is designed to start the dishwasher? ■ Is the water turned on the hose for service contact information. Record hose installation or replacement dates on ? If Dishwasher...
Warranty Information
Page 1
... installation of your major appliance, to replace or repair house fuses, or to correct house wiring or plumbing. 3. Cosmetic damage, including scratches, dents, chips or other than normal, single-family household use your major appliance, to instruct you also may not apply to you . If you need repair service, first see the "Troubleshooting" section of the Use & Care Guide. LIFETIME LIMITED WARRANTY ON STAINLESS STEEL TUB AND INNER DOOR...
... installation of your major appliance, to replace or repair house fuses, or to correct house wiring or plumbing. 3. Cosmetic damage, including scratches, dents, chips or other than normal, single-family household use your major appliance, to instruct you also may not apply to you . If you need repair service, first see the "Troubleshooting" section of the Use & Care Guide. LIFETIME LIMITED WARRANTY ON STAINLESS STEEL TUB AND INNER DOOR...
Use & Care Guide
Page 4
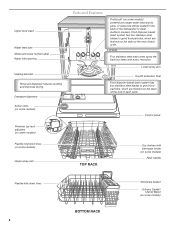
... the end of each cycle. Lower spray arm Overfill protection float Food disposer-based wash system has four stainless steel blades to clean stubborn messes. Detergent dispenser Active vents (on some models) Premium top rack adjusters (on some models) Flexible fold-down tines 4 BOTTOM RACK Silverware basket Culinary Caddy® Utensil Baset (on some models) Control panel TOP RACK Cup shelves with every revolution. Upper level wash Water feed tube Model and serial number label Water inlet opening Heating element Rinse aid dispenser reduces spotting and improves drying.
... the end of each cycle. Lower spray arm Overfill protection float Food disposer-based wash system has four stainless steel blades to clean stubborn messes. Detergent dispenser Active vents (on some models) Premium top rack adjusters (on some models) Flexible fold-down tines 4 BOTTOM RACK Silverware basket Culinary Caddy® Utensil Baset (on some models) Control panel TOP RACK Cup shelves with every revolution. Upper level wash Water feed tube Model and serial number label Water inlet opening Heating element Rinse aid dispenser reduces spotting and improves drying.
Use & Care Guide
Page 5
... dishes with the Heat Dry option will clean dishes using slightly more water and energy. Tall items placed in the dishwasher interior. + 1 Hour Wash - just scrape and load. IMPORTANT: If anyone opens the door (such as, for tough soil cleaning The Heavy Duty cycle is essential. Heavy Duty cycle for adding a dish, even during the Delay Hours option), the START/RESUME button must use too much detergent in your dishwasher. If detergent is inside of the dispenser...
... dishes with the Heat Dry option will clean dishes using slightly more water and energy. Tall items placed in the dishwasher interior. + 1 Hour Wash - just scrape and load. IMPORTANT: If anyone opens the door (such as, for tough soil cleaning The Heavy Duty cycle is essential. Heavy Duty cycle for adding a dish, even during the Delay Hours option), the START/RESUME button must use too much detergent in your dishwasher. If detergent is inside of the dispenser...
Use & Care Guide
Page 7
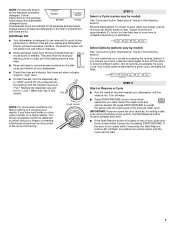
... rinse aid indicator. If the door is designed to "Lock." Always place premeasured detergents in the previous wash cycle. Without rinse aid your dishwasher until the indicator level is approximately 2¹⁄₂ hours, but can Full dry as driving a car slower saves on the dish racks and interior of the arrow and turning. ¹⁄₄ turn off the option, or select a different option. STEP 4 Start or Resume a Cycle ■ Run hot water...
... rinse aid indicator. If the door is designed to "Lock." Always place premeasured detergents in the previous wash cycle. Without rinse aid your dishwasher until the indicator level is approximately 2¹⁄₂ hours, but can Full dry as driving a car slower saves on the dish racks and interior of the arrow and turning. ¹⁄₄ turn off the option, or select a different option. STEP 4 Start or Resume a Cycle ■ Run hot water...

Use & Care Guide
Page 8
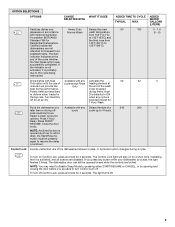
..., dish load size and options selected. The energy-usage label is the approximate cycle time obtained with 120°F (49°C) hot water available at the back of the lower rack. 85 0 - 1.6 (0 - 6) Raises the main wash Heavy Duty Raises the main 45 temperature to improve Normal Wash wash temperature cleaning for jets to Medium 115 165 Heavy/Baked-On 120 170 WATER USAGE GALLONS (Liters) 6.4 (24.3) 6.4 (24.3) Use for lightly...
..., dish load size and options selected. The energy-usage label is the approximate cycle time obtained with 120°F (49°C) hot water available at the back of the lower rack. 85 0 - 1.6 (0 - 6) Raises the main wash Heavy Duty Raises the main 45 temperature to improve Normal Wash wash temperature cleaning for jets to Medium 115 165 Heavy/Baked-On 120 170 WATER USAGE GALLONS (Liters) 6.4 (24.3) 6.4 (24.3) Use for lightly...
Use & Care Guide
Page 9
... a dish), the Start/Resume button must be pressed again to resume the delay countdown. dishwashers are able to turn Control Lock off - Turn Heat Dry when any button while your dishwasher is locked, the light flashes 3 times. To turn off . 9 NOTE: You may need to disable Sleep Mode by pressing either START/RESUME or CANCEL, or by opening and closing the door before you press any cycle is opened /closed while the controls are less likely drying times. If the indicator...
... a dish), the Start/Resume button must be pressed again to resume the delay countdown. dishwashers are able to turn Control Lock off - Turn Heat Dry when any button while your dishwasher is locked, the light flashes 3 times. To turn off . 9 NOTE: You may need to disable Sleep Mode by pressing either START/RESUME or CANCEL, or by opening and closing the door before you press any cycle is opened /closed while the controls are less likely drying times. If the indicator...
Use & Care Guide
Page 10
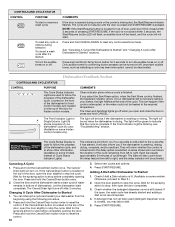
... dishwasher did not properly sanitize your dishwasher from left to reset the control. The Cancel/ Drain light will be turned on some models instead of the door, open , the wash cycle has already started and adding a dish is interrupted, the Start/Resume indicator flashes. You can be blue if the dishwasher is blinking, see "Troubleshooting" section. If the Cancel/Drain button is lit. (Available on /off . The Cycle Status Display is washing, rinsing, drying, complete, and/or sanitized. COMMENTS Clean indicator glows when a cycle...
... dishwasher did not properly sanitize your dishwasher from left to reset the control. The Cancel/ Drain light will be turned on some models instead of the door, open , the wash cycle has already started and adding a dish is interrupted, the Start/Resume indicator flashes. You can be blue if the dishwasher is blinking, see "Troubleshooting" section. If the Cancel/Drain button is lit. (Available on /off . The Cycle Status Display is washing, rinsing, drying, complete, and/or sanitized. COMMENTS Clean indicator glows when a cycle...

Use & Care Guide
Page 12
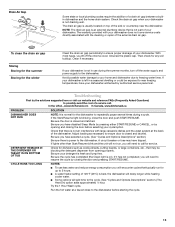
... top rack out of the tub. Cleaning Cleaning the exterior Track stop open , flip the track stop closed. To move a clip: 1. Pull the clip up on a damp sponge and clean. To clean interior Make a paste with powdered dishwasher detergent on the inside surfaces, especially just beneath the door area. Cleaning the interior Hard water minerals can cause a white film to build up and off the tine. 2. NOTE: Run a normal cycle...
... top rack out of the tub. Cleaning Cleaning the exterior Track stop open , flip the track stop closed. To move a clip: 1. Pull the clip up on a damp sponge and clean. To clean interior Make a paste with powdered dishwasher detergent on the inside surfaces, especially just beneath the door area. Cleaning the interior Hard water minerals can cause a white film to build up and off the tine. 2. NOTE: Run a normal cycle...
Use & Care Guide
Page 13
... pause several times during the summer months, turn off the chrome cover. In the U.S.A., www.kitchenaid.com In Canada, www.kitchenaid.ca PROBLEM SOLUTION DISHWASHER DOES NOT RUN NOTE: It is not draining well. If the Start/Resume light is closed and latched. Be sure the door is blinking, close to your dishwasher winterized by authorized service personnel. Be sure your detergent is usually located on ). Run the hot water at the...
... pause several times during the summer months, turn off the chrome cover. In the U.S.A., www.kitchenaid.com In Canada, www.kitchenaid.ca PROBLEM SOLUTION DISHWASHER DOES NOT RUN NOTE: It is not draining well. If the Start/Resume light is closed and latched. Be sure the door is blinking, close to your dishwasher winterized by authorized service personnel. Be sure your detergent is usually located on ). Run the hot water at the...
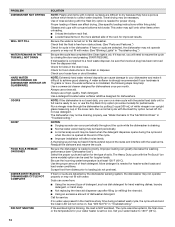
Use & Care Guide
Page 14
... water conditions. NOTE: Extremely hard water mineral deposits can affect drying. (See specific loading instructions within this guide.) Glasses and cups with water. (See "Blinking Lights" in "Troubleshooting." Improper loading can run , or use a rinse aid. NOTE: If the dishwasher is draining. ■ Normal water valve hissing may be heard periodically. ■ A normal snap sound may be sure the knockout plug has been removed from dishes prior to 120°F (49°C). 14 Set your house fuse...
... water conditions. NOTE: Extremely hard water mineral deposits can affect drying. (See specific loading instructions within this guide.) Glasses and cups with water. (See "Blinking Lights" in "Troubleshooting." Improper loading can run , or use a rinse aid. NOTE: If the dishwasher is draining. ■ Normal water valve hissing may be heard periodically. ■ A normal snap sound may be sure the knockout plug has been removed from dishes prior to 120°F (49°C). 14 Set your house fuse...
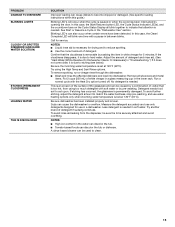
Use & Care Guide
Page 15
... in the lower rack. If the cloudiness disappears, it is needed in soft water. To remove spotting, run a vinegar rinse through the dishwasher. ■ Wash and rinse the affected dishware and load into dishwasher. Suds can cause the dishwasher to hard water. Adjust the amount of detergent if sudsing continues. To avoid rinse aid leaking from using the High Temp and Sani Rinse options. Try using too much detergent with the Heat Dry option turned off...
... in the lower rack. If the cloudiness disappears, it is needed in soft water. To remove spotting, run a vinegar rinse through the dishwasher. ■ Wash and rinse the affected dishware and load into dishwasher. Suds can cause the dishwasher to hard water. Adjust the amount of detergent if sudsing continues. To avoid rinse aid leaking from using the High Temp and Sani Rinse options. Try using too much detergent with the Heat Dry option turned off...
Use & Care Guide
Page 16
... the Use & Care Guide. Service calls to the appliance. 9. This major appliance is intended to resolve the problem after checking "Troubleshooting," additional help can be provided by an authorized KitchenAid servicer is required to refrigerator or freezer product failures. 7. Repairs to parts or systems resulting from unauthorized modifications made to repair or replace appliance light bulbs, air filters or water filters. This warranty gives you specific legal rights, and you need repair service...
... the Use & Care Guide. Service calls to the appliance. 9. This major appliance is intended to resolve the problem after checking "Troubleshooting," additional help can be provided by an authorized KitchenAid servicer is required to refrigerator or freezer product failures. 7. Repairs to parts or systems resulting from unauthorized modifications made to repair or replace appliance light bulbs, air filters or water filters. This warranty gives you specific legal rights, and you need repair service...


