
Use & Care Guide
Page 2
... for its intended function. ■ Use only detergents or rinse agents recommended for use . ■ Do not operate the dishwasher unless all enclosure panels are not likely to play in a risk of least resistance for several minutes. Doing so can result in or on all ... outlet, have a proper outlet installed by providing a path of electric shock. and 2) Load sharp knives with all local codes and ordinances. In the event of a malfunction or breakdown, grounding will reduce the risk of injury, do not smoke or use an open dishwasher drawer until inside cabinet opening. WARNING:...
... for its intended function. ■ Use only detergents or rinse agents recommended for use . ■ Do not operate the dishwasher unless all enclosure panels are not likely to play in a risk of least resistance for several minutes. Doing so can result in or on all ... outlet, have a proper outlet installed by providing a path of electric shock. and 2) Load sharp knives with all local codes and ordinances. In the event of a malfunction or breakdown, grounding will reduce the risk of injury, do not smoke or use an open dishwasher drawer until inside cabinet opening. WARNING:...
Use & Care Guide
Page 7
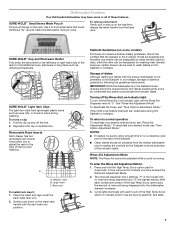
...release the insert handle from the drawer dishwasher prior to setting the controls for the Sabbath to hold small items that the drawers in the 2-drawer model are washing. To remove rack insert: Gently pull in the disabled mode, drawers should be adjusted while a cycle is not permitted on the ..."3" the highest setting. Pull the clip up on the rack. C A. Base rack To install rack insert: 1. Place the insert end legs under the back base rack wire. 2. IMPORTANT: While the dishwasher is in and up and off the Rinse Aid Low indicator light, set , deactivate during ...
...release the insert handle from the drawer dishwasher prior to setting the controls for the Sabbath to hold small items that the drawers in the 2-drawer model are washing. To remove rack insert: Gently pull in the disabled mode, drawers should be adjusted while a cycle is not permitted on the ..."3" the highest setting. Pull the clip up on the rack. C A. Base rack To install rack insert: 1. Place the insert end legs under the back base rack wire. 2. IMPORTANT: While the dishwasher is in and up and off the Rinse Aid Low indicator light, set , deactivate during ...
Use & Care Guide
Page 8
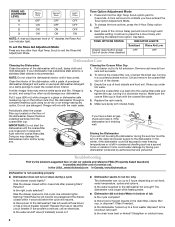
...saving dry option. In the U.S.A., www.kitchenaid.com In Canada, www.kitchenaid.ca Dishwasher is an acid, and using it has cooled. The dishwasher runs longer while heating water. ■ Dishwasher did not drain/Water in a clockwise motion...cycle using the dishwasher during a cycle Is the drawer closed within 4 seconds before the cycle will need to the dishwasher. Is the right cycle selected? Replace the fuse or reset the circuit breaker. Is the water supplied to 3 hours depending on a damp sponge to its full extension. Is the water shutoff valve (if installed...
...saving dry option. In the U.S.A., www.kitchenaid.com In Canada, www.kitchenaid.ca Dishwasher is an acid, and using it has cooled. The dishwasher runs longer while heating water. ■ Dishwasher did not drain/Water in a clockwise motion...cycle using the dishwasher during a cycle Is the drawer closed within 4 seconds before the cycle will need to the dishwasher. Is the right cycle selected? Replace the fuse or reset the circuit breaker. Is the water supplied to 3 hours depending on a damp sponge to its full extension. Is the water shutoff valve (if installed...

Use & Care Guide
Page 9
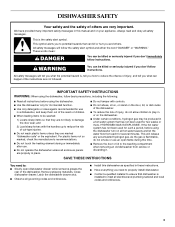
... mL) of tomato-based foods on dishes Are aluminum items rubbing dishes during a cycle? See "Installation Instructions." Did you choose the cycle that describes the most difficult soil in your dishwasher? If you select the High Temp Scrub option and allow the dry fan to use...china and glassware might not be effective. Does the drawer have a full load. Spots and stains on dishes ■ Spotting and filming on cookware with nonstick finish Has the dishwasher detergent removed cookware seasoning? Use recommended dishwasher detergents only. etching is a cloudy film) Sometimes ...
... mL) of tomato-based foods on dishes Are aluminum items rubbing dishes during a cycle? See "Installation Instructions." Did you choose the cycle that describes the most difficult soil in your dishwasher? If you select the High Temp Scrub option and allow the dry fan to use...china and glassware might not be effective. Does the drawer have a full load. Spots and stains on dishes ■ Spotting and filming on cookware with nonstick finish Has the dishwasher detergent removed cookware seasoning? Use recommended dishwasher detergents only. etching is a cloudy film) Sometimes ...

Use & Care Guide
Page 10
KITCHENAID® DISHWASHER WARRANTY TWO YEAR LIMITED WARRANTY For two years from the date of KitchenAid, U.S.A., KitchenAid Canada licensee in Canada 6/08 Printed in U.S.A. Service calls to the appliance. 8. Repairs to parts or systems resulting from warranty coverage. 3. Replacement parts or repair labor costs when the major appliance is designed to correct the installation of your...
KITCHENAID® DISHWASHER WARRANTY TWO YEAR LIMITED WARRANTY For two years from the date of KitchenAid, U.S.A., KitchenAid Canada licensee in Canada 6/08 Printed in U.S.A. Service calls to the appliance. 8. Repairs to parts or systems resulting from warranty coverage. 3. Replacement parts or repair labor costs when the major appliance is designed to correct the installation of your...
Installation Guide
Page 3
... you what the potential hazard is installed to meet all enclosure panels are not likely to damage the door seal; This symbol alerts you what can be killed or seriously injured if you how to reduce the risk of the dishwasher. All safety messages will tell you... do not smoke or use . ■ Do not operate the dishwasher unless all electrical and plumbing national and local codes and ordinances. 3 Latch the dishwasher drawer shut. ■ Observe all governing codes and ordinances. ■ Install this dishwasher as specified in this time. ■ Remove the door or lid...
... you what the potential hazard is installed to meet all enclosure panels are not likely to damage the door seal; This symbol alerts you what can be killed or seriously injured if you how to reduce the risk of the dishwasher. All safety messages will tell you... do not smoke or use . ■ Do not operate the dishwasher unless all electrical and plumbing national and local codes and ordinances. 3 Latch the dishwasher drawer shut. ■ Observe all governing codes and ordinances. ■ Install this dishwasher as specified in this time. ■ Remove the door or lid...

Installation Guide
Page 4
... bit ■ Security T-20 TORX®† driver (if installing custom front panels) Parts needed Parts Supplied Check that the dishwasher is a registered trademark of Textron Innovations Inc. 4 A C D F B E H G A B I . 2 panel fasteners (on some models) J. 10 TORX®† screws ...use . †®TORX is installed to meet codes and ordinances could lead to dishwasher against freezing. Zip tie C. 2 appropriate sized UL listed wire connectors D. Hardware (if installing custom front panels) E. Overlay panel (if installing custom front panels) A. ³⁄₄" UL...
... bit ■ Security T-20 TORX®† driver (if installing custom front panels) Parts needed Parts Supplied Check that the dishwasher is a registered trademark of Textron Innovations Inc. 4 A C D F B E H G A B I . 2 panel fasteners (on some models) J. 10 TORX®† screws ...use . †®TORX is installed to meet codes and ordinances could lead to dishwasher against freezing. Zip tie C. 2 appropriate sized UL listed wire connectors D. Hardware (if installing custom front panels) E. Overlay panel (if installing custom front panels) A. ³⁄₄" UL...

Installation Guide
Page 5
...malfunction or breakdown, grounding will not fit the outlet, have a proper outlet installed by providing a path of electric shock by a qualified electrician. ■ For a permanently connected dishwasher: The dishwasher must be connected to a grounded metal, permanent wiring system, or an ...Hazard Plug into an appropriate outlet that the electrical installation is installed and grounded in accordance with the dishwasher; Do not use an extension cord. GROUNDING INSTRUCTIONS ■ For a grounded, cord-connected dishwasher: The dishwasher must be drilled at 1½" (3.8 cm) ...
...malfunction or breakdown, grounding will not fit the outlet, have a proper outlet installed by providing a path of electric shock by a qualified electrician. ■ For a permanently connected dishwasher: The dishwasher must be connected to a grounded metal, permanent wiring system, or an ...Hazard Plug into an appropriate outlet that the electrical installation is installed and grounded in accordance with the dishwasher; Do not use an extension cord. GROUNDING INSTRUCTIONS ■ For a grounded, cord-connected dishwasher: The dishwasher must be drilled at 1½" (3.8 cm) ...

Installation Guide
Page 6
... electrical power at dishwasher. ■ Flexible stainless steel braided fill line (½" minimum plastic tubing is not recommended). Failure to do so can result in the cabinet next to the house wiring junction box. Disconnect power. 2. Unpack Dish Drawer WARNING Excessive Weight Hazard Use two or more people to install a garbage disposer, an...
... electrical power at dishwasher. ■ Flexible stainless steel braided fill line (½" minimum plastic tubing is not recommended). Failure to do so can result in the cabinet next to the house wiring junction box. Disconnect power. 2. Unpack Dish Drawer WARNING Excessive Weight Hazard Use two or more people to install a garbage disposer, an...
Installation Guide
Page 7
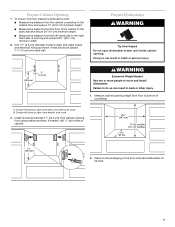
... Over Hazard Do not open dishwasher drawer until inside cabinet opening floor using screws provided. Failure to do so can result in death or serious injury. 8" (20.3 cm) ¹⁄₂" (1.3 cm) WARNING Excessive Weight Hazard Use two or more people to move and install dishwasher. A. If needed, drill ...;₂" (47 cm) Max. 24" (61 cm) 17" (43.2 cm) 2. B. Choose left -hand or right-hand drain and water hose route. Install mounting brackets 17" (43.2 cm) from back wall. Drill 1½" (3.8 cm) diameter holes for drain and water hoses and electrical wiring as shown. Choose ...
... Over Hazard Do not open dishwasher drawer until inside cabinet opening floor using screws provided. Failure to do so can result in death or serious injury. 8" (20.3 cm) ¹⁄₂" (1.3 cm) WARNING Excessive Weight Hazard Use two or more people to move and install dishwasher. A. If needed, drill ...;₂" (47 cm) Max. 24" (61 cm) 17" (43.2 cm) 2. B. Choose left -hand or right-hand drain and water hose route. Install mounting brackets 17" (43.2 cm) from back wall. Drill 1½" (3.8 cm) diameter holes for drain and water hoses and electrical wiring as shown. Choose ...

Installation Guide
Page 8
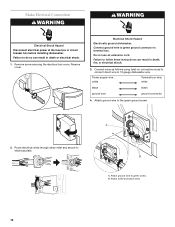
.... Option 2: Left-hand side utility route Route Electrical Wiring WARNING Electrical Shock Hazard Disconnect electrical power at the fuse box or circuit breaker box before installing dishwasher. After routing the electrical wire through 1½" (3.81 cm) hole located 8" (20.32 cm) above the floor. 3. Failure to do so can result in upright...
.... Option 2: Left-hand side utility route Route Electrical Wiring WARNING Electrical Shock Hazard Disconnect electrical power at the fuse box or circuit breaker box before installing dishwasher. After routing the electrical wire through 1½" (3.81 cm) hole located 8" (20.32 cm) above the floor. 3. Failure to do so can result in upright...
Installation Guide
Page 10
Electrical Shock Hazard Electrically ground dishwasher. Route electrical wires through strain relief and secure to green screw. A B A. Remove screw securing the electrical box cover. Connect ground wire to green ground connector ... to the green ground screw. 2. B. Make Electrical Connection WARNING WARNING Electrical Shock Hazard Disconnect electrical power at the fuse box or circuit breaker box before installing dishwasher. Do not use an extension cord. Attach ground wire to 16 gauge...
Electrical Shock Hazard Electrically ground dishwasher. Route electrical wires through strain relief and secure to green screw. A B A. Remove screw securing the electrical box cover. Connect ground wire to green ground connector ... to the green ground screw. 2. B. Make Electrical Connection WARNING WARNING Electrical Shock Hazard Disconnect electrical power at the fuse box or circuit breaker box before installing dishwasher. Do not use an extension cord. Attach ground wire to 16 gauge...
Installation Guide
Page 12
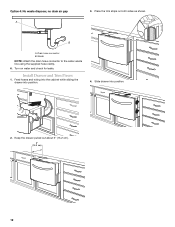
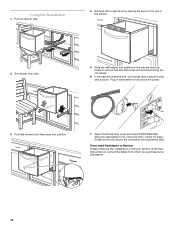
Drain hose connector B. Install Drawer and Trim Pieces 1. Slide drawer into position. 4. Feed hoses and wiring into the cabinet while sliding the drawer into position. 2. Waste NOTE: Attach the drain hose connector to the water waste line using the supplied hose clamp. 6. B A. Turn on both sides as shown. Keep the drawer pulled out about 6" (15.2 cm). 6" (15.2 cm) 12 Place the trim strips on water and check for leaks. Option 4: No waste disposer, no drain air gap A 3.
Drain hose connector B. Install Drawer and Trim Pieces 1. Slide drawer into position. 4. Feed hoses and wiring into the cabinet while sliding the drawer into position. 2. Waste NOTE: Attach the drain hose connector to the water waste line using the supplied hose clamp. 6. B A. Turn on both sides as shown. Keep the drawer pulled out about 6" (15.2 cm). 6" (15.2 cm) 12 Place the trim strips on water and check for leaks. Option 4: No waste disposer, no drain air gap A 3.
Installation Guide
Page 13
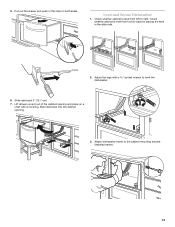
Check whether cabinet is level from left to back by placing the level in the clips on a chair with a socket wrench to the cabinet mounting bracket (installed earlier). 13 Check whether cabinet is level from front to right. Slide rails back 5" (12.7 cm). 7. Pull out the drawer and push in the slide rails. 2. Slide rails back into the cabinet opening and place on both sides. Lift drawer up and out of the cabinet opening . 3. 5. Adjust the legs with a covering. Level and Secure Dishwasher 1. Attach dishwasher frame to level the dishwasher. 6.
Check whether cabinet is level from left to back by placing the level in the clips on a chair with a socket wrench to the cabinet mounting bracket (installed earlier). 13 Check whether cabinet is level from front to right. Slide rails back 5" (12.7 cm). 7. Pull out the drawer and push in the slide rails. 2. Slide rails back into the cabinet opening and place on both sides. Lift drawer up and out of the cabinet opening . 3. 5. Adjust the legs with a covering. Level and Secure Dishwasher 1. Attach dishwasher frame to level the dishwasher. 6.
Installation Guide
Page 14
... In the cabinet under the sink, coil excess drain hose and wrap with a zip tie. Select the Rinse Only cycle and press START/RESUME. Complete Installation 1. Allow the dishwasher to ensure that the drain hose and electrical wiring are found, secure the connection and repeat this step. If leaks are not kinked. 6. ... of the User Instructions or contact the dealer from whom you need Assistance or Service: Please reference the "Assistance or Service" section of the drawer. 2. ON OFF ON OFF OFF 7. Plug in the cabinet opening. Check to fill, rinse and drain. Set...
... In the cabinet under the sink, coil excess drain hose and wrap with a zip tie. Select the Rinse Only cycle and press START/RESUME. Complete Installation 1. Allow the dishwasher to ensure that the drain hose and electrical wiring are found, secure the connection and repeat this step. If leaks are not kinked. 6. ... of the User Instructions or contact the dealer from whom you need Assistance or Service: Please reference the "Assistance or Service" section of the drawer. 2. ON OFF ON OFF OFF 7. Plug in the cabinet opening. Check to fill, rinse and drain. Set...

Installation Guide
Page 15
... be sure that exceed the height dimension may damage the drawer dishwasher, cabinets or countertop. ■ The width of the overlay panel may vary according to ³⁄₄" (19.05 mm). ■ Do not exceed the height dimension for the overlay panel(s). When installing the hardware, be ¹⁄₂" (12.7 mm) to the...
... be sure that exceed the height dimension may damage the drawer dishwasher, cabinets or countertop. ■ The width of the overlay panel may vary according to ³⁄₄" (19.05 mm). ■ Do not exceed the height dimension for the overlay panel(s). When installing the hardware, be ¹⁄₂" (12.7 mm) to the...

Installation Guide
Page 16
...panel onto the drawer, push the overlay panel down until the top of the overlay panel is flush with the top of the inner door. 2. Using the screws provided, secure the overlay panel to the two keyhole slots and insert the panel. 16 Install Panel Fasteners 1. Mount the overlay panel to the drawer by aligning the panel... fasteners to the inner door by screwing through the inner door and into the panel fastener pilot holes of...
...panel onto the drawer, push the overlay panel down until the top of the overlay panel is flush with the top of the inner door. 2. Using the screws provided, secure the overlay panel to the two keyhole slots and insert the panel. 16 Install Panel Fasteners 1. Mount the overlay panel to the drawer by aligning the panel... fasteners to the inner door by screwing through the inner door and into the panel fastener pilot holes of...

Parts Diagram
Page 1
No. DESCRIPTION 1 Literature Parts W10155577 Instructions, Installation W10208033 Energy Guide 2 Control Panel (Includes User Interface) W10117977 Black 3 W10117987 Intermediate Panel 4 W10117969 Harness, User Interface 5 Y912620 Screw 1 Part No. W10312182 Rev. FRONT PANEL PARTS For Model: KUDD03STPA2 (Panel−Ready) DRAWER DISHWASHER Illus. A Part No.
No. DESCRIPTION 1 Literature Parts W10155577 Instructions, Installation W10208033 Energy Guide 2 Control Panel (Includes User Interface) W10117977 Black 3 W10117987 Intermediate Panel 4 W10117969 Harness, User Interface 5 Y912620 Screw 1 Part No. W10312182 Rev. FRONT PANEL PARTS For Model: KUDD03STPA2 (Panel−Ready) DRAWER DISHWASHER Illus. A Part No.


