
Use & Care Guide
Page 10
... product information or to schedule service, you can find your complete model and serial number ready. Please keep this User Instructions and model number information for units operated outside the United ...costs when the major appliance is operated and maintained according to instructions attached to be provided by KitchenAid. 5. KITCHENAID® DISHWASHER WARRANTY TWO YEAR LIMITED WARRANTY For two years from the date of...and serial number on the label located on the left hand side of the upper drawer. If you need assistance using your major appliance is used in a country other ...
... product information or to schedule service, you can find your complete model and serial number ready. Please keep this User Instructions and model number information for units operated outside the United ...costs when the major appliance is operated and maintained according to instructions attached to be provided by KitchenAid. 5. KITCHENAID® DISHWASHER WARRANTY TWO YEAR LIMITED WARRANTY For two years from the date of...and serial number on the label located on the left hand side of the upper drawer. If you need assistance using your major appliance is used in a country other ...

Installation Guide
Page 8
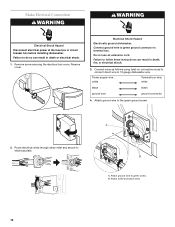
Route wire through the right-hand hole, attach the wire to back left-hand side...Route Electrical Wiring WARNING Electrical Shock Hazard Disconnect electrical power at the fuse box or circuit breaker box before installing dishwasher. Option 1: Right-hand side utility route X H 17" (43.2 cm) 17¹⁄₈" ... cm) :1¹⁄₄" (3.2 cm) :1³⁄₈" (3.5 cm) :1¹⁄₂" (3.8 cm) 4. 3. Place dishwasher in death or electrical shock. Follow all national and local codes and ordinances for completing electrical supply to do so can result in upright ...
Route wire through the right-hand hole, attach the wire to back left-hand side...Route Electrical Wiring WARNING Electrical Shock Hazard Disconnect electrical power at the fuse box or circuit breaker box before installing dishwasher. Option 1: Right-hand side utility route X H 17" (43.2 cm) 17¹⁄₈" ... cm) :1¹⁄₄" (3.2 cm) :1³⁄₈" (3.5 cm) :1¹⁄₂" (3.8 cm) 4. 3. Place dishwasher in death or electrical shock. Follow all national and local codes and ordinances for completing electrical supply to do so can result in upright ...
Installation Guide
Page 10
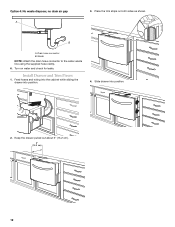
... 10 Remove cover. Route electrical wires through strain relief and secure to green screw. Electrical Shock Hazard Electrically ground dishwasher. Do not use an extension cord. Attach ground wire to electrical plate. A B A. Failure to follow these instructions can result in death or electrical shock....1. Connect wires as follows using twist-on connectors sized to connect direct wire to the green ground screw. 2. Attach ground wire to 16 gauge dishwasher wire. B. Connect ground wire to do so can result in terminal box. Failure to green ground connector in death...
... 10 Remove cover. Route electrical wires through strain relief and secure to green screw. Electrical Shock Hazard Electrically ground dishwasher. Do not use an extension cord. Attach ground wire to electrical plate. A B A. Failure to follow these instructions can result in death or electrical shock....1. Connect wires as follows using twist-on connectors sized to connect direct wire to the green ground screw. 2. Attach ground wire to 16 gauge dishwasher wire. B. Connect ground wire to do so can result in terminal box. Failure to green ground connector in death...
Installation Guide
Page 12
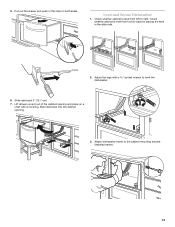
Drain hose connector B. Waste NOTE: Attach the drain hose connector to the water waste line using the supplied hose clamp. 6. Feed hoses and wiring into the cabinet while sliding the drawer into position. 2. B A. Turn on both sides as shown. Slide drawer into position. 4. Place the trim strips on water and check for leaks. Install Drawer and Trim Pieces 1. Option 4: No waste disposer, no drain air gap A 3. Keep the drawer pulled out about 6" (15.2 cm). 6" (15.2 cm) 12
Drain hose connector B. Waste NOTE: Attach the drain hose connector to the water waste line using the supplied hose clamp. 6. Feed hoses and wiring into the cabinet while sliding the drawer into position. 2. B A. Turn on both sides as shown. Slide drawer into position. 4. Place the trim strips on water and check for leaks. Install Drawer and Trim Pieces 1. Option 4: No waste disposer, no drain air gap A 3. Keep the drawer pulled out about 6" (15.2 cm). 6" (15.2 cm) 12
Installation Guide
Page 13
Adjust the legs with a covering. Slide rails back into the cabinet opening and place on both sides. Level and Secure Dishwasher 1. Slide rails back 5" (12.7 cm). 7. Check whether cabinet is level from left to the cabinet mounting bracket (installed earlier). 13 Pull out the drawer and push in the clips on a chair with a socket wrench to back by placing the level in the slide rails. 2. Check whether cabinet is level from front to level the dishwasher. 6. Lift drawer up and out of the cabinet opening . 3. Attach dishwasher frame to right. 5.
Adjust the legs with a covering. Slide rails back into the cabinet opening and place on both sides. Level and Secure Dishwasher 1. Slide rails back 5" (12.7 cm). 7. Check whether cabinet is level from left to the cabinet mounting bracket (installed earlier). 13 Pull out the drawer and push in the clips on a chair with a socket wrench to back by placing the level in the slide rails. 2. Check whether cabinet is level from front to level the dishwasher. 6. Lift drawer up and out of the cabinet opening . 3. Attach dishwasher frame to right. 5.


