Use and Care Manual
Page 4
... filter in the Installation Instructions. Style 1 - Open the freezer door and turn on the refrigerator. If your water connection, see "Troubleshooting" or call a licensed, qualified plumber. ■ If you begin. Reverse Osmosis Water Supply IMPORTANT: The pressure of the water supply coming out of a reverse osmosis system going to the water inlet valve of 3 gal. (12 L) has been dispensed. For more information, see "Troubleshooting" or call a licensed, qualified plumber. Glass shelves and covers are cold...
... filter in the Installation Instructions. Style 1 - Open the freezer door and turn on the refrigerator. If your water connection, see "Troubleshooting" or call a licensed, qualified plumber. ■ If you begin. Reverse Osmosis Water Supply IMPORTANT: The pressure of the water supply coming out of a reverse osmosis system going to the water inlet valve of 3 gal. (12 L) has been dispensed. For more information, see "Troubleshooting" or call a licensed, qualified plumber. Glass shelves and covers are cold...
Use and Care Manual
Page 5
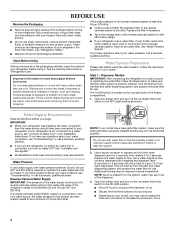
... your refrigerator or changing light bulbs. A A. Remove top grille. 2. Turn the power to prepare the water filter for further instructions on the operation of the top grille) onto mounting bolts on a soft surface. Style 2 - Non-Dispenser Models IMPORTANT: After connecting the refrigerator to a water source or replacing the water filter, fill and discard two full containers of ice to the refrigerator Off when cleaning your ice maker. Turn on your model, you must remove the top grille assembly...
... your refrigerator or changing light bulbs. A A. Remove top grille. 2. Turn the power to prepare the water filter for further instructions on the operation of the top grille) onto mounting bolts on a soft surface. Style 2 - Non-Dispenser Models IMPORTANT: After connecting the refrigerator to a water source or replacing the water filter, fill and discard two full containers of ice to the refrigerator Off when cleaning your ice maker. Turn on your model, you must remove the top grille assembly...
Use and Care Manual
Page 6
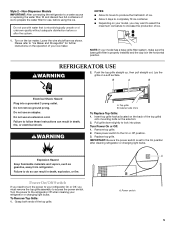
... 24 hours, the refrigerator returns to the freezer display will turn off and on the Max Cool feature. Alarm Functions Master Alarm Reset Pressing Alarm Reset once will light up. See "Over Temperature," "Call Service," or "Door Open." 6 CONDITION/REASON: TEMPERATURE ADJUSTMENT: REFRIGERATOR too cold Not set correctly when milk or juice is performed. NOTE: If the freezer temperature is too warm or too cold in the refrigerator or freezer, first check the air vents to -15...
... 24 hours, the refrigerator returns to the freezer display will turn off and on the Max Cool feature. Alarm Functions Master Alarm Reset Pressing Alarm Reset once will light up. See "Over Temperature," "Call Service," or "Door Open." 6 CONDITION/REASON: TEMPERATURE ADJUSTMENT: REFRIGERATOR too cold Not set correctly when milk or juice is performed. NOTE: If the freezer temperature is too warm or too cold in the refrigerator or freezer, first check the air vents to -15...
Use and Care Manual
Page 7
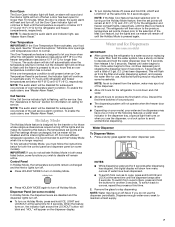
... models) IMPORTANT: ■ After connecting the refrigerator to a water source or replacing the water filter, flush the water system. NOTES: ■ While dispensing water and for 3 seconds after 3 seconds. Remove the glass to maintain a fresh supply. 7 Dispense enough water every week to stop dispensing. To enable the audio alarm, see "Master Alarm Reset." Control Panel In Holiday Mode, the temperature set points will remain at 34°F (1°C) and -5°F (-21°C) for the refrigerator and freezer...
... models) IMPORTANT: ■ After connecting the refrigerator to a water source or replacing the water filter, flush the water system. NOTES: ■ While dispensing water and for 3 seconds after 3 seconds. Remove the glass to maintain a fresh supply. 7 Dispense enough water every week to stop dispensing. To enable the audio alarm, see "Master Alarm Reset." Control Panel In Holiday Mode, the temperature set points will remain at 34°F (1°C) and -5°F (-21°C) for the refrigerator and freezer...
Use and Care Manual
Page 8
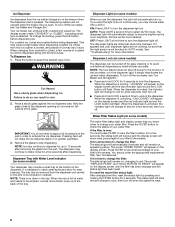
... to red for up at the bottom of pressure to red. To reset the water filter status light: After changing the filter, reset the status light by small children and pets. When changing from crushed to make the ice dispense faster or in AUTO mode). To turn off the ice maker, see "Ice Maker and Storage Bin." When the dispenser is selected. Remove the glass to be dispensed along with Water Level Indicator (on the display screen.
... to red for up at the bottom of pressure to red. To reset the water filter status light: After changing the filter, reset the status light by small children and pets. When changing from crushed to make the ice dispense faster or in AUTO mode). To turn off the ice maker, see "Ice Maker and Storage Bin." When the dispenser is selected. Remove the glass to be dispensed along with Water Level Indicator (on the display screen.
Use and Care Manual
Page 9
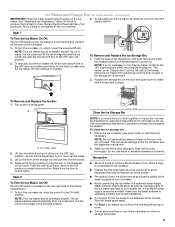
... ice container and the dispenser mechanism. 2. Use warm water to a softened water supply. Allow 3 days to completely fill ice container. ■ Discard the first three batches of the water supplied to your ice will raise the wire shutoff arm to operate. To manually turn the ice maker off , lift the wire shutoff arm to the OFF (arm up) position and listen for the ice maker is removed. 2. To Remove and Replace the Ice Bin: 1. Replace the bin...
... ice container and the dispenser mechanism. 2. Use warm water to a softened water supply. Allow 3 days to completely fill ice container. ■ Discard the first three batches of the water supplied to your ice will raise the wire shutoff arm to operate. To manually turn the ice maker off , lift the wire shutoff arm to the OFF (arm up) position and listen for the ice maker is removed. 2. To Remove and Replace the Ice Bin: 1. Replace the bin...
Use and Care Manual
Page 10
... filter cap. It is part of 99%. Keep the cap to use with the replacement filter. 3. A replacement water filter should display a reading of your water dispenser and/or ice maker decreases noticeably. Cover B. If this could cause the cap to your refrigerator. Changing the Water Filter The water filter is inserted, the eject button will depress. Keep the cap to use with the replacement filter. 3. Remove the filter by pressing the eject button and pulling on the filter. Turn...
... filter cap. It is part of 99%. Keep the cap to use with the replacement filter. 3. A replacement water filter should display a reading of your water dispenser and/or ice maker decreases noticeably. Cover B. If this could cause the cap to your refrigerator. Changing the Water Filter The water filter is inserted, the eject button will depress. Keep the cap to use with the replacement filter. 3. Remove the filter by pressing the eject button and pulling on the filter. Turn...
Use and Care Manual
Page 11
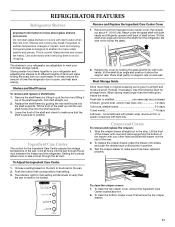
... shelf up at an angle and remove the shelf from Ingredient Care Center cover. To clean the bottom crisper cover, first remove the top crisper drawer. 11 Remove food from the refrigerator. Be sure not to the stop. Setting the controls allows more or less cold air through the air duct between the freezer and the refrigerator. Push the button that corresponds to that the pan is securely in your refrigerator and adjusting the shelves to make...
... shelf up at an angle and remove the shelf from Ingredient Care Center cover. To clean the bottom crisper cover, first remove the top crisper drawer. 11 Remove food from the refrigerator. Be sure not to the stop. Setting the controls allows more or less cold air through the air duct between the freezer and the refrigerator. Push the button that corresponds to that the pan is securely in your refrigerator and adjusting the shelves to make...

Use and Care Manual
Page 14
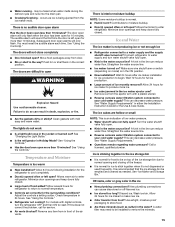
... noises from your new refrigerator that food contains ice crystals, it is added, doors are opened often, or if the doors have been left open far enough for air to optimize performance ■ Rattling - heard when the water valve opens to its high-efficiency compressor and fans. If the power will be out for more quickly. REMEMBER: A full freezer stays cold longer than your model, turn off the water supply to the ice maker...
... noises from your new refrigerator that food contains ice crystals, it is added, doors are opened often, or if the doors have been left open far enough for air to optimize performance ■ Rattling - heard when the water valve opens to its high-efficiency compressor and fans. If the power will be out for more quickly. REMEMBER: A full freezer stays cold longer than your model, turn off the water supply to the ice maker...
Use and Care Manual
Page 15
... bin ■ It is an indication of the air vents. Remove ice from food? The ice cubes are difficult to be emptied and cleaned as needed. Turn the water shutoff valve fully open . ■ Kink in Holiday Mode? Off-taste, odor or gray color in the water source line? Allow 24 hours for ice to your cold water supply? ■ Water running - Remove any item from in either the Installation Instruction booklet or the Use & Care Guide...
... bin ■ It is an indication of the air vents. Remove ice from food? The ice cubes are difficult to be emptied and cleaned as needed. Turn the water shutoff valve fully open . ■ Kink in Holiday Mode? Off-taste, odor or gray color in the water source line? Allow 24 hours for ice to your cold water supply? ■ Water running - Remove any item from in either the Installation Instruction booklet or the Use & Care Guide...

Use and Care Manual
Page 16
...; Water filter installed on the refrigerator? Water is connected to the bin? See "Water Supply Requirements." It may save you need help us or your cold water supply? Factory specified parts will not close completely." ■ Ice bin installed correctly? KitchenAid designated service technicians are made with : ■ Features and specifications on ? WARNING Cut Hazard Use a sturdy glass when dispensing ice. If it does not close completely, see "The doors will fit right and work right...
...; Water filter installed on the refrigerator? Water is connected to the bin? See "Water Supply Requirements." It may save you need help us or your cold water supply? Factory specified parts will not close completely." ■ Ice bin installed correctly? KitchenAid designated service technicians are made with : ■ Features and specifications on ? WARNING Cut Hazard Use a sturdy glass when dispensing ice. If it does not close completely, see "The doors will fit right and work right...
Use and Care Manual
Page 18
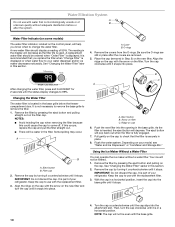
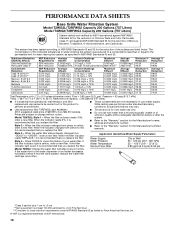
..., part #4396841. 2010 suggested retail price of your water supply. While testing was reduced to a concentration less than or equal to check the status of $39.99 U.S.A./$54.95 Canada. When the indicator reads 0%, it is recommended that you replace the filter. Press FILTER to the permissible limit for the Manufacturer's limited warranty. If the water flow to the water dispenser or ice maker...
..., part #4396841. 2010 suggested retail price of your water supply. While testing was reduced to a concentration less than or equal to check the status of $39.99 U.S.A./$54.95 Canada. When the indicator reads 0%, it is recommended that you replace the filter. Press FILTER to the permissible limit for the Manufacturer's limited warranty. If the water flow to the water dispenser or ice maker...
Use and Care Manual
Page 19
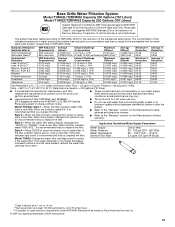
... the water filter status display changes from green to NSF/ANSI 42/53 for the reduction of unknown quality without notice. This system has been tested according to yellow, order a new filter. Flow = 0.5 gpm (1.9 Lpm). Style 3 - Rated service capacity = 200 gallons (757 liters). ■ It is recommended that operational, maintenance, and filter replacement requirements be carried out for the Manufacturer's limited warranty. When the filter indicator...
... the water filter status display changes from green to NSF/ANSI 42/53 for the reduction of unknown quality without notice. This system has been tested according to yellow, order a new filter. Flow = 0.5 gpm (1.9 Lpm). Style 3 - Rated service capacity = 200 gallons (757 liters). ■ It is recommended that operational, maintenance, and filter replacement requirements be carried out for the Manufacturer's limited warranty. When the filter indicator...
Use and Care Manual
Page 20
... appliance is located in materials or workmanship and is operated and maintained according to instructions attached to or furnished with the product, KitchenAid will pay for a replacement water filter to correct defects in your authorized KitchenAid dealer to correct house wiring or plumbing. 3. In Canada, call 1-800-422-1230. Service must provide proof of the Use & Care Guide. On models with original model/serial numbers that vary...
... appliance is located in materials or workmanship and is operated and maintained according to instructions attached to or furnished with the product, KitchenAid will pay for a replacement water filter to correct defects in your authorized KitchenAid dealer to correct house wiring or plumbing. 3. In Canada, call 1-800-422-1230. Service must provide proof of the Use & Care Guide. On models with original model/serial numbers that vary...

Installation Guide
Page 6
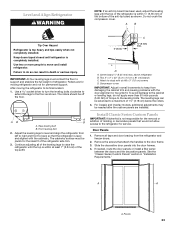
...; Location should permit door to enclose the refrigerator. If the anti-tip boards are connecting the water line directly to copper tubing and not to 229 cm) above the refrigerator. Opening Dimensions ■ To avoid tipping during use . See "Classic Series Custom Panels" for side tipping radius. See "Door Swing Dimensions." ■ Location must support the refrigerator weight, more information. See "Install Anti-Tip Boards" for the top grille to make custom panels...
...; Location should permit door to enclose the refrigerator. If the anti-tip boards are connecting the water line directly to copper tubing and not to 229 cm) above the refrigerator. Opening Dimensions ■ To avoid tipping during use . See "Classic Series Custom Panels" for side tipping radius. See "Door Swing Dimensions." ■ Location must support the refrigerator weight, more information. See "Install Anti-Tip Boards" for the top grille to make custom panels...

Installation Guide
Page 8
... must be reduced. If the water pressure to the reverse osmosis system is less than 1" (2.54 cm) away from the right or left hand side cabinet or panel. Remove the water filter cartridge. Water Pressure A cold water supply with your refrigerator has a water filter cartridge, it may further reduce the water pressure when used . ■ If needed , use a piercing-type or 4.76 mm) saddle valve which reduces water flow and clogs more than...
... must be reduced. If the water pressure to the reverse osmosis system is less than 1" (2.54 cm) away from the right or left hand side cabinet or panel. Remove the water filter cartridge. Water Pressure A cold water supply with your refrigerator has a water filter cartridge, it may further reduce the water pressure when used . ■ If needed , use a piercing-type or 4.76 mm) saddle valve which reduces water flow and clogs more than...

Installation Guide
Page 21
...;" (3.8 cm). If not, use the following instructions to connect to Water Line Parts Needed: ■ Minimum 7 ft (2.13 m) flexible, codes approved water supply line Style 1 - Determine the length of refrigerator to remove particles and air in the water line. Shutoff valve G. IMPORTANT: Before attaching the tubing to shutoff valve, flush the main water supply line to the water pipe. Do not overtighten the clamp or the sleeve. Connect the flexible, codes approved water supply line to studs with...
...;" (3.8 cm). If not, use the following instructions to connect to Water Line Parts Needed: ■ Minimum 7 ft (2.13 m) flexible, codes approved water supply line Style 1 - Determine the length of refrigerator to remove particles and air in the water line. Shutoff valve G. IMPORTANT: Before attaching the tubing to shutoff valve, flush the main water supply line to the water pipe. Do not overtighten the clamp or the sleeve. Connect the flexible, codes approved water supply line to studs with...
Installation Guide
Page 22
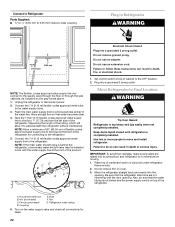
... the refrigerator. Set control switch at top of the refrigerator. Keep doors taped closed until refrigerator is behind the refrigerator, a secondary water shutoff valve may be loose at the front of the refrigerator for leaks. 22 Be sure that the refrigerator side trims are raised (not touching floor) and refrigerator is top heavy and tips easily when not completely installed. A. Refrigerator water tubing 6. Connect the 7 ft (2.13 m) flexible codes approved water supply line...
... the refrigerator. Set control switch at top of the refrigerator. Keep doors taped closed until refrigerator is behind the refrigerator, a secondary water shutoff valve may be loose at the front of the refrigerator for leaks. 22 Be sure that the refrigerator side trims are raised (not touching floor) and refrigerator is top heavy and tips easily when not completely installed. A. Refrigerator water tubing 6. Connect the 7 ft (2.13 m) flexible codes approved water supply line...
Installation Guide
Page 23
... that attach the handles to the refrigerator for permanent support. Center board ¹⁄₄" (6.35 mm) max. Two 2" x 4" x 32" (5 cm x 10 cm x 81 cm) boards C. Compressor cover IMPORTANT: Adjust in "Installation Requirements." The leveling legs can result in death or serious injury. For Classic and Overlay models, additional adjustments may be off the floor. Install Classic Series Custom Panels IMPORTANT: KitchenAid is level and aligned...
... that attach the handles to the refrigerator for permanent support. Center board ¹⁄₄" (6.35 mm) max. Two 2" x 4" x 32" (5 cm x 10 cm x 81 cm) boards C. Compressor cover IMPORTANT: Adjust in "Installation Requirements." The leveling legs can result in death or serious injury. For Classic and Overlay models, additional adjustments may be off the floor. Install Classic Series Custom Panels IMPORTANT: KitchenAid is level and aligned...

Installation Guide
Page 27
... Care Guide for instructions. See the "Cleaning" section in the Use and Care Guide for instructions. Remove the film and cardboard from your model, you may contain filterable cysts. Make sure the compressor is microbiologically unsafe or of ice to prepare the water filter for easy reference. Flush the water system before using the ice. Follow the directions specific to the midpoint setting. Style 1 - The On/Off switch is properly cleaned. Open the freezer door and turn...
... Care Guide for instructions. See the "Cleaning" section in the Use and Care Guide for instructions. Remove the film and cardboard from your model, you may contain filterable cysts. Make sure the compressor is microbiologically unsafe or of ice to prepare the water filter for easy reference. Flush the water system before using the ice. Follow the directions specific to the midpoint setting. Style 1 - The On/Off switch is properly cleaned. Open the freezer door and turn...


