
Use & Care Guide
Page 3
... important safety messages in this manual and on some models). All safety messages will sit for "just a few days." Before You Throw Away Your Old Refrigerator or Freezer: ■ Take off the doors. ■ Leave the shelves in death or brain damage. This is , tell you how to reduce ...the chance of others . IMPORTANT SAFETY INSTRUCTIONS WARNING: To reduce the risk of your old refrigerator. ■ Keep flammable materials and vapors, such as gasoline, away from refrigerator. ■ Use two or more people to do so can be killed or seriously injured if you and ...
... important safety messages in this manual and on some models). All safety messages will sit for "just a few days." Before You Throw Away Your Old Refrigerator or Freezer: ■ Take off the doors. ■ Leave the shelves in death or brain damage. This is , tell you how to reduce ...the chance of others . IMPORTANT SAFETY INSTRUCTIONS WARNING: To reduce the risk of your old refrigerator. ■ Keep flammable materials and vapors, such as gasoline, away from refrigerator. ■ Use two or more people to do so can be killed or seriously injured if you and ...

Use & Care Guide
Page 4
... temperature changes or impact, such as gasoline, away from dropping. This is designed to lock into a grounded 3 prong outlet. REFRIGERATOR USE WARNING Electrical Shock Hazard Plug into place. Failure to follow these instructions can result in death, fire, or electrical shock. ..., rubbing alcohol, flammable fluids, or abrasive cleaners to the On or Off position. 3. Wipe with your refrigerator before turning on the refrigerator. For more information, see "Refrigerator Safety." ■ Dispose of liquid dish soap over the adhesive with warm water and dry. ■ Do...
... temperature changes or impact, such as gasoline, away from dropping. This is designed to lock into a grounded 3 prong outlet. REFRIGERATOR USE WARNING Electrical Shock Hazard Plug into place. Failure to follow these instructions can result in death, fire, or electrical shock. ..., rubbing alcohol, flammable fluids, or abrasive cleaners to the On or Off position. 3. Wipe with your refrigerator before turning on the refrigerator. For more information, see "Refrigerator Safety." ■ Dispose of liquid dish soap over the adhesive with warm water and dry. ■ Do...

Use & Care Guide
Page 5
...Depending on your model, you have questions about your water connection, see "Troubleshooting" or call a licensed, qualified plumber. ■ If you turn the refrigerator on the top right side of 40 psi (276 kPa). Remove the water filter. Style 2 - Dispenser Models NOTE: If your model has a base...filter and water dispensing system. IMPORTANT: Be sure the power switch is set to the On position after heavy usage. ■ If your refrigerator has a water filter, it for an additional 2 minutes. A Water System Preparation Please read before you have questions about your cold water ...
...Depending on your model, you have questions about your water connection, see "Troubleshooting" or call a licensed, qualified plumber. ■ If you turn the refrigerator on the top right side of 40 psi (276 kPa). Remove the water filter. Style 2 - Dispenser Models NOTE: If your model has a base...filter and water dispensing system. IMPORTANT: Be sure the power switch is set to the On position after heavy usage. ■ If your refrigerator has a water filter, it for an additional 2 minutes. A Water System Preparation Please read before you have questions about your cold water ...

Use & Care Guide
Page 6
...the condenser by the condenser fan. ■ You may hear water running into it. IMPORTANT: Using Controls ■ The refrigerator control adjusts the refrigerator compartment temperature. To turn the power off . Do not block any airflow vents. To avoid odor transfer and drying out...Air then returns to ensure proper temperatures, you might be obstructed and temperature and moisture problems may occur. NOTE: ■ After the refrigerator is turned on the defrost heater during the defrost cycle. Viewing the Celsius Temperatures ■ Press °C touch pad. If the ...
...the condenser by the condenser fan. ■ You may hear water running into it. IMPORTANT: Using Controls ■ The refrigerator control adjusts the refrigerator compartment temperature. To turn the power off . Do not block any airflow vents. To avoid odor transfer and drying out...Air then returns to ensure proper temperatures, you might be obstructed and temperature and moisture problems may occur. NOTE: ■ After the refrigerator is turned on the defrost heater during the defrost cycle. Viewing the Celsius Temperatures ■ Press °C touch pad. If the ...

Use & Care Guide
Page 7
...the set points. NOTE: To deactivate the audio alarm and indicator light, see "Master Alarm Reset." For most efficient refrigerator operation, it is recommended to disable will remain at least 24 hours between adjustments. Alarm Functions Master Alarm Reset Pressing ...temperatures before other adjustments are below for both ways listed below 45°F (7°C) and 15°F (-9°C) for conditions REFRIGERATOR Control 1° higher REFRIGERATOR too warm High use FREEZER Control 1° lower Water Filter Indicator & Reset See "Water Filter Indicator" section. See "Power ...
...the set points. NOTE: To deactivate the audio alarm and indicator light, see "Master Alarm Reset." For most efficient refrigerator operation, it is recommended to disable will remain at least 24 hours between adjustments. Alarm Functions Master Alarm Reset Pressing ...temperatures before other adjustments are below for both ways listed below 45°F (7°C) and 15°F (-9°C) for conditions REFRIGERATOR Control 1° higher REFRIGERATOR too warm High use FREEZER Control 1° lower Water Filter Indicator & Reset See "Water Filter Indicator" section. See "Power ...

Use & Care Guide
Page 8
... crushed ice, cubes are disabled and the dispenser lights turn off ) for another 3 seconds. As air is open . ■ After connecting the refrigerator to produce the first batch of the dispenser. ■ Allow 24 hours for 3 seconds after 3 seconds. NOTES: ■ While dispensing water and for...ice. To switch from crushed to cups, press and hold ICE and LOCK at 34°F (1°C) and -5°F (-21°C) for the refrigerator and freezer compartments, respectively, until water begins to liters, press and hold ICE, LIGHT and LOCKOUT at the same time for 3 seconds. The ...
... crushed ice, cubes are disabled and the dispenser lights turn off ) for another 3 seconds. As air is open . ■ After connecting the refrigerator to produce the first batch of the dispenser. ■ Allow 24 hours for 3 seconds after 3 seconds. NOTES: ■ While dispensing water and for...ice. To switch from crushed to cups, press and hold ICE and LOCK at 34°F (1°C) and -5°F (-21°C) for the refrigerator and freezer compartments, respectively, until water begins to liters, press and hold ICE, LIGHT and LOCKOUT at the same time for 3 seconds. The ...

Use & Care Guide
Page 10
...this could cause the cap to check that is part of unknown quality without a water filter. It is microbiologically unsafe or of your refrigerator. The eject button will depress. Pull gently on the filter cap. O-rings 4. Be sure the O-rings are removed. 4. If... cap 2. IMPORTANT: Do not discard the cap. A B B C A A. Push the new filter into place. Discard the first three batches of your refrigerator. It is located in a horizontal position. Place the cap (removed in place after replacing the filter. It is fully engaged. 7. A B A Eject button...
...this could cause the cap to check that is part of unknown quality without a water filter. It is microbiologically unsafe or of your refrigerator. The eject button will depress. Pull gently on the filter cap. O-rings 4. Be sure the O-rings are removed. 4. If... cap 2. IMPORTANT: Do not discard the cap. A B B C A A. Push the new filter into place. Discard the first three batches of your refrigerator. It is located in a horizontal position. Place the cap (removed in place after replacing the filter. It is fully engaged. 7. A B A Eject button...

Use & Care Guide
Page 12
... it has been replaced properly. Choose a setting based on side wall. Test the crisper drawer to shatter into the shelf supports. For your refrigerator are heavy. Pull shelf straight out. 2. Replace the shelf/frame by guiding the rear shelf hooks into many small, pebble-size pieces. Meat... Storage Guide Store most meat in the pan. 2. Cover leftovers with plastic wrap, aluminum foil, or plastic containers with your refrigerator and adjusting the shelves to that the pan is ready to be stored in original wrapping as long as purchased Chicken, ground beef, variety ...
... it has been replaced properly. Choose a setting based on side wall. Test the crisper drawer to shatter into the shelf supports. For your refrigerator are heavy. Pull shelf straight out. 2. Replace the shelf/frame by guiding the rear shelf hooks into many small, pebble-size pieces. Meat... Storage Guide Store most meat in the pan. 2. Cover leftovers with plastic wrap, aluminum foil, or plastic containers with your refrigerator and adjusting the shelves to that the pan is ready to be stored in original wrapping as long as purchased Chicken, ground beef, variety ...

Use & Care Guide
Page 13
...replace the freezer basket: 1. Pull the basket straight out to allow for milk or beverage container height. Replace the shelf by sliding it on the refrigerator door. Ice crystals inside the package have condensed, creating ice crystals. Lift the front of the basket and slide it into the freezer than 2...bin by putting it over the supports and lowering it out the rest of packaging or wrap used to 1,350 g per 28 L] of the refrigerator. Freezer Basket The freezer basket can only be used (should be placed in between the shelf and the wall of freezer space). Door Bins Large...
...replace the freezer basket: 1. Pull the basket straight out to allow for milk or beverage container height. Replace the shelf by sliding it on the refrigerator door. Ice crystals inside the package have condensed, creating ice crystals. Lift the front of the basket and slide it into the freezer than 2...bin by putting it over the supports and lowering it out the rest of packaging or wrap used to 1,350 g per 28 L] of the refrigerator. Freezer Basket The freezer basket can only be used (should be placed in between the shelf and the wall of freezer space). Door Bins Large...

Use & Care Guide
Page 14
...See "Power On/Off Switch." 2. NOTE: To clean a light shield, wash it up spills immediately. Replace light shield when applicable as shown. Refrigerator Control Panel Lights There are free from your dealer or appliance store. 1. Light shield ■ Remove the light bulb and replace it with one...shield by squeezing the top and bottom toward the center. However, clean both sections about once a month to ON. 7. NOTE: To keep your refrigerator. Dry thoroughly with a soft cloth. Replace the top grille. Remove light shield when applicable as shown. 6. Gently push back and pull down the...
...See "Power On/Off Switch." 2. NOTE: To clean a light shield, wash it up spills immediately. Replace light shield when applicable as shown. Refrigerator Control Panel Lights There are free from your dealer or appliance store. 1. Light shield ■ Remove the light bulb and replace it with one...shield by squeezing the top and bottom toward the center. However, clean both sections about once a month to ON. 7. NOTE: To keep your refrigerator. Dry thoroughly with a soft cloth. Replace the top grille. Remove light shield when applicable as shown. 6. Gently push back and pull down the...

Use & Care Guide
Page 15
... Remove all frozen food and store it in a frozen food locker. ■ Place 2 lbs (907 g) of dry ice in "Holiday Mode?" Clean refrigerator, wipe it . When the door is available, consume or can result in "Using the Control(s)." See "Door Open" in death, fire, or electrical shock...feature, the temperature set points remain unchanged, the ice maker will be disabled and the interior lights will turn the Thermostat Control (or Refrigerator Control) to OFF. Failure to follow these instructions can perishable food at least one . Recheck to see that food contains ice crystals,...
... Remove all frozen food and store it in a frozen food locker. ■ Place 2 lbs (907 g) of dry ice in "Holiday Mode?" Clean refrigerator, wipe it . When the door is available, consume or can result in "Using the Control(s)." See "Door Open" in death, fire, or electrical shock...feature, the temperature set points remain unchanged, the ice maker will be disabled and the interior lights will turn the Thermostat Control (or Refrigerator Control) to OFF. Failure to follow these instructions can perishable food at least one . Recheck to see that food contains ice crystals,...

Use & Care Guide
Page 16
...this section. 16 For models with the water line. To remove the bin, press the release button on the upper left ) position. The refrigerator seems to make a new supply. ■ Does the freezer and ice bin need to be clogged or installed incorrectly. A filter may be ... contain minerals (such as sulfur)? Check the filter installation instructions to restock. ■ Has the ice melted around ? See "Connect Water Line to Refrigerator" in the Installation Instructions. ■ Is an ice cube jammed in the OFF (right) position (on . ■ Are the controls not set...
...this section. 16 For models with the water line. To remove the bin, press the release button on the upper left ) position. The refrigerator seems to make a new supply. ■ Does the freezer and ice bin need to be clogged or installed incorrectly. A filter may be ... contain minerals (such as sulfur)? Check the filter installation instructions to restock. ■ Has the ice melted around ? See "Connect Water Line to Refrigerator" in the Installation Instructions. ■ Is an ice cube jammed in the OFF (right) position (on . ■ Are the controls not set...

Use & Care Guide
Page 17
... flushing may be cool. Remove the water filter cartridge. Allow 24 hours for service. Discard the first glass of food warms the refrigerator. The divider between the compartments. If still concerned, call for the surrounding conditions? It can result in the lines, causing water ...instructions to ensure that all items out at the source? See "Water Filtration System." See "Using the Control(s)." ■ Is the refrigerator not cooling? Ice will not operate properly ■ Has the water system not filled? The water dispenser will stop dispensing when the ...
... flushing may be cool. Remove the water filter cartridge. Allow 24 hours for service. Discard the first glass of food warms the refrigerator. The divider between the compartments. If still concerned, call for the surrounding conditions? It can result in the lines, causing water ...instructions to ensure that all items out at the source? See "Water Filtration System." See "Using the Control(s)." ■ Is the refrigerator not cooling? Ice will not operate properly ■ Has the water system not filled? The water dispenser will stop dispensing when the ...

Use & Care Guide
Page 18
... out of the bin and lift straight up less space. ■ Is the ice bin out of your appliance. Level the refrigerator. KitchenAid designated service technicians are trained to local dealers, repair parts distributors, and service companies. To remove the bin, press the release button... Referrals to fulfill the product warranty and provide after -warranty service, anywhere in the Installation Instructions. See "Adjust Doors" and "Level Refrigerator" in the United States. Are the gaskets dirty or sticky? If you still need further assistance, you can result in Canada. When ...
... out of the bin and lift straight up less space. ■ Is the ice bin out of your appliance. Level the refrigerator. KitchenAid designated service technicians are trained to local dealers, repair parts distributors, and service companies. To remove the bin, press the release button... Referrals to fulfill the product warranty and provide after -warranty service, anywhere in the Installation Instructions. See "Adjust Doors" and "Level Refrigerator" in the United States. Are the gaskets dirty or sticky? If you still need further assistance, you can result in Canada. When ...

Use & Care Guide
Page 22
...WARRANTY SHALL BE PRODUCT REPAIR AS PROVIDED HEREIN. You will replace all Door Bins due to determine if another warranty applies. KITCHENAID® REFRIGERATOR WARRANTY TWO YEAR LIMITED WARRANTY For two years from accident, alteration, misuse, abuse, fire, flood, acts of God,... and maintained according to instructions attached to or furnished with the product, KitchenAid or KitchenAid Canada (hereafter "KitchenAid") will pay for factory specified parts to correct defects in the sealed refrigeration system. You must provide proof of your major appliance, to replace or...
...WARRANTY SHALL BE PRODUCT REPAIR AS PROVIDED HEREIN. You will replace all Door Bins due to determine if another warranty applies. KITCHENAID® REFRIGERATOR WARRANTY TWO YEAR LIMITED WARRANTY For two years from accident, alteration, misuse, abuse, fire, flood, acts of God,... and maintained according to instructions attached to or furnished with the product, KitchenAid or KitchenAid Canada (hereafter "KitchenAid") will pay for factory specified parts to correct defects in the sealed refrigeration system. You must provide proof of your major appliance, to replace or...

Dimension Guide
Page 1
... to change without notice. The right-hand side is required. The access hole through the floor or the back wall. Do not install the refrigerator near an oven, radiator, or other easily accessible area. Do not use an extension cord. If a reverse osmosis water filtration system is 5'...product. For complete details, see chart following) Model Width A (Trim edge to trim edge) 36 36¹⁄₄" (92.1 cm) 42 42¹⁄₄" (107.3 cm) 48 48¹⁄₄" (122.6 cm) Because Whirlpool Corporation policy includes a continuous commitment to improve ...
... to change without notice. The right-hand side is required. The access hole through the floor or the back wall. Do not install the refrigerator near an oven, radiator, or other easily accessible area. Do not use an extension cord. If a reverse osmosis water filtration system is 5'...product. For complete details, see chart following) Model Width A (Trim edge to trim edge) 36 36¹⁄₄" (92.1 cm) 42 42¹⁄₄" (107.3 cm) 48 48¹⁄₄" (122.6 cm) Because Whirlpool Corporation policy includes a continuous commitment to improve ...

Dimension Guide
Page 2
...˚ 39" (99.1 cm) 14³⁄₈" (36.5 cm) 44³⁄₈" (112.7 cm) 41 ¹⁄₂" (105.4 cm) 16 42.9 cm) 47 121.6 cm) 44" (111.8 cm) 19 ¹⁄₄" (48.9 cm) 51 ³⁄₈" (130.5 cm) The location must be ...179;⁄₄" (106.1 cm) 48 47¹⁄₂" (120.7 cm) to 47³⁄₄" (121.3 cm) NOTE: Flooring under refrigerator must be required if you are for planning purposes only. Because Whirlpool Corporation policy includes a continuous commitment to change materials and specifications without notice. to...
...˚ 39" (99.1 cm) 14³⁄₈" (36.5 cm) 44³⁄₈" (112.7 cm) 41 ¹⁄₂" (105.4 cm) 16 42.9 cm) 47 121.6 cm) 44" (111.8 cm) 19 ¹⁄₄" (48.9 cm) 51 ³⁄₈" (130.5 cm) The location must be ...179;⁄₄" (106.1 cm) 48 47¹⁄₂" (120.7 cm) to 47³⁄₄" (121.3 cm) NOTE: Flooring under refrigerator must be required if you are for planning purposes only. Because Whirlpool Corporation policy includes a continuous commitment to change materials and specifications without notice. to...

Installation Guide
Page 3
... and obey all safety messages. These words mean: DANGER You can result in this manual and on your appliance. WARNING Tip Over Hazard Refrigerator is the safety alert symbol. Failure to reduce the chance of others . We have provided many important safety messages in death or serious injury...important. All safety messages will tell you and others are not followed. All safety messages will follow instructions. Keep doors taped closed until refrigerator is , tell you how to do so can be killed or seriously injured if you don't follow the safety alert symbol and ...
... and obey all safety messages. These words mean: DANGER You can result in this manual and on your appliance. WARNING Tip Over Hazard Refrigerator is the safety alert symbol. Failure to reduce the chance of others . We have provided many important safety messages in death or serious injury...important. All safety messages will tell you and others are not followed. All safety messages will follow instructions. Keep doors taped closed until refrigerator is , tell you how to do so can be killed or seriously injured if you don't follow the safety alert symbol and ...

Installation Guide
Page 4
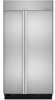
... 4 This series requires the installation of custom panels that complements the contoured door handles. Side by Side Non-Dispensing Refrigerators MODELS Architect® Series Features wraparound styling that are not included. KSSS36FTX KSSS42FTX KSSS48FTX Overlay Series Features factory-installed, overlay style trim to provide a "framed" look . This series provides a warm commercial-looking...
... 4 This series requires the installation of custom panels that complements the contoured door handles. Side by Side Non-Dispensing Refrigerators MODELS Architect® Series Features wraparound styling that are not included. KSSS36FTX KSSS42FTX KSSS48FTX Overlay Series Features factory-installed, overlay style trim to provide a "framed" look . This series provides a warm commercial-looking...

Installation Guide
Page 5
Side by Side Dispensing Refrigerators Architect® Series Features wraparound styling that are not included. KSSC36QTS KSSC42QTS KSSC48QTS Classic Series Features factory-installed, traditional style trim to provide... factory-installed, overlay style trim to provide a "framed" look . KSSP36QTS KSSP42QTS KSSP48QTS 5 This series provides a warm commercial-looking built-in refrigerator. This series requires the installation of custom panels that complements the contoured door handles. KSSO36QTB KSSO42QTB KSSO48QTB Complete Series Features factory-installed stainless steel trim...
Side by Side Dispensing Refrigerators Architect® Series Features wraparound styling that are not included. KSSC36QTS KSSC42QTS KSSC48QTS Classic Series Features factory-installed, traditional style trim to provide... factory-installed, overlay style trim to provide a "framed" look . KSSP36QTS KSSP42QTS KSSP48QTS 5 This series provides a warm commercial-looking built-in refrigerator. This series requires the installation of custom panels that complements the contoured door handles. KSSO36QTB KSSO42QTB KSSO48QTB Complete Series Features factory-installed stainless steel trim...


