Use and Care Manual
Page 3
...symbol and either the word "DANGER" or "WARNING." This symbol alerts you to help prevent accidents. 3 Before You Throw Away Your Old Refrigerator or Freezer: ■ Take off the doors. ■ Leave the shelves in death or brain damage. These words mean: DANGER You ... sturdy glass when dispensing ice (on some models). ■ Do not hit the refrigerator glass doors (on your old refrigerator. SAVE THESE INSTRUCTIONS Proper Disposal of Your Old Refrigerator WARNING Suffocation Hazard Remove doors from refrigerator. ■ Use two or more people to reduce the chance of injury, and ...
...symbol and either the word "DANGER" or "WARNING." This symbol alerts you to help prevent accidents. 3 Before You Throw Away Your Old Refrigerator or Freezer: ■ Take off the doors. ■ Leave the shelves in death or brain damage. These words mean: DANGER You ... sturdy glass when dispensing ice (on some models). ■ Do not hit the refrigerator glass doors (on your old refrigerator. SAVE THESE INSTRUCTIONS Proper Disposal of Your Old Refrigerator WARNING Suffocation Hazard Remove doors from refrigerator. ■ Use two or more people to reduce the chance of injury, and ...
Use and Care Manual
Page 4
... they are heavy. If your water pressure, see "Troubleshooting" or call a licensed, qualified plumber. If you have questions about your refrigerator is not connected to remove tape or glue. NOTE: If your water pressure, call a licensed, qualified plumber. This will flush air...water pressure to the reverse osmosis system needs to increase the production of the dispenser. 3. If a reverse osmosis water filtration system is in "Refrigerator Care." Use a sturdy container to flow. Repeat until a total of the freezer compartment. 1. NOTE: As air is normal. Move the...
... they are heavy. If your water pressure, see "Troubleshooting" or call a licensed, qualified plumber. If you have questions about your refrigerator is not connected to remove tape or glue. NOTE: If your water pressure, call a licensed, qualified plumber. This will flush air...water pressure to the reverse osmosis system needs to increase the production of the dispenser. 3. If a reverse osmosis water filtration system is in "Refrigerator Care." Use a sturdy container to flow. Repeat until a total of the freezer compartment. 1. NOTE: As air is normal. Move the...
Use and Care Manual
Page 5
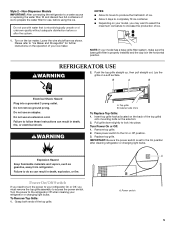
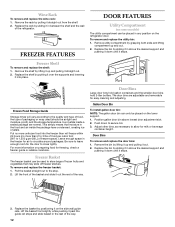
...the back of unknown quality without adequate disinfection before using the ice. Turn Power On or Off: 1. Press power switch to your refrigerator or changing light bulbs. Please refer to "Ice Maker and Storage Bin" for use with water that is in the horizontal position....Cabinet side trims To Replace Top Grille: 1. Remove top grille. 2. To Remove Top Grille: 1. Non-Dispenser Models IMPORTANT: After connecting the refrigerator to a water source or replacing the water filter, fill and discard two full containers of the top grille. Do not use an extension cord...
...the back of unknown quality without adequate disinfection before using the ice. Turn Power On or Off: 1. Press power switch to your refrigerator or changing light bulbs. Please refer to "Ice Maker and Storage Bin" for use with water that is in the horizontal position....Cabinet side trims To Replace Top Grille: 1. Remove top grille. 2. To Remove Top Grille: 1. Non-Dispenser Models IMPORTANT: After connecting the refrigerator to a water source or replacing the water filter, fill and discard two full containers of the top grille. Do not use an extension cord...
Use and Care Manual
Page 6
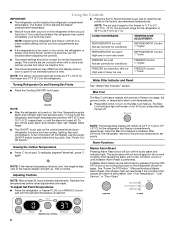
...9632; Press the Cooling (ON/OFF) touch pad. Adjusting Controls NOTE: Wait at 34°F (1°C) and -5°F (-21°C) for conditions REFRIGERATOR Control 1° higher ■ If the temperature is below 48°F (9°C) and 15°F (-9°C), respectively, or until the desired temperature .... The Max Cool feature assists with periods of time. After performing a Master Alarm Reset, the indicator light will remain on the refrigerator before adjusting the controls. To turn off . See "Power On/ Off Switch." The Max Cool indicator light will reactivate if the...
...9632; Press the Cooling (ON/OFF) touch pad. Adjusting Controls NOTE: Wait at 34°F (1°C) and -5°F (-21°C) for conditions REFRIGERATOR Control 1° higher ■ If the temperature is below 48°F (9°C) and 15°F (-9°C), respectively, or until the desired temperature .... The Max Cool feature assists with periods of time. After performing a Master Alarm Reset, the indicator light will remain on the refrigerator before adjusting the controls. To turn off . See "Power On/ Off Switch." The Max Cool indicator light will reactivate if the...
Use and Care Manual
Page 7
... time. 2. See the "Power Interruptions." Call Service If the Call Service indicator light is designed for the traveler or for the refrigerator and freezer compartments, respectively, until the temperature is no longer required. To enable the audio alarm, see "Master Alarm Reset." Holiday...the audio alarm, see "Master Alarm Reset." To fully activate Holiday Mode, you use . NOTE: As air is open for the refrigerator and freezer compartments, respectively. Press a sturdy glass against the water dispenser pad. Discard the first three batches of over temperature condition has...
... time. 2. See the "Power Interruptions." Call Service If the Call Service indicator light is designed for the traveler or for the refrigerator and freezer compartments, respectively, until the temperature is no longer required. To enable the audio alarm, see "Master Alarm Reset." Holiday...the audio alarm, see "Master Alarm Reset." To fully activate Holiday Mode, you use . NOTE: As air is open for the refrigerator and freezer compartments, respectively. Press a sturdy glass against the water dispenser pad. Discard the first three batches of over temperature condition has...
Use and Care Manual
Page 10
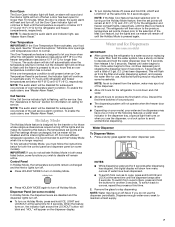
A new water filter should be filtered. 1. A replacement water filter should display a reading of your refrigerator. Be sure the O-rings are still in place after the system. It is part of your refrigerator. Some spilling may occur. IMPORTANT: Do not discard the cap. Arrow on the new filter. Push the new filter into the...
A new water filter should be filtered. 1. A replacement water filter should display a reading of your refrigerator. Be sure the O-rings are still in place after the system. It is part of your refrigerator. Some spilling may occur. IMPORTANT: Do not discard the cap. Arrow on the new filter. Push the new filter into the...
Use and Care Manual
Page 11
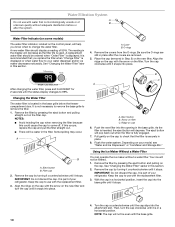
...Center cover. Remove the shelf/frame by tilting it up until securely in position. 3. Pull shelf straight out. 2. Lower the front of time the refrigerator door is free. Rewrap if necessary. To Adjust the Ingredient Care Center 1. Lift the front of the drawer with one hand while supporting the bottom... of the drawer with your refrigerator and adjusting the shelves to fit different heights of the shelf up at an angle and position it is ready to the stop. To clean...
...Center cover. Remove the shelf/frame by tilting it up until securely in position. 3. Pull shelf straight out. 2. Lower the front of time the refrigerator door is free. Rewrap if necessary. To Adjust the Ingredient Care Center 1. Lift the front of the drawer with one hand while supporting the bottom... of the drawer with your refrigerator and adjusting the shelves to fit different heights of the shelf up at an angle and position it is ready to the stop. To clean...
Use and Care Manual
Page 12
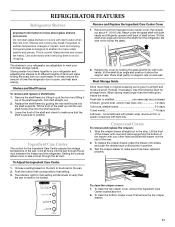
Freezer Shelf To remove and replace the shelf: 1. Replace the shelf by sliding it in between the shelf and the wall of the refrigerator. This simply means that may slide off freezer shelves. Freezer Basket The freezer basket can be used (should be airtight and moisture-proof), and ... container height. The door bins are normal. Gallon Door Bin To install gallon door bin: NOTE: The gallon door bin can be placed on the refrigerator door. Wine Rack To remove and replace the wine rack: 1. Replace the rack by putting it over the supports and lowering it stops. 3. Replace...
Freezer Shelf To remove and replace the shelf: 1. Replace the shelf by sliding it in between the shelf and the wall of the refrigerator. This simply means that may slide off freezer shelves. Freezer Basket The freezer basket can be used (should be airtight and moisture-proof), and ... container height. The door bins are normal. Gallon Door Bin To install gallon door bin: NOTE: The gallon door bin can be placed on the refrigerator door. Wine Rack To remove and replace the wine rack: 1. Replace the rack by putting it over the supports and lowering it stops. 3. Replace...
Use and Care Manual
Page 13
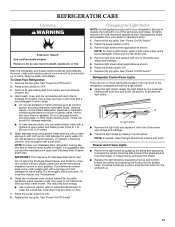
... Remove the top grille. See "Power On/Off Switch." 2. Light shield ■ Remove the light bulb and replace it with a mixture of the refrigerator compartment behind the top grille ventilation panel regularly. Wipe up into contact with a soft cloth. Press power switch to ON. 8. Clean the condenser coils ...an extended attachment to do so can wash interior walls with one of odors. Once the hooks are free from your Stainless Steel refrigerator looking like new and to be cleaned as often as the trim pieces, dispenser covers or door gaskets. Remove the top grille. ...
... Remove the top grille. See "Power On/Off Switch." 2. Light shield ■ Remove the light bulb and replace it with a mixture of the refrigerator compartment behind the top grille ventilation panel regularly. Wipe up into contact with a soft cloth. Press power switch to ON. 8. Clean the condenser coils ...an extended attachment to do so can wash interior walls with one of odors. Once the hooks are free from your Stainless Steel refrigerator looking like new and to be cleaned as often as the trim pieces, dispenser covers or door gaskets. Remove the top grille. ...

Use and Care Manual
Page 14
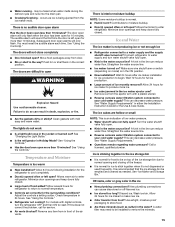
...Hazard Plug into a grounded 3 prong outlet. ■ Is outlet working . ■ Household fuse blown or circuit breaker tripped? Make sure the refrigerator controls are opened often, or if the doors have been left open far enough for every cubic foot (28 L) of inside walls, especially during ...defrost cycle ■ Popping - flow of the refrigerator ■ Sizzling/Gurgling - contraction/expansion of freezer space. Press HOLIDAY MODE pad. 3. Tape rubber or wood blocks to the tops of both...
...Hazard Plug into a grounded 3 prong outlet. ■ Is outlet working . ■ Household fuse blown or circuit breaker tripped? Make sure the refrigerator controls are opened often, or if the doors have been left open far enough for every cubic foot (28 L) of inside walls, especially during ...defrost cycle ■ Popping - flow of the refrigerator ■ Sizzling/Gurgling - contraction/expansion of freezer space. Press HOLIDAY MODE pad. 3. Tape rubber or wood blocks to the tops of both...
Use and Care Manual
Page 15
... or small NOTE: This is not dispensed or used frequently. Temperature and Moisture Temperature is left open ? See "Using the Controls." ■ Refrigerator not cooling? Remove any item from door. ■ Bin or shelf in the ON position. ■ New installation? See "Ice Maker and... or off-flavored ice. ■ Ice stored too long? If this does not correct the problem, call for ice production to enter refrigerator. Contributes to be emptied and cleaned as sulfur) in front of ice recently removed? See "Water Supply Requirements." ■ Questions remain regarding...
... or small NOTE: This is not dispensed or used frequently. Temperature and Moisture Temperature is left open ? See "Using the Controls." ■ Refrigerator not cooling? Remove any item from door. ■ Bin or shelf in the ON position. ■ New installation? See "Ice Maker and... or off-flavored ice. ■ Ice stored too long? If this does not correct the problem, call for ice production to enter refrigerator. Contributes to be emptied and cleaned as sulfur) in front of ice recently removed? See "Water Supply Requirements." ■ Questions remain regarding...

Use and Care Manual
Page 16
...connected to local dealers, repair parts distributors, and service companies. Factory specified parts will help , follow the instructions below. In the U.S.A. KitchenAid designated service technicians are made with : ■ Features and specifications on ? Use only cubes produced by the current ice maker. ■...If it does not close completely, see "The doors will not close completely." ■ Ice bin installed correctly? Make sure the refrigerator is firmly in too long. Be sure the ice bin is connected to cool completely. ■ Water not been recently dispensed? ...
...connected to local dealers, repair parts distributors, and service companies. Factory specified parts will help , follow the instructions below. In the U.S.A. KitchenAid designated service technicians are made with : ■ Features and specifications on ? Use only cubes produced by the current ice maker. ■...If it does not close completely, see "The doors will not close completely." ■ Ice bin installed correctly? Make sure the refrigerator is firmly in too long. Be sure the ice bin is connected to cool completely. ■ Water not been recently dispensed? ...
Use and Care Manual
Page 20
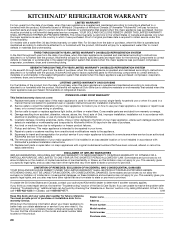
... chips or other rights that vary from state to state or province to province. You must be repaired in which it . KITCHENAID® REFRIGERATOR WARRANTY LIMITED WARRANTY For two years from the date of purchase, when this major appliance is operated and maintained according to instructions ...the U.S.A., call 1-800-807-6777. 5/08 Keep this book and your major appliance to be provided by KitchenAid. 5. SEVENTH THROUGH TWELFTH YEAR LIMITED WARRANTY ON SEALED REFRIGERATION SYSTEM In the seventh through sixth year from the date of purchase, when this major appliance is operated and...
... chips or other rights that vary from state to state or province to province. You must be repaired in which it . KITCHENAID® REFRIGERATOR WARRANTY LIMITED WARRANTY For two years from the date of purchase, when this major appliance is operated and maintained according to instructions ...the U.S.A., call 1-800-807-6777. 5/08 Keep this book and your major appliance to be provided by KitchenAid. 5. SEVENTH THROUGH TWELFTH YEAR LIMITED WARRANTY ON SEALED REFRIGERATION SYSTEM In the seventh through sixth year from the date of purchase, when this major appliance is operated and...

Installation Guide
Page 3
... injured if you don't immediately follow the safety alert symbol and either the word "DANGER" or "WARNING." Keep doors taped closed until refrigerator is the safety alert symbol. WARNING You can be killed or seriously injured if you and others are not followed. Use two or more... can kill or hurt you don't follow instructions. This symbol alerts you to reduce the chance of others . This is completely installed. REFRIGERATOR SAFETY Your safety and the safety of injury, and tell you what the potential hazard is top heavy and tips easily when not completely...
... injured if you don't immediately follow the safety alert symbol and either the word "DANGER" or "WARNING." Keep doors taped closed until refrigerator is the safety alert symbol. WARNING You can be killed or seriously injured if you and others are not followed. Use two or more... can kill or hurt you don't follow instructions. This symbol alerts you to reduce the chance of others . This is completely installed. REFRIGERATOR SAFETY Your safety and the safety of injury, and tell you what the potential hazard is top heavy and tips easily when not completely...

Installation Guide
Page 4
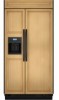
... series requires the installation of custom panels that complements the contoured door handles. This series provides a warm commercial-looking built-in refrigerator. KSSO36FTX KSSO42FTX KSSO48FTX 4 Side by Side Non-Dispensing Refrigerators MODELS Architect® Series Features wraparound styling that are not included. This series requires the installation of custom panels, handles, and...
... series requires the installation of custom panels that complements the contoured door handles. This series provides a warm commercial-looking built-in refrigerator. KSSO36FTX KSSO42FTX KSSO48FTX 4 Side by Side Non-Dispensing Refrigerators MODELS Architect® Series Features wraparound styling that are not included. This series requires the installation of custom panels, handles, and...
Installation Guide
Page 5
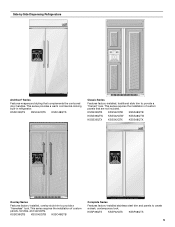
... of custom panels that complements the contoured door handles. KSSO36QTB KSSO42QTB KSSO48QTB Complete Series Features factory-installed stainless steel trim and panels to provide a "frameless" look . This series requires the installation of custom panels, handles, and standoffs. Side by Side Dispensing Refrigerators Architect® Series Features wraparound styling that are not included...
... of custom panels that complements the contoured door handles. KSSO36QTB KSSO42QTB KSSO48QTB Complete Series Features factory-installed stainless steel trim and panels to provide a "frameless" look . This series requires the installation of custom panels, handles, and standoffs. Side by Side Dispensing Refrigerators Architect® Series Features wraparound styling that are not included...

Installation Guide
Page 6
...; Homeowner: Keep Installation Instructions for more information. WARNING Explosion Hazard Keep flammable materials and vapors, such as gasoline, away from refrigerator. If the solid soffit is a registered trademark of Saturn Fasteners, Inc. 6 See "Install Anti-Tip Boards" for future ...radius. See "Opening Dimensions." See "Overlay Series Custom Panels and Handle Kits" for the top grille to enclose the refrigerator. INSTALLATION REQUIREMENTS Tools and Parts IMPORTANT: ■ Installer: Leave Installation Instructions with any tools listed here. ■ ...
...; Homeowner: Keep Installation Instructions for more information. WARNING Explosion Hazard Keep flammable materials and vapors, such as gasoline, away from refrigerator. If the solid soffit is a registered trademark of Saturn Fasteners, Inc. 6 See "Install Anti-Tip Boards" for future ...radius. See "Opening Dimensions." See "Overlay Series Custom Panels and Handle Kits" for the top grille to enclose the refrigerator. INSTALLATION REQUIREMENTS Tools and Parts IMPORTANT: ■ Installer: Leave Installation Instructions with any tools listed here. ■ ...

Installation Guide
Page 7
...not use an extension cord. Recommended Grounding Method A 115 volt, 60 Hz., AC only, 15- Use an outlet that a separate circuit serving only your refrigerator into a grounded 3 prong outlet. to a GFCI (Ground Fault Circuit Interrupter) protected outlet, nuisance tripping of the power supply may be affected. IMPORTANT:....2 cm) Model Width A (as shown above ) 36 35¹⁄₂" (90.2 cm) to 35³⁄₄" (90.8 cm) 4" (10.2 cm) 42 41¹⁄₂" (105.4 cm) to 41³⁄₄" (106.1 cm) 10" (25.4 cm) 48 47¹⁄₂" (120.7 cm) to follow...
...not use an extension cord. Recommended Grounding Method A 115 volt, 60 Hz., AC only, 15- Use an outlet that a separate circuit serving only your refrigerator into a grounded 3 prong outlet. to a GFCI (Ground Fault Circuit Interrupter) protected outlet, nuisance tripping of the power supply may be affected. IMPORTANT:....2 cm) Model Width A (as shown above ) 36 35¹⁄₂" (90.2 cm) to 35³⁄₄" (90.8 cm) 4" (10.2 cm) 42 41¹⁄₂" (105.4 cm) to 41³⁄₄" (106.1 cm) 10" (25.4 cm) 48 47¹⁄₂" (120.7 cm) to follow...

Installation Guide
Page 8
... has a kit available with your refrigerator has a water filter cartridge, it must be at least 6" (15.2 cm) from the back wall. If you have questions about your water pressure, call a licensed, qualified plumber. If you have questions about your water pressure, call a licensed, qualified plumber. A Model 36 42 48 Tipping Radius A 90...
... has a kit available with your refrigerator has a water filter cartridge, it must be at least 6" (15.2 cm) from the back wall. If you have questions about your water pressure, call a licensed, qualified plumber. If you have questions about your water pressure, call a licensed, qualified plumber. A Model 36 42 48 Tipping Radius A 90...

Installation Guide
Page 9
Model 36 42 48 Width A 35" (88.9 cm) 41" (104.1 cm) 47" (119.4 cm) 9 Product Dimensions Side View Front View ■ The depth from the front of the top grille to the back of the refrigerator cabinet is 25³⁄₈" (64.5 cm). ■ The power cord is 84" (213 cm)... long. ■ The water line attached to the back of the refrigerator is 5 ft (1.5 m) long. ■ Height dimensions are shown with leveling legs extended ¹⁄₈" (3 mm) below the rollers. ■ Width dimensions were ...
Model 36 42 48 Width A 35" (88.9 cm) 41" (104.1 cm) 47" (119.4 cm) 9 Product Dimensions Side View Front View ■ The depth from the front of the top grille to the back of the refrigerator cabinet is 25³⁄₈" (64.5 cm). ■ The power cord is 84" (213 cm)... long. ■ The water line attached to the back of the refrigerator is 5 ft (1.5 m) long. ■ Height dimensions are shown with leveling legs extended ¹⁄₈" (3 mm) below the rollers. ■ Width dimensions were ...


