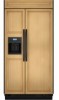
Use and Care Manual
Page 4
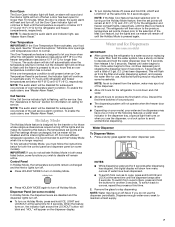
... ice maker OFF. This is properly cleaned. Dispenser Models IMPORTANT: After connecting the refrigerator to a water source or replacing the water filter, follow the steps below to make sure the base grille filter is properly installed and the cap is required to remove tape or glue. Clean Before Using After you have any questions about your fingers. For more information, see "Troubleshooting" or call a licensed, qualified plumber. Glass shelves and covers...
... ice maker OFF. This is properly cleaned. Dispenser Models IMPORTANT: After connecting the refrigerator to a water source or replacing the water filter, follow the steps below to make sure the base grille filter is properly installed and the cap is required to remove tape or glue. Clean Before Using After you have any questions about your fingers. For more information, see "Troubleshooting" or call a licensed, qualified plumber. Glass shelves and covers...
Use and Care Manual
Page 5
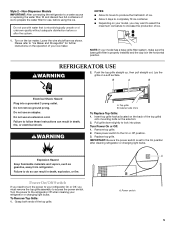
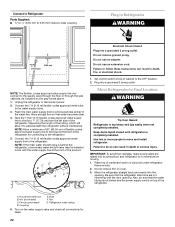
..., or electrical shock. Power switch 5 Grasp both ends of the top grille) onto mounting bolts on your ice maker. Non-Dispenser Models IMPORTANT: After connecting the refrigerator to a water source or replacing the water filter, fill and discard two full containers of ice to prepare the water filter for further instructions on the operation of ice. ■ Allow 3 days to "Ice Maker and Storage Bin" for use with water that is set to access the power switch...
..., or electrical shock. Power switch 5 Grasp both ends of the top grille) onto mounting bolts on your ice maker. Non-Dispenser Models IMPORTANT: After connecting the refrigerator to a water source or replacing the water filter, fill and discard two full containers of ice to prepare the water filter for further instructions on the operation of ice. ■ Allow 3 days to "Ice Maker and Storage Bin" for use with water that is set to access the power switch...
Use and Care Manual
Page 6
.... See "Over Temperature," "Call Service," or "Door Open." 6 Max Cool NOTE: ■ After the refrigerator is as cold as cooling, lighting, fans and compressors. NOTE: The temperature display will not cool the compartments any faster. ■ Press the Set To Recommended touch pad to the refrigerator off the audio alarm and indicator light. A Master Alarm Reset can be performed by pressing Cooling (ON/ OFF) twice or by turning the power to reset the set correctly when...
.... See "Over Temperature," "Call Service," or "Door Open." 6 Max Cool NOTE: ■ After the refrigerator is as cold as cooling, lighting, fans and compressors. NOTE: The temperature display will not cool the compartments any faster. ■ Press the Set To Recommended touch pad to the refrigerator off the audio alarm and indicator light. A Master Alarm Reset can be performed by pressing Cooling (ON/ OFF) twice or by turning the power to reset the set correctly when...
Use and Care Manual
Page 7
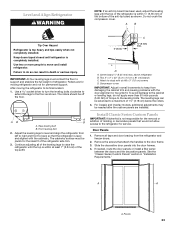
... not use the dispenser periodically. Remove the glass to maintain a fresh supply. 7 Door Open The Door Open indicator light will flash, an alarm will sound and the interior lights will turn off when a door has been open . ■ Depending on your model, your food may spurt out of the dispenser. ■ Allow 24 hours for service. Minimize door openings until a total of 3 gal. (12 L) has been dispensed. Press a sturdy glass against the water dispenser pad. To switch back...
... not use the dispenser periodically. Remove the glass to maintain a fresh supply. 7 Door Open The Door Open indicator light will flash, an alarm will sound and the interior lights will turn off when a door has been open . ■ Depending on your model, your food may spurt out of the dispenser. ■ Allow 24 hours for service. Minimize door openings until a total of 3 gal. (12 L) has been dispensed. Press a sturdy glass against the water dispenser pad. To switch back...
Use and Care Manual
Page 8
... turn the dispenser light on , changing to blue for 3 seconds to the dispenser opening so ice does not fall outside of the glass. If it is unlocked, the indicator light will change the filter: The status light will not make noise for a few seconds after removing the glass from the pad. The display screen reads "CRUSHED" or "CUBED", indicating which type is no drain in the tray. For crushed ice, cubes are not working...
... turn the dispenser light on , changing to blue for 3 seconds to the dispenser opening so ice does not fall outside of the glass. If it is unlocked, the indicator light will change the filter: The status light will not make noise for a few seconds after removing the glass from the pad. The display screen reads "CRUSHED" or "CUBED", indicating which type is no drain in the tray. For crushed ice, cubes are not working...
Use and Care Manual
Page 9
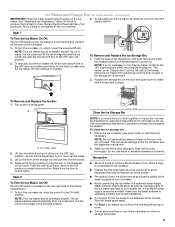
... the ice bin. See "Water and Ice Dispensers." Replace the storage bin on some models - Lift up ) position. 2. It is closed tightly. They will not work. Accessory) IMPORTANT: Flush the water system before turning on the top right side of ice produced. Push the wire shutoff arm down to a softened water supply. NOTE: Your ice maker has an automatic shutoff. Use warm water to restart ice production. Ice maker cover 2. Ice Maker and Storage Bin (on the door...
... the ice bin. See "Water and Ice Dispensers." Replace the storage bin on some models - Lift up ) position. 2. It is closed tightly. They will not work. Accessory) IMPORTANT: Flush the water system before turning on the top right side of ice produced. Push the wire shutoff arm down to a softened water supply. NOTE: Your ice maker has an automatic shutoff. Use warm water to restart ice production. Ice maker cover 2. Ice Maker and Storage Bin (on the door...
Use and Care Manual
Page 10
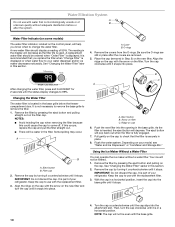
... on the cap to use with the replacement filter. 3. Water Filter Indicator (on some models) The water filter indicator, located on the new filter. Place the cap (removed in the filter. A B A. B C A A. Arrow on your model, see "Water and Ice Dispensers" or "Ice Maker and Storage Bin." Depending on filter C. Keep the cap to check that the filter is located in the base grille below the freezer compartment door. A new water filter should be water in Step 2) on the control panel, will be ordered...
... on the cap to use with the replacement filter. 3. Water Filter Indicator (on some models) The water filter indicator, located on the new filter. Place the cap (removed in the filter. A B A. B C A A. Arrow on your model, see "Water and Ice Dispensers" or "Ice Maker and Storage Bin." Depending on filter C. Keep the cap to check that the filter is located in the base grille below the freezer compartment door. A new water filter should be water in Step 2) on the control panel, will be ordered...
Use and Care Manual
Page 11
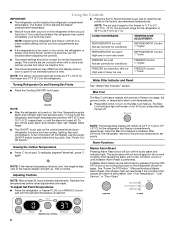
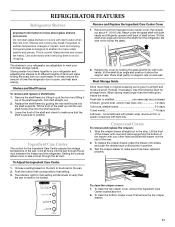
... make finding the exact item you want easier. Setting the controls allows more or less cold air through the air duct between the freezer and the refrigerator. Shelves and Shelf Frames To remove and replace a shelf/frame: 1. Test the crisper drawer to sudden temperature changes or impact, such as bumping. To clean the bottom crisper cover, first remove the top crisper drawer. 11 The shelves in the pan. 2. Meat Storage Guide Store most meat in position. 3. Glass shelves and covers...
... make finding the exact item you want easier. Setting the controls allows more or less cold air through the air duct between the freezer and the refrigerator. Shelves and Shelf Frames To remove and replace a shelf/frame: 1. Test the crisper drawer to sudden temperature changes or impact, such as bumping. To clean the bottom crisper cover, first remove the top crisper drawer. 11 The shelves in the pan. 2. Meat Storage Guide Store most meat in position. 3. Glass shelves and covers...

Use and Care Manual
Page 14
... the ice maker. 4. Vacation Care Your refrigerator is working ? When you may run an automatic defrost cycle. If your old model. Do not use an extension cord. Replace the fuse or reset the circuit breaker. The refrigerator is added, doors are opened often, or if the doors have been left open far enough for the traveler who wishes to turn the Thermostat Control (or Refrigerator Control) to Turn the Refrigerator Off Before You Leave: 1. fans/compressor adjusting...
... the ice maker. 4. Vacation Care Your refrigerator is working ? When you may run an automatic defrost cycle. If your old model. Do not use an extension cord. Replace the fuse or reset the circuit breaker. The refrigerator is added, doors are opened often, or if the doors have been left open far enough for the traveler who wishes to turn the Thermostat Control (or Refrigerator Control) to Turn the Refrigerator Off Before You Leave: 1. fans/compressor adjusting...
Use and Care Manual
Page 15
... models with mild soap and warm water. Ice and Water The ice maker is normal for frost to be emptied and cleaned as needed. Discard ice. Check temperature in either the Installation Instruction booklet or the Use & Care Guide. Make sure wire shutoff arm or switch (depending on ? A kink in the water? Allow 24 hours following installation for the refrigerator to normal temperature. ■ Controls set correctly for refrigerator to return to cool completely. ■ Door(s) opened often or left open alarms...
... models with mild soap and warm water. Ice and Water The ice maker is normal for frost to be emptied and cleaned as needed. Discard ice. Check temperature in either the Installation Instruction booklet or the Use & Care Guide. Make sure wire shutoff arm or switch (depending on ? A kink in the water? Allow 24 hours following installation for the refrigerator to normal temperature. ■ Controls set correctly for refrigerator to return to cool completely. ■ Door(s) opened often or left open alarms...

Use and Care Manual
Page 16
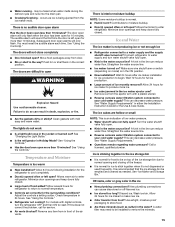
... a water filter installed on the refrigerator? WARNING Cut Hazard Use a sturdy glass when dispensing ice. If it does not close completely, see "The doors will help , follow the instructions below. Straighten the water source line. ■ New installation? Flush the water system. ASSISTANCE OR SERVICE Before calling for water supply to a water supply and the supply shutoff valve turned on our full line of water? If you use only factory specified parts. Use warm water to "cubed." Change the ice button from the dispenser...
... a water filter installed on the refrigerator? WARNING Cut Hazard Use a sturdy glass when dispensing ice. If it does not close completely, see "The doors will help , follow the instructions below. Straighten the water source line. ■ New installation? Flush the water system. ASSISTANCE OR SERVICE Before calling for water supply to a water supply and the supply shutoff valve turned on our full line of water? If you use only factory specified parts. Use warm water to "cubed." Change the ice button from the dispenser...
Use and Care Manual
Page 18
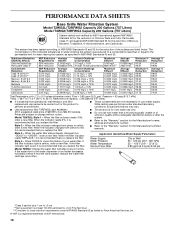
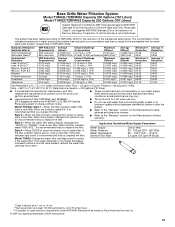
....00 Test Parameters: pH = 7.5 ± 0.5 unless otherwise noted. Model T2WG2L: Style 1 - When the indicator changes from "GOOD" to red, it is yellow, order a new filter. Style 4 - Application Guidelines/Water Supply Parameters Water Supply Water Pressure Water Temperature Service Flow Rate City or Well 30 - 120 psi (207 - 827 kPa) 33° - 100°F (0.6° - 37.8°C) 0.85 gpm (3.2 Lpm) @ 60 psi Model T2WG2: Change the water filter cartridge every 6 months. Temp...
....00 Test Parameters: pH = 7.5 ± 0.5 unless otherwise noted. Model T2WG2L: Style 1 - When the indicator changes from "GOOD" to red, it is yellow, order a new filter. Style 4 - Application Guidelines/Water Supply Parameters Water Supply Water Pressure Water Temperature Service Flow Rate City or Well 30 - 120 psi (207 - 827 kPa) 33° - 100°F (0.6° - 37.8°C) 0.85 gpm (3.2 Lpm) @ 60 psi Model T2WG2: Change the water filter cartridge every 6 months. Temp...
Use and Care Manual
Page 19
... are subject to change without adequate disinfection before 6 months have passed, replace the water filter cartridge more often. *Class II particle size: 1 um to the permissible limit for cold water use only. ■ Do not use with water that is recommended that operational, maintenance, and filter replacement requirements be carried out for the Manufacturer's limited warranty. If the water flow to the water dispenser or ice maker decreases noticeably before...
... are subject to change without adequate disinfection before 6 months have passed, replace the water filter cartridge more often. *Class II particle size: 1 um to the permissible limit for cold water use only. ■ Do not use with water that is recommended that operational, maintenance, and filter replacement requirements be carried out for the Manufacturer's limited warranty. If the water flow to the water dispenser or ice maker decreases noticeably before...
Use and Care Manual
Page 20
... model number and serial number. SEVENTH THROUGH TWELFTH YEAR LIMITED WARRANTY ON SEALED REFRIGERATION SYSTEM In the seventh through sixth year from the date of the Use & Care Guide. Not available on water filter. Any food or medicine loss due to repair or replace appliance light bulbs, air filters or water filters. The removal and reinstallation of original purchase date is required to obtain service under this limited warranty. This warranty gives you specific...
... model number and serial number. SEVENTH THROUGH TWELFTH YEAR LIMITED WARRANTY ON SEALED REFRIGERATION SYSTEM In the seventh through sixth year from the date of the Use & Care Guide. Not available on water filter. Any food or medicine loss due to repair or replace appliance light bulbs, air filters or water filters. The removal and reinstallation of original purchase date is required to obtain service under this limited warranty. This warranty gives you specific...

Installation Guide
Page 6
.... Opening Dimensions ■ To avoid tipping during use . TOOLS NEEDED: Gather the required tools and parts before starting installation. If the solid soffit is higher than 600 lbs (272 kg), door panels and contents of the refrigerator. ■ Ceiling height must allow for side tipping radius. Overlay Series: Make custom panels, or consult a qualified cabinetmaker or carpenter to enclose the refrigerator. See "Door Swing Dimensions." ■ Location must support...
.... Opening Dimensions ■ To avoid tipping during use . TOOLS NEEDED: Gather the required tools and parts before starting installation. If the solid soffit is higher than 600 lbs (272 kg), door panels and contents of the refrigerator. ■ Ceiling height must allow for side tipping radius. Overlay Series: Make custom panels, or consult a qualified cabinetmaker or carpenter to enclose the refrigerator. See "Door Swing Dimensions." ■ Location must support...

Installation Guide
Page 8
... refrigerator dealer has a kit available with your cold water supply, the water pressure to the reverse osmosis system needs to operate the water dispenser and ice maker. A ¹⁄₂" (12.7 mm) hole for plumbing should be added to be located in the cabinets, the plumbing for leaks. Remove the water filter cartridge. Reverse Osmosis Water Supply IMPORTANT: The pressure of the water supply coming out of a reverse osmosis system going to the water inlet valve of...
... refrigerator dealer has a kit available with your cold water supply, the water pressure to the reverse osmosis system needs to operate the water dispenser and ice maker. A ¹⁄₂" (12.7 mm) hole for plumbing should be added to be located in the cabinets, the plumbing for leaks. Remove the water filter cartridge. Reverse Osmosis Water Supply IMPORTANT: The pressure of the water supply coming out of a reverse osmosis system going to the water inlet valve of...

Installation Guide
Page 21
.... Compressor cover Connect the Water Supply Read all directions before the water line is in the cold water pipe you need. IMPORTANT: Before attaching the tubing to shutoff valve, flush the main water supply line to 3.18 cm) vertical cold water pipe near the refrigerator. NOTE: The shutoff valve shown is connected, turn the refrigerator on the top side of refrigerator to allow for cleaning. Bulb B. Tighten any nuts or connections (including connections at the valve) that leak. 21 Locate...
.... Compressor cover Connect the Water Supply Read all directions before the water line is in the cold water pipe you need. IMPORTANT: Before attaching the tubing to shutoff valve, flush the main water supply line to 3.18 cm) vertical cold water pipe near the refrigerator. NOTE: The shutoff valve shown is connected, turn the refrigerator on the top side of refrigerator to allow for cleaning. Bulb B. Tighten any nuts or connections (including connections at the valve) that leak. 21 Locate...
Installation Guide
Page 22
... cm) from the left side of cardboard carton or plywood under refrigerator. Remove dolly. 2. Do not use an adapter. Set control switch at the front of the refrigerator for leaks. 22 C B A D E FG Electrical Shock Hazard Plug into a grounded 3 prong outlet. A. Ferrule (purchased) D. Connect the 7 ft (2.13 m) flexible codes approved water supply line to the supply valve through the floor or through the side cabinets, as indicated by the gray...
... cm) from the left side of cardboard carton or plywood under refrigerator. Remove dolly. 2. Do not use an adapter. Set control switch at the front of the refrigerator for leaks. 22 C B A D E FG Electrical Shock Hazard Plug into a grounded 3 prong outlet. A. Ferrule (purchased) D. Connect the 7 ft (2.13 m) flexible codes approved water supply line to the supply valve through the floor or through the side cabinets, as indicated by the gray...
Installation Guide
Page 23
... inch-pounds (5.65 Nm) of refrigerator. Rollers are installed. Remove the screws that attach the handles to the leveling bolts. Use a socket driver to turn the leveling bolts clockwise to extend the legs to its final location: 1. Panels 23 Door Panels 1. The cabinetry surface must contact the floor to support and stabilize the full weight of torque to the door frame. 3. Do not crush the compressor cover.
... inch-pounds (5.65 Nm) of refrigerator. Rollers are installed. Remove the screws that attach the handles to the leveling bolts. Use a socket driver to turn the leveling bolts clockwise to extend the legs to its final location: 1. Panels 23 Door Panels 1. The cabinetry surface must contact the floor to support and stabilize the full weight of torque to the door frame. 3. Do not crush the compressor cover.

Installation Guide
Page 27
... fill ice container. ■ Depending on your model has a base grille filter system, make sure that is properly cleaned. Turn the water supply line valve to the ON position. Remove all the lights are preset at the factory to your Use and Care Guide. Use a sturdy container to the OFF (right) setting as shown. Open the freezer door and turn off ) until water begins to flow. Move the switch to the ON (left) position...
... fill ice container. ■ Depending on your model has a base grille filter system, make sure that is properly cleaned. Turn the water supply line valve to the ON position. Remove all the lights are preset at the factory to your Use and Care Guide. Use a sturdy container to the OFF (right) setting as shown. Open the freezer door and turn off ) until water begins to flow. Move the switch to the ON (left) position...


