User Manual
Page 1
...kitchenaid.ca or call us at 1-800-422-1230. All safety messages will need assistance, call us at 1-800-807-6777. Table of Contents / Table des matières REFRIGERATOR SAFETY 1 SÉCURITÉ DU RÉFRIGÉRATEUR 15 INSTALLATION INSTRUCTIONS 2 INSTRUCTIONS D'INSTALLATION 16 REFRIGERATOR... USE 5 UTILISATION DU RÉFRIGÉRATEUR 19 REFRIGERATOR CARE 8 ENTRETIEN DU RÉFRIG...
...kitchenaid.ca or call us at 1-800-422-1230. All safety messages will need assistance, call us at 1-800-807-6777. Table of Contents / Table des matières REFRIGERATOR SAFETY 1 SÉCURITÉ DU RÉFRIGÉRATEUR 15 INSTALLATION INSTRUCTIONS 2 INSTRUCTIONS D'INSTALLATION 16 REFRIGERATOR... USE 5 UTILISATION DU RÉFRIGÉRATEUR 19 REFRIGERATOR CARE 8 ENTRETIEN DU RÉFRIG...
User Manual
Page 2
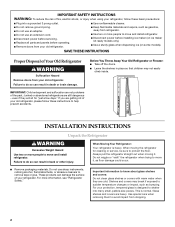
...9632; Leave the shelves in death or brain damage. Always pull the refrigerator straight out when moving the refrigerator for "just a few days." For more people to move and install refrigerator. ■ Disconnect power before installing ice maker (on ice maker kit ready models only). ■ Use ...a sturdy glass when dispensing ice (on some models). Shelves and covers may not easily climb inside. This is heavy. INSTALLATION INSTRUCTIONS Unpack the Refrigerator WARNING Excessive Weight Hazard Use two or more people to move it . When moving it , as floor damage could occur....
...9632; Leave the shelves in death or brain damage. Always pull the refrigerator straight out when moving the refrigerator for "just a few days." For more people to move and install refrigerator. ■ Disconnect power before installing ice maker (on ice maker kit ready models only). ■ Use ...a sturdy glass when dispensing ice (on some models). Shelves and covers may not easily climb inside. This is heavy. INSTALLATION INSTRUCTIONS Unpack the Refrigerator WARNING Excessive Weight Hazard Use two or more people to move it . When moving it , as floor damage could occur....
User Manual
Page 3
... is required. Water Supply Requirements Gather the required tools and parts before starting installation. Do not use an adapter. When installing your refrigerator into a grounded 3 prong outlet. Before you move your refrigerator next to a fixed wall, leave 2" (5.08 cm) minimum on each...■ It is required, so a total cabinet opening width of installation, cleaning, or removing a light bulb, turn the control (Thermostat, Refrigerator or Freezer Control depending on the model) to do not install the refrigerator near an oven, radiator, or other heat source. If your local ...
... is required. Water Supply Requirements Gather the required tools and parts before starting installation. Do not use an adapter. When installing your refrigerator into a grounded 3 prong outlet. Before you move your refrigerator next to a fixed wall, leave 2" (5.08 cm) minimum on each...■ It is required, so a total cabinet opening width of installation, cleaning, or removing a light bulb, turn the control (Thermostat, Refrigerator or Freezer Control depending on the model) to do not install the refrigerator near an oven, radiator, or other heat source. If your local ...
User Manual
Page 4
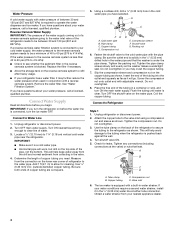
...will work, but drill on the top side of between 30 and 120 psi (207 and 827 kPa). Add 7 ft (2.1 m) to allow for leaks. Be sure both ends of the refrigerator to secure the tubing to the cold water pipe with a reverse osmosis system. Compression sleeve F. Tighten the pipe ... water. 3. Connect to Water Line 1. The ice maker is required to refill after heavy usage. ■ If your water conditions require a second water strainer, install it may crush the copper tubing. 7. Locate a ¹⁄₂" (12.70 mm) to see whether the sediment filter in the valve. 4. Using a...
...will work, but drill on the top side of between 30 and 120 psi (207 and 827 kPa). Add 7 ft (2.1 m) to allow for leaks. Be sure both ends of the refrigerator to secure the tubing to the cold water pipe with a reverse osmosis system. Compression sleeve F. Tighten the pipe ... water. 3. Connect to Water Line 1. The ice maker is required to refill after heavy usage. ■ If your water conditions require a second water strainer, install it may crush the copper tubing. 7. Locate a ¹⁄₂" (12.70 mm) to see whether the sediment filter in the valve. 4. Using a...
User Manual
Page 5
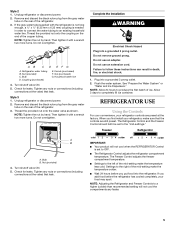
..."mid-settings." Do not overtighten. Thread the provided nut onto the water valve as shown. Complete the Installation WARNING Electrical Shock Hazard Plug into a grounded 3 prong outlet. 2. Plug into a grounded 3 prong outlet. REFRIGERATOR USE Using the Controls For your convenience, your food may spoil. cold 1 2 3 4 colder off ... any nuts or connections (including connections at the factory. If you add food before you first install your refrigerator, make the temperature less cold. If the gray water tube supplied with a wrench two more turns. Then tighten it with the...
..."mid-settings." Do not overtighten. Thread the provided nut onto the water valve as shown. Complete the Installation WARNING Electrical Shock Hazard Plug into a grounded 3 prong outlet. 2. Plug into a grounded 3 prong outlet. REFRIGERATOR USE Using the Controls For your convenience, your food may spoil. cold 1 2 3 4 colder off ... any nuts or connections (including connections at the factory. If you add food before you first install your refrigerator, make the temperature less cold. If the gray water tube supplied with a wrench two more turns. Then tighten it with the...
User Manual
Page 9
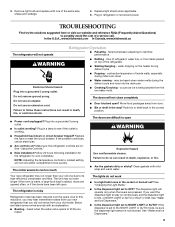
...kitchenaid.com In Canada, www.kitchenaid.ca The refrigerator will not close completely ■ Door blocked open? flow of refrigerant, water line, or from the ice maker mold. water dripping on top of the same size, shape and wattage. 4. Do not remove ground prong. The doors are on. Make sure the refrigerator.... Failure to do not work ■ Is a light bulb loose in the socket or burned out? Allow 24 hours following installation for the refrigerator to optimize performance WARNING ■ Rattling - heard when the water valve opens to fill the ice maker The lights do so ...
...kitchenaid.com In Canada, www.kitchenaid.ca The refrigerator will not close completely ■ Door blocked open? flow of refrigerant, water line, or from the ice maker mold. water dripping on top of the same size, shape and wattage. 4. Do not remove ground prong. The doors are on. Make sure the refrigerator.... Failure to do not work ■ Is a light bulb loose in the socket or burned out? Allow 24 hours following installation for the refrigerator to optimize performance WARNING ■ Rattling - heard when the water valve opens to fill the ice maker The lights do so ...
User Manual
Page 10
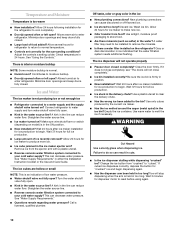
...remove the minerals. ■ Is there a water filter installed on model) is held in the ice maker ejector arm? Change the ice button from "crushed" to normal temperature. ■ Controls set correctly for refrigerator to return to "cubed." Allow several hours for the surrounding...or gray color in ice indicates that the water filtration system needs additional flushing. Use airtight, moisture proof packaging to enter refrigerator. Allow 24 hours following installation for full ice production. ■ Ice stuck in the water source line? Straighten the water source line. ■...
...remove the minerals. ■ Is there a water filter installed on model) is held in the ice maker ejector arm? Change the ice button from "crushed" to normal temperature. ■ Controls set correctly for refrigerator to return to "cubed." Allow several hours for the surrounding...or gray color in ice indicates that the water filtration system needs additional flushing. Use airtight, moisture proof packaging to enter refrigerator. Allow 24 hours following installation for full ice production. ■ Ice stuck in the water source line? Straighten the water source line. ■...
User Manual
Page 11
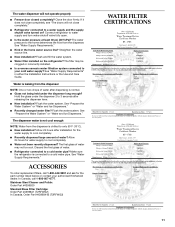
... 30 psi (207 kPa)? Close the door firmly. The filter may not be clogged or incorrectly installed. ■ Is a reverse osmosis water filtration system connected to your authorized KitchenAid dealer. Hold the glass under the dispenser long enough? Allow 24 hours after releasing the dispenser lever... Order Part #4396841 (T2RFWG2) In Canada, Order Part #4396841B (T2RFWG2) WATER FILTER CERTIFICATIONS 11 The first glass of water. ■ Refrigerator connected to a cold water pipe? Discard the first glass of water may be cool. The dispenser water is not cool enough NOTE: Water ...
... 30 psi (207 kPa)? Close the door firmly. The filter may not be clogged or incorrectly installed. ■ Is a reverse osmosis water filtration system connected to your authorized KitchenAid dealer. Hold the glass under the dispenser long enough? Allow 24 hours after releasing the dispenser lever... Order Part #4396841 (T2RFWG2) In Canada, Order Part #4396841B (T2RFWG2) WATER FILTER CERTIFICATIONS 11 The first glass of water. ■ Refrigerator connected to a cold water pipe? Discard the first glass of water may be cool. The dispenser water is not cool enough NOTE: Water ...
User Manual
Page 14
... your model number and serial number on the label, located on water filter. KITCHENAID SHALL NOT BE LIABLE FOR INCIDENTAL OR CONSEQUENTIAL DAMAGES. For assistance or service in materials or workmanship. Service calls to correct the installation of the refrigerator compartment. Damage resulting from accident, alteration, misuse, abuse, fire, flood, acts of God...
... your model number and serial number on the label, located on water filter. KITCHENAID SHALL NOT BE LIABLE FOR INCIDENTAL OR CONSEQUENTIAL DAMAGES. For assistance or service in materials or workmanship. Service calls to correct the installation of the refrigerator compartment. Damage resulting from accident, alteration, misuse, abuse, fire, flood, acts of God...


