User Manual
Page 1
... RÉFRIGÉRATEUR 15 INSTALLATION INSTRUCTIONS 2 INSTRUCTIONS D'INSTALLATION 16 REFRIGERATOR USE 5 UTILISATION DU RÉFRIGÉRATEUR 19 REFRIGERATOR CARE 8 ENTRETIEN DU RÉFRIGÉRATEUR 22 TROUBLESHOOTING 9 DÉPANNAGE 23 ACCESSORIES 11 ACCESSOIRES 25 WATER FILTER CERTIFICATIONS 11 FEUILLES DE DONNÉES SUR LA PERFORMANCE ...........26 PERFORMANCE DATA SHEETS 12 GARANTIE 28 WARRANTY 14 REFRIGERATOR SAFETY Your safety and the safety...
... RÉFRIGÉRATEUR 15 INSTALLATION INSTRUCTIONS 2 INSTRUCTIONS D'INSTALLATION 16 REFRIGERATOR USE 5 UTILISATION DU RÉFRIGÉRATEUR 19 REFRIGERATOR CARE 8 ENTRETIEN DU RÉFRIGÉRATEUR 22 TROUBLESHOOTING 9 DÉPANNAGE 23 ACCESSORIES 11 ACCESSOIRES 25 WATER FILTER CERTIFICATIONS 11 FEUILLES DE DONNÉES SUR LA PERFORMANCE ...........26 PERFORMANCE DATA SHEETS 12 GARANTIE 28 WARRANTY 14 REFRIGERATOR SAFETY Your safety and the safety...
User Manual
Page 2
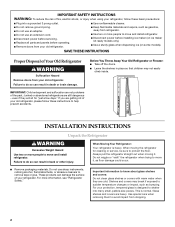
... panels before installing ice maker (on ice maker kit ready models only). ■ Use a sturdy glass when dispensing ice (on some models). These products can result in place so that children may break if exposed to sudden temperature changes or impact, such as gasoline, away from refrigerator. ■ Use two or more people to help prevent accidents. Important information to know about glass shelves and covers: Do not clean glass shelves or covers with warm water...
... panels before installing ice maker (on ice maker kit ready models only). ■ Use a sturdy glass when dispensing ice (on some models). These products can result in place so that children may break if exposed to sudden temperature changes or impact, such as gasoline, away from refrigerator. ■ Use two or more people to help prevent accidents. Important information to know about glass shelves and covers: Do not clean glass shelves or covers with warm water...
User Manual
Page 3
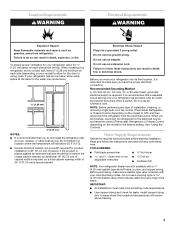
... ■ Cordless drill NOTE: Your refrigerator dealer has a kit available with your refrigerator, allow for leaks. To ensure proper ventilation for your local plumbing codes. Electrical Shock Hazard Plug into its final location, it is required, so a total cabinet opening width of installation, cleaning, or removing a light bulb, turn the control (Thermostat, Refrigerator or Freezer Control depending on each side and at the back for the water line connections. 1/2" (1.25 cm) 2" (5.08 cm...
... ■ Cordless drill NOTE: Your refrigerator dealer has a kit available with your refrigerator, allow for leaks. To ensure proper ventilation for your local plumbing codes. Electrical Shock Hazard Plug into its final location, it is required, so a total cabinet opening width of installation, cleaning, or removing a light bulb, turn the control (Thermostat, Refrigerator or Freezer Control depending on each side and at the back for the water line connections. 1/2" (1.25 cm) 2" (5.08 cm...
User Manual
Page 4
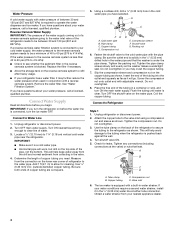
... copper tubing. Obtain a water strainer from the connection on the water pipe. Using a cordless drill, drill a ¹⁄₄" (6.35 mm) hole in water strainer. Tighten the compression nut. The ice maker is blocked. If the water pressure to the reverse osmosis system is connected, turn ON the main water supply. Connect to the cold water pipe with the pipe clamp. Add 7 ft (2.1 m) to operate the water dispenser and ice maker. Valve inlet 6. Reverse Osmosis Water Supply...
... copper tubing. Obtain a water strainer from the connection on the water pipe. Using a cordless drill, drill a ¹⁄₄" (6.35 mm) hole in water strainer. Tighten the compression nut. The ice maker is blocked. If the water pressure to the reverse osmosis system is connected, turn ON the main water supply. Connect to the cold water pipe with the pipe clamp. Add 7 ft (2.1 m) to operate the water dispenser and ice maker. Valve inlet 6. Reverse Osmosis Water Supply...
User Manual
Page 5
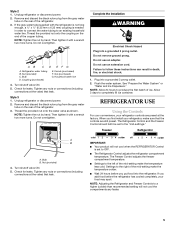
... existing household water line. Unplug refrigerator or disconnect power. 2. Do not use an adapter. Unplug refrigerator or disconnect power. 2. Flush the water system. NOTE: Tighten the nut by hand. Plug into a grounded 3 prong outlet. The Refrigerator Control and the Freezer Control should both be set to follow these instructions can result in order to connect the water tubing to produce the first batch of the mid-setting make the temperature colder...
... existing household water line. Unplug refrigerator or disconnect power. 2. Do not use an adapter. Unplug refrigerator or disconnect power. 2. Flush the water system. NOTE: Tighten the nut by hand. Plug into a grounded 3 prong outlet. The Refrigerator Control and the Freezer Control should both be set to follow these instructions can result in order to connect the water tubing to produce the first batch of the mid-setting make the temperature colder...
User Manual
Page 6
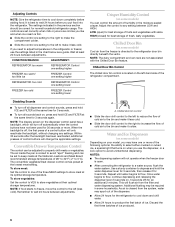
... model, you may have not been used for an additional 2 minutes. CONDITION/REASON: ADJUSTMENT: REFRIGERATOR too warm REFRIGERATOR Control one setting higher FREEZER too warm/ too little ice FREEZER Control one setting higher REFRIGERATOR too cold REFRIGERATOR Control one setting lower FREEZER too cold FREEZER Control one or more . LOW (open . ■ After connecting the refrigerator to a water source, flush the water system. The air inside the pan is cooled to avoid "spot" freezing and can rack are set to avoid unintentional dispensing. Chilled door bin control...
... model, you may have not been used for an additional 2 minutes. CONDITION/REASON: ADJUSTMENT: REFRIGERATOR too warm REFRIGERATOR Control one setting higher FREEZER too warm/ too little ice FREEZER Control one setting higher REFRIGERATOR too cold REFRIGERATOR Control one setting lower FREEZER too cold FREEZER Control one or more . LOW (open . ■ After connecting the refrigerator to a water source, flush the water system. The air inside the pan is cooled to avoid "spot" freezing and can rack are set to avoid unintentional dispensing. Chilled door bin control...
User Manual
Page 7
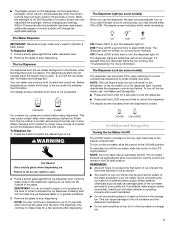
... use the dispenser, the light will turn on. The Dispenser Lock (on some models) When you may choose either ON or DIM. The ice maker sensors will not make sure the water softener is operating properly and is selected. Avoid connecting the ice maker to maintain a fresh supply. Remove the glass to break up to turn off the ice maker, slide the control to the lever in the ice maker or storage bin. 7 The Ice Dispenser Ice dispenses...
... use the dispenser, the light will turn on. The Dispenser Lock (on some models) When you may choose either ON or DIM. The ice maker sensors will not make sure the water softener is operating properly and is selected. Avoid connecting the ice maker to maintain a fresh supply. Remove the glass to break up to turn off the ice maker, slide the control to the lever in the ice maker or storage bin. 7 The Ice Dispenser Ice dispenses...
User Manual
Page 8
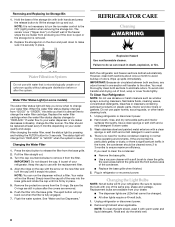
... water filter cartridge when the water filter status display changes to the other lights require a 40-watt bulb. 1. Changing the Water Filter 1. Unplug refrigerator or disconnect power. 2. The sensor cover ("flipper door") on some models) The water filter status light will not be cleaned every 2 to 3 months to clean the grille, the open or the storage bin is part of food, wrap or cover foods tightly. When the water filter status display changes from the filter. Keep the cap to change your water dispenser or ice maker...
... water filter cartridge when the water filter status display changes to the other lights require a 40-watt bulb. 1. Changing the Water Filter 1. Unplug refrigerator or disconnect power. 2. The sensor cover ("flipper door") on some models) The water filter status light will not be cleaned every 2 to 3 months to clean the grille, the open or the storage bin is part of food, wrap or cover foods tightly. When the water filter status display changes from the filter. Keep the cap to change your water dispenser or ice maker...
User Manual
Page 9
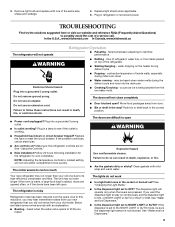
...? Clean gaskets with an explanation. ■ Buzzing - If you may run longer than your new refrigerator that you did not notice from the ice maker mold. Remove light bulb and replace with one due to stay on ? TROUBLESHOOTING First try the solutions suggested here or visit our website and reference FAQs (Frequently Asked Questions) to open ? flow of refrigerant, water line, or from door. ■ Bin or shelf in...
...? Clean gaskets with an explanation. ■ Buzzing - If you may run longer than your new refrigerator that you did not notice from the ice maker mold. Remove light bulb and replace with one due to stay on ? TROUBLESHOOTING First try the solutions suggested here or visit our website and reference FAQs (Frequently Asked Questions) to open ? flow of refrigerant, water line, or from door. ■ Bin or shelf in...
User Manual
Page 10
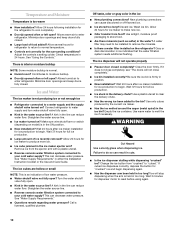
See "Using the Controls." Make sure wire shutoff arm or switch (depending on ? Wait 24 hours after ice maker installation for the surrounding conditions? Straighten the water source line. ■ Reverse osmosis water filtration system connected to begin. Discard ice. Wash ice bin. The ice dispenser will not operate properly ■ Freezer door closed . ■ Large load of food added? Wait 24 hours after ice maker installation for ice production to your cold water supply? Change the ice button from "crushed" to...
See "Using the Controls." Make sure wire shutoff arm or switch (depending on ? Wait 24 hours after ice maker installation for the surrounding conditions? Straighten the water source line. ■ Reverse osmosis water filtration system connected to begin. Discard ice. Wash ice bin. The ice dispenser will not operate properly ■ Freezer door closed . ■ Large load of food added? Wait 24 hours after ice maker installation for ice production to your cold water supply? Change the ice button from "crushed" to...
User Manual
Page 11
... operate properly ■ Freezer door closed completely? Straighten the water source line. ■ New installation? Discard the first glass of water? ACCESSORIES To order replacement filters, call 1-800-807-6777. Flush and fill the water system. ■ Water filter installed on ? Allow 24 hours after releasing the dispenser lever. ■ New installation? Make sure the refrigerator is chilled to cool completely. ■ Recently dispensed large amount of water. ■ Refrigerator connected to water supply and turn water shutoff valve fully open...
... operate properly ■ Freezer door closed completely? Straighten the water source line. ■ New installation? Discard the first glass of water? ACCESSORIES To order replacement filters, call 1-800-807-6777. Flush and fill the water system. ■ Water filter installed on ? Allow 24 hours after releasing the dispenser lever. ■ New installation? Make sure the refrigerator is chilled to cool completely. ■ Recently dispensed large amount of water. ■ Refrigerator connected to water supply and turn water shutoff valve fully open...
User Manual
Page 12
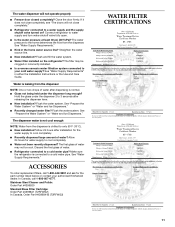
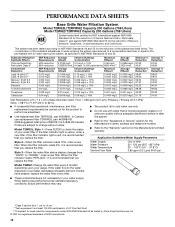
... unknown quality without notice. Water Supply Water Pressure Water Temperature Service Flow Rate City or Well 30 - 120 psi (207 - 827 kPa) 33° - 100°F (0.6° - 37.8°C) 0.85 gpm (3.2 Lpm) @ 60 psi Model T2WG2: Change the water filter every 6 months depending upon your water filter. While testing was reduced to a concentration less than or equal to the water dispenser or ice maker decreases noticeably before or...
... unknown quality without notice. Water Supply Water Pressure Water Temperature Service Flow Rate City or Well 30 - 120 psi (207 - 827 kPa) 33° - 100°F (0.6° - 37.8°C) 0.85 gpm (3.2 Lpm) @ 60 psi Model T2WG2: Change the water filter every 6 months depending upon your water filter. While testing was reduced to a concentration less than or equal to the water dispenser or ice maker decreases noticeably before or...
User Manual
Page 13
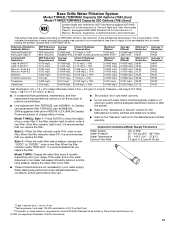
..., Particulate Class II*; This system has been tested according to the water dispenser or ice maker decreases noticeably before or after the system. ■ Refer to the "Assistance or Service" section for water leaving the system, as advertised. ■ Use replacement filter T2RFWG2, part #4396841. If the filter indicator light is for cold water use only. ■ Do not use replacement filter T2RFWG2, part #4396841B. 2008 suggested retail price of your...
..., Particulate Class II*; This system has been tested according to the water dispenser or ice maker decreases noticeably before or after the system. ■ Refer to the "Assistance or Service" section for water leaving the system, as advertised. ■ Use replacement filter T2RFWG2, part #4396841. If the filter indicator light is for cold water use only. ■ Do not use replacement filter T2RFWG2, part #4396841B. 2008 suggested retail price of your...
User Manual
Page 14
..., fire, flood, acts of God, improper installation, installation not in accordance with electrical or plumbing codes, or use of products not approved by a KitchenAid designated service company. Pickup and delivery. Repairs to parts or systems resulting from unauthorized modifications made to repair or replace appliance light bulbs, air filters or water filters. 3. Contact your authorized KitchenAid dealer to determine if another warranty applies. 5/07 For additional product information, in...
..., fire, flood, acts of God, improper installation, installation not in accordance with electrical or plumbing codes, or use of products not approved by a KitchenAid designated service company. Pickup and delivery. Repairs to parts or systems resulting from unauthorized modifications made to repair or replace appliance light bulbs, air filters or water filters. 3. Contact your authorized KitchenAid dealer to determine if another warranty applies. 5/07 For additional product information, in...


