User Instructions
Page 1
... RÉFRIGÉRATEUR 19 INSTALLATION INSTRUCTIONS 2 INSTRUCTIONS D'INSTALLATION 20 REFRIGERATOR USE 5 UTILISATION DU RÉFRIGÉRATEUR 23 REFRIGERATOR CARE 8 ENTRETIEN DU RÉFRIGÉRATEUR 27 TROUBLESHOOTING 9 DÉPANNAGE 28 ACCESSORIES 11 ACCESSOIRES 30 WATER FILTER CERTIFICATIONS 12 FEUILLES DE DONNÉES SUR LA PERFORMANCE 31 PERFORMANCE DATA SHEETS 13 GARANTIE 35 WARRANTY 17 REFRIGERATOR SAFETY Your safety and the safety...
... RÉFRIGÉRATEUR 19 INSTALLATION INSTRUCTIONS 2 INSTRUCTIONS D'INSTALLATION 20 REFRIGERATOR USE 5 UTILISATION DU RÉFRIGÉRATEUR 23 REFRIGERATOR CARE 8 ENTRETIEN DU RÉFRIGÉRATEUR 27 TROUBLESHOOTING 9 DÉPANNAGE 28 ACCESSORIES 11 ACCESSOIRES 30 WATER FILTER CERTIFICATIONS 12 FEUILLES DE DONNÉES SUR LA PERFORMANCE 31 PERFORMANCE DATA SHEETS 13 GARANTIE 35 WARRANTY 17 REFRIGERATOR SAFETY Your safety and the safety...

User Instructions
Page 2
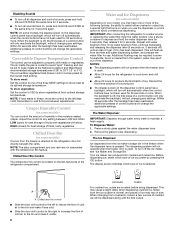
... with warm water when they are getting rid of your old refrigerator, please follow these instructions to do so can damage the surface of your refrigerator. Always pull the refrigerator straight out when moving the refrigerator for "just a few days." Do not use an extension cord. ■ Disconnect power before servicing. ■ Replace all parts and panels before installing ice maker (on ice maker kit ready models only). ■ Use a sturdy glass when dispensing ice...
... with warm water when they are getting rid of your old refrigerator, please follow these instructions to do so can damage the surface of your refrigerator. Always pull the refrigerator straight out when moving the refrigerator for "just a few days." Do not use an extension cord. ■ Disconnect power before servicing. ■ Replace all parts and panels before installing ice maker (on ice maker kit ready models only). ■ Use a sturdy glass when dispensing ice...
User Instructions
Page 3
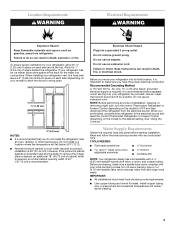
... not use a piercing-type or 4.76 mm) saddle valve which reduces water flow and clogs more easily. To ensure proper ventilation for your refrigerator, allow the doors to swing open. 1/2" (1.25 cm) 2" (5.08 cm) NOTES: ■ It is important to allow for 1" (2.54 cm) of installation, cleaning, or removing a light bulb, turn the control (Thermostat, Refrigerator or Freezer Control depending on the model) to do not install the refrigerator near an...
... not use a piercing-type or 4.76 mm) saddle valve which reduces water flow and clogs more easily. To ensure proper ventilation for your refrigerator, allow the doors to swing open. 1/2" (1.25 cm) 2" (5.08 cm) NOTES: ■ It is important to allow for 1" (2.54 cm) of installation, cleaning, or removing a light bulb, turn the control (Thermostat, Refrigerator or Freezer Control depending on the model) to do not install the refrigerator near an...
User Instructions
Page 4
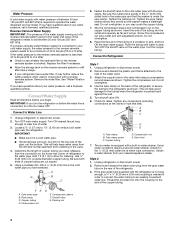
... operate the water dispenser and ice maker. Using a cordless drill, drill a ¹⁄₄" (6.35 mm) hole in the valve. 4. Coil the copper tubing. Shutoff valve G. Unplug refrigerator or disconnect power. 2. Add 7 ft (2.1 m) to an existing household water line. Turn OFF the shutoff valve on the back of the tubing in order to connect the water tubing to allow for leaks. Remove and discard the plastic part that leak. Unplug refrigerator or disconnect power. 2. IMPORTANT: ■ Make...
... operate the water dispenser and ice maker. Using a cordless drill, drill a ¹⁄₄" (6.35 mm) hole in the valve. 4. Coil the copper tubing. Shutoff valve G. Unplug refrigerator or disconnect power. 2. Add 7 ft (2.1 m) to an existing household water line. Turn OFF the shutoff valve on the back of the tubing in order to connect the water tubing to allow for leaks. Remove and discard the plastic part that leak. Unplug refrigerator or disconnect power. 2. IMPORTANT: ■ Make...
User Instructions
Page 5
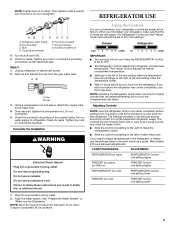
.... If you need to adjust temperatures in the refrigerator or freezer, use the settings listed in the chart below as you put food into the refrigerator. CONDITION/REASON: ADJUSTMENT: REFRIGERATOR too warm REFRIGERATOR Control one setting higher FREEZER too warm/ too little ice FREEZER Control one setting higher REFRIGERATOR too cold REFRIGERATOR Control one setting lower FREEZER too cold FREEZER Control one setting to the left of ice. Ferrule (purchased) F. Inlet 3. Check the connection by hand. Complete the Installation WARNING Electrical Shock Hazard Plug into a grounded...
.... If you need to adjust temperatures in the refrigerator or freezer, use the settings listed in the chart below as you put food into the refrigerator. CONDITION/REASON: ADJUSTMENT: REFRIGERATOR too warm REFRIGERATOR Control one setting higher FREEZER too warm/ too little ice FREEZER Control one setting higher REFRIGERATOR too cold REFRIGERATOR Control one setting lower FREEZER too cold FREEZER Control one setting to the left of ice. Ferrule (purchased) F. Inlet 3. Check the connection by hand. Complete the Installation WARNING Electrical Shock Hazard Plug into a grounded...
User Instructions
Page 6
... when the control buttons have not been used for 5 seconds. The display screen indicates which type of 3 gal. (12 L) has been dispensed. Chilled door bin control ■ Slide the door chill control to the refrigerator door bin directly beneath the vents. Noise from the freezer is located on the dispenser control panel has a backlight, which will change the applicable settings. Chilled Door Bin Control The chilled door bin control is directed to the left (less cold). Repeat until a total of ice you...
... when the control buttons have not been used for 5 seconds. The display screen indicates which type of 3 gal. (12 L) has been dispensed. Chilled door bin control ■ Slide the door chill control to the refrigerator door bin directly beneath the vents. Noise from the freezer is located on the dispenser control panel has a backlight, which will change the applicable settings. Chilled Door Bin Control The chilled door bin control is directed to the left (less cold). Repeat until a total of ice you...
User Instructions
Page 7
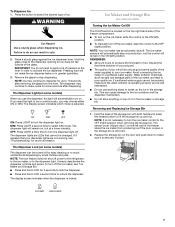
...) position. The display screen indicates which mode is locked. NOTE: The lock feature does not shut off . Avoid connecting the ice maker to select DIM mode. Removing and Replacing Ice Storage Bin 1. The sensor cover ("flipper door") on . WARNING Cut Hazard Use a sturdy glass when dispensing ice. OFF: Press LIGHT a third time to turn off the ice maker, slide the control to make the ice dispense faster or in cuts. 2. The Dispenser Lock (on some models) When you...
...) position. The display screen indicates which mode is locked. NOTE: The lock feature does not shut off . Avoid connecting the ice maker to select DIM mode. Removing and Replacing Ice Storage Bin 1. The sensor cover ("flipper door") on . WARNING Cut Hazard Use a sturdy glass when dispensing ice. OFF: Press LIGHT a third time to turn off the ice maker, slide the control to make the ice dispense faster or in cuts. 2. The Dispenser Lock (on some models) When you...
User Instructions
Page 8
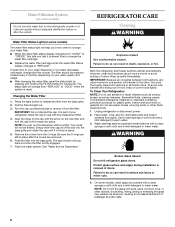
... containing petroleum products on plastic parts, interior and door liners or gaskets. NOTE: Do not hit the glass with the arrow on the new filter and turn the cap until it is part of odors. Water Filtration System (on some models) Do not use with water that it is almost time to change the water filter cartridge. ■ Replace the water filter cartridge when the water filter status display changes to "REPLACE." Keep the cap to...
... containing petroleum products on plastic parts, interior and door liners or gaskets. NOTE: Do not hit the glass with the arrow on the new filter and turn the cap until it is part of odors. Water Filtration System (on some models) Do not use with water that it is almost time to change the water filter cartridge. ■ Replace the water filter cartridge when the water filter status display changes to "REPLACE." Keep the cap to...
User Instructions
Page 9
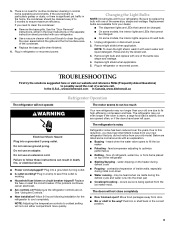
... refrigerator may be changed . ■ On some models, the interior lights are listed some models, the interior lights require a 40-watt bulb. 1. Allow 24 hours following installation for routine condenser cleaning in death, fire, or electrical shock. ■ Power cord unplugged? The refrigerator is added, doors are on ? fans/compressor adjusting to cool completely. contraction/expansion of the same size, shape and wattage. occurs as ice is working ? Move food packages away from the ice maker mold...
... refrigerator may be changed . ■ On some models, the interior lights are listed some models, the interior lights require a 40-watt bulb. 1. Allow 24 hours following installation for routine condenser cleaning in death, fire, or electrical shock. ■ Power cord unplugged? The refrigerator is added, doors are on ? fans/compressor adjusting to cool completely. contraction/expansion of the same size, shape and wattage. occurs as ice is working ? Move food packages away from the ice maker mold...
User Instructions
Page 10
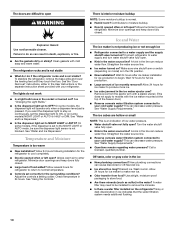
See the "Door Removal" instructions, either in the water source line? Allow 24 hours following installation for the refrigerator to water supply and turn water shutoff valve fully open ? Adjust the controls a setting colder. Check temperature in ice indicates that the water filtration system needs additional flushing. 10 Connect refrigerator to cool completely. ■ Door(s) opened often or left open . ■ Kink in the User Instructions or the separate instruction sheet provided with your cold water supply? Make sure wire shutoff arm or switch (depending on the ...
See the "Door Removal" instructions, either in the water source line? Allow 24 hours following installation for the refrigerator to water supply and turn water shutoff valve fully open ? Adjust the controls a setting colder. Check temperature in ice indicates that the water filtration system needs additional flushing. 10 Connect refrigerator to cool completely. ■ Door(s) opened often or left open . ■ Kink in the User Instructions or the separate instruction sheet provided with your cold water supply? Make sure wire shutoff arm or switch (depending on the ...
User Instructions
Page 11
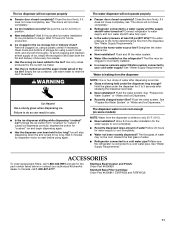
... the ice bin is chilled to only 50°F (10°C). ■ New installation? Use warm water to reset before using again. If cubed ice dispenses correctly, depress the button for "crushed" ice and begin . Wait 3 minutes for the part number listed below or contact your cold water supply? The filter may not be clogged or incorrectly installed. ■ Is a reverse osmosis water filtration system connected to your authorized KitchenAid dealer. See "Water Supply Requirements." Hold the glass...
... the ice bin is chilled to only 50°F (10°C). ■ New installation? Use warm water to reset before using again. If cubed ice dispenses correctly, depress the button for "crushed" ice and begin . Wait 3 minutes for the part number listed below or contact your cold water supply? The filter may not be clogged or incorrectly installed. ■ Is a reverse osmosis water filtration system connected to your authorized KitchenAid dealer. See "Water Supply Requirements." Hold the glass...
User Instructions
Page 13
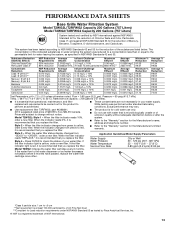
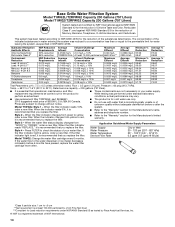
... necessarily in your water filter. When the filter indicator reads 10%, order a new filter. Style 4 - If the filter indicator light is red, it is recommended that you replace the filter. Application Guidelines/Water Supply Parameters Water Supply Water Pressure Water Temperature Service Flow Rate City or Well 30 - 120 psi (207 - 827 kPa) 33° - 100°F (0.6° - 37.8°C) 0.85 gpm (3.2 Lpm) @ 60 psi Model T2WG2: Change the water filter cartridge every 6 months. Flow...
... necessarily in your water filter. When the filter indicator reads 10%, order a new filter. Style 4 - If the filter indicator light is red, it is recommended that you replace the filter. Application Guidelines/Water Supply Parameters Water Supply Water Pressure Water Temperature Service Flow Rate City or Well 30 - 120 psi (207 - 827 kPa) 33° - 100°F (0.6° - 37.8°C) 0.85 gpm (3.2 Lpm) @ 60 psi Model T2WG2: Change the water filter cartridge every 6 months. Flow...
User Instructions
Page 14
... the Manufacturer's limited warranty. Application Guidelines/Water Supply Parameters Water Supply Water Pressure Water Temperature Service Flow Rate City or Well 30 - 120 psi (207 - 827 kPa) 33° - 100°F (0.6° - 37.8°C) 0.5 gpm (1.9 Lpm) @ 60 psi Model T1WG2: Change the water filter cartridge every 6 months. When the filter indicator reads 10%, order a new filter. When the indicator reads 0%, it is recommended that operational, maintenance, and filter replacement requirements be carried out...
... the Manufacturer's limited warranty. Application Guidelines/Water Supply Parameters Water Supply Water Pressure Water Temperature Service Flow Rate City or Well 30 - 120 psi (207 - 827 kPa) 33° - 100°F (0.6° - 37.8°C) 0.5 gpm (1.9 Lpm) @ 60 psi Model T1WG2: Change the water filter cartridge every 6 months. When the filter indicator reads 10%, order a new filter. When the indicator reads 0%, it is recommended that operational, maintenance, and filter replacement requirements be carried out...
User Instructions
Page 15
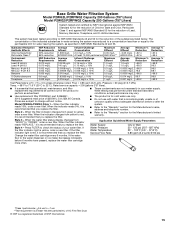
... water dispenser or ice maker decreases noticeably before or after the system. ■ Refer to the "Warranty" section for the Manufacturer's limited warranty. While testing was reduced to a concentration less than or equal to change without adequate disinfection before 6 months have passed, replace the water filter cartridge more often. *Class I particle size: >0.5 um to the "Warranty" section for the Manufacturer's name, address and telephone number...
... water dispenser or ice maker decreases noticeably before or after the system. ■ Refer to the "Warranty" section for the Manufacturer's limited warranty. While testing was reduced to a concentration less than or equal to change without adequate disinfection before 6 months have passed, replace the water filter cartridge more often. *Class I particle size: >0.5 um to the "Warranty" section for the Manufacturer's name, address and telephone number...

User Instructions
Page 16
... is essential that is recommended that you replace the filter. Model P1WG2L/P1WG2: Style 1 - When the indicator reads 0%, it is microbiologically unsafe or of the substances listed below. When the water filter status display changes from green to 22°C). If the filter indicator light is red, it is yellow, order a new filter. Application Guidelines/Water Supply Parameters Water Supply Water Pressure Water Temperature Service Flow Rate City or Well 30 - 120 psi...
... is essential that is recommended that you replace the filter. Model P1WG2L/P1WG2: Style 1 - When the indicator reads 0%, it is microbiologically unsafe or of the substances listed below. When the water filter status display changes from green to 22°C). If the filter indicator light is red, it is yellow, order a new filter. Application Guidelines/Water Supply Parameters Water Supply Water Pressure Water Temperature Service Flow Rate City or Well 30 - 120 psi...
User Instructions
Page 17
... the refrigerator/freezer cavity liner (including labor costs) if the part cracks due to published user or operator instructions and/or installation instructions. 2. This major appliance is operated and maintained according to instructions attached to parts or systems resulting from warranty coverage. 4. Repairs to or furnished with a water filter: 30 day limited warranty on the duration of implied warranties of your major appliance if it was purchased: compressor, evaporator...
... the refrigerator/freezer cavity liner (including labor costs) if the part cracks due to published user or operator instructions and/or installation instructions. 2. This major appliance is operated and maintained according to instructions attached to parts or systems resulting from warranty coverage. 4. Repairs to or furnished with a water filter: 30 day limited warranty on the duration of implied warranties of your major appliance if it was purchased: compressor, evaporator...
User Instructions
Page 18
... In Canada: KitchenAid Brand Home Appliances Customer eXperience Centre 200 - 6750 Century Ave. For additional product information, in the U.S.A., visit www.kitchenaid.com In Canada, visit www.kitchenaid.ca If you do not have access to the Internet and you need further assistance, you can find your model number and serial number on the label, located on the inside wall of...
... In Canada: KitchenAid Brand Home Appliances Customer eXperience Centre 200 - 6750 Century Ave. For additional product information, in the U.S.A., visit www.kitchenaid.com In Canada, visit www.kitchenaid.ca If you do not have access to the Internet and you need further assistance, you can find your model number and serial number on the label, located on the inside wall of...
Parts Diagram
Page 2
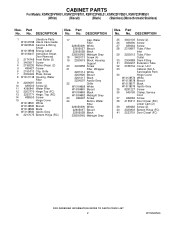
... Hinge (FC) 41 2223751 Door Closer (FC) 2 W10246564 DESCRIPTION 1 Literature Parts W10167098 Use & Care Guide W10205540 Service & Wiring Sheet W10139598 Energy Label W10180407 Instruction Sheet, Door Removal 2 2174748 Front Roller (2) 3 3400517 Screw 4 2196236 Roller (Rear) (2) 5 489427 Screw 6 2155013 Clip, Grille 7 2304249 Plate, Screw 8 W10121138 Housing, Water Filter 9 2209697 Shim 10 489500 Screw (2) 11 4396841 Water Filter 12 2203770 Hinge Top (FC) 13 2203771 Hinge, Top (RC) 14 488500 Screw 15 Hinge Cover...
... Hinge (FC) 41 2223751 Door Closer (FC) 2 W10246564 DESCRIPTION 1 Literature Parts W10167098 Use & Care Guide W10205540 Service & Wiring Sheet W10139598 Energy Label W10180407 Instruction Sheet, Door Removal 2 2174748 Front Roller (2) 3 3400517 Screw 4 2196236 Roller (Rear) (2) 5 489427 Screw 6 2155013 Clip, Grille 7 2304249 Plate, Screw 8 W10121138 Housing, Water Filter 9 2209697 Shim 10 489500 Screw (2) 11 4396841 Water Filter 12 2203770 Hinge Top (FC) 13 2203771 Hinge, Top (RC) 14 488500 Screw 15 Hinge Cover...

Parts Diagram
Page 10
DESCRIPTION 1 Refrigerator Door (Includes Item 5) 2325248W White 2325248T Biscuit 2325248B Black 2323861S Stainless W10191409 Monochromatic 2 2256101 Door, Compartment 3 488208 Screw 4 2304235 Door Bin (3) 5 Door Gasket, Magnetic 2309600 Mist Beige 2309653 Black 2327161 Grey 6 Handle (Includes #3) 2319727W White 2319727T Biscuit 2319727B Black 2319727S Stainless/Satina 7 2308091 Thimble−Top 8 2219698 Stud, Handle 9 2182178 Door Closer, Upper Cam 10 489420 Screw 11 Bracket, Door Stop 2206629 Chrome...
DESCRIPTION 1 Refrigerator Door (Includes Item 5) 2325248W White 2325248T Biscuit 2325248B Black 2323861S Stainless W10191409 Monochromatic 2 2256101 Door, Compartment 3 488208 Screw 4 2304235 Door Bin (3) 5 Door Gasket, Magnetic 2309600 Mist Beige 2309653 Black 2327161 Grey 6 Handle (Includes #3) 2319727W White 2319727T Biscuit 2319727B Black 2319727S Stainless/Satina 7 2308091 Thimble−Top 8 2219698 Stud, Handle 9 2182178 Door Closer, Upper Cam 10 489420 Screw 11 Bracket, Door Stop 2206629 Chrome...

Parts Diagram
Page 12
FREEZER DOOR PARTS For Models: KSRV22FVWH01, KSRV22FVBT01, KSRV22FVBL01, KSRV22FVSS01, KSRV22FVMS01 (White) (Biscuit) (Black) (Stainless) (Monochromatic Stainless) Illus. DESCRIPTION 1 Freezer Door (Includes Item 8 And Dispenser Front Parts) W10214818 White W10214815 Biscuit W10214814 Black W10214817 Stainless W10214816 Monochromatic 2 Handle (Includes #4) 2319727W White 2319727T Biscuit 2319727B Black 2319727S Stainless/Satina 3 2308091 Thimble−Top 4 488208 Screw 5 2219698 Stud, Handle 6 2156021 Trivet (3) 7 3400012 Screw 8 Door Gasket, Magnetic ...
FREEZER DOOR PARTS For Models: KSRV22FVWH01, KSRV22FVBT01, KSRV22FVBL01, KSRV22FVSS01, KSRV22FVMS01 (White) (Biscuit) (Black) (Stainless) (Monochromatic Stainless) Illus. DESCRIPTION 1 Freezer Door (Includes Item 8 And Dispenser Front Parts) W10214818 White W10214815 Biscuit W10214814 Black W10214817 Stainless W10214816 Monochromatic 2 Handle (Includes #4) 2319727W White 2319727T Biscuit 2319727B Black 2319727S Stainless/Satina 3 2308091 Thimble−Top 4 488208 Screw 5 2219698 Stud, Handle 6 2156021 Trivet (3) 7 3400012 Screw 8 Door Gasket, Magnetic ...


