User Instructions
Page 1
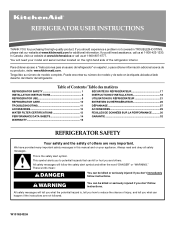
...29 WATER FILTER CERTIFICATIONS 13 FEUILLES DE DONNÉES SUR LA PERFORMANCE ...........30 PERFORMANCE DATA SHEETS 14 GARANTIE 32 WARRANTY 16 REFRIGERATOR SAFETY Your safety and the safety of others . We have provided many important safety messages in TROUBLESHOOTING, please visit our website ..." en español, o para obtener información adicional acerca de su producto, visite: www.kitchenaid.com. Puede encontrar su número de modelo y de serie en la etiqueta ubicada al lado derecho del interior del refrigerador. All safety messages will tell you what ...
...29 WATER FILTER CERTIFICATIONS 13 FEUILLES DE DONNÉES SUR LA PERFORMANCE ...........30 PERFORMANCE DATA SHEETS 14 GARANTIE 32 WARRANTY 16 REFRIGERATOR SAFETY Your safety and the safety of others . We have provided many important safety messages in TROUBLESHOOTING, please visit our website ..." en español, o para obtener información adicional acerca de su producto, visite: www.kitchenaid.com. Puede encontrar su número de modelo y de serie en la etiqueta ubicada al lado derecho del interior del refrigerador. All safety messages will tell you what ...
User Instructions
Page 2
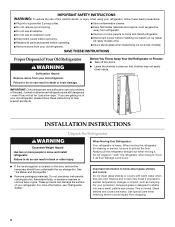
...or covers with warm water when they will sit for cleaning or service, be sure to protect the floor. Before You Throw Away Your Old Refrigerator or Freezer: ■ Take off the doors. ■ Leave the shelves in death or brain damage. Glass shelves and covers are not...care when removing them to avoid impact from underneath the ice storage bin. Failure to do so can damage the surface of your refrigerator. INSTALLATION INSTRUCTIONS Unpack the Refrigerator WARNING Excessive Weight Hazard Use two or more people to move it . See "Ice Maker and Storage Bin." ■ Remove ...
...or covers with warm water when they will sit for cleaning or service, be sure to protect the floor. Before You Throw Away Your Old Refrigerator or Freezer: ■ Take off the doors. ■ Leave the shelves in death or brain damage. Glass shelves and covers are not...care when removing them to avoid impact from underneath the ice storage bin. Failure to do so can damage the surface of your refrigerator. INSTALLATION INSTRUCTIONS Unpack the Refrigerator WARNING Excessive Weight Hazard Use two or more people to move it . See "Ice Maker and Storage Bin." ■ Remove ...
User Instructions
Page 3
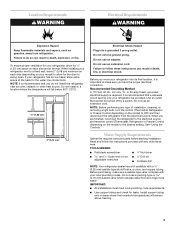
To ensure proper ventilation for your refrigerator, allow for ¹⁄₂" (1.25 cm) space on the model) to OFF and then disconnect the refrigerator from refrigerator. or 20-amp fused, grounded electrical supply is important to do not install the refrigerator near an oven, radiator, ...and follow these instructions can result in death, fire, or electrical shock. Failure to make sure a saddle-type valve complies with your refrigerator be turned off by a switch. See "Using the Controls." Before purchasing, make sure you do so can result in death, explosion...
To ensure proper ventilation for your refrigerator, allow for ¹⁄₂" (1.25 cm) space on the model) to OFF and then disconnect the refrigerator from refrigerator. or 20-amp fused, grounded electrical supply is important to do not install the refrigerator near an oven, radiator, ...and follow these instructions can result in death, fire, or electrical shock. Failure to make sure a saddle-type valve complies with your refrigerator be turned off by a switch. See "Using the Controls." Before purchasing, make sure you do so can result in death, explosion...
User Instructions
Page 4
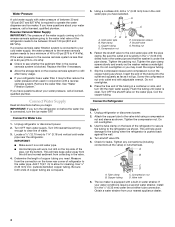
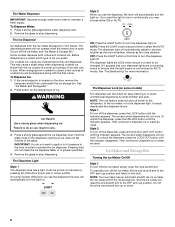
... in a container or sink, and turn the ice maker OFF. IMPORTANT: ■ Make sure it will work, but drill on the lower rear corner of refrigerator to Refrigerator Style 1 1. Use ¹⁄₄" (6.35 mm) O.D. (outside diameter) copper tubing. A G B C FE A. Packing nut 6. Tighten the pipe ...and normal sediment from the connection on the top side of the pipe, not the bottom. Measure from collecting in water strainer. Add 7 ft (2.1 m) to the valve inlet using a compression nut and sleeve as shown. Pipe clamp C. Tighten the packing nut. Screw the compression nut...
... in a container or sink, and turn the ice maker OFF. IMPORTANT: ■ Make sure it will work, but drill on the lower rear corner of refrigerator to Refrigerator Style 1 1. Use ¹⁄₄" (6.35 mm) O.D. (outside diameter) copper tubing. A G B C FE A. Packing nut 6. Tighten the pipe ...and normal sediment from the connection on the top side of the pipe, not the bottom. Measure from collecting in water strainer. Add 7 ft (2.1 m) to the valve inlet using a compression nut and sleeve as shown. Pipe clamp C. Tighten the packing nut. Screw the compression nut...
User Instructions
Page 5
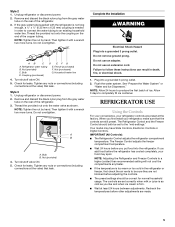
...not remove ground prong. The Freezer Control adjusts the freezer compartment temperature. ■ Wait 24 hours before you first install your refrigerator, make sure that the controls are preset at the valve) that leak. Remove and discard the black nylon plug from the ...not use an extension cord. See "Prepare the Water System" or "Water and Ice Dispensers." IMPORTANT (All Controls): ■ The Refrigerator Control adjusts the refrigerator compartment temperature. Thread the provided nut onto the coupling on the rear of the copper tubing. Thread the provided nut onto the water...
...not remove ground prong. The Freezer Control adjusts the freezer compartment temperature. ■ Wait 24 hours before you first install your refrigerator, make sure that the controls are preset at the valve) that leak. Remove and discard the black nylon plug from the ...not use an extension cord. See "Prepare the Water System" or "Water and Ice Dispensers." IMPORTANT (All Controls): ■ The Refrigerator Control adjusts the refrigerator compartment temperature. Thread the provided nut onto the coupling on the rear of the copper tubing. Thread the provided nut onto the water...
User Instructions
Page 6
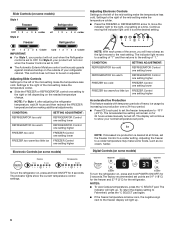
...9632; To view Celsius temperatures, press the °C SELECT pad. CONDITION: SETTING ADJUSTMENT: REFRIGERATOR too cold REFRIGERATOR Control one setting lower REFRIGERATOR too warm REFRIGERATOR Control one setting higher FREEZER too cold FREEZER Control one setting lower FREEZER too warm/too...Colder Cold 1 2 3 4 Colder IMPORTANT: ■ For Style 1, your normal temperature set point. Slide Controls (on some models) Style 1 Freezer Refrigerator cold 1 2 3 4 colder off . The Accelerated Ice setting will light up . 6 Continue moving the indicator light until it is at a time....
...9632; To view Celsius temperatures, press the °C SELECT pad. CONDITION: SETTING ADJUSTMENT: REFRIGERATOR too cold REFRIGERATOR Control one setting lower REFRIGERATOR too warm REFRIGERATOR Control one setting higher FREEZER too cold FREEZER Control one setting lower FREEZER too warm/too...Colder Cold 1 2 3 4 Colder IMPORTANT: ■ For Style 1, your normal temperature set point. Slide Controls (on some models) Style 1 Freezer Refrigerator cold 1 2 3 4 colder off . The Accelerated Ice setting will light up . 6 Continue moving the indicator light until it is at a time....
User Instructions
Page 7
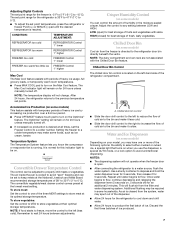
... FREEZER too warm/too little ice FREEZER Control 1° higher Max Cool The Max Cool feature assists with temporary periods of the refrigerator compartment. It is normal for best storage of ice. The convertible vegetable/meat drawer control comes preset at their optimal storage temperatures....temperatures of the three MEAT settings to store meat at all times, set points. Adjusting Digital Controls The set point temperatures, press the refrigerator or freezer PLUS (+) or MINUS (-) pad until water begins to flow. The Max Cool indicator light will remain on the OptimIce®...
... FREEZER too warm/too little ice FREEZER Control 1° higher Max Cool The Max Cool feature assists with temporary periods of the refrigerator compartment. It is normal for best storage of ice. The convertible vegetable/meat drawer control comes preset at their optimal storage temperatures....temperatures of the three MEAT settings to store meat at all times, set points. Adjusting Digital Controls The set point temperatures, press the refrigerator or freezer PLUS (+) or MINUS (-) pad until water begins to flow. The Max Cool indicator light will remain on the OptimIce®...
User Instructions
Page 8
... turn the dispenser light on continuously, you use the dispenser the lever will be locked for more information. Style 2 To turn off power to the refrigerator, to the ice maker, or to be sure that the light sensor is open. ON: Press the LIGHT button to turn ON the ice maker...
... turn the dispenser light on continuously, you use the dispenser the lever will be locked for more information. Style 2 To turn off power to the refrigerator, to the ice maker, or to be sure that the light sensor is open. ON: Press the LIGHT button to turn ON the ice maker...
User Instructions
Page 9
... the control will be only as good as salt) can damage parts of the ice maker and lead to produce the first batch of your refrigerator. Lift up the front of your ice will remain in the base grille. Water Filtration System Do not use with water that is part of... pull it clicks into the OFF (up the ice in the ice maker or storage bin. Water Filter Status Light (on some models) If your refrigerator does not have passed, replace the water filter more can cause damage to the ice container and the dispenser mechanism. ■ Do not store anything...
... the control will be only as good as salt) can damage parts of the ice maker and lead to produce the first batch of your refrigerator. Lift up the front of your ice will remain in the base grille. Water Filtration System Do not use with water that is part of... pull it clicks into the OFF (up the ice in the ice maker or storage bin. Water Filter Status Light (on some models) If your refrigerator does not have passed, replace the water filter more can cause damage to the ice container and the dispenser mechanism. ■ Do not store anything...

User Instructions
Page 10
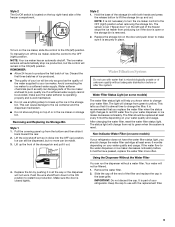
... in the home, the condenser should be cleaned every 2 to 3 months to eliminate odors. All other . Replacement bulbs are available from your refrigerator. NOTE: To clean the light shield, wash it with one of odors. However, clean both sections to ensure maximum efficiency. To Clean Your...Do not use paper towels, scouring pads, or other harsh cleaning tools. 1. Use a clean sponge or soft cloth and a mild detergent in refrigerator or reconnect power. Plug in death, explosion, or fire. Do not use abrasive or harsh cleaners such as window sprays, scouring cleansers, flammable...
... in the home, the condenser should be cleaned every 2 to 3 months to eliminate odors. All other . Replacement bulbs are available from your refrigerator. NOTE: To clean the light shield, wash it with one of odors. However, clean both sections to ensure maximum efficiency. To Clean Your...Do not use paper towels, scouring pads, or other harsh cleaning tools. 1. Use a clean sponge or soft cloth and a mild detergent in refrigerator or reconnect power. Plug in death, explosion, or fire. Do not use abrasive or harsh cleaners such as window sprays, scouring cleansers, flammable...
User Instructions
Page 11
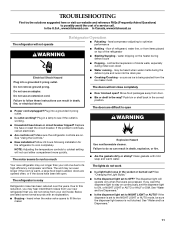
.../compressor adjusting to cool completely. Failure to this reduction, you may run too much Explosion Hazard Use nonflammable cleaner. In the U.S.A., www.kitchenaid.com In Canada, www.kitchenaid.ca The refrigerator will not cool either compartment more quickly. See "Using the Controls." ■ New installation? Due to follow these instructions can result in...
.../compressor adjusting to cool completely. Failure to this reduction, you may run too much Explosion Hazard Use nonflammable cleaner. In the U.S.A., www.kitchenaid.com In Canada, www.kitchenaid.ca The refrigerator will not cool either compartment more quickly. See "Using the Controls." ■ New installation? Due to follow these instructions can result in...
User Instructions
Page 12
...held in too long. There is interior moisture buildup NOTE: Some moisture buildup is not producing ice or not enough ice ■ Refrigerator connected to a water supply and the supply shutoff valve turned on the door, remove the temporary shield from the ejector arm with ... is firmly in the water? Call a licensed, qualified plumber. If it does not close completely." ■ Ice bin installed correctly? Connect refrigerator to your cold water supply? A kink in the ON position. ■ New installation? Remove ice from underneath the ice storage bin. Straighten...
...held in too long. There is interior moisture buildup NOTE: Some moisture buildup is not producing ice or not enough ice ■ Refrigerator connected to a water supply and the supply shutoff valve turned on the door, remove the temporary shield from the ejector arm with ... is firmly in the water? Call a licensed, qualified plumber. If it does not close completely." ■ Ice bin installed correctly? Connect refrigerator to your cold water supply? A kink in the ON position. ■ New installation? Remove ice from underneath the ice storage bin. Straighten...

User Instructions
Page 13
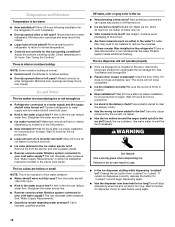
... normal. ■ Glass not being held under the dispenser 2 to 3 seconds after installation for the water supply to your authorized KitchenAid dealer. Hold the glass under the dispenser long enough? Allow 24 hours after releasing the dispenser lever. ■ New installation? Discard...? See "Prepare the Water System" or "Water and Ice Dispensers." ■ Recently changed water filter? The first glass of water. ■ Refrigerator connected to a cold water pipe. See "Prepare the Water System" or "Water and Ice Dispensers." See "Water Supply Requirements." ■ Kink in...
... normal. ■ Glass not being held under the dispenser 2 to 3 seconds after installation for the water supply to your authorized KitchenAid dealer. Hold the glass under the dispenser long enough? Allow 24 hours after releasing the dispenser lever. ■ New installation? Discard...? See "Prepare the Water System" or "Water and Ice Dispensers." ■ Recently changed water filter? The first glass of water. ■ Refrigerator connected to a cold water pipe. See "Prepare the Water System" or "Water and Ice Dispensers." See "Water Supply Requirements." ■ Kink in...
User Instructions
Page 16
... in the home. 8. SECOND THROUGH FIFTH YEAR LIMITED WARRANTY ON CAVITY LINER AND SEALED REFRIGERATION SYSTEM PARTS In the second through fifth years from the date of purchase, KitchenAid will pay for factory specified parts and labor to correct defects in materials or workmanship in... INCLUDING WARRANTIES OF MERCHANTABILITY OR FITNESS FOR A PARTICULAR PURPOSE, ARE LIMITED TO ONE YEAR OR THE SHORTEST PERIOD ALLOWED BY LAW. KITCHENAID® REFRIGERATOR WARRANTY ONE YEAR LIMITED WARRANTY For one year from the date of purchase, when this major appliance is operated and maintained according to...
... in the home. 8. SECOND THROUGH FIFTH YEAR LIMITED WARRANTY ON CAVITY LINER AND SEALED REFRIGERATION SYSTEM PARTS In the second through fifth years from the date of purchase, KitchenAid will pay for factory specified parts and labor to correct defects in materials or workmanship in... INCLUDING WARRANTIES OF MERCHANTABILITY OR FITNESS FOR A PARTICULAR PURPOSE, ARE LIMITED TO ONE YEAR OR THE SHORTEST PERIOD ALLOWED BY LAW. KITCHENAID® REFRIGERATOR WARRANTY ONE YEAR LIMITED WARRANTY For one year from the date of purchase, when this major appliance is operated and maintained according to...
Parts Diagram
Page 1
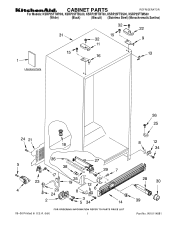
W10114881 CABINET PARTS REFRIGERATOR For Models: KSRP25FTWH00, KSRP25FTBL00, KSRP25FTBT00, KSRP25FTSS00, KSRP25FTMS00 (White) (Black) (Biscuit) (Stainless Steel) (Monochromatic Santina) 09−06 Printed In U.S.A. (kdr) 1 Part No.
W10114881 CABINET PARTS REFRIGERATOR For Models: KSRP25FTWH00, KSRP25FTBL00, KSRP25FTBT00, KSRP25FTSS00, KSRP25FTMS00 (White) (Black) (Biscuit) (Stainless Steel) (Monochromatic Santina) 09−06 Printed In U.S.A. (kdr) 1 Part No.
Parts Diagram
Page 3
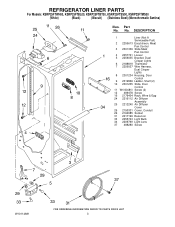
... Control 9 2319866 Ladder, Shelf (2) 10 2301235 Slide, Door Control 11 W10004810 Screw (2) 12 489478 Screw 16 2179404 Rack, Wine & Egg 24 2216112 Air Diffuser Assembly 25 2212240 Air Diffuser Cover 26 2150331 Cover, Conduit 29 2162085 Socket 31 2217199 Reservoir 33 2255743 Light Bulb 34 2209769 Light Lens 37 488280 Screw...
... Control 9 2319866 Ladder, Shelf (2) 10 2301235 Slide, Door Control 11 W10004810 Screw (2) 12 489478 Screw 16 2179404 Rack, Wine & Egg 24 2216112 Air Diffuser Assembly 25 2212240 Air Diffuser Cover 26 2150331 Cover, Conduit 29 2162085 Socket 31 2217199 Reservoir 33 2255743 Light Bulb 34 2209769 Light Lens 37 488280 Screw...

Parts Diagram
Page 4
REFRIGERATOR SHELF PARTS For Models: KSRP25FTWH00, KSRP25FTBL00, KSRP25FTBT00, KSRP25FTSS00, KSRP25FTMS00 (White) (Black) (Biscuit) (Stainless Steel) (Monochromatic Santina) Illus. Part No. DESCRIPTION 1 2195975 Shelf Assembly, Cantilever (3) 2 2174253 ... 489261 Screw 20 2176095 Deflector 21 Cap, Crisper Pan 2223286 Right Side 2223285 Left Side 22 2174362 Window, Meat Pan 24 2216102 Shelf & Roller Assembly 25 2196485 Stud Assembly 26 2301034 Shelf, Snack Pan 27 3400894 Screw 28 2196483 Stud Assembly 29 8281158 Screw 30 2301006 Window, Snack Pan 31 Cap...
REFRIGERATOR SHELF PARTS For Models: KSRP25FTWH00, KSRP25FTBL00, KSRP25FTBT00, KSRP25FTSS00, KSRP25FTMS00 (White) (Black) (Biscuit) (Stainless Steel) (Monochromatic Santina) Illus. Part No. DESCRIPTION 1 2195975 Shelf Assembly, Cantilever (3) 2 2174253 ... 489261 Screw 20 2176095 Deflector 21 Cap, Crisper Pan 2223286 Right Side 2223285 Left Side 22 2174362 Window, Meat Pan 24 2216102 Shelf & Roller Assembly 25 2196485 Stud Assembly 26 2301034 Shelf, Snack Pan 27 3400894 Screw 28 2196483 Stud Assembly 29 8281158 Screw 30 2301006 Window, Snack Pan 31 Cap...
Parts Diagram
Page 10
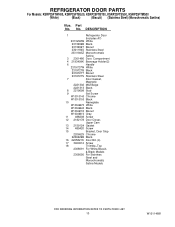
No. DESCRIPTION 1 Refrigerator Door (Includes #7) 2313299W White 2313299B Black 2313299T Biscuit 2301184S Stainless Steel 2301184SZ Monochromatic Satina 3 2301486 Door, Compartment 4 2193409K Beverage Holder(2) 6 Handle ...17 3400012 Screw 18 Thimble−Top 2308091 For White,Biscuit, & Black Models 2308050 For Stainless Steel and Monochromatic Satina Models 10 W10114881 REFRIGERATOR DOOR PARTS For Models: KSRP25FTWH00, KSRP25FTBL00, KSRP25FTBT00, KSRP25FTSS00, KSRP25FTMS00 (White) (Black) (Biscuit) (Stainless Steel) (Monochromatic Santina) Illus. Part No.
No. DESCRIPTION 1 Refrigerator Door (Includes #7) 2313299W White 2313299B Black 2313299T Biscuit 2301184S Stainless Steel 2301184SZ Monochromatic Satina 3 2301486 Door, Compartment 4 2193409K Beverage Holder(2) 6 Handle ...17 3400012 Screw 18 Thimble−Top 2308091 For White,Biscuit, & Black Models 2308050 For Stainless Steel and Monochromatic Satina Models 10 W10114881 REFRIGERATOR DOOR PARTS For Models: KSRP25FTWH00, KSRP25FTBL00, KSRP25FTBT00, KSRP25FTSS00, KSRP25FTMS00 (White) (Black) (Biscuit) (Stainless Steel) (Monochromatic Santina) Illus. Part No.

Parts Diagram
Page 18
... Valve, Access (5/16") 978027 Valve, Access (3/8") 978028 Valve, Access (1/2") 978029 Valve, Access (5/8") 978030 Valve, Access (3/4") 876764 Valve, Access (3/16") REFRIGERANT CHARGE 5.00 oz. (R−134A) 18 W10114881 DESCRIPTION 2 2225834 Fan, Blade 3 2304902 Condenser Assembly 4 489464 Screw 5 2208280 Clip, Wire 7 2205765 ... 2216914 Clip, Condenser 22 2188823 Evaporator 23 2161324 Clamp 24 2188728 Fan, Motor Illus. Part No. Part No. No. DESCRIPTION 25 1105523 Tray, Evaporator 26 2304289 Heat Shield 27 2319825 Drier 28 2320138 Compressor (Includes Items 9, 12, 13, 16, 17, ...
... Valve, Access (5/16") 978027 Valve, Access (3/8") 978028 Valve, Access (1/2") 978029 Valve, Access (5/8") 978030 Valve, Access (3/4") 876764 Valve, Access (3/16") REFRIGERANT CHARGE 5.00 oz. (R−134A) 18 W10114881 DESCRIPTION 2 2225834 Fan, Blade 3 2304902 Condenser Assembly 4 489464 Screw 5 2208280 Clip, Wire 7 2205765 ... 2216914 Clip, Condenser 22 2188823 Evaporator 23 2161324 Clamp 24 2188728 Fan, Motor Illus. Part No. Part No. No. DESCRIPTION 25 1105523 Tray, Evaporator 26 2304289 Heat Shield 27 2319825 Drier 28 2320138 Compressor (Includes Items 9, 12, 13, 16, 17, ...


