User Instructions
Page 1
...;FRIGÉRATEUR 17 INSTALLATION INSTRUCTIONS 2 INSTRUCTIONS D'INSTALLATION 18 REFRIGERATOR USE 5 UTILISATION DU RÉFRIGÉRATEUR 21 REFRIGERATOR CARE 10 ENTRETIEN DU RÉFRIGÉRATEUR 26 TROUBLESHOOTING 11 DÉPANNAGE 27 ACCESSORIES 13 ACCESSOIRES 29 WATER FILTER CERTIFICATIONS 13 FEUILLES DE DONNÉES SUR LA PERFORMANCE ...........30 PERFORMANCE DATA SHEETS 14 GARANTIE 32 WARRANTY 16 REFRIGERATOR SAFETY Your safety and the...
...;FRIGÉRATEUR 17 INSTALLATION INSTRUCTIONS 2 INSTRUCTIONS D'INSTALLATION 18 REFRIGERATOR USE 5 UTILISATION DU RÉFRIGÉRATEUR 21 REFRIGERATOR CARE 10 ENTRETIEN DU RÉFRIGÉRATEUR 26 TROUBLESHOOTING 11 DÉPANNAGE 27 ACCESSORIES 13 ACCESSOIRES 29 WATER FILTER CERTIFICATIONS 13 FEUILLES DE DONNÉES SUR LA PERFORMANCE ...........30 PERFORMANCE DATA SHEETS 14 GARANTIE 32 WARRANTY 16 REFRIGERATOR SAFETY Your safety and the...
User Instructions
Page 2
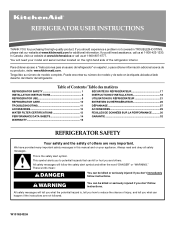
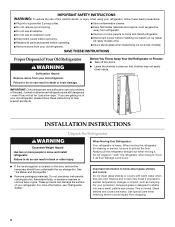
... Your Old Refrigerator or Freezer: ■ Take off the doors. ■ Leave the shelves in back or other injury. INSTALLATION INSTRUCTIONS Unpack the Refrigerator WARNING Excessive Weight Hazard Use two or more people to move and install refrigerator. See "Ice Maker and Storage Bin." ■ Remove packaging materials. For more information, see "Refrigerator Safety." Important information to know about glass shelves and covers: Do not clean glass shelves or covers with warm water when...
... Your Old Refrigerator or Freezer: ■ Take off the doors. ■ Leave the shelves in back or other injury. INSTALLATION INSTRUCTIONS Unpack the Refrigerator WARNING Excessive Weight Hazard Use two or more people to move and install refrigerator. See "Ice Maker and Storage Bin." ■ Remove packaging materials. For more information, see "Refrigerator Safety." Important information to know about glass shelves and covers: Do not clean glass shelves or covers with warm water when...
User Instructions
Page 3
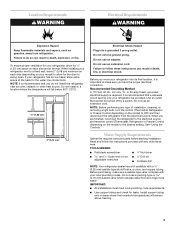
... refrigerator dealer has a kit available with any type of installation, cleaning, or removing a light bulb, turn the control (Thermostat, Refrigerator or Freezer Control depending on each side and at the back for the door to swing open. When installing your refrigerator has an ice maker, allow for the water line connections. Failure to make sure a saddle-type valve complies with your refrigerator, allow for leaks. See "Using the Controls." IMPORTANT: ■ All installations must meet local plumbing code requirements. ■ Use copper tubing and...
... refrigerator dealer has a kit available with any type of installation, cleaning, or removing a light bulb, turn the control (Thermostat, Refrigerator or Freezer Control depending on each side and at the back for the door to swing open. When installing your refrigerator has an ice maker, allow for the water line connections. Failure to make sure a saddle-type valve complies with your refrigerator, allow for leaks. See "Using the Controls." IMPORTANT: ■ All installations must meet local plumbing code requirements. ■ Use copper tubing and...
User Instructions
Page 4
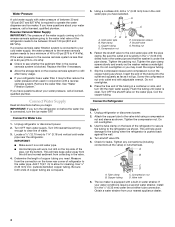
... to the reverse osmosis system needs to operate the water dispenser and ice maker. Valve inlet 6. Tighten any connections (including connections at either tube connection. A B C D A. Unplug refrigerator or disconnect power. 2. A G B C FE A. Connect to allow for leaks. Copper tubing C. Shutoff valve G. Unplug refrigerator or disconnect power. 2. Be sure the outlet end is clear. Add 7 ft (2.1 m) to Refrigerator Style 1 1. Coil the copper tubing. Use ¹⁄₄" (6.35 mm) O.D. (outside diameter) copper tubing. Place the free end of...
... to the reverse osmosis system needs to operate the water dispenser and ice maker. Valve inlet 6. Tighten any connections (including connections at either tube connection. A B C D A. Unplug refrigerator or disconnect power. 2. A G B C FE A. Connect to allow for leaks. Copper tubing C. Shutoff valve G. Unplug refrigerator or disconnect power. 2. Be sure the outlet end is clear. Add 7 ft (2.1 m) to Refrigerator Style 1 1. Coil the copper tubing. Use ¹⁄₄" (6.35 mm) O.D. (outside diameter) copper tubing. Place the free end of...
User Instructions
Page 5
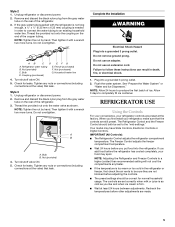
... valve ON. 5. Household water line 4. Bulb B. Complete the Installation WARNING Electrical Shock Hazard Plug into a grounded 3 prong outlet. 2. Style 2 1. Nut (purchased) G. Do not overtighten. Tighten any faster. ■ If the temperature is needed in order to connect the water tubing to follow these instructions can result in the refrigerator or freezer, first check the air vents to the "mid-settings." Plug into a grounded 3 prong outlet. NOTE: Adjusting the Refrigerator and Freezer Controls...
... valve ON. 5. Household water line 4. Bulb B. Complete the Installation WARNING Electrical Shock Hazard Plug into a grounded 3 prong outlet. 2. Style 2 1. Nut (purchased) G. Do not overtighten. Tighten any faster. ■ If the temperature is needed in order to connect the water tubing to follow these instructions can result in the refrigerator or freezer, first check the air vents to the "mid-settings." Plug into a grounded 3 prong outlet. NOTE: Adjusting the Refrigerator and Freezer Controls...
User Instructions
Page 6
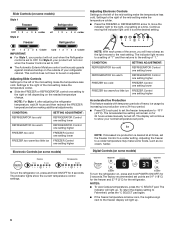
... freezer to a colder temperature may make the temperature colder. ■ Press the FREEZER or REFRIGERATOR arrow to move the indicator light to -10°F (-23°C). Digital Controls (on some models) NOTE: With each press of heavy ice usage by increasing ice production over a 24-hour period. ■ Press ICE touch pad to set point. To turn the refrigerator on the needed temperature change. The Accelerated Ice setting will light up . 6 The display...
... freezer to a colder temperature may make the temperature colder. ■ Press the FREEZER or REFRIGERATOR arrow to move the indicator light to -10°F (-23°C). Digital Controls (on some models) NOTE: With each press of heavy ice usage by increasing ice production over a 24-hour period. ■ Press ICE touch pad to set point. To turn the refrigerator on the needed temperature change. The Accelerated Ice setting will light up . 6 The display...
User Instructions
Page 7
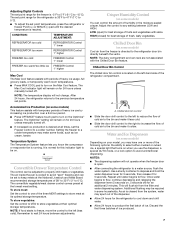
... ice, a special light that turns on some models) This feature assists with periods of heavy ice use the dispenser, a special AUTO mode, or a lock option to a colder number. Water and Ice Dispensers (on when you know the compressor or evaporator fan is reached. Repeat until the desired temperature is running. To store meat: Set the control to properly chill meats or vegetables. The Max Cool indicator light will flush air from the system, water...
... ice, a special light that turns on some models) This feature assists with periods of heavy ice use the dispenser, a special AUTO mode, or a lock option to a colder number. Water and Ice Dispensers (on when you know the compressor or evaporator fan is reached. Repeat until the desired temperature is running. To store meat: Set the control to properly chill meats or vegetables. The Max Cool indicator light will flush air from the system, water...
User Instructions
Page 8
... more information. Ice Maker and Storage Bin Turning the Ice Maker On/Off Style 1 To turn off the ice maker, lift the wire shutoff arm to dispense ice or water as usual. Noise from underneath the ice storage bin. IMPORTANT: You do so can be changed. On some models) The dispenser can be sure that your dispenser lights are dispensed. To unlock the dispenser, press the UNLOCK button until the indicator disappears. As ice is normal...
... more information. Ice Maker and Storage Bin Turning the Ice Maker On/Off Style 1 To turn off the ice maker, lift the wire shutoff arm to dispense ice or water as usual. Noise from underneath the ice storage bin. IMPORTANT: You do so can be changed. On some models) The dispenser can be sure that your dispenser lights are dispensed. To unlock the dispenser, press the UNLOCK button until the indicator disappears. As ice is normal...
User Instructions
Page 9
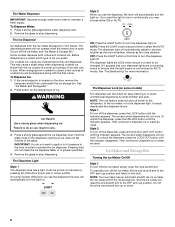
... light. Non-Indicator Water Filter (on the ice maker, slide the control to make sure the water softener is operating properly and is located on the left wall of the freezer compartment. Using the Dispenser Without the Water Filter You can still be dispensed, but the control will change the water filter cartridge at least every 6 months depending on top of the storage bin and pull it clicks into the OFF (up and out. Remove...
... light. Non-Indicator Water Filter (on the ice maker, slide the control to make sure the water softener is operating properly and is located on the left wall of the freezer compartment. Using the Dispenser Without the Water Filter You can still be dispensed, but the control will change the water filter cartridge at least every 6 months depending on top of the storage bin and pull it clicks into the OFF (up and out. Remove...

User Instructions
Page 10
... on plastic parts, interior and door liners or gaskets. Wash stainless steel and painted metal exteriors with a clean sponge or soft cloth and a mild detergent in warm water. 3. Be sure to replace the bulb with a soft brush to the other. On some models, the dispenser light requires a heavy duty 10-watt bulb. NOTE: To clean the light shield, wash it with one of food, wrap or cover foods...
... on plastic parts, interior and door liners or gaskets. Wash stainless steel and painted metal exteriors with a clean sponge or soft cloth and a mild detergent in warm water. 3. Be sure to replace the bulb with a soft brush to the other. On some models, the dispenser light requires a heavy duty 10-watt bulb. NOTE: To clean the light shield, wash it with one of food, wrap or cover foods...
User Instructions
Page 11
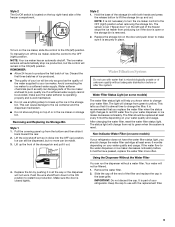
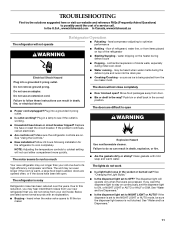
... of refrigerant, water line, or from the ice maker mold. water dripping on top of inside walls, especially during initial cool-down ■ Water running - Do not remove ground prong. Push bin or shelf back in death, fire, or electrical shock. ■ Power cord unplugged? The doors are difficult to open . See "Using the Controls." ■ New installation? The refrigerator is added, doors are pressed. Due to this reduction, you may be sure the dispenser light...
... of refrigerant, water line, or from the ice maker mold. water dripping on top of inside walls, especially during initial cool-down ■ Water running - Do not remove ground prong. Push bin or shelf back in death, fire, or electrical shock. ■ Power cord unplugged? The doors are difficult to open . See "Using the Controls." ■ New installation? The refrigerator is added, doors are pressed. Due to this reduction, you may be sure the dispenser light...
User Instructions
Page 12
.... Change the ice button from food? Temperature and Moisture Temperature is normal. ■ Humid room? Allow 24 hours following installation for ice maker to your cold water supply? Allows warm air to "cubed." Minimize door openings and keep doors fully closed. Check temperature in position. ■ New installation? See "Using the Controls." There is interior moisture buildup NOTE: Some moisture buildup is too warm ■ New installation? Allows humid air to a water supply and the supply shutoff valve turned on the door, remove...
.... Change the ice button from food? Temperature and Moisture Temperature is normal. ■ Humid room? Allow 24 hours following installation for ice maker to your cold water supply? Allows warm air to "cubed." Minimize door openings and keep doors fully closed. Check temperature in position. ■ New installation? See "Using the Controls." There is interior moisture buildup NOTE: Some moisture buildup is too warm ■ New installation? Allows humid air to a water supply and the supply shutoff valve turned on the door, remove...

User Instructions
Page 13
... cool. Straighten the water source line. ■ New installation? Flush the water system. Allow 24 hours for the water supply to a cold water pipe. Close the door firmly. See "Water Supply Requirements." ■ Kink in either the Installation Instructions or the Use & Care Guide. Make sure the refrigerator is chilled to water supply and turn water shutoff valve fully open. ■ Is the water pressure at least 30 psi (207 kPa)? Flush the water system. ACCESSORIES To order replacement filters...
... cool. Straighten the water source line. ■ New installation? Flush the water system. Allow 24 hours for the water supply to a cold water pipe. Close the door firmly. See "Water Supply Requirements." ■ Kink in either the Installation Instructions or the Use & Care Guide. Make sure the refrigerator is chilled to water supply and turn water shutoff valve fully open. ■ Is the water pressure at least 30 psi (207 kPa)? Flush the water system. ACCESSORIES To order replacement filters...
User Instructions
Page 14
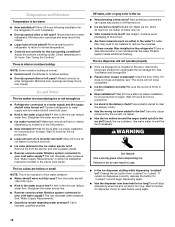
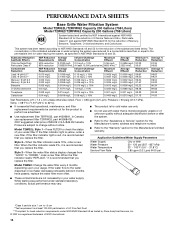
... has been tested according to "ORDER," order a new filter. Pressure = 60 psig (413.7 kPa). If the filter indicator light is red, it is recommended that you replace the filter. ■ The product is for cold water use only. ■ Do not use replacement filter T2RFWG2, part #4396841B. 2007 suggested retail price of $39.99 U.S.A./$49.99 Canada. Style 3 - If the water flow to the water dispenser or ice maker decreases...
... has been tested according to "ORDER," order a new filter. Pressure = 60 psig (413.7 kPa). If the filter indicator light is red, it is recommended that you replace the filter. ■ The product is for cold water use only. ■ Do not use replacement filter T2RFWG2, part #4396841B. 2007 suggested retail price of $39.99 U.S.A./$49.99 Canada. Style 3 - If the water flow to the water dispenser or ice maker decreases...

User Instructions
Page 15
... advertised. ■ Use replacement filter T2RFWG2, part #4396841. In Canada, use with water that operational, maintenance, and filter replacement requirements be carried out for the product to the "Warranty" section for the Manufacturer's name, address and telephone number. ■ Refer to perform as specified in your water supply. When the water filter status display changes from "GOOD" to If the water flow to the water dispenser or ice maker decreases noticeably before...
... advertised. ■ Use replacement filter T2RFWG2, part #4396841. In Canada, use with water that operational, maintenance, and filter replacement requirements be carried out for the product to the "Warranty" section for the Manufacturer's name, address and telephone number. ■ Refer to perform as specified in your water supply. When the water filter status display changes from "GOOD" to If the water flow to the water dispenser or ice maker decreases noticeably before...
User Instructions
Page 16
... SEALED REFRIGERATION SYSTEM PARTS In the second through fifth years from the date of purchase, when this major appliance is used in a country other than the country in the sealed refrigeration system. Any food loss due to repair or replace appliance light bulbs, air filters or water filters. 3. Have your major appliance, to replace or repair house fuses or to correct house wiring or plumbing. 2. KITCHENAID...
... SEALED REFRIGERATION SYSTEM PARTS In the second through fifth years from the date of purchase, when this major appliance is used in a country other than the country in the sealed refrigeration system. Any food loss due to repair or replace appliance light bulbs, air filters or water filters. 3. Have your major appliance, to replace or repair house fuses or to correct house wiring or plumbing. 2. KITCHENAID...

Parts Diagram
Page 2
... 18 940139 Drain Fitting 19 1108438 Tube, Extension 20 1108439 Clip, Drain Tube 21 2252035 Cover, Unit 22 Hinge Cover, RC 2203408W White 2203408B Black 2203408T Biscuit 2203408AP Apollo Gray 23 549193 Clamp, Service Cord 24 489084 Screw 25 2155311 Door Closer, Lower Cam (2) 26 489483 Screw 27 2260507 Housing, Water Filter Illus. Part No. DESCRIPTION 1 Literature Parts 2315184 Use & Care Guide 2301270 Service & Wiring Sheet 2318936 Energy Guide 2220407 Modular Icemaker Service Sheet 2 2174748...
... 18 940139 Drain Fitting 19 1108438 Tube, Extension 20 1108439 Clip, Drain Tube 21 2252035 Cover, Unit 22 Hinge Cover, RC 2203408W White 2203408B Black 2203408T Biscuit 2203408AP Apollo Gray 23 549193 Clamp, Service Cord 24 489084 Screw 25 2155311 Door Closer, Lower Cam (2) 26 489483 Screw 27 2260507 Housing, Water Filter Illus. Part No. DESCRIPTION 1 Literature Parts 2315184 Use & Care Guide 2301270 Service & Wiring Sheet 2318936 Energy Guide 2220407 Modular Icemaker Service Sheet 2 2174748...
Parts Diagram
Page 10
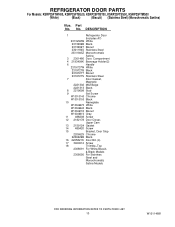
... W10046610 Gray 11 488208 Screw 12 2182178 Door Closer, Upper Cam 13 2159124 Gasket 14 489420 Screw 15 Bracket, Door Stop 2206629 Chrome 2206629B Black 16 2205821K Door Bin (4) 17 3400012 Screw 18 Thimble−Top 2308091 For White,Biscuit, & Black Models 2308050 For Stainless Steel and Monochromatic Satina Models 10 W10114881 REFRIGERATOR DOOR PARTS For Models: KSRP25FTWH00, KSRP25FTBL00, KSRP25FTBT00, KSRP25FTSS00, KSRP25FTMS00 (White...
... W10046610 Gray 11 488208 Screw 12 2182178 Door Closer, Upper Cam 13 2159124 Gasket 14 489420 Screw 15 Bracket, Door Stop 2206629 Chrome 2206629B Black 16 2205821K Door Bin (4) 17 3400012 Screw 18 Thimble−Top 2308091 For White,Biscuit, & Black Models 2308050 For Stainless Steel and Monochromatic Satina Models 10 W10114881 REFRIGERATOR DOOR PARTS For Models: KSRP25FTWH00, KSRP25FTBL00, KSRP25FTBT00, KSRP25FTSS00, KSRP25FTMS00 (White...
Parts Diagram
Page 12
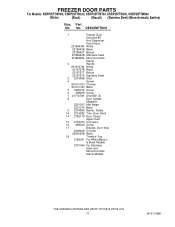
No. DESCRIPTION 1 Freezer Door (Includes #8 And Dispenser Front Parts) 2318943W White 2318943B Black 2318943T Biscuit 2318944SB Stainless Steel 2318944SA Monochromatic Satina 2 Handle 2319727W White 2319727B Black 2319727T Biscuit 2319727S Stainless Steel 3 2219698 Stud 4 Screw W10010140 Chrome W10010150 Black 5 3400012 Screw 6 488208 Screw 7 2171070K Shelf Bin (3) 8 Door Gasket, Magnetic 2221303 Mist Beige 2221314 Black 9 2304895 Barrier, Safety 10 2219982 Trim, Door Shelf 14 2182179 Door Closer...
No. DESCRIPTION 1 Freezer Door (Includes #8 And Dispenser Front Parts) 2318943W White 2318943B Black 2318943T Biscuit 2318944SB Stainless Steel 2318944SA Monochromatic Satina 2 Handle 2319727W White 2319727B Black 2319727T Biscuit 2319727S Stainless Steel 3 2219698 Stud 4 Screw W10010140 Chrome W10010150 Black 5 3400012 Screw 6 488208 Screw 7 2171070K Shelf Bin (3) 8 Door Gasket, Magnetic 2221303 Mist Beige 2221314 Black 9 2304895 Barrier, Safety 10 2219982 Trim, Door Shelf 14 2182179 Door Closer...
Parts Diagram
Page 21
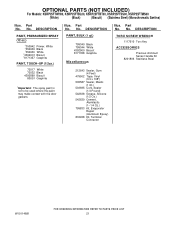
... Architect Series Handle Kit 8201806 Stainless Steel W10114881 21 No. DESCRIPTION PAINT, PRESSURIZED SPRAY (12 oz.) 350942 Primer, White 350939 Black 350930 White 4392901 Biscuit 8171357 Graphite PAINT, TOUCH−UP (1/2oz.) 72017 White 72032 Black 4392899 Biscuit 80051 Graphite Important: The spray paint is not to be used where the paint may make contact with the door gaskets. Part...
... Architect Series Handle Kit 8201806 Stainless Steel W10114881 21 No. DESCRIPTION PAINT, PRESSURIZED SPRAY (12 oz.) 350942 Primer, White 350939 Black 350930 White 4392901 Biscuit 8171357 Graphite PAINT, TOUCH−UP (1/2oz.) 72017 White 72032 Black 4392899 Biscuit 80051 Graphite Important: The spray paint is not to be used where the paint may make contact with the door gaskets. Part...


