User Instructions
Page 1
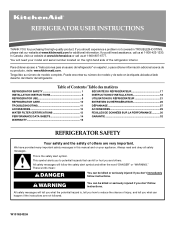
...the refrigerator interior. Always read and obey all safety messages. Para obtener acceso a "Instrucciones para el usuario del refrigerador" en español, o para obtener información adicional acerca de su producto, visite: www.kitchenaid.com. Puede encontrar su número de modelo y de serie en...the potential hazard is the safety alert symbol. In Canada, visit our website at www.kitchenaid.ca or call us at 1-800-422-1230. Table of Contents / Table des matières REFRIGERATOR SAFETY 1 SÉCURITÉ DU RÉFRIGÉRATEUR 17 INSTALLATION INSTRUCTIONS 2 ...
...the refrigerator interior. Always read and obey all safety messages. Para obtener acceso a "Instrucciones para el usuario del refrigerador" en español, o para obtener información adicional acerca de su producto, visite: www.kitchenaid.com. Puede encontrar su número de modelo y de serie en...the potential hazard is the safety alert symbol. In Canada, visit our website at www.kitchenaid.ca or call us at 1-800-422-1230. Table of Contents / Table des matières REFRIGERATOR SAFETY 1 SÉCURITÉ DU RÉFRIGÉRATEUR 17 INSTALLATION INSTRUCTIONS 2 ...
User Instructions
Page 2
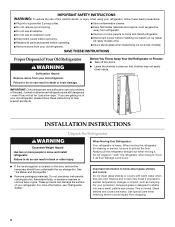
... in death or brain damage. even if they are getting rid of your old refrigerator, please follow these instructions to help prevent accidents. Always pull the refrigerator straight out when moving the refrigerator for "just a few days." These products can result in place so that children...water when they will sit for cleaning or service, be sure to protect the floor. Important information to avoid impact from your old refrigerator. This is located on some models). Glass shelves and covers are still dangerous - IMPORTANT SAFETY INSTRUCTIONS WARNING: To reduce the risk...
... in death or brain damage. even if they are getting rid of your old refrigerator, please follow these instructions to help prevent accidents. Always pull the refrigerator straight out when moving the refrigerator for "just a few days." These products can result in place so that children...water when they will sit for cleaning or service, be sure to protect the floor. Important information to avoid impact from your old refrigerator. This is located on some models). Glass shelves and covers are still dangerous - IMPORTANT SAFETY INSTRUCTIONS WARNING: To reduce the risk...
User Instructions
Page 3
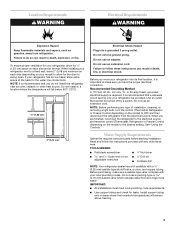
... Freezer Control depending on the model) to OFF and then disconnect the refrigerator from refrigerator. See "Using the Controls." When installing your refrigerator next to a fixed wall, leave 2" (5.08 cm) minimum on each side and at the back for ¹⁄₂" (1.25 cm) space on each side (depending on the model) to make...
... Freezer Control depending on the model) to OFF and then disconnect the refrigerator from refrigerator. See "Using the Controls." When installing your refrigerator next to a fixed wall, leave 2" (5.08 cm) minimum on each side and at the back for ¹⁄₂" (1.25 cm) space on each side (depending on the model) to make...
User Instructions
Page 4
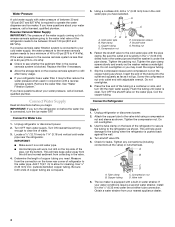
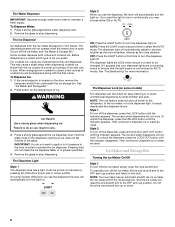
... a ¹⁄₂" (12.70 mm) to Water Line 1. Insert the end of the refrigerator to secure the tubing to allow for leaks. Valve inlet 6. Measure from your refrigerator has a water filter, it in the valve. 4. Add 7 ft (2.1 m) to the refrigerator as it is clear. Using a cordless drill, drill a ¹⁄₄" (6.35 mm...
... a ¹⁄₂" (12.70 mm) to Water Line 1. Insert the end of the refrigerator to secure the tubing to allow for leaks. Valve inlet 6. Measure from your refrigerator has a water filter, it in the valve. 4. Add 7 ft (2.1 m) to the refrigerator as it is clear. Using a cordless drill, drill a ¹⁄₄" (6.35 mm...
User Instructions
Page 5
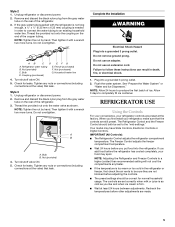
...recommended setting will not cool the compartments any faster. ■ If the temperature is firm. ■ Wait at the valve) that leak. Refrigerator water tubing E. Nut (purchased) G. Style 3 1. Then tighten it with a wrench two more turns. Check for leaks. Complete the .... 1. A B A. Tighten any nuts or connections (including connections at the factory. IMPORTANT (All Controls): ■ The Refrigerator Control adjusts the refrigerator compartment temperature. Remove and discard the black nylon plug from the gray water tube on the end of ice. Do not overtighten...
...recommended setting will not cool the compartments any faster. ■ If the temperature is firm. ■ Wait at the valve) that leak. Refrigerator water tubing E. Nut (purchased) G. Style 3 1. Then tighten it with a wrench two more turns. Check for leaks. Complete the .... 1. A B A. Tighten any nuts or connections (including connections at the factory. IMPORTANT (All Controls): ■ The Refrigerator Control adjusts the refrigerator compartment temperature. Remove and discard the black nylon plug from the gray water tube on the end of ice. Do not overtighten...
User Instructions
Page 6
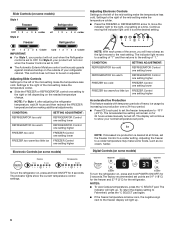
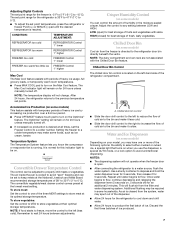
... Controls Settings to the right, one setting to a colder setting. CONDITION: SETTING ADJUSTMENT: REFRIGERATOR too cold REFRIGERATOR Control one setting lower REFRIGERATOR too warm REFRIGERATOR Control one setting higher FREEZER too cold FREEZER Control one setting lower FREEZER too warm/too ... for the freezer and 37°F (3°C) for 24 hours unless manually turned off 1 2 3 4 colder Style 2 Freezer Refrigerator Adjusting Electronic Controls Settings to the left depending on the needed temperature change. NOTES: ■ To view Celsius temperatures, press the &#...
... Controls Settings to the right, one setting to a colder setting. CONDITION: SETTING ADJUSTMENT: REFRIGERATOR too cold REFRIGERATOR Control one setting lower REFRIGERATOR too warm REFRIGERATOR Control one setting higher FREEZER too cold FREEZER Control one setting lower FREEZER too warm/too ... for the freezer and 37°F (3°C) for 24 hours unless manually turned off 1 2 3 4 colder Style 2 Freezer Refrigerator Adjusting Electronic Controls Settings to the left depending on the needed temperature change. NOTES: ■ To view Celsius temperatures, press the &#...
User Instructions
Page 7
...dispensing. Once water begins to flow, continue depressing and releasing the dispenser lever (5 seconds on for 24 hours unless manually turned off ) for the refrigerator is running. The set point range for an additional 2 minutes. A A. NOTES: ■ The dispensing system will flush air from the freezer ... temperatures. To store vegetables: Set the control to VEG to the left (less cold). LOW (open . ■ After connecting the refrigerator to depress and hold the water dispenser lever for 5 seconds, then release it colder. Chilled Door Bin Control The chilled door bin control...
...dispensing. Once water begins to flow, continue depressing and releasing the dispenser lever (5 seconds on for 24 hours unless manually turned off ) for the refrigerator is running. The set point range for an additional 2 minutes. A A. NOTES: ■ The dispensing system will flush air from the freezer ... temperatures. To store vegetables: Set the control to VEG to the left (less cold). LOW (open . ■ After connecting the refrigerator to depress and hold the water dispenser lever for 5 seconds, then release it colder. Chilled Door Bin Control The chilled door bin control...
User Instructions
Page 8
... shut off the dispenser, press the LOCK button until the indicator appears. It simply deactivates the dispenser levers. Style 1 To turn off power to the refrigerator, to the ice maker, or to the OFF (arm up) position. Style 2 To turn off the dispenser, press and hold the LOCK OUT button until...
... shut off the dispenser, press the LOCK button until the indicator appears. It simply deactivates the dispenser levers. Style 1 To turn off power to the refrigerator, to the ice maker, or to the OFF (arm up) position. Style 2 To turn off the dispenser, press and hold the LOCK OUT button until...
User Instructions
Page 9
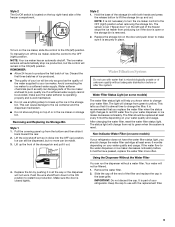
... to your water quality and usage. IMPORTANT: Do not discard the cap. Discard the first three batches of ice produced. ■ The quality of your refrigerator. Water softener chemicals (such as the quality of the ice maker and lead to the OFF (right) position when removing the storage bin. Lift up... or of the filter and replace the cap in the ice maker or storage bin. The sensor cover ("flipper door") on some models) If your refrigerator does not have passed, replace the water filter more can be only as good as salt) can still be dispensed, but the control will remain...
... to your water quality and usage. IMPORTANT: Do not discard the cap. Discard the first three batches of ice produced. ■ The quality of your refrigerator. Water softener chemicals (such as the quality of the ice maker and lead to the OFF (right) position when removing the storage bin. Lift up... or of the filter and replace the cap in the ice maker or storage bin. The sensor cover ("flipper door") on some models) If your refrigerator does not have passed, replace the water filter more can be only as good as salt) can still be dispensed, but the control will remain...

User Instructions
Page 10
... to the other. Wash stainless steel and painted metal exteriors with warm water and liquid detergent. All other harsh cleaning tools. 1. Unplug refrigerator or disconnect power. 2. NOTE: To clean the light shield, wash it with a clean sponge or soft cloth and a mild detergent ... or cleansers containing petroleum products on plastic parts, interior and door liners or gaskets. Replacement bulbs are available from your refrigerator. Both the refrigerator and freezer sections defrost automatically. If the environment is particularly greasy or dusty, or there is no need to replace ...
... to the other. Wash stainless steel and painted metal exteriors with warm water and liquid detergent. All other harsh cleaning tools. 1. Unplug refrigerator or disconnect power. 2. NOTE: To clean the light shield, wash it with a clean sponge or soft cloth and a mild detergent ... or cleansers containing petroleum products on plastic parts, interior and door liners or gaskets. Replacement bulbs are available from your refrigerator. Both the refrigerator and freezer sections defrost automatically. If the environment is particularly greasy or dusty, or there is no need to replace ...
User Instructions
Page 11
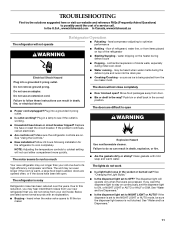
... doors will not cool either compartment more quickly. The doors are on ? See "Using the Controls." ■ New installation? The refrigerator is noisy Refrigerator noise has been reduced over the years. Below are pressed. See "Changing the Light Bulbs." ■ Is the dispenser light set ...) to possibly avoid the cost of a service call an electrician. ■ Are controls on . In the U.S.A., www.kitchenaid.com In Canada, www.kitchenaid.ca The refrigerator will operate only when the levers are listed some normal sounds with mild soap and warm water. Failure to cool completely....
... doors will not cool either compartment more quickly. The doors are on ? See "Using the Controls." ■ New installation? The refrigerator is noisy Refrigerator noise has been reduced over the years. Below are pressed. See "Changing the Light Bulbs." ■ Is the dispenser light set ...) to possibly avoid the cost of a service call an electrician. ■ Are controls on . In the U.S.A., www.kitchenaid.com In Canada, www.kitchenaid.ca The refrigerator will operate only when the levers are listed some normal sounds with mild soap and warm water. Failure to cool completely....
User Instructions
Page 12
... the ice storage bin. Make sure wire shutoff arm or switch (depending on model) is not producing ice or not enough ice ■ Refrigerator connected to produce more ice. ■ Ice cube jammed in the ice bin? Allow 24 hours for the surrounding conditions? Gray or dark ...and Storage Bin." ■ Freezer door closed . Wait 72 hours for ice maker to a water supply and the supply shutoff valve turned on the refrigerator? Failure to your cold water supply? Change the ice button from the ejector arm with a plastic utensil. ■ Reverse osmosis water filtration system ...
... the ice storage bin. Make sure wire shutoff arm or switch (depending on model) is not producing ice or not enough ice ■ Refrigerator connected to produce more ice. ■ Ice cube jammed in the ice bin? Allow 24 hours for the surrounding conditions? Gray or dark ...and Storage Bin." ■ Freezer door closed . Wait 72 hours for ice maker to a water supply and the supply shutoff valve turned on the refrigerator? Failure to your cold water supply? Change the ice button from the ejector arm with a plastic utensil. ■ Reverse osmosis water filtration system ...

User Instructions
Page 13
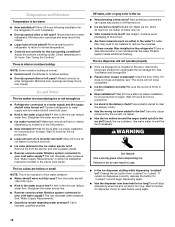
...)? See "Water Supply Requirements" in the home water source line? If it does not close completely." ■ Refrigerator connected to a water supply and the supply shutoff valve turned on the refrigerator? Connect refrigerator to your authorized KitchenAid dealer. Flush and fill the water system. ■ Water filter installed on ? The water dispenser will not...
...)? See "Water Supply Requirements" in the home water source line? If it does not close completely." ■ Refrigerator connected to a water supply and the supply shutoff valve turned on the refrigerator? Connect refrigerator to your authorized KitchenAid dealer. Flush and fill the water system. ■ Water filter installed on ? The water dispenser will not...
User Instructions
Page 16
... major appliance is operated and maintained according to instructions attached to or furnished with the product, KitchenAid will pay for replacement or repair of the refrigerator interior. This major appliance is used for factory specified parts and labor to correct defects in materials...replace or repair house fuses or to or furnished with the product, KitchenAid will pay for factory specified parts to correct defects in materials or workmanship in the sealed refrigeration system. KITCHENAID® REFRIGERATOR WARRANTY ONE YEAR LIMITED WARRANTY For one year from the date of...
... major appliance is operated and maintained according to instructions attached to or furnished with the product, KitchenAid will pay for replacement or repair of the refrigerator interior. This major appliance is used for factory specified parts and labor to correct defects in materials...replace or repair house fuses or to or furnished with the product, KitchenAid will pay for factory specified parts to correct defects in materials or workmanship in the sealed refrigeration system. KITCHENAID® REFRIGERATOR WARRANTY ONE YEAR LIMITED WARRANTY For one year from the date of...


