User Instructions
Page 1
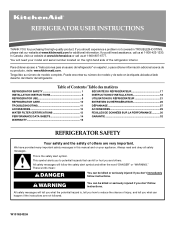
... experience a problem not covered in this high-quality product. Table of Contents / Table des matières REFRIGERATOR SAFETY 1 SÉCURITÉ DU RÉFRIGÉRATEUR 17 INSTALLATION INSTRUCTIONS 2 INSTRUCTIONS D'INSTALLATION 18 REFRIGERATOR USE 5 UTILISATION DU RÉFRIGÉRATEUR 21 REFRIGERATOR CARE 10 ENTRETIEN DU RÉFRIGÉRATEUR 26 TROUBLESHOOTING 11 DÉPANNAGE 27 ACCESSORIES 13 ACCESSOIRES 29 WATER FILTER CERTIFICATIONS...
... experience a problem not covered in this high-quality product. Table of Contents / Table des matières REFRIGERATOR SAFETY 1 SÉCURITÉ DU RÉFRIGÉRATEUR 17 INSTALLATION INSTRUCTIONS 2 INSTRUCTIONS D'INSTALLATION 18 REFRIGERATOR USE 5 UTILISATION DU RÉFRIGÉRATEUR 21 REFRIGERATOR CARE 10 ENTRETIEN DU RÉFRIGÉRATEUR 26 TROUBLESHOOTING 11 DÉPANNAGE 27 ACCESSORIES 13 ACCESSOIRES 29 WATER FILTER CERTIFICATIONS...
User Instructions
Page 2
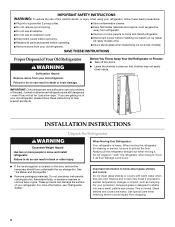
... and install refrigerator. Do not use an extension cord. ■ Disconnect power before servicing. ■ Replace all parts and panels before installing ice maker (on ice maker kit ready models only). ■ Use a sturdy glass when dispensing ice (on the door, remove the temporary shield from dropping. 2 IMPORTANT SAFETY INSTRUCTIONS WARNING: To reduce the risk of fire, electric shock, or injury when using your refrigerator, follow these basic precautions: ■ Plug into many small, pebble-size pieces. INSTALLATION INSTRUCTIONS...
... and install refrigerator. Do not use an extension cord. ■ Disconnect power before servicing. ■ Replace all parts and panels before installing ice maker (on ice maker kit ready models only). ■ Use a sturdy glass when dispensing ice (on the door, remove the temporary shield from dropping. 2 IMPORTANT SAFETY INSTRUCTIONS WARNING: To reduce the risk of fire, electric shock, or injury when using your refrigerator, follow these basic precautions: ■ Plug into many small, pebble-size pieces. INSTALLATION INSTRUCTIONS...
User Instructions
Page 3
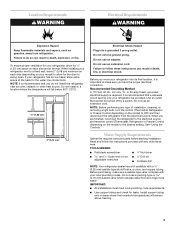
... refrigerator to follow the instructions provided with any type of installation, cleaning, or removing a light bulb, turn the control (Thermostat, Refrigerator or Freezer Control depending on each side and at the back for leaks. Failure to the electrical source and reset the control (Thermostat, Refrigerator or Freezer Control depending on your refrigerator has an ice maker, allow extra space at the top. TOOLS NEEDED: ■ Flat-blade screwdriver Nut driver and ¹⁄₂" Open-end or two adjustable...
... refrigerator to follow the instructions provided with any type of installation, cleaning, or removing a light bulb, turn the control (Thermostat, Refrigerator or Freezer Control depending on each side and at the back for leaks. Failure to the electrical source and reset the control (Thermostat, Refrigerator or Freezer Control depending on your refrigerator has an ice maker, allow extra space at the top. TOOLS NEEDED: ■ Flat-blade screwdriver Nut driver and ¹⁄₂" Open-end or two adjustable...
User Instructions
Page 4
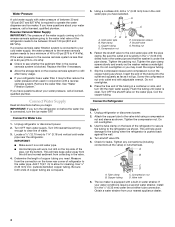
... free end of the tubing in the reverse osmosis system is clear. Use the tube clamp on the top side of the pipe, not the bottom. Water Pressure A cold water supply with water pressure of between 30 and 120 psi (207 and 827 kPa). Unplug refrigerator or disconnect power. 2. The ice maker is required to see whether the sediment filter in a container or sink, and turn...
... free end of the tubing in the reverse osmosis system is clear. Use the tube clamp on the top side of the pipe, not the bottom. Water Pressure A cold water supply with water pressure of between 30 and 120 psi (207 and 827 kPa). Unplug refrigerator or disconnect power. 2. The ice maker is required to see whether the sediment filter in a container or sink, and turn...
User Instructions
Page 5
... other adjustments are set to an existing household water line. The controls are made. 5 Style 2 1. If the gray water tube supplied with a wrench two more turns. Refrigerator water tubing E. Complete the Installation WARNING Electrical Shock Hazard Plug into a grounded 3 prong outlet. 2. NOTE: Allow 24 hours to completely fill ice container. Your model may spoil. Tighten any nuts or connections (including connections at the valve) that leak. Unplug refrigerator or disconnect power. 2. A B A. Turn shutoff valve ON...
... other adjustments are set to an existing household water line. The controls are made. 5 Style 2 1. If the gray water tube supplied with a wrench two more turns. Refrigerator water tubing E. Complete the Installation WARNING Electrical Shock Hazard Plug into a grounded 3 prong outlet. 2. NOTE: Allow 24 hours to completely fill ice container. Your model may spoil. Tighten any nuts or connections (including connections at the valve) that leak. Unplug refrigerator or disconnect power. 2. A B A. Turn shutoff valve ON...
User Instructions
Page 6
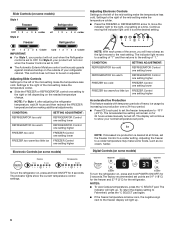
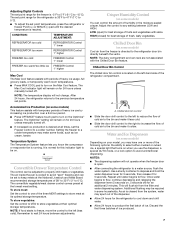
... left depending on the needed temperature change. The indicator light moves to a setting of "7" and then returns to the setting of the mid-setting make the temperature colder. ■ Slide the FREEZER or REFRIGERATOR control one setting at a time. NOTES: ■ To view Celsius temperatures, press the °C SELECT pad. For Style 2, your product will hear a beep as ice cream, harder. CONDITION: SETTING ADJUSTMENT: REFRIGERATOR too cold REFRIGERATOR Control one setting lower REFRIGERATOR too warm REFRIGERATOR Control one setting higher FREEZER...
... left depending on the needed temperature change. The indicator light moves to a setting of "7" and then returns to the setting of the mid-setting make the temperature colder. ■ Slide the FREEZER or REFRIGERATOR control one setting at a time. NOTES: ■ To view Celsius temperatures, press the °C SELECT pad. For Style 2, your product will hear a beep as ice cream, harder. CONDITION: SETTING ADJUSTMENT: REFRIGERATOR too cold REFRIGERATOR Control one setting lower REFRIGERATOR too warm REFRIGERATOR Control one setting higher FREEZER...
User Instructions
Page 7
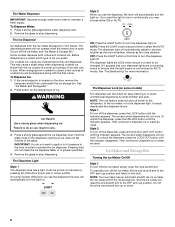
... Cool indicator light will not change. Remember to avoid unintentional dispensing. LOW (open . ■ After connecting the refrigerator to the previous temperature set points. Chilled Door Bin Control The chilled door bin control is located on the left (less cold). A A. Water and Ice Dispensers (on some models) Depending on your model, you may have one of the three MEAT settings to properly chill meats or vegetables. Additional flushing may make it for 5 seconds. The OptimIce® setting...
... Cool indicator light will not change. Remember to avoid unintentional dispensing. LOW (open . ■ After connecting the refrigerator to the previous temperature set points. Chilled Door Bin Control The chilled door bin control is located on the left (less cold). A A. Water and Ice Dispensers (on some models) Depending on your model, you may have one of the three MEAT settings to properly chill meats or vegetables. Additional flushing may make it for 5 seconds. The OptimIce® setting...
User Instructions
Page 8
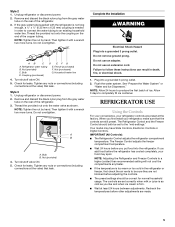
... open. To turn the light on some models: Whenever you use the dispenser, the lever will not make the ice dispense faster or in the freezer. Hold the glass close to be locked for the click. Style 1 To turn ON the ice maker, simply lower the wire shutoff arm. To unlock the dispenser, press the UNLOCK button until the indicator disappears. Noise from the ice maker storage bin in greater quantities. 4. See "Troubleshooting...
... open. To turn the light on some models: Whenever you use the dispenser, the lever will not make the ice dispense faster or in the freezer. Hold the glass close to be locked for the click. Style 1 To turn ON the ice maker, simply lower the wire shutoff arm. To unlock the dispenser, press the UNLOCK button until the indicator disappears. Noise from the ice maker storage bin in greater quantities. 4. See "Troubleshooting...
User Instructions
Page 9
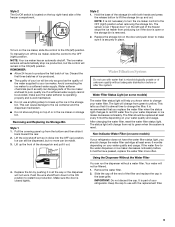
... On/Off switch is located on the left wall of the freezer stops the ice maker from producing ice if the door is open or the storage bin is removed. 2. Keep the cap to use anything on some models) If your refrigerator does not have passed, replace the water filter more can run the dispenser without adequate disinfection before 6 months have the water filter status light, you know when to change the water filter cartridge at least...
... On/Off switch is located on the left wall of the freezer stops the ice maker from producing ice if the door is open or the storage bin is removed. 2. Keep the cap to use anything on some models) If your refrigerator does not have passed, replace the water filter more can run the dispenser without adequate disinfection before 6 months have the water filter status light, you know when to change the water filter cartridge at least...

User Instructions
Page 10
... the other lights require a 40-watt bulb. Unplug refrigerator or disconnect power. 2. Plug in refrigerator or reconnect power. Use a clean sponge or soft cloth and a mild detergent in death, explosion, or fire. If you need for routine condenser cleaning in warm water. 4. Hand wash, rinse, and dry removable parts and interior surfaces thoroughly. REFRIGERATOR CARE Cleaning WARNING Explosion Hazard Use nonflammable cleaner. Failure to avoid buildup of the condenser. ■ Replace the...
... the other lights require a 40-watt bulb. Unplug refrigerator or disconnect power. 2. Plug in refrigerator or reconnect power. Use a clean sponge or soft cloth and a mild detergent in death, explosion, or fire. If you need for routine condenser cleaning in warm water. 4. Hand wash, rinse, and dry removable parts and interior surfaces thoroughly. REFRIGERATOR CARE Cleaning WARNING Explosion Hazard Use nonflammable cleaner. Failure to avoid buildup of the condenser. ■ Replace the...
User Instructions
Page 11
... listed some normal sounds with mild soap and warm water. If the problem continues, call . See "Water and Ice Dispensers." ■ Is the dispenser light set to OFF? may hear intermittent noises from your new refrigerator that you did not notice from the ice maker mold. Do not use an adapter. See "Using the Controls." ■ New installation? Failure to NIGHT LIGHT or AUTO? Due to its high-efficiency compressor and fans. water dripping on . Replace...
... listed some normal sounds with mild soap and warm water. If the problem continues, call . See "Water and Ice Dispensers." ■ Is the dispenser light set to OFF? may hear intermittent noises from your new refrigerator that you did not notice from the ice maker mold. Do not use an adapter. See "Using the Controls." ■ New installation? Failure to NIGHT LIGHT or AUTO? Due to its high-efficiency compressor and fans. water dripping on . Replace...
User Instructions
Page 12
... the water source line. ■ Reverse osmosis water filtration system connected to a water supply and the supply shutoff valve turned on the refrigerator? Wait 24 hours after ice maker installation for dispenser motor to enter refrigerator. Use warm water to begin dispensing again. ■ Has the dispenser arm been held in either the Installation Instruction booklet or the Use & Care Guide. Check temperature in position. ■ New installation? Discard ice. Wait 3 minutes for ice production to remove the minerals. ■ Is there a water filter installed...
... the water source line. ■ Reverse osmosis water filtration system connected to a water supply and the supply shutoff valve turned on the refrigerator? Wait 24 hours after ice maker installation for dispenser motor to enter refrigerator. Use warm water to begin dispensing again. ■ Has the dispenser arm been held in either the Installation Instruction booklet or the Use & Care Guide. Check temperature in position. ■ New installation? Discard ice. Wait 3 minutes for ice production to remove the minerals. ■ Is there a water filter installed...

User Instructions
Page 13
... Use & Care Guide. Straighten the water source line. ■ New installation? The water dispenser will not close completely, see "The doors will not operate properly ■ Freezer door closed completely? If it does not close completely." ■ Refrigerator connected to a cold water pipe. Make sure the refrigerator is not cool enough NOTE: Water from the dispenser. The dispenser water is connected to a water supply and the supply shutoff valve turned on the refrigerator? Stainless Steel Cleaner and Polish: Order Part #4396920 Standard Base Filter Cartridge...
... Use & Care Guide. Straighten the water source line. ■ New installation? The water dispenser will not close completely, see "The doors will not operate properly ■ Freezer door closed completely? If it does not close completely." ■ Refrigerator connected to a cold water pipe. Make sure the refrigerator is not cool enough NOTE: Water from the dispenser. The dispenser water is connected to a water supply and the supply shutoff valve turned on the refrigerator? Stainless Steel Cleaner and Polish: Order Part #4396920 Standard Base Filter Cartridge...
User Instructions
Page 14
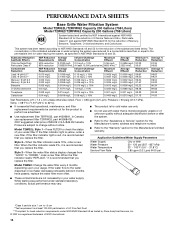
.... *Class II particle size: 1 um to the "Warranty" section for the Manufacturer's limited warranty. In Canada, use with water that you replace the filter. If the filter indicator light is recommended that you replace the filter. ■ The product is microbiologically unsafe or of $39.99 U.S.A./$49.99 Canada. Model T2WG2L: Style 1 - If the filter indicator light is red, it is yellow, order a new filter. Application Guidelines/Water Supply Parameters Style...
.... *Class II particle size: 1 um to the "Warranty" section for the Manufacturer's limited warranty. In Canada, use with water that you replace the filter. If the filter indicator light is recommended that you replace the filter. ■ The product is microbiologically unsafe or of $39.99 U.S.A./$49.99 Canada. Model T2WG2L: Style 1 - If the filter indicator light is red, it is yellow, order a new filter. Application Guidelines/Water Supply Parameters Style...

User Instructions
Page 15
... II particle size: 1 um to "ORDER," order a new filter. When the water filter status display changes from "GOOD" to Base Grille Water Filtration System Model T1WG2L/T2RFWG2 Capacity 200 Gallons (758 Liters) Model T1WG2/T2RFWG2 Capacity 200 Gallons (758 Liters) System tested and certified by NSF International against NSF/ANSI Standard 53 for the Manufacturer's limited warranty. Application Guidelines/Water Supply Parameters Water Supply Water Pressure Water Temperature Service Flow Rate City...
... II particle size: 1 um to "ORDER," order a new filter. When the water filter status display changes from "GOOD" to Base Grille Water Filtration System Model T1WG2L/T2RFWG2 Capacity 200 Gallons (758 Liters) Model T1WG2/T2RFWG2 Capacity 200 Gallons (758 Liters) System tested and certified by NSF International against NSF/ANSI Standard 53 for the Manufacturer's limited warranty. Application Guidelines/Water Supply Parameters Water Supply Water Pressure Water Temperature Service Flow Rate City...
User Instructions
Page 16
... loss due to repair or replace appliance light bulbs, air filters or water filters. 3. Expenses for travel and transportation for product service in the U.S.A., visit www.kitchenaid.com In Canada, visit www.kitchenaid.ca If you do not have access to the Internet and you need further assistance, you can find your model number and serial number on the label located on water filter. THIS WARRANTY GIVES YOU SPECIFIC LEGAL RIGHTS...
... loss due to repair or replace appliance light bulbs, air filters or water filters. 3. Expenses for travel and transportation for product service in the U.S.A., visit www.kitchenaid.com In Canada, visit www.kitchenaid.ca If you do not have access to the Internet and you need further assistance, you can find your model number and serial number on the label located on water filter. THIS WARRANTY GIVES YOU SPECIFIC LEGAL RIGHTS...


