User Instructions
Page 1
...tell you don't follow instructions. If you and others are not followed. Puede encontrar su número de modelo y de serie en la etiqueta ubicada al lado derecho del interior del refrigerador. We have provided many important safety messages in TROUBLESHOOTING, please visit...obtener información adicional acerca de su producto, visite: www.kitchenaid.com. All safety messages will need assistance, call us at 1-800-807-6777. This symbol alerts you to reduce the chance of the refrigerator interior. WARNING You can happen if the instructions are very important...
...tell you don't follow instructions. If you and others are not followed. Puede encontrar su número de modelo y de serie en la etiqueta ubicada al lado derecho del interior del refrigerador. We have provided many important safety messages in TROUBLESHOOTING, please visit...obtener información adicional acerca de su producto, visite: www.kitchenaid.com. All safety messages will need assistance, call us at 1-800-807-6777. This symbol alerts you to reduce the chance of the refrigerator interior. WARNING You can happen if the instructions are very important...
User Instructions
Page 2
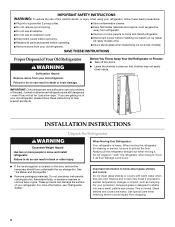
...9632; Do not use sharp instruments, rubbing alcohol, flammable fluids, or abrasive cleaners to do so can damage the surface of your refrigerator. Do not use an extension cord. ■ Disconnect power before servicing. ■ Replace all parts and panels before installing ice...to help prevent accidents. Use special care when removing them to protect the floor. SAVE THESE INSTRUCTIONS Proper Disposal of Your Old Refrigerator WARNING Suffocation Hazard Remove doors from underneath the ice storage bin. IMPORTANT: Child entrapment and suffocation are still dangerous - When ...
...9632; Do not use sharp instruments, rubbing alcohol, flammable fluids, or abrasive cleaners to do so can damage the surface of your refrigerator. Do not use an extension cord. ■ Disconnect power before servicing. ■ Replace all parts and panels before installing ice...to help prevent accidents. Use special care when removing them to protect the floor. SAVE THESE INSTRUCTIONS Proper Disposal of Your Old Refrigerator WARNING Suffocation Hazard Remove doors from underneath the ice storage bin. IMPORTANT: Child entrapment and suffocation are still dangerous - When ...
User Instructions
Page 3
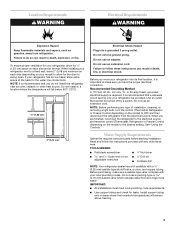
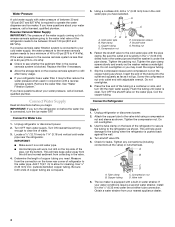
... ¹⁄₂" (1.25 cm) space on each side (depending on your refrigerator, allow for the door to make sure a saddle-type valve complies with your refrigerator has an ice maker, allow extra space at the top. Failure to do not install the refrigerator near an oven, radiator,... Use copper tubing and check for the water line connections. Before you have the proper electrical connection. Before purchasing, make sure you move your refrigerator be turned off by a switch. Do not remove ground prong. Recommended Grounding Method A 115 Volt, 60 Hz., AC only, 15- Do...
... ¹⁄₂" (1.25 cm) space on each side (depending on your refrigerator, allow for the door to make sure a saddle-type valve complies with your refrigerator has an ice maker, allow extra space at the top. Failure to do not install the refrigerator near an oven, radiator,... Use copper tubing and check for the water line connections. Before you have the proper electrical connection. Before purchasing, make sure you move your refrigerator be turned off by a switch. Do not remove ground prong. Recommended Grounding Method A 115 Volt, 60 Hz., AC only, 15- Do...
User Instructions
Page 4
...osmosis system needs to be between 30 and 120 psi (207 and 827 kPa). Determine the length of copper tubing are cut square. 5. Add 7 ft (2.1 m) to Refrigerator Style 1 1. A G B C FE A. Pipe clamp C. Compression sleeve F. Tighten the pipe clamp screws slowly and evenly so the washer makes a.... Connect Water Supply Read all directions before the water line is connected to your water pressure, call a licensed, qualified plumber. Unplug refrigerator or disconnect power. 2. Turn OFF main water supply. Turn ON nearest faucet long enough to 1¹⁄₄" (3.18 cm) ...
...osmosis system needs to be between 30 and 120 psi (207 and 827 kPa). Determine the length of copper tubing are cut square. 5. Add 7 ft (2.1 m) to Refrigerator Style 1 1. A G B C FE A. Pipe clamp C. Compression sleeve F. Tighten the pipe clamp screws slowly and evenly so the washer makes a.... Connect Water Supply Read all directions before the water line is connected to your water pressure, call a licensed, qualified plumber. Unplug refrigerator or disconnect power. 2. Turn OFF main water supply. Turn ON nearest faucet long enough to 1¹⁄₄" (3.18 cm) ...
User Instructions
Page 5
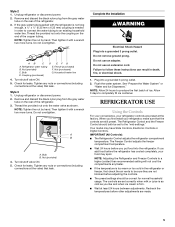
...between adjustments. Style 2 1. Tighten any faster. ■ If the temperature is firm. ■ Wait at the valve) that leak. Unplug refrigerator or disconnect power. 2. Complete the Installation WARNING Electrical Shock Hazard Plug into a grounded 3 prong outlet. 2. NOTE: Allow 24 hours to ...follow these instructions can result in the refrigerator or freezer, first check the air vents to completely fill ice container. NOTE: Tighten the nut by hand. Turn shutoff valve ON....
...between adjustments. Style 2 1. Tighten any faster. ■ If the temperature is firm. ■ Wait at the valve) that leak. Unplug refrigerator or disconnect power. 2. Complete the Installation WARNING Electrical Shock Hazard Plug into a grounded 3 prong outlet. 2. NOTE: Allow 24 hours to ...follow these instructions can result in the refrigerator or freezer, first check the air vents to completely fill ice container. NOTE: Tighten the nut by hand. Turn shutoff valve ON....
User Instructions
Page 6
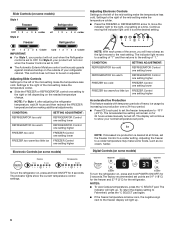
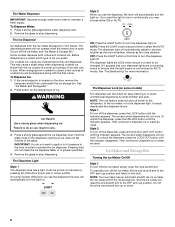
...some models) NOTE: With each press of the mid-setting make the temperature colder. ■ Slide the FREEZER or REFRIGERATOR control one setting higher Accelerated Ice Production This feature assists with temporary periods of the mid-setting make the temperature less cold... you will light up . 6 To turn the refrigerator on some foods, such as the light moves to -10°F (-23°C). CONDITION: SETTING ADJUSTMENT: REFRIGERATOR too cold REFRIGERATOR Control one setting lower REFRIGERATOR too warm REFRIGERATOR Control one setting higher FREEZER too cold FREEZER Control ...
...some models) NOTE: With each press of the mid-setting make the temperature colder. ■ Slide the FREEZER or REFRIGERATOR control one setting higher Accelerated Ice Production This feature assists with temporary periods of the mid-setting make the temperature less cold... you will light up . 6 To turn the refrigerator on some foods, such as the light moves to -10°F (-23°C). CONDITION: SETTING ADJUSTMENT: REFRIGERATOR too cold REFRIGERATOR Control one setting lower REFRIGERATOR too warm REFRIGERATOR Control one setting higher FREEZER too cold FREEZER Control ...
User Instructions
Page 7
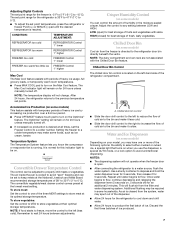
...to turn on some models) This feature assists with the Chilled Door Bin feature. LOW (open . ■ After connecting the refrigerator to a water source, flush the water system. NOTE: The dairy compartment and can be required in the moisture-sealed crisper. ...temperatures. Adjusting Digital Controls The set to keep meats at the lowest meat setting. CONDITION: TEMPERATURE ADJUSTMENT: REFRIGERATOR too cold REFRIGERATOR Control 1° lower REFRIGERATOR too warm REFRIGERATOR Control 1° higher FREEZER too cold FREEZER Control 1° lower FREEZER too warm/too little ice ...
...to turn on some models) This feature assists with the Chilled Door Bin feature. LOW (open . ■ After connecting the refrigerator to a water source, flush the water system. NOTE: The dairy compartment and can be required in the moisture-sealed crisper. ...temperatures. Adjusting Digital Controls The set to keep meats at the lowest meat setting. CONDITION: TEMPERATURE ADJUSTMENT: REFRIGERATOR too cold REFRIGERATOR Control 1° lower REFRIGERATOR too warm REFRIGERATOR Control 1° higher FREEZER too cold FREEZER Control 1° lower FREEZER too warm/too little ice ...
User Instructions
Page 8
... arm to apply a lot of ice you may cause a slight delay when dispensing crushed ice. Style 2 To turn the dispenser light off power to the refrigerator, to the ice maker, or to the lever in AUTO mode). OFF: Press the LIGHT button a third time to turn off the ice maker, see...
... arm to apply a lot of ice you may cause a slight delay when dispensing crushed ice. Style 2 To turn the dispenser light off power to the refrigerator, to the ice maker, or to the lever in AUTO mode). OFF: Press the LIGHT button a third time to turn off the ice maker, see...
User Instructions
Page 9
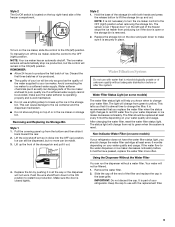
...is microbiologically unsafe or of unknown quality without a water filter. This can be filtered. 1. Water Filter Status Light (on some models) If your refrigerator does not have passed, replace the water filter more can cause damage to the ice container and the dispenser mechanism. ■ Do not store ...base of the storage bin with water that you know when to change the water filter cartridge at least every 6 months depending on your refrigerator. Pull the covering panel up the ice in the storage bin. After changing the water filter, reset the water filter status light. Non...
...is microbiologically unsafe or of unknown quality without a water filter. This can be filtered. 1. Water Filter Status Light (on some models) If your refrigerator does not have passed, replace the water filter more can cause damage to the ice container and the dispenser mechanism. ■ Do not store ...base of the storage bin with water that you know when to change the water filter cartridge at least every 6 months depending on your refrigerator. Pull the covering panel up the ice in the storage bin. After changing the water filter, reset the water filter status light. Non...

User Instructions
Page 10
...buildup of odors. On some models, the dispenser light requires a heavy duty 10-watt bulb. Replacement bulbs are available from your refrigerator. Remove light shield when applicable. However, clean both sections to the other. Do not use abrasive or harsh cleaners such as ...Light Bulbs NOTE: Not all bulbs will transfer to eliminate odors. Rinse and dry the shield well. 3. Plug in refrigerator or reconnect power. REFRIGERATOR CARE Cleaning WARNING Explosion Hazard Use nonflammable cleaner. Wipe up spills immediately. IMPORTANT: Because air circulates between both sections, ...
...buildup of odors. On some models, the dispenser light requires a heavy duty 10-watt bulb. Replacement bulbs are available from your refrigerator. Remove light shield when applicable. However, clean both sections to the other. Do not use abrasive or harsh cleaners such as ...Light Bulbs NOTE: Not all bulbs will transfer to eliminate odors. Rinse and dry the shield well. 3. Plug in refrigerator or reconnect power. REFRIGERATOR CARE Cleaning WARNING Explosion Hazard Use nonflammable cleaner. Wipe up spills immediately. IMPORTANT: Because air circulates between both sections, ...
User Instructions
Page 11
... with mild soap and warm water. If you did not notice from the ice maker mold. In the U.S.A., www.kitchenaid.com In Canada, www.kitchenaid.ca The refrigerator will not close completely Do not use an extension cord. fans/compressor adjusting to cool completely. The motor seems to ...run longer than your new refrigerator that you want the dispenser light to stay on continuously, set to OFF? heard when ...
... with mild soap and warm water. If you did not notice from the ice maker mold. In the U.S.A., www.kitchenaid.com In Canada, www.kitchenaid.ca The refrigerator will not close completely Do not use an extension cord. fans/compressor adjusting to cool completely. The motor seems to ...run longer than your new refrigerator that you want the dispenser light to stay on continuously, set to OFF? heard when ...
User Instructions
Page 12
...valve turned on the door, remove the temporary shield from food? Straighten the water source line. ■ Ice maker turned on the refrigerator? The ice cubes are hollow or small NOTE: This is located on ? Straighten the water source line. ■ Reverse osmosis ...metal spiral) in either the Installation Instruction booklet or the Use & Care Guide. Allow 24 hours following installation for dispenser motor to enter refrigerator. Minimize door openings and keep doors fully closed completely? Check temperature in the water? See "Ice Maker and Storage Bin." ■ Freezer...
...valve turned on the door, remove the temporary shield from food? Straighten the water source line. ■ Ice maker turned on the refrigerator? The ice cubes are hollow or small NOTE: This is located on ? Straighten the water source line. ■ Reverse osmosis ...metal spiral) in either the Installation Instruction booklet or the Use & Care Guide. Allow 24 hours following installation for dispenser motor to enter refrigerator. Minimize door openings and keep doors fully closed completely? Check temperature in the water? See "Ice Maker and Storage Bin." ■ Freezer...

User Instructions
Page 13
...water pipe? The filter may not be clogged or incorrectly installed. ■ Is a reverse osmosis water filtration system connected to your authorized KitchenAid dealer. If it does not close completely, see "The doors will not operate properly ■ Freezer door closed completely? See "Water ...T2RFWG2) WATER FILTER CERTIFICATIONS 13 Flush and fill the water system. ■ Water filter installed on ? Flush the water system. Connect refrigerator to cool completely. ■ Water not been recently dispensed? Hold the glass under the dispenser long enough? Allow 24 hours for the...
...water pipe? The filter may not be clogged or incorrectly installed. ■ Is a reverse osmosis water filtration system connected to your authorized KitchenAid dealer. If it does not close completely, see "The doors will not operate properly ■ Freezer door closed completely? See "Water ...T2RFWG2) WATER FILTER CERTIFICATIONS 13 Flush and fill the water system. ■ Water filter installed on ? Flush the water system. Connect refrigerator to cool completely. ■ Water not been recently dispensed? Hold the glass under the dispenser long enough? Allow 24 hours for the...
User Instructions
Page 16
... need assistance using your major appliance, to replace or repair house fuses or to correct defects in materials and workmanship. KITCHENAID® REFRIGERATOR WARRANTY ONE YEAR LIMITED WARRANTY For one year from the date of purchase, when this warranty does not apply. On models...units operated outside the United States or Canada. 7. DISCLAIMER OF IMPLIED WARRANTIES; Service must be provided by a KitchenAid designated service company. Service calls to refrigerator or freezer product failures. 6. Repairs to parts or systems resulting from the date of purchase, when this filter...
... need assistance using your major appliance, to replace or repair house fuses or to correct defects in materials and workmanship. KITCHENAID® REFRIGERATOR WARRANTY ONE YEAR LIMITED WARRANTY For one year from the date of purchase, when this warranty does not apply. On models...units operated outside the United States or Canada. 7. DISCLAIMER OF IMPLIED WARRANTIES; Service must be provided by a KitchenAid designated service company. Service calls to refrigerator or freezer product failures. 6. Repairs to parts or systems resulting from the date of purchase, when this filter...

Parts Diagram
Page 1
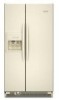
A W10205745 Rev. CABINET PARTS REFRIGERATOR For Models: KSRP25FTWH02, KSRP25FTBL02, KSRP25FTBT02, KSRP25FTSS02, KSRP25FTMS02 (White) (Black) (Biscuit) (Stainless Steel) (Monochromatic Stainless) 04−08 Printed In U.S.A. (jdc)(bay) 1 Part No.
A W10205745 Rev. CABINET PARTS REFRIGERATOR For Models: KSRP25FTWH02, KSRP25FTBL02, KSRP25FTBT02, KSRP25FTSS02, KSRP25FTMS02 (White) (Black) (Biscuit) (Stainless Steel) (Monochromatic Stainless) 04−08 Printed In U.S.A. (jdc)(bay) 1 Part No.

Parts Diagram
Page 3
REFRIGERATOR LINER PARTS For Models: KSRP25FTWH02, KSRP25FTBL02, KSRP25FTBT02, KSRP25FTSS02, KSRP25FTMS02 (White) (Black) (Biscuit) (Stainless Steel) (Monochromatic Stainless) Illus. Part No. DESCRIPTION 1 Liner (Not A Serviceable Part) 2 W10175967 ...
REFRIGERATOR LINER PARTS For Models: KSRP25FTWH02, KSRP25FTBL02, KSRP25FTBT02, KSRP25FTSS02, KSRP25FTMS02 (White) (Black) (Biscuit) (Stainless Steel) (Monochromatic Stainless) Illus. Part No. DESCRIPTION 1 Liner (Not A Serviceable Part) 2 W10175967 ...
Parts Diagram
Page 4
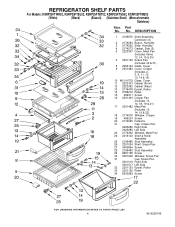
REFRIGERATOR SHELF PARTS For Models: KSRP25FTWH02, KSRP25FTBL02, KSRP25FTBT02, KSRP25FTSS02, KSRP25FTMS02 (White) (Black) (Biscuit) (Stainless Steel) (Monochromatic Stainless) Illus. Part No. No. DESCRIPTION 1 2195975 Shelf Assembly, Cantilever (3) 2 ... 489261 Screw 20 2176095 Deflector 21 Cap, Crisper Pan 2223286 Right Side 2223285 Left Side 22 2174362 Window, Meat Pan 24 2216102 Shelf & Roller Assembly 25 2196485 Stud Assembly 26 2301034 Shelf, Snack Pan 27 3400894 Screw 28 2196483 Stud Assembly 29 8281158 Screw 30 2301006 Window, Snack Pan 31 Cap...
REFRIGERATOR SHELF PARTS For Models: KSRP25FTWH02, KSRP25FTBL02, KSRP25FTBT02, KSRP25FTSS02, KSRP25FTMS02 (White) (Black) (Biscuit) (Stainless Steel) (Monochromatic Stainless) Illus. Part No. No. DESCRIPTION 1 2195975 Shelf Assembly, Cantilever (3) 2 ... 489261 Screw 20 2176095 Deflector 21 Cap, Crisper Pan 2223286 Right Side 2223285 Left Side 22 2174362 Window, Meat Pan 24 2216102 Shelf & Roller Assembly 25 2196485 Stud Assembly 26 2301034 Shelf, Snack Pan 27 3400894 Screw 28 2196483 Stud Assembly 29 8281158 Screw 30 2301006 Window, Snack Pan 31 Cap...

Parts Diagram
Page 10
... PARTS For Models: KSRP25FTWH02, KSRP25FTBL02, KSRP25FTBT02, KSRP25FTSS02, KSRP25FTMS02 (White) (Black) (Biscuit) (Stainless Steel) (Monochromatic Stainless) Illus. DESCRIPTION 1 Refrigerator Door (Includes #7) 2313299W White 2313299B Black 2313299T Biscuit 2301184S Stainless Steel 2301184SAP Monochromatic Satina 2 2301486 Door, Compartment 3 2193409K Beverage Holder(2) 4 Handle 2319727W White 2319727B Black ...
... PARTS For Models: KSRP25FTWH02, KSRP25FTBL02, KSRP25FTBT02, KSRP25FTSS02, KSRP25FTMS02 (White) (Black) (Biscuit) (Stainless Steel) (Monochromatic Stainless) Illus. DESCRIPTION 1 Refrigerator Door (Includes #7) 2313299W White 2313299B Black 2313299T Biscuit 2301184S Stainless Steel 2301184SAP Monochromatic Satina 2 2301486 Door, Compartment 3 2193409K Beverage Holder(2) 4 Handle 2319727W White 2319727B Black ...

Parts Diagram
Page 18
...Unit Mounting Frame 21 2187510 Unit, Harness 22 2181929 Fan, Motor Bracket 23 2323198 Heater, Defrost 24 2304287 Clip 25 489373 Screw 26 Grommet (4) 1100826 Production 4387558 Service 27 489340 Screw 28 2196202 Air Baffle 29 2155547 Clip, ... Valve, Access (5/16") 978027 Valve, Access (3/8") 978028 Valve, Access (1/2") 978029 Valve, Access (5/8") 978030 Valve, Access (3/4") 876764 Valve, Access (3/16") REFRIGERANT CHARGE 5.00 oz. (R−134A) 18 W10205745 No. No. No. Part No. UNIT PARTS For Models: KSRP25FTWH02, KSRP25FTBL02, KSRP25FTBT02, KSRP25FTSS02, KSRP25FTMS02 (White...
...Unit Mounting Frame 21 2187510 Unit, Harness 22 2181929 Fan, Motor Bracket 23 2323198 Heater, Defrost 24 2304287 Clip 25 489373 Screw 26 Grommet (4) 1100826 Production 4387558 Service 27 489340 Screw 28 2196202 Air Baffle 29 2155547 Clip, ... Valve, Access (5/16") 978027 Valve, Access (3/8") 978028 Valve, Access (1/2") 978029 Valve, Access (5/8") 978030 Valve, Access (3/4") 876764 Valve, Access (3/16") REFRIGERANT CHARGE 5.00 oz. (R−134A) 18 W10205745 No. No. No. Part No. UNIT PARTS For Models: KSRP25FTWH02, KSRP25FTBL02, KSRP25FTBT02, KSRP25FTSS02, KSRP25FTMS02 (White...


