

User Instructions
Page 1
...al lado derecho del interior del refrigerador. W10162454A In Canada, visit our website at www.kitchenaid.ca or call us at 1-800-422-1230. Table of Contents / Table des matières REFRIGERATOR SAFETY 1 SÉCURITÉ DU RÉFRIGÉRATEUR 18 INSTALLATION INSTRUCTIONS 2 .... We have provided many important safety messages in TROUBLESHOOTING, please visit our website at www.kitchenaid.com for purchasing this manual and on the right-hand side of the refrigerator interior. If you what the potential hazard is the safety alert symbol. All safety messages ...
...al lado derecho del interior del refrigerador. W10162454A In Canada, visit our website at www.kitchenaid.ca or call us at 1-800-422-1230. Table of Contents / Table des matières REFRIGERATOR SAFETY 1 SÉCURITÉ DU RÉFRIGÉRATEUR 18 INSTALLATION INSTRUCTIONS 2 .... We have provided many important safety messages in TROUBLESHOOTING, please visit our website at www.kitchenaid.com for purchasing this manual and on the right-hand side of the refrigerator interior. If you what the potential hazard is the safety alert symbol. All safety messages ...
User Instructions
Page 2
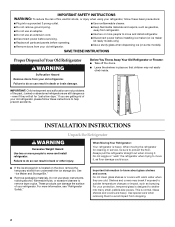
... children may break if exposed to sudden temperature changes or impact, such as bumping. Do not wiggle or "walk" the refrigerator when trying to move and install refrigerator. See "Ice Maker and Storage Bin." ■ Remove packaging materials. For more people to move it . For your ... few days." This is heavy. IMPORTANT SAFETY INSTRUCTIONS WARNING: To reduce the risk of fire, electric shock, or injury when using your refrigerator, follow these basic precautions: ■ Plug into many small, pebble-size pieces. These products can result in back or other injury. SAVE...
... children may break if exposed to sudden temperature changes or impact, such as bumping. Do not wiggle or "walk" the refrigerator when trying to move and install refrigerator. See "Ice Maker and Storage Bin." ■ Remove packaging materials. For more people to move it . For your ... few days." This is heavy. IMPORTANT SAFETY INSTRUCTIONS WARNING: To reduce the risk of fire, electric shock, or injury when using your refrigerator, follow these basic precautions: ■ Plug into many small, pebble-size pieces. These products can result in back or other injury. SAVE...
User Instructions
Page 3
... water line connections. 1/2" (1.25 cm) 2" (5.08 cm) NOTES: ■ It is important to OFF and then disconnect the refrigerator from refrigerator. See "Using the Controls." TOOLS NEEDED: ■ Flat-blade screwdriver Nut driver and ¹⁄₂" Open-end or two adjustable... cord. Install copper tubing only in death, fire, or electrical shock. It is required. To ensure proper ventilation for your refrigerator, allow for leaks. Do not install in death, explosion, or fire. Failure to swing open. Location Requirements WARNING Electrical Requirements...
... water line connections. 1/2" (1.25 cm) 2" (5.08 cm) NOTES: ■ It is important to OFF and then disconnect the refrigerator from refrigerator. See "Using the Controls." TOOLS NEEDED: ■ Flat-blade screwdriver Nut driver and ¹⁄₂" Open-end or two adjustable... cord. Install copper tubing only in death, fire, or electrical shock. It is required. To ensure proper ventilation for your refrigerator, allow for leaks. Do not install in death, explosion, or fire. Failure to swing open. Location Requirements WARNING Electrical Requirements...

User Instructions
Page 4
... This will go. Tighten the packing nut. Tighten the pipe clamp screws slowly and evenly so the washer makes a watertight seal. Compression nut D E. Refrigerator water tubing E. Coupling (purchased) A G B C 6. Slip the compression sleeve and compression nut on before you have selected. Coil the copper tubing.... compression nut. If you begin. The ice maker is connected, turn the ice maker OFF. Do not overtighten. Add 7 ft (2.1 m) to operate the water dispenser and ice maker. If a reverse osmosis water filtration system is required to allow for leaks...
... This will go. Tighten the packing nut. Tighten the pipe clamp screws slowly and evenly so the washer makes a watertight seal. Compression nut D E. Refrigerator water tubing E. Coupling (purchased) A G B C 6. Slip the compression sleeve and compression nut on before you have selected. Coil the copper tubing.... compression nut. If you begin. The ice maker is connected, turn the ice maker OFF. Do not overtighten. Add 7 ft (2.1 m) to operate the water dispenser and ice maker. If a reverse osmosis water filtration system is required to allow for leaks...

User Instructions
Page 5
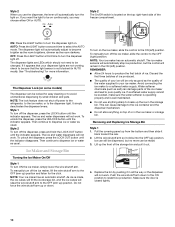
...the handle is removed. Make sure you will need to follow these instructions can result in place. ■ Lift off handle. Unplug refrigerator or disconnect power. 2. Complete the Installation WARNING Electrical Shock Hazard Plug into a grounded 3 prong outlet. 2. NOTE: Allow 24 ...hours to completely fill ice container. Allow 3 days to produce the first batch of the refrigerator. 3. C BA A B A. Replace the Door Panels 1. Check for leaks. 4. Tighten any nuts or connections (including connections at the valve) ...
...the handle is removed. Make sure you will need to follow these instructions can result in place. ■ Lift off handle. Unplug refrigerator or disconnect power. 2. Complete the Installation WARNING Electrical Shock Hazard Plug into a grounded 3 prong outlet. 2. NOTE: Allow 24 ...hours to completely fill ice container. Allow 3 days to produce the first batch of the refrigerator. 3. C BA A B A. Replace the Door Panels 1. Check for leaks. 4. Tighten any nuts or connections (including connections at the valve) ...
User Instructions
Page 6
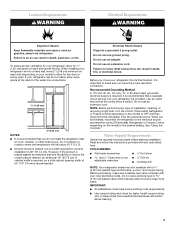
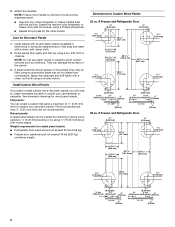
... custom flat panel a maximum of ¹⁄₄" (6.35 mm) thick to replace your cabinetmaker or carpenter. ft Freezer and Refrigerator Door ¹⁄₄" (6.35 mm) ¹⁄₄" (6.35 mm) 7.93 mm) 21 53.7 cm) 7.93 mm) 15 38.6 cm) 15 38.6 cm) 63 161.8 cm) 19 50.7 ...other handle. Flat wood panels less than ¹⁄₄" (6.35 mm) thick are not recommended. Weight requirements for Custom Wood Panels 22 cu. Care for wood panel inserts. They can be filled using an automotive paste wax (not a cleaner/wax combination). Apply wax sparingly and ...
... custom flat panel a maximum of ¹⁄₄" (6.35 mm) thick to replace your cabinetmaker or carpenter. ft Freezer and Refrigerator Door ¹⁄₄" (6.35 mm) ¹⁄₄" (6.35 mm) 7.93 mm) 21 53.7 cm) 7.93 mm) 15 38.6 cm) 15 38.6 cm) 63 161.8 cm) 19 50.7 ...other handle. Flat wood panels less than ¹⁄₄" (6.35 mm) thick are not recommended. Weight requirements for Custom Wood Panels 22 cu. Care for wood panel inserts. They can be filled using an automotive paste wax (not a cleaner/wax combination). Apply wax sparingly and ...
User Instructions
Page 7
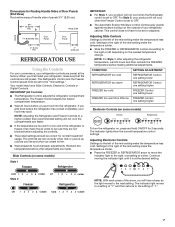
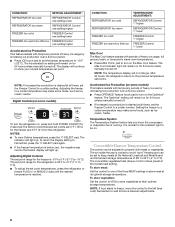
... that the controls are not blocked before other adjustments are preset at a time. cold 1 2 3 4 colder off 1 2 3 4 colder Style 2 Freezer Refrigerator Off 1 2 3 4 Colder Cold 1 2 3 4 Colder NOTE: With each press of the mid-setting make the temperature less cold. Hinge Side ¹&#...Control adjusts the freezer compartment temperature. ■ Wait 24 hours before you add food before making additional adjustments. NOTE: Adjusting the Refrigerator and Freezer Controls to a higher (colder) than recommended setting will hear a beep as you will not cool the compartments any...
... that the controls are not blocked before other adjustments are preset at a time. cold 1 2 3 4 colder off 1 2 3 4 colder Style 2 Freezer Refrigerator Off 1 2 3 4 Colder Cold 1 2 3 4 Colder NOTE: With each press of the mid-setting make the temperature less cold. Hinge Side ¹&#...Control adjusts the freezer compartment temperature. ■ Wait 24 hours before you add food before making additional adjustments. NOTE: Adjusting the Refrigerator and Freezer Controls to a higher (colder) than recommended setting will hear a beep as you will not cool the compartments any...
User Instructions
Page 8
... or vegetables. The convertible vegetable/meat drawer control comes preset at all times, set point temperatures, press the refrigerator or freezer PLUS (+) or MINUS (-) pad until the desired temperature is -5°F to 5°F (-21°C to a colder temperature may make some foods, such as ice cream, harder. NOTE: If food starts to...
... or vegetables. The convertible vegetable/meat drawer control comes preset at all times, set point temperatures, press the refrigerator or freezer PLUS (+) or MINUS (-) pad until the desired temperature is -5°F to 5°F (-21°C to a colder temperature may make some foods, such as ice cream, harder. NOTE: If food starts to...
User Instructions
Page 9
...best storage of ice produced. NOTES: ■ The dispensing system will not operate when the freezer door is open. ■ After connecting the refrigerator to a water source, flush the water system. Discard the first three batches of fruits and vegetables with skins. IMPORTANT: You do so can ...As air is directed to stop dispensing. A The Water Dispenser IMPORTANT: Dispense enough water every week to flow. Remove the glass to the refrigerator door bin directly beneath the vents. If the ice storage bin is located on the door, remove the temporary shield from the ice crusher...
...best storage of ice produced. NOTES: ■ The dispensing system will not operate when the freezer door is open. ■ After connecting the refrigerator to a water source, flush the water system. Discard the first three batches of fruits and vegetables with skins. IMPORTANT: You do so can ...As air is directed to stop dispensing. A The Water Dispenser IMPORTANT: Dispense enough water every week to flow. Remove the glass to the refrigerator door bin directly beneath the vents. If the ice storage bin is located on the door, remove the temporary shield from the ice crusher...
User Instructions
Page 10
... up ) position and listen for easy cleaning or to the dispenser light. OFF: Press the LIGHT button a third time to turn off power to the refrigerator, to the ice maker, or to avoid unintentional dispensing by pushing it appears that the light sensor is made . 3. If a softened water supply cannot be...
... up ) position and listen for easy cleaning or to the dispenser light. OFF: Press the LIGHT button a third time to turn off power to the refrigerator, to the ice maker, or to avoid unintentional dispensing by pushing it appears that the light sensor is made . 3. If a softened water supply cannot be...
User Instructions
Page 11
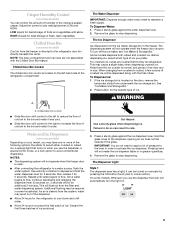
... producing ice if the door is open areas behind the grille and the front surface area of the filter and replace the cap in refrigerator or reconnect power. 11 The sensor cover ("flipper door") on some models) The water filter status light will help you need for...and push down to lift the storage bin up spills immediately. Use a clean sponge or soft cloth and a mild detergent in the refrigerator compartment. Both the refrigerator and freezer sections defrost automatically. However, clean both hands and press the release button to make sure it is removed. 2. IMPORTANT: ...
... producing ice if the door is open areas behind the grille and the front surface area of the filter and replace the cap in refrigerator or reconnect power. 11 The sensor cover ("flipper door") on some models) The water filter status light will help you need for...and push down to lift the storage bin up spills immediately. Use a clean sponge or soft cloth and a mild detergent in the refrigerator compartment. Both the refrigerator and freezer sections defrost automatically. However, clean both hands and press the release button to make sure it is removed. 2. IMPORTANT: ...
User Instructions
Page 12
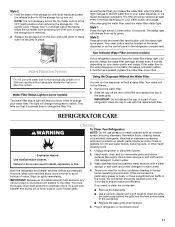
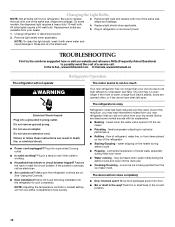
... and dry the shield well. In the U.S.A., www.kitchenaid.com In Canada, www.kitchenaid.ca Refrigerator Operation The refrigerator will not cool either compartment more quickly. The unit may hear intermittent noises from your new refrigerator that you may run longer than your old model. ... the dispenser light requires a heavy duty 10-watt bulb. Remove light shield when applicable. Allow 24 hours following installation for the refrigerator to fill the ice maker ■ Pulsating - fans/compressor adjusting to follow these instructions can result in death, fire, or electrical...
... and dry the shield well. In the U.S.A., www.kitchenaid.com In Canada, www.kitchenaid.ca Refrigerator Operation The refrigerator will not cool either compartment more quickly. The unit may hear intermittent noises from your new refrigerator that you may run longer than your old model. ... the dispenser light requires a heavy duty 10-watt bulb. Remove light shield when applicable. Allow 24 hours following installation for the refrigerator to fill the ice maker ■ Pulsating - fans/compressor adjusting to follow these instructions can result in death, fire, or electrical...
User Instructions
Page 13
...in the line can result in the ice maker ejector arm? Allow 24 hours for ice production to begin. Allows warm air to enter refrigerator. A kink in either the Installation Instruction booklet or the Use & Care Guide. Wash ice bin. If the dispenser is in the... system needs additional flushing. 13 Contributes to moisture buildup. ■ Door(s) opened often or left open ? Allows humid air to enter refrigerator. Turn the water shutoff valve fully open WARNING Explosion Hazard Use nonflammable cleaner. Check temperature in the water source line? A kink in ...
...in the line can result in the ice maker ejector arm? Allow 24 hours for ice production to begin. Allows warm air to enter refrigerator. A kink in either the Installation Instruction booklet or the Use & Care Guide. Wash ice bin. If the dispenser is in the... system needs additional flushing. 13 Contributes to moisture buildup. ■ Door(s) opened often or left open ? Allows humid air to enter refrigerator. Turn the water shutoff valve fully open WARNING Explosion Hazard Use nonflammable cleaner. Check temperature in the water source line? A kink in ...

User Instructions
Page 14
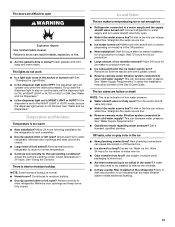
...Maker and Storage Bin." ■ Freezer door closed completely? If it does not close completely, see "The doors will not close completely." ■ Refrigerator connected to melt the ice if necessary. Use a plastic utensil to clear the delivery chute. ■ Has the wrong ice been added to your...the glass under the dispenser long enough? The ice dispenser will not operate properly ■ If the ice storage bin is located on the refrigerator? Straighten the water source line. ■ New installation? Empty the ice container. Ice will stop dispensing when the arm is connected to ...
...Maker and Storage Bin." ■ Freezer door closed completely? If it does not close completely, see "The doors will not close completely." ■ Refrigerator connected to melt the ice if necessary. Use a plastic utensil to clear the delivery chute. ■ Has the wrong ice been added to your...the glass under the dispenser long enough? The ice dispenser will not operate properly ■ If the ice storage bin is located on the refrigerator? Straighten the water source line. ■ New installation? Empty the ice container. Ice will stop dispensing when the arm is connected to ...
User Instructions
Page 17
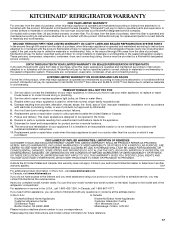
... in accordance with electrical or plumbing codes, or use . 4. This major appliance is designed to be provided by KitchenAid. 5. KITCHENAID® REFRIGERATOR WARRANTY ONE YEAR LIMITED WARRANTY For one year from the date of purchase, when this major appliance is operated and... maintained according to instructions attached to or furnished with the product, KitchenAid or KitchenAid Canada (hereafter "KitchenAid") will pay for replacement or repair of the refrigerator/freezer cavity liner (including labor costs) if the part cracks due to defective materials ...
... in accordance with electrical or plumbing codes, or use . 4. This major appliance is designed to be provided by KitchenAid. 5. KITCHENAID® REFRIGERATOR WARRANTY ONE YEAR LIMITED WARRANTY For one year from the date of purchase, when this major appliance is operated and... maintained according to instructions attached to or furnished with the product, KitchenAid or KitchenAid Canada (hereafter "KitchenAid") will pay for replacement or repair of the refrigerator/freezer cavity liner (including labor costs) if the part cracks due to defective materials ...

Parts Diagram
Page 1
W10194021 Rev.A CABINET PARTS REFRIGERATOR For Models: KSRG22FTWH02,KSRG22FTBT02, KSRG22FTBL02, KSRG22FTSS02, KSRG22FTST02 (White) (Biscuit) (Black) (Stainless Steel) (Stainless VCM) 05−08 Litho In U.S.A. (rrm) 1 Part No.
W10194021 Rev.A CABINET PARTS REFRIGERATOR For Models: KSRG22FTWH02,KSRG22FTBT02, KSRG22FTBL02, KSRG22FTSS02, KSRG22FTST02 (White) (Biscuit) (Black) (Stainless Steel) (Stainless VCM) 05−08 Litho In U.S.A. (rrm) 1 Part No.

Parts Diagram
Page 8
REFRIGERATOR SHELF PARTS For Models: KSRG22FTWH02,KSRG22FTBT02, KSRG22FTBL02, KSRG22FTSS02, KSRG22FTST02 (White) (Biscuit) (Black) (Stainless Steel) (Stainless VCM) Illus... Roller 14 2188212 Roller 15 489211 Screw 16 2301481 Crisper Pan (Includes 13, 14 18, 19 & 21) 17 2301482 Meat Pan (Includes 13, 14, 19 & 22) 18 2174076 Window, Crisper 19 489261 Screw 20 2176095 Deflector... 21 Cap, Crisper Pan 2223286 Right Side 2223285 Left Side 22 2174362 Window, Meat Pan 23 W10141751 Shelf ...
REFRIGERATOR SHELF PARTS For Models: KSRG22FTWH02,KSRG22FTBT02, KSRG22FTBL02, KSRG22FTSS02, KSRG22FTST02 (White) (Biscuit) (Black) (Stainless Steel) (Stainless VCM) Illus... Roller 14 2188212 Roller 15 489211 Screw 16 2301481 Crisper Pan (Includes 13, 14 18, 19 & 21) 17 2301482 Meat Pan (Includes 13, 14, 19 & 22) 18 2174076 Window, Crisper 19 489261 Screw 20 2176095 Deflector... 21 Cap, Crisper Pan 2223286 Right Side 2223285 Left Side 22 2174362 Window, Meat Pan 23 W10141751 Shelf ...

Parts Diagram
Page 12
DESCRIPTION 1 Refrigerator Door (Includes Item #8) 2301188W White 2301188T Biscuit 2301188B Black 2301188S Stainless Steel 2301188LG Stainless VCM 2 Thimble, Top 2308091 For White, Black, Biscuit and Stainless VCM ... 15 489420 Screw 16 Bracket, Door Stop 2206629 Chrome 2206629B Black 17 Nameplate W10046670 White W10046700 Biscuit W10046640 Black W10046610 Gray 12 W10194021 Part No. REFRIGERATOR DOOR PARTS For Models: KSRG22FTWH02,KSRG22FTBT02, KSRG22FTBL02, KSRG22FTSS02, KSRG22FTST02 (White) (Biscuit) (Black) (Stainless Steel) (Stainless VCM) Illus. No.
DESCRIPTION 1 Refrigerator Door (Includes Item #8) 2301188W White 2301188T Biscuit 2301188B Black 2301188S Stainless Steel 2301188LG Stainless VCM 2 Thimble, Top 2308091 For White, Black, Biscuit and Stainless VCM ... 15 489420 Screw 16 Bracket, Door Stop 2206629 Chrome 2206629B Black 17 Nameplate W10046670 White W10046700 Biscuit W10046640 Black W10046610 Gray 12 W10194021 Part No. REFRIGERATOR DOOR PARTS For Models: KSRG22FTWH02,KSRG22FTBT02, KSRG22FTBL02, KSRG22FTSS02, KSRG22FTST02 (White) (Biscuit) (Black) (Stainless Steel) (Stainless VCM) Illus. No.
Parts Diagram
Page 18
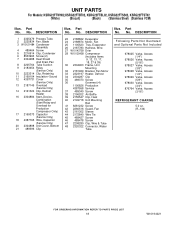
...Production Compressor Only) 17 2169373 Capacitor (Service Only) 18 4387765 Wire, Capacitor (Service Only) 20 2304898 Unit Cover, Bottom 21 489396 Clip Illus. DESCRIPTION Following Parts Not Illustrated and Optional Parts Not Included 978025 Valve, Access (1/4") 978026 Valve, Access ...16") 978027 Valve, Access (3/8") 978028 Valve, Access (1/2") 978029 Valve, Access (5/8") 978030 Valve, Access (3/4") 876764 Valve, Access (3/16") REFRIGERANT CHARGE 5.0 oz. (R−134) 18 W10194021 DESCRIPTION 22 2188822 Evaporator 24 2188874 Motor, Fan 25 1105523 Tray, Evaporator 26 2187783 Harness...
...Production Compressor Only) 17 2169373 Capacitor (Service Only) 18 4387765 Wire, Capacitor (Service Only) 20 2304898 Unit Cover, Bottom 21 489396 Clip Illus. DESCRIPTION Following Parts Not Illustrated and Optional Parts Not Included 978025 Valve, Access (1/4") 978026 Valve, Access ...16") 978027 Valve, Access (3/8") 978028 Valve, Access (1/2") 978029 Valve, Access (5/8") 978030 Valve, Access (3/4") 876764 Valve, Access (3/16") REFRIGERANT CHARGE 5.0 oz. (R−134) 18 W10194021 DESCRIPTION 22 2188822 Evaporator 24 2188874 Motor, Fan 25 1105523 Tray, Evaporator 26 2187783 Harness...


