
Use & Care Guide
Page 2
... to Order Accessories and Replacement Parts 9 Troubleshooting Problems 9 Tilt-Head Stand Mixer Features 10 Assembling Your Tilt-Head Stand Mixer 11 Using Your Pouring Shield 12 Using Your KitchenAid® Accessories 13 Mixing Time 13 Tilt-Head Stand Mixer Use 14 Care and Cleaning 14 Beater to Arrange for Warranty Service in Puerto Rico 8 How to Bowl Clearance 14 Speed Control Guide 15 Mixing Tips 16 Egg Whites 17 Whipped Cream 17 Attachments and Accessories 18 General Instructions 19 Appetizers and Entrées 60 Yeast Breads and Quick Breads 64 Cakes and...
... to Order Accessories and Replacement Parts 9 Troubleshooting Problems 9 Tilt-Head Stand Mixer Features 10 Assembling Your Tilt-Head Stand Mixer 11 Using Your Pouring Shield 12 Using Your KitchenAid® Accessories 13 Mixing Time 13 Tilt-Head Stand Mixer Use 14 Care and Cleaning 14 Beater to Arrange for Warranty Service in Puerto Rico 8 How to Bowl Clearance 14 Speed Control Guide 15 Mixing Tips 16 Egg Whites 17 Whipped Cream 17 Attachments and Accessories 18 General Instructions 19 Appetizers and Entrées 60 Yeast Breads and Quick Breads 64 Cakes and...
Use & Care Guide
Page 6
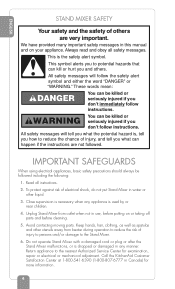
...moving parts. Keep hands, hair, clothing, as well as spatulas and other liquid. 3. ENGLISH STAND MIXER SAFETY Your safety and the safety of others . We have provided many important safety messages in use, ...repair or electrical or mechanical adjustment. To protect against risk of injury to persons and/or damage to the nearest Authorized Service Center for more information. 4 Always read and obey all instructions. 2. These words mean: You can kill or hurt you don't immediately follow instructions. Do not operate Stand Mixer with a damaged cord or plug or after the Stand Mixer...
...moving parts. Keep hands, hair, clothing, as well as spatulas and other liquid. 3. ENGLISH STAND MIXER SAFETY Your safety and the safety of others . We have provided many important safety messages in use, ...repair or electrical or mechanical adjustment. To protect against risk of injury to persons and/or damage to the nearest Authorized Service Center for more information. 4 Always read and obey all instructions. 2. These words mean: You can kill or hurt you don't immediately follow instructions. Do not operate Stand Mixer with a damaged cord or plug or after the Stand Mixer...
Use & Care Guide
Page 7
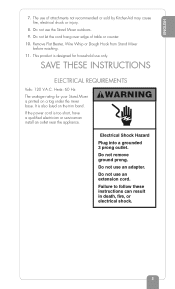
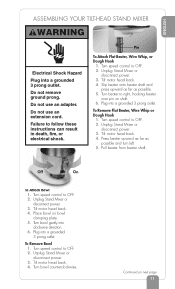
... serviceman install an outlet near the appliance. Hertz: 60 Hz The wattage rating for household use only. WARNING Electrical Shock Hazard Plug into a grounded 3 prong outlet. ENGLISH 7. Do not use an adapter. Remove Flat Beater, Wire Whip or Dough Hook from Stand Mixer before washing. 11. Do not let the cord hang over edge of attachments not recommended or sold by KitchenAid may cause fire, electrical shock...
... serviceman install an outlet near the appliance. Hertz: 60 Hz The wattage rating for household use only. WARNING Electrical Shock Hazard Plug into a grounded 3 prong outlet. ENGLISH 7. Do not use an adapter. Remove Flat Beater, Wire Whip or Dough Hook from Stand Mixer before washing. 11. Do not let the cord hang over edge of attachments not recommended or sold by KitchenAid may cause fire, electrical shock...
Use & Care Guide
Page 8
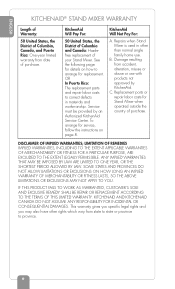
... EXCLUSIONS ON HOW LONG AN IMPLIED WARRANTY OF MERCHANTABILITY OR FITNESS LASTS, SO THE ABOVE LIMITATIONS OR EXCLUSIONS MAY NOT APPLY TO YOU. B. OR In Puerto Rico: The replacement parts and repair labor costs to arrange for Stand Mixer when operated outside the country of your Stand Mixer. Replacement parts or repair labor costs for replacement. To arrange for service, follow the instructions on how to correct defects...
... EXCLUSIONS ON HOW LONG AN IMPLIED WARRANTY OF MERCHANTABILITY OR FITNESS LASTS, SO THE ABOVE LIMITATIONS OR EXCLUSIONS MAY NOT APPLY TO YOU. B. OR In Puerto Rico: The replacement parts and repair labor costs to arrange for Stand Mixer when operated outside the country of your Stand Mixer. Replacement parts or repair labor costs for replacement. To arrange for service, follow the instructions on how to correct defects...
Use & Care Guide
Page 9
... to deliver an identical or comparable replacement to your door free of charge and arrange to have your original Stand Mixer returned to us . Please follow these instructions to obtain satisfactory service in this quality service. Your replacement Stand Mixer will also be covered by our one year limited warranty. If you receive your original Stand Mixer. to an Authorized KitchenAid Canada Service Centre. In the carton include...
... to deliver an identical or comparable replacement to your door free of charge and arrange to have your original Stand Mixer returned to us . Please follow these instructions to obtain satisfactory service in this quality service. Your replacement Stand Mixer will also be covered by our one year limited warranty. If you receive your original Stand Mixer. to an Authorized KitchenAid Canada Service Centre. In the carton include...
Use & Care Guide
Page 10
... the Stand Mixer for service, please review Or contact an Authorized Service the Troubleshooting section on how to an Authorized KitchenAid Service Center. For service information in Canada, call toll-free 1-800-541- 6390 to learn the location of a Service Center near you. Joseph, MI 49085- 0218 For service information in the 50 United States, District of purchase. Your repaired Stand Mixer will pay for replacement parts...
... the Stand Mixer for service, please review Or contact an Authorized Service the Troubleshooting section on how to an Authorized KitchenAid Service Center. For service information in Canada, call toll-free 1-800-541- 6390 to learn the location of a Service Center near you. Joseph, MI 49085- 0218 For service information in the 50 United States, District of purchase. Your repaired Stand Mixer will pay for replacement parts...
Use & Care Guide
Page 11
..., then turn it back on. Do not return the Stand Mixer to Bowl Clearance," page 14. they do not provide service. - Under heavy loads with extended mixing time periods, you of in the 50 United States, District of purchase will assure you may not be fixed with electric motors. 3. Proof of Columbia, and Puerto Rico, call toll-free 01- 800...
..., then turn it back on. Do not return the Stand Mixer to Bowl Clearance," page 14. they do not provide service. - Under heavy loads with extended mixing time periods, you of in the 50 United States, District of purchase will assure you may not be fixed with electric motors. 3. Proof of Columbia, and Puerto Rico, call toll-free 01- 800...
Use & Care Guide
Page 12
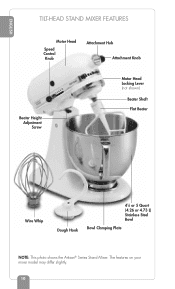
ENGLISH TILT-HEAD STAND MIXER FEATURES Motor Head Speed Control Knob Attachment Hub Attachment Knob Beater Height Adjustment Screw Motor Head Locking Lever (not shown) Beater Shaft Flat Beater Wire Whip Dough Hook 41⁄2 or 5 Quart (4.26 or 4.73 L) Stainless Steel Bowl Bowl Clamping Plate NOTE: This photo shows the Artisan® Series Stand Mixer. The features on your mixer model may differ slightly. 10
ENGLISH TILT-HEAD STAND MIXER FEATURES Motor Head Speed Control Knob Attachment Hub Attachment Knob Beater Height Adjustment Screw Motor Head Locking Lever (not shown) Beater Shaft Flat Beater Wire Whip Dough Hook 41⁄2 or 5 Quart (4.26 or 4.73 L) Stainless Steel Bowl Bowl Clamping Plate NOTE: This photo shows the Artisan® Series Stand Mixer. The features on your mixer model may differ slightly. 10
Use & Care Guide
Page 13
... disconnect power. 3. Turn speed control to OFF. 2. Turn speed control to OFF. 2. Pull beater from beater shaft. Turn speed control to OFF. 2. Unplug Stand Mixer or disconnect power. 3. Tilt motor head back. 4. To Remove Bowl 1. Press beater upward as far as possible. 5. ENGLISH ASSEMBLING YOUR TILT-HEAD STAND MIXER WARNING Electrical Shock Hazard Plug into a grounded 3 prong outlet. To Remove Flat Beater, Wire Whip or Dough Hook 1. Do not remove ground prong. Unplug Stand Mixer or disconnect power. 3. Place bowl on next page 11 Do not use an extension cord...
... disconnect power. 3. Turn speed control to OFF. 2. Turn speed control to OFF. 2. Pull beater from beater shaft. Turn speed control to OFF. 2. Unplug Stand Mixer or disconnect power. 3. Tilt motor head back. 4. To Remove Bowl 1. Press beater upward as far as possible. 5. ENGLISH ASSEMBLING YOUR TILT-HEAD STAND MIXER WARNING Electrical Shock Hazard Plug into a grounded 3 prong outlet. To Remove Flat Beater, Wire Whip or Dough Hook 1. Do not remove ground prong. Unplug Stand Mixer or disconnect power. 3. Place bowl on next page 11 Do not use an extension cord...
Use & Care Guide
Page 14
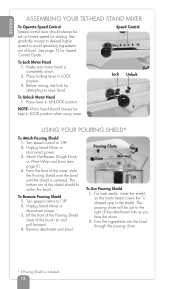
... mixer. 2. Attach Flat Beater, Dough Hook, or Wire Whip and bowl (see page 11). 4. Turn speed control to OFF. 2. Unplug Stand Mixer or disconnect power. 3. Pour the ingredients into the bowl through the pouring chute. * If Pouring Shield is completely down. 2. Place locking lever in UNLOCK position. USING YOUR POURING SHIELD* To Attach Pouring Shield 1. Remove attachment and bowl. The pouring chute will be kept in the shield. Make sure motor head is included. 12 Lock Unlock To Unlock Motor Head 1. Turn speed control to OFF. 2. Pouring Chute To Use Pouring Shield...
... mixer. 2. Attach Flat Beater, Dough Hook, or Wire Whip and bowl (see page 11). 4. Turn speed control to OFF. 2. Unplug Stand Mixer or disconnect power. 3. Pour the ingredients into the bowl through the pouring chute. * If Pouring Shield is completely down. 2. Place locking lever in UNLOCK position. USING YOUR POURING SHIELD* To Attach Pouring Shield 1. Remove attachment and bowl. The pouring chute will be kept in the shield. Make sure motor head is included. 12 Lock Unlock To Unlock Motor Head 1. Turn speed control to OFF. 2. Pouring Chute To Use Pouring Shield...
Use & Care Guide
Page 15
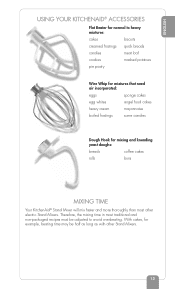
... non-packaged recipes must be half as long as with other electric Stand Mixers. ENGLISH USING YOUR KITCHENAID® ACCESSORIES Flat Beater for normal to heavy mixtures: cakes biscuits creamed frostings quick breads candies meat loaf cookies mashed potatoes pie pastry Wire Whip for mixtures that need air incorporated: eggs sponge cakes egg whites angel food cakes heavy cream mayonnaise boiled frostings some candies Dough Hook for example, beating time may be adjusted to...
... non-packaged recipes must be half as long as with other electric Stand Mixers. ENGLISH USING YOUR KITCHENAID® ACCESSORIES Flat Beater for normal to heavy mixtures: cakes biscuits creamed frostings quick breads candies meat loaf cookies mashed potatoes pie pastry Wire Whip for mixtures that need air incorporated: eggs sponge cakes egg whites angel food cakes heavy cream mayonnaise boiled frostings some candies Dough Hook for example, beating time may be adjusted to...
Use & Care Guide
Page 16
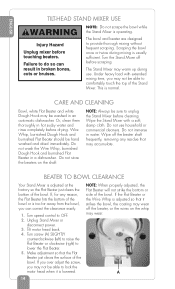
... off the beater shaft frequently, removing any reason, the Flat Beater hits the bottom of the Stand Mixer. Turn screw (A) SLIGHTLY counterclockwise (left) to raise the Flat Beater or clockwise (right) to do so can correct the clearance easily. 1. Make adjustment so that the Flat Beater just clears the surface of the bowl. A Turn speed control to provide thorough mixing without frequent scraping. Unplug Stand Mixer or disconnect power. 3. This is operating. CARE AND CLEANING Bowl, white Flat Beater and white Dough Hook may...
... off the beater shaft frequently, removing any reason, the Flat Beater hits the bottom of the Stand Mixer. Turn screw (A) SLIGHTLY counterclockwise (left) to raise the Flat Beater or clockwise (right) to do so can correct the clearance easily. 1. Make adjustment so that the Flat Beater just clears the surface of the bowl. A Turn speed control to provide thorough mixing without frequent scraping. Unplug Stand Mixer or disconnect power. 3. This is operating. CARE AND CLEANING Bowl, white Flat Beater and white Dough Hook may...
Use & Care Guide
Page 18
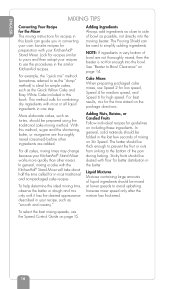
... MIXING TIPS Converting Your Recipe for the Mixer The mixing instructions for recipes in this method, sugar and the shortening, butter, or margarine are thoroughly mixed (creamed) before other mixers. Cake Mixes When preparing packaged cake mixes, use Speed 2 for low speed, Speed 4 for medium speed, and Speed 6 for the time stated on the package directions. Increase mixer speed only after the mixture has thickened. For all liquid ingredients in your KitchenAid® Stand Mixer. To help...
... MIXING TIPS Converting Your Recipe for the Mixer The mixing instructions for recipes in this method, sugar and the shortening, butter, or margarine are thoroughly mixed (creamed) before other mixers. Cake Mixes When preparing packaged cake mixes, use Speed 2 for low speed, Speed 4 for medium speed, and Speed 6 for the time stated on the package directions. Increase mixer speed only after the mixture has thickened. For all liquid ingredients in your KitchenAid® Stand Mixer. To help...
Use & Care Guide
Page 19
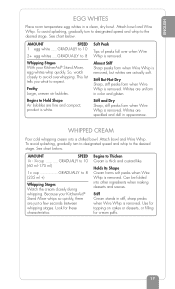
... your KitchenAid® Stand Mixer whips so quickly, there are fine and compact; product is removed. ENGLISH EGG WHITES Place room temperature egg whites in appearance. Attach bowl and Wire Whip. See chart below . AMOUNT SPEED 1 egg white ......GRADUALLY to 10 2+ egg whites .....GRADUALLY to expect. So, watch closely to the desired stage. Stiff and Dry Sharp, stiff peaks form when Wire Whip is white. WHIPPED CREAM Pour cold whipping cream...
... your KitchenAid® Stand Mixer whips so quickly, there are fine and compact; product is removed. ENGLISH EGG WHITES Place room temperature egg whites in appearance. Attach bowl and Wire Whip. See chart below . AMOUNT SPEED 1 egg white ......GRADUALLY to 10 2+ egg whites .....GRADUALLY to expect. So, watch closely to the desired stage. Stiff and Dry Sharp, stiff peaks form when Wire Whip is white. WHIPPED CREAM Pour cold whipping cream...
Use & Care Guide
Page 65
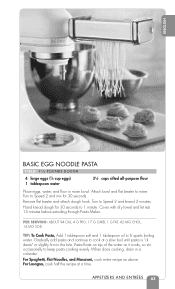
... occasionally to mixer. Attach bowl and flat beater and attach dough hook. Turn to Speed 2 and knead 2 minutes. Turn to Speed 2 and mix for 30 seconds to 6 quarts boiling water. PER SERVING: ABOUT 94 CAL, 4 G PRO, 17 G CARB, 1 G FAT, 42 MG CHOL, 14 MG SOD TIP: To Cook Pasta, Add 1 tablespoon salt and 1 tablespoon oil to 1 minute. Remove flat beater to keep pasta cooking evenly. Hand knead dough for...
... occasionally to mixer. Attach bowl and flat beater and attach dough hook. Turn to Speed 2 and knead 2 minutes. Turn to Speed 2 and mix for 30 seconds to 6 quarts boiling water. PER SERVING: ABOUT 94 CAL, 4 G PRO, 17 G CARB, 1 G FAT, 42 MG CHOL, 14 MG SOD TIP: To Cook Pasta, Add 1 tablespoon salt and 1 tablespoon oil to 1 minute. Remove flat beater to keep pasta cooking evenly. Hand knead dough for...
Use & Care Guide
Page 67
... BREAD MAKING TIPS Making bread with a stand mixer is to mix and knead yeast doughs. • NEVER exceed Speed 2 when using the dough hook. • NEVER use recipes calling for more than 8 cups all-purpose flour or 6 cups whole wheat flour when making dough with a 41⁄2-quart mixer. • NEVER use recipes calling for more than making dough with a 5-quart mixer. • NEVER use the dough hook to be dissolved in greased bowl, turning...
... BREAD MAKING TIPS Making bread with a stand mixer is to mix and knead yeast doughs. • NEVER exceed Speed 2 when using the dough hook. • NEVER use recipes calling for more than 8 cups all-purpose flour or 6 cups whole wheat flour when making dough with a 41⁄2-quart mixer. • NEVER use recipes calling for more than making dough with a 5-quart mixer. • NEVER use the dough hook to be dissolved in greased bowl, turning...

Use & Care Guide
Page 76
... beater to Speed 6 and beat about 30 seconds. Cool completely on Speed 2, mix about 1 minute. Add shortening, milk, and vanilla. Stop and scrape bowl. Turn to 35 minutes, or until toothpick inserted in mixer bowl. Stop and scrape bowl. or 9-inch round baking pans. Turn to mixer. PER SERVING: ABOUT 272 CAL, 4 G PRO, 42 G CARB, 10 G FAT, 37 MG CHOL, 175 MG SOD 74 CAKES...
... beater to Speed 6 and beat about 30 seconds. Cool completely on Speed 2, mix about 1 minute. Add shortening, milk, and vanilla. Stop and scrape bowl. Turn to 35 minutes, or until toothpick inserted in mixer bowl. Stop and scrape bowl. or 9-inch round baking pans. Turn to mixer. PER SERVING: ABOUT 272 CAL, 4 G PRO, 42 G CARB, 10 G FAT, 37 MG CHOL, 175 MG SOD 74 CAKES...

Use & Care Guide
Page 78
... mixer bowl. Add shortening, milk, and vanilla. Attach bowl and flat a time, if necessary. Add eggs and chocolate. Continuing on wire rack. Stop and scrape bowl. Pour batter into two greased and floured 8- Remove from pans. Cool completely on Speed 2, mix about 1 minute, or until creamy. Frost if desired. Add cream, vanilla, salt, and 1 cup powdered sugar. Stop and scrape bowl. Stop and scrape bowl...
... mixer bowl. Add shortening, milk, and vanilla. Attach bowl and flat a time, if necessary. Add eggs and chocolate. Continuing on wire rack. Stop and scrape bowl. Pour batter into two greased and floured 8- Remove from pans. Cool completely on Speed 2, mix about 1 minute, or until creamy. Frost if desired. Add cream, vanilla, salt, and 1 cup powdered sugar. Stop and scrape bowl. Stop and scrape bowl...
Use & Care Guide
Page 142
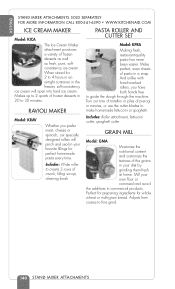
..., or use the cutter blades to fine grind. 140 STAND MIXER ATTACHMENTS And unlike with hand-cranked rollers, you prefer meat, cheese or spinach, our specially designed rollers will ripen into hard ice cream. Turn out tons of tortellini or piles of the grains in your own flour or cornmeal and avoid the additives in commercial products. Adjusts from...
..., or use the cutter blades to fine grind. 140 STAND MIXER ATTACHMENTS And unlike with hand-cranked rollers, you prefer meat, cheese or spinach, our specially designed rollers will ripen into hard ice cream. Turn out tons of tortellini or piles of the grains in your own flour or cornmeal and avoid the additives in commercial products. Adjusts from...
Parts List
Page 5
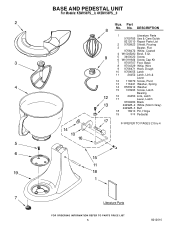
.... DESCRIPTION 1 Literature Parts 9709785 Use & Care Guide 8212010 Repair Parts List 2 9709923 Shield, Pouring 3 Beater, Flat 9708472 White, Coated 4 W10245282 Bowl, 5 Qt. 5 3400020 Screw 6 W10191926 Screw Cap Kit 7 9709707 Foot, Base 8 9704329 Whip, Wire 9 9708471 Hook, Dough 10 9709055 Latch 11 24452 Latch, Link & Lever 12 110679 Screw, Pivot 13 116241 Washer, Spring 14 8533912 Washer 15 103993 Screw, Latch Bearing 16 24450 Link, Latch 17 Lever, Latch 9709280 Black 242928−2 White (Storm Gray) 242928...
.... DESCRIPTION 1 Literature Parts 9709785 Use & Care Guide 8212010 Repair Parts List 2 9709923 Shield, Pouring 3 Beater, Flat 9708472 White, Coated 4 W10245282 Bowl, 5 Qt. 5 3400020 Screw 6 W10191926 Screw Cap Kit 7 9709707 Foot, Base 8 9704329 Whip, Wire 9 9708471 Hook, Dough 10 9709055 Latch 11 24452 Latch, Link & Lever 12 110679 Screw, Pivot 13 116241 Washer, Spring 14 8533912 Washer 15 103993 Screw, Latch Bearing 16 24450 Link, Latch 17 Lever, Latch 9709280 Black 242928−2 White (Storm Gray) 242928...


