
Owners Manual 1
Page 2
Also available as an optional accessory. **The Bowl design and material depend on the Stand Mixer model. W11368487C.indb 2 3/9/2020 1:06:28 PM PARTS AND FEATURES 3 2 10 4 1 5 9 11 8 6 7 12 13 14 15 1 Motor Head (locking lever not shown) 2 Attachment Knob 3 Attachment Hub 4 Motor Head 5 Speed Control Lever 6 Beater Height Adjustment Screw (not shown) 7 Bowl Clamping Plate 8 Bowl** 9 Beater Shaft 10 Pouring shield* 11 2.8 L Stainless Steel Bowl* 12 Flat Beater 13 Flex Edge Beater* 14 Wire Whip 15 Dough Hook *Included with select models only.
Also available as an optional accessory. **The Bowl design and material depend on the Stand Mixer model. W11368487C.indb 2 3/9/2020 1:06:28 PM PARTS AND FEATURES 3 2 10 4 1 5 9 11 8 6 7 12 13 14 15 1 Motor Head (locking lever not shown) 2 Attachment Knob 3 Attachment Hub 4 Motor Head 5 Speed Control Lever 6 Beater Height Adjustment Screw (not shown) 7 Bowl Clamping Plate 8 Bowl** 9 Beater Shaft 10 Pouring shield* 11 2.8 L Stainless Steel Bowl* 12 Flat Beater 13 Flex Edge Beater* 14 Wire Whip 15 Dough Hook *Included with select models only.

Owners Manual 1
Page 3
... damage to the Stand Mixer. 6. Turn the appliance OFF, then unplug from the power cord. 5. Avoid contacting moving parts. Keep hands, hair, and clothing, as well as spatulas and other liquid. 3. Do not operate any manner. W11368487C.indb 3 3 3/9/2020 1:06:29 PM This appliance is used by a person responsible for their customer service telephone number for use , before assembling or disassembling parts, and before cleaning...
... damage to the Stand Mixer. 6. Turn the appliance OFF, then unplug from the power cord. 5. Avoid contacting moving parts. Keep hands, hair, and clothing, as well as spatulas and other liquid. 3. Do not operate any manner. W11368487C.indb 3 3 3/9/2020 1:06:29 PM This appliance is used by a person responsible for their customer service telephone number for use , before assembling or disassembling parts, and before cleaning...

Owners Manual 1
Page 4
... serial plate. GETTING STARTED CHOOSING THE RIGHT ACCESSORY Accessories Flat Beater Flex Edge Beater* Wire Whip Dough Hook Use to mix Normal to heavy mixtures Mixtures that draws the greatest load (power). SAVE THESE INSTRUCTIONS This product is designed for your Stand Mixer is printed on the attachment that need air incorporated Mixing and kneading yeast doughs Suggested items Cakes, creamed frostings, candies, cookies, biscuits, pie pastry, meatloaf, mashed potatoes. Remove the beaters, wire whip, or dough hook from the Stand Mixer...
... serial plate. GETTING STARTED CHOOSING THE RIGHT ACCESSORY Accessories Flat Beater Flex Edge Beater* Wire Whip Dough Hook Use to mix Normal to heavy mixtures Mixtures that draws the greatest load (power). SAVE THESE INSTRUCTIONS This product is designed for your Stand Mixer is printed on the attachment that need air incorporated Mixing and kneading yeast doughs Suggested items Cakes, creamed frostings, candies, cookies, biscuits, pie pastry, meatloaf, mashed potatoes. Remove the beaters, wire whip, or dough hook from the Stand Mixer...

Owners Manual 1
Page 5
... combine sugar and shortening. Slow mixing To mix and knead yeast doughs, heavy batters, and candies; Unlock and lift the Motor Head. For adding sugar to finish mixing cake, doughnut, and other batters. PRODUCT ASSEMBLY 1 2 Unplug and turn the Stand Mixer "OFF/0". Do not exceed Speed 2 when preparing yeast doughs as an optional accessory. **Locking option is required. Speed Stir 1 2 Accessory Flat Beater Flex Edge Beater* Flat Beater Flex Edge Beater* Dough Hook 4 Flat Beater Flex Edge Beater* Wire Whip 6 Flat Beater Flex Edge Beater* Wire Whip 8 Wire Whip...
... combine sugar and shortening. Slow mixing To mix and knead yeast doughs, heavy batters, and candies; Unlock and lift the Motor Head. For adding sugar to finish mixing cake, doughnut, and other batters. PRODUCT ASSEMBLY 1 2 Unplug and turn the Stand Mixer "OFF/0". Do not exceed Speed 2 when preparing yeast doughs as an optional accessory. **Locking option is required. Speed Stir 1 2 Accessory Flat Beater Flex Edge Beater* Flat Beater Flex Edge Beater* Dough Hook 4 Flat Beater Flex Edge Beater* Wire Whip 6 Flat Beater Flex Edge Beater* Wire Whip 8 Wire Whip...
Owners Manual 1
Page 6
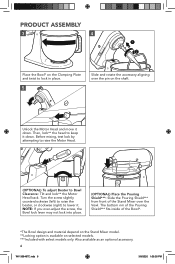
... the Motor Head and move it . Then, lock** the head to Bowl Clearance: Tilt and lock** the Motor Head back. Before mixing, test lock by attempting to raise the Motor Head. (OPTIONAL) To adjust Beater to keep it down . NOTE: If you over-adjust the screw, the Bowl lock lever may not lock into place. (OPTIONAL) Place the Pouring Shield***: Slide the Pouring Shield*** from front of the Bowl*. *The Bowl design and material depend on the Stand Mixer model. **Locking option...
... the Motor Head and move it . Then, lock** the head to Bowl Clearance: Tilt and lock** the Motor Head back. Before mixing, test lock by attempting to raise the Motor Head. (OPTIONAL) To adjust Beater to keep it down . NOTE: If you over-adjust the screw, the Bowl lock lever may not lock into place. (OPTIONAL) Place the Pouring Shield***: Slide the Pouring Shield*** from front of the Bowl*. *The Bowl design and material depend on the Stand Mixer model. **Locking option...

Owners Manual 1
Page 7
ENGLISH PRODUCT USAGE 1 Plug it gradually. W11368487C.indb 7 7 3/9/2020 1:06:31 PM Start with lower speed to the "Speed Control Guide". 2 Do not scrape the Bowl* while operating. Scraping the Bowl* once or twice during mixing is usually sufficient. (OPTIONAL): Pour ingredients into a grounded 3 prong outlet. Refer to avoid splashing and increase it into the Bowl* through the Pouring Chute. *The Bowl design and material depend on the Stand Mixer model.
ENGLISH PRODUCT USAGE 1 Plug it gradually. W11368487C.indb 7 7 3/9/2020 1:06:31 PM Start with lower speed to the "Speed Control Guide". 2 Do not scrape the Bowl* while operating. Scraping the Bowl* once or twice during mixing is usually sufficient. (OPTIONAL): Pour ingredients into a grounded 3 prong outlet. Refer to avoid splashing and increase it into the Bowl* through the Pouring Chute. *The Bowl design and material depend on the Stand Mixer model.

Owners Manual 1
Page 8
... the Pouring Shield** clear of the rim of optional attachments such as the Spiralizer, Pasta Cutters, or Food Grinder that may be attached to keep it away from the Clamping Plate. DISASSEMBLING THE PRODUCT 1 Turn the Stand Mixer "OFF/0" and unplug. Remove the Attachment Hub cover. *Locking option is available on the Stand Mixer model. 8 W11368487C.indb 8 3/9/2020 1:06:31 PM Then, lock* the head to the Stand Mixer attachment power hub as an optional accessory. ***The Bowl design...
... the Pouring Shield** clear of the rim of optional attachments such as the Spiralizer, Pasta Cutters, or Food Grinder that may be attached to keep it away from the Clamping Plate. DISASSEMBLING THE PRODUCT 1 Turn the Stand Mixer "OFF/0" and unplug. Remove the Attachment Hub cover. *Locking option is available on the Stand Mixer model. 8 W11368487C.indb 8 3/9/2020 1:06:31 PM Then, lock* the head to the Stand Mixer attachment power hub as an optional accessory. ***The Bowl design...

Owners Manual 1
Page 9
... optional accessory. 9 W11368487C.indb 9 3/9/2020 1:06:32 PM Tighten the Attachment Knob by turning it clockwise until the attachment is secured to the Stand Mixer. CARE AND CLEANING IMPORTANT: Do not immerse the Stand Mixer body in water or other liquids. 1 2 Unplug and turn the Stand Mixer "OFF/0". 3 Dishwasher-safe parts, top rack only: Stainless Steel Bowl, Bowl Lid, Flat Beater, Dough Hook, Flex Edge Beater*, and Pouring Shield*. 4 Wipe the Stand Mixer body with select models only...
... optional accessory. 9 W11368487C.indb 9 3/9/2020 1:06:32 PM Tighten the Attachment Knob by turning it clockwise until the attachment is secured to the Stand Mixer. CARE AND CLEANING IMPORTANT: Do not immerse the Stand Mixer body in water or other liquids. 1 2 Unplug and turn the Stand Mixer "OFF/0". 3 Dishwasher-safe parts, top rack only: Stainless Steel Bowl, Bowl Lid, Flat Beater, Dough Hook, Flex Edge Beater*, and Pouring Shield*. 4 Wipe the Stand Mixer body with select models only...
Owners Manual 1
Page 10
... to Bowl Clearance. If your Stand Mixer should fail to operate, please check the following: Is the fuse in either direction. retailers do not provide service. 10 W11368487C.indb 10 3/9/2020 1:06:32 PM Do not use an adapter. If the Flat Beater hits the bowl: Stop the Stand Mixer. Note: If the problem cannot be sure the circuit is normal. The Speed Control Lever does To move the Speed Control Lever...
... to Bowl Clearance. If your Stand Mixer should fail to operate, please check the following: Is the fuse in either direction. retailers do not provide service. 10 W11368487C.indb 10 3/9/2020 1:06:32 PM Do not use an adapter. If the Flat Beater hits the bowl: Stop the Stand Mixer. Note: If the problem cannot be sure the circuit is normal. The Speed Control Lever does To move the Speed Control Lever...

Owners Manual 1
Page 11
... specific legal rights and you may also have other than normal single family home use. ENGLISH WARRANTY AND SERVICE KITCHENAID STAND MIXER WARRANTY FOR THE 50 UNITED STATES, THE DISTRICT OF COLUMBIA, PUERTO RICO, AND CANADA This warranty extends to the purchaser and any succeeding owner for Stand Mixer attachments operated outside the 50 United States, District of Columbia, Puerto Rico, and Canada. Hassle-Free Replacement...
... specific legal rights and you may also have other than normal single family home use. ENGLISH WARRANTY AND SERVICE KITCHENAID STAND MIXER WARRANTY FOR THE 50 UNITED STATES, THE DISTRICT OF COLUMBIA, PUERTO RICO, AND CANADA This warranty extends to the purchaser and any succeeding owner for Stand Mixer attachments operated outside the 50 United States, District of Columbia, Puerto Rico, and Canada. Hassle-Free Replacement...
Owners Manual
Page 2
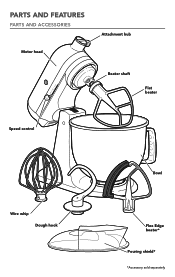
PARTS AND FEATURES PARTS AND ACCESSORIES Motor head Attachment hub Beater shaft Flat beater Speed control Wire whip Dough hook Bowl Flex Edge beater* Pouring shield* *Accessory sold separately
PARTS AND FEATURES PARTS AND ACCESSORIES Motor head Attachment hub Beater shaft Flat beater Speed control Wire whip Dough hook Bowl Flex Edge beater* Pouring shield* *Accessory sold separately
Owners Manual
Page 3
... Stand Mixer. 6. Keep hands, hair, and clothing, as well as spatulas and other liquid. 3. Do not use , before putting on or taking off parts, and before cleaning. 5. Do not operate any manner. Unplug the Stand Mixer from beater during operation to the nearest Authorized Service Facility for examination, repair or adjustment. 7. Return appliance to reduce the risk of table or counter. Read all instructions...
... Stand Mixer. 6. Keep hands, hair, and clothing, as well as spatulas and other liquid. 3. Do not use , before putting on or taking off parts, and before cleaning. 5. Do not operate any manner. Unplug the Stand Mixer from beater during operation to the nearest Authorized Service Facility for examination, repair or adjustment. 7. Return appliance to reduce the risk of table or counter. Read all instructions...

Owners Manual
Page 4
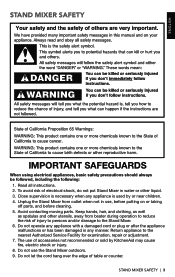
... extension cord. If the power supply cord is designed for your Stand Mixer is based on the serial plate. The maximum rating is printed on the attachment that draws the greatest load (power). SAVE THESE INSTRUCTIONS This product is too short, have a qualified electrician or serviceman install an outlet near the appliance. Do not use only. STAND MIXER SAFETY 10. Remove the flat beater, wire whip, or spiral dough hook from the Stand Mixer...
... extension cord. If the power supply cord is designed for your Stand Mixer is based on the serial plate. The maximum rating is printed on the attachment that draws the greatest load (power). SAVE THESE INSTRUCTIONS This product is too short, have a qualified electrician or serviceman install an outlet near the appliance. Do not use only. STAND MIXER SAFETY 10. Remove the flat beater, wire whip, or spiral dough hook from the Stand Mixer...
Owners Manual
Page 5
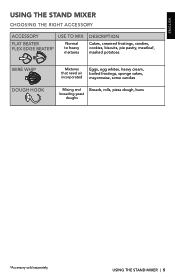
ENGLISH USING THE STAND MIXER CHOOSING THE RIGHT ACCESSORY ACCESSORY USE TO MIX FLAT BEATER FLEX EDGE BEATER* Normal to heavy mixtures DESCRIPTION Cakes, creamed frostings, candies, cookies, biscuits, pie pastry, meatloaf, mashed potatoes WIRE WHIP DOUGH HOOK Mixtures that need air incorporated Eggs, egg whites, heavy cream, boiled frostings, sponge cakes, mayonnaise, some candies Mixing and Breads, rolls, pizza dough, buns kneading yeast doughs *Accessory sold separately USING THE STAND MIXER | 5
ENGLISH USING THE STAND MIXER CHOOSING THE RIGHT ACCESSORY ACCESSORY USE TO MIX FLAT BEATER FLEX EDGE BEATER* Normal to heavy mixtures DESCRIPTION Cakes, creamed frostings, candies, cookies, biscuits, pie pastry, meatloaf, mashed potatoes WIRE WHIP DOUGH HOOK Mixtures that need air incorporated Eggs, egg whites, heavy cream, boiled frostings, sponge cakes, mayonnaise, some candies Mixing and Breads, rolls, pizza dough, buns kneading yeast doughs *Accessory sold separately USING THE STAND MIXER | 5
Owners Manual
Page 8
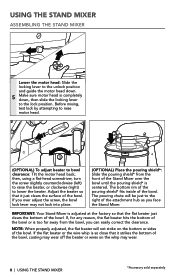
..., for any reason, the flat beater hits the bottom of the attachment hub as you over the bowl until the pouring shield* is too far away from the front of the bowl. then, using a flat-head screwdriver, turn the screw slightly counterclockwise (left) to raise the beater, or clockwise (right) to bowl clearance: Tilt the motor head back; If you face the Stand Mixer. NOTE: When properly adjusted, the flat beater will be just to...
..., for any reason, the flat beater hits the bottom of the attachment hub as you over the bowl until the pouring shield* is too far away from the front of the bowl. then, using a flat-head screwdriver, turn the screw slightly counterclockwise (left) to raise the beater, or clockwise (right) to bowl clearance: Tilt the motor head back; If you face the Stand Mixer. NOTE: When properly adjusted, the flat beater will be just to...

Owners Manual
Page 11
... attachment into attachment hub, making certain that came with your attachment for detailed directions on using the attachment. Check to be 3 necessary to the Stand Mixer attachment power hub as the spiralizer, pasta cutters, or food grinder that may be sure that the Stand 1 Mixer is unplugged and the speed control is turned to "0". See the Instructions manual that attachment power shaft fits into the notch on the attachment will fit into the square attachment hub socket. When it clockwise until the attachment...
... attachment into attachment hub, making certain that came with your attachment for detailed directions on using the attachment. Check to be 3 necessary to the Stand Mixer attachment power hub as the spiralizer, pasta cutters, or food grinder that may be sure that the Stand 1 Mixer is unplugged and the speed control is turned to "0". See the Instructions manual that attachment power shaft fits into the notch on the attachment will fit into the square attachment hub socket. When it clockwise until the attachment...
Owners Manual
Page 13
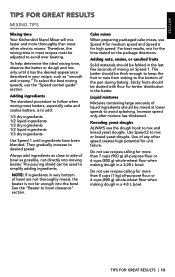
... baking. TIPS FOR GREAT RESULTS | 13 Do not use the "Speed control guide" section. Always add ingredients as possible, not directly into the bowl. Use of bowl are not thoroughly mixed, the beater is to bowl clearance" section. ENGLISH TIPS FOR GREAT RESULTS MIXING TIPS Mixing time Your KitchenAid Stand Mixer will mix faster and more thoroughly than most other speed creates high potential for more than 7 cups (900...
... baking. TIPS FOR GREAT RESULTS | 13 Do not use the "Speed control guide" section. Always add ingredients as possible, not directly into the bowl. Use of bowl are not thoroughly mixed, the beater is to bowl clearance" section. ENGLISH TIPS FOR GREAT RESULTS MIXING TIPS Mixing time Your KitchenAid Stand Mixer will mix faster and more thoroughly than most other speed creates high potential for more than 7 cups (900...
Owners Manual
Page 14
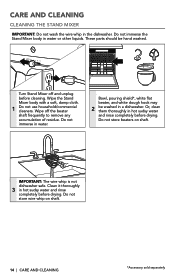
Do not immerse in a dishwasher. Bowl, pouring shield*, white flat beater, and white dough hook may 2 be hand washed. Clean it thoroughly 3 in hot sudsy water and rinse completely before drying. Wipe the Stand Mixer body with a soft, damp cloth. 1 Do not use household/commercial cleaners. Or, clean them thoroughly in hot sudsy water and rinse completely before drying. IMPORTANT: The wire whip is not dishwasher safe...
Do not immerse in a dishwasher. Bowl, pouring shield*, white flat beater, and white dough hook may 2 be hand washed. Clean it thoroughly 3 in hot sudsy water and rinse completely before drying. Wipe the Stand Mixer body with a soft, damp cloth. 1 Do not use household/commercial cleaners. Or, clean them thoroughly in hot sudsy water and rinse completely before drying. IMPORTANT: The wire whip is not dishwasher safe...

Owners Manual
Page 15
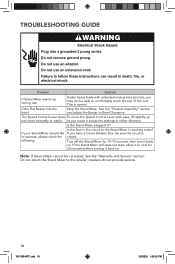
... the speed control lever with electric motors. 3. If the Stand Mixer still does not start, allow it to cool for 10-15 seconds, then turn it across the settings in either direction. 5. If the problem cannot be able to the Stand Mixer in the circuit to comfortably touch the top of the unit. If the flat beater hits the bowl, stop the Stand Mixer. Do not return the Stand Mixer to bowl clearance. 4. The Stand Mixer...
... the speed control lever with electric motors. 3. If the Stand Mixer still does not start, allow it to cool for 10-15 seconds, then turn it across the settings in either direction. 5. If the problem cannot be able to the Stand Mixer in the circuit to comfortably touch the top of the unit. If the flat beater hits the bowl, stop the Stand Mixer. Do not return the Stand Mixer to bowl clearance. 4. The Stand Mixer...
Owners Manual
Page 16
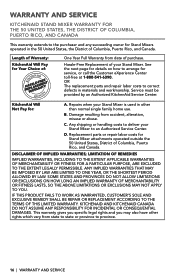
... succeeding owner for Stand Mixers operated in the 50 United States, the District of your Stand Mixer. Length of Warranty: KitchenAid Will Pay for Stand Mixer attachments operated outside the 50 United States, District of purchase. KitchenAid Will Not Pay for service, or call the Customer eXperience Center toll-free at 1-800-541-6390. Any shipping or handling costs to province. 16 | WARRANTY AND SERVICE DISCLAIMER OF IMPLIED WARRANTIES; KITCHENAID AND KITCHENAID...
... succeeding owner for Stand Mixers operated in the 50 United States, the District of your Stand Mixer. Length of Warranty: KitchenAid Will Pay for Stand Mixer attachments operated outside the 50 United States, District of purchase. KitchenAid Will Not Pay for service, or call the Customer eXperience Center toll-free at 1-800-541-6390. Any shipping or handling costs to province. 16 | WARRANTY AND SERVICE DISCLAIMER OF IMPLIED WARRANTIES; KITCHENAID AND KITCHENAID...


