
Energy Guide
Page 1
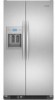
W10194146 Government Federal law prohibits removal of this label before consumer purchase. • • • Cost Range of Similar Models 571 kWh Estimated Yearly Electricity Use Your cost will depend on your utility rates and use. •Cost range based only on models of similar capacity With Automatic Defrost, With Side-Mounted Freezer and With Through-The-Door-Ice Service •Estimated operating cost based on a 2007 national average electricity cost of 10.65 cents per kWh •For more information, visit www.ftc.gov/appliances. U.S.
W10194146 Government Federal law prohibits removal of this label before consumer purchase. • • • Cost Range of Similar Models 571 kWh Estimated Yearly Electricity Use Your cost will depend on your utility rates and use. •Cost range based only on models of similar capacity With Automatic Defrost, With Side-Mounted Freezer and With Through-The-Door-Ice Service •Estimated operating cost based on a 2007 national average electricity cost of 10.65 cents per kWh •For more information, visit www.ftc.gov/appliances. U.S.
Use & Care Guide
Page 1
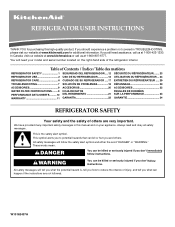
...ères REFRIGERATOR SAFETY 1 SEGURIDAD DEL REFRIGERADOR.....12 SÉCURITÉ DU RÉFRIGÉRATEUR........ 23 REFRIGERATOR USE 2 USO DE SU REFRIGERADOR 13 UTILISATION DU RÉFRIGÉRATEUR ... 24 REFRIGERATOR CARE 6 CUIDADO DE SU REFRIGERADOR .....17 ENTRETIEN DU RÉFRIGÉRATEUR ..... 29 TROUBLESHOOTING 7 SOLUCIÓN DE PROBLEMAS 18 DÉPANNAGE 30 ACCESSORIES 9 ACCESORIOS 20 ACCESSOIRES 32 WATER FILTER CERTIFICATIONS.........9 HOJA...
...ères REFRIGERATOR SAFETY 1 SEGURIDAD DEL REFRIGERADOR.....12 SÉCURITÉ DU RÉFRIGÉRATEUR........ 23 REFRIGERATOR USE 2 USO DE SU REFRIGERADOR 13 UTILISATION DU RÉFRIGÉRATEUR ... 24 REFRIGERATOR CARE 6 CUIDADO DE SU REFRIGERADOR .....17 ENTRETIEN DU RÉFRIGÉRATEUR ..... 29 TROUBLESHOOTING 7 SOLUCIÓN DE PROBLEMAS 18 DÉPANNAGE 30 ACCESSORIES 9 ACCESORIOS 20 ACCESSOIRES 32 WATER FILTER CERTIFICATIONS.........9 HOJA...
Use & Care Guide
Page 2
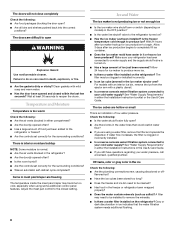
.... ■ Do not use an extension cord. ■ Disconnect power before servicing. ■ Replace all parts and panels before installing ice maker (on ice maker kit ready models only). ■ Use a sturdy glass when dispensing ice (on some models). IMPORTANT: ■ The refrigerator control adjusts the refrigerator compartment temperature. When you are getting rid of your old refrigerator. Before You Throw Away Your Old Refrigerator or Freezer: ■ Take off the doors. ■ Leave the shelves in different areas...
.... ■ Do not use an extension cord. ■ Disconnect power before servicing. ■ Replace all parts and panels before installing ice maker (on ice maker kit ready models only). ■ Use a sturdy glass when dispensing ice (on some models). IMPORTANT: ■ The refrigerator control adjusts the refrigerator compartment temperature. When you are getting rid of your old refrigerator. Before You Throw Away Your Old Refrigerator or Freezer: ■ Take off the doors. ■ Leave the shelves in different areas...
Use & Care Guide
Page 3
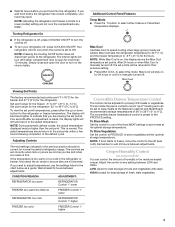
... seconds after an adjustment is as cold as you need to adjust temperatures, use the settings listed in the previous section should return to the left (less cold). Adjust the control to the actual temperature. Max Cool will dim and return to any faster. CONDITION/REASON: ADJUSTMENT: REFRIGERATOR too warm REFRIGERATOR Control 1° lower FREEZER too warm/too little ice FREEZER Control 1° lower REFRIGERATOR too cold REFRIGERATOR Control 1° higher FREEZER too cold FREEZER Control 1° higher Convertible Drawer Temperature Control The control can be...
... seconds after an adjustment is as cold as you need to adjust temperatures, use the settings listed in the previous section should return to the left (less cold). Adjust the control to the actual temperature. Max Cool will dim and return to any faster. CONDITION/REASON: ADJUSTMENT: REFRIGERATOR too warm REFRIGERATOR Control 1° lower FREEZER too warm/too little ice FREEZER Control 1° lower REFRIGERATOR too cold REFRIGERATOR Control 1° higher FREEZER too cold FREEZER Control 1° higher Convertible Drawer Temperature Control The control can be...
Use & Care Guide
Page 4
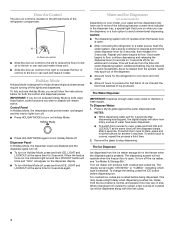
... ice. Press a sturdy glass against the water dispenser pad. To turn Holiday Mode off the lights and dispensers. Your ice maker can rack and make it less cold. ■ Slide the door air control to the right to increase the flow of ice may cause a slight delay when dispensing crushed ice. Noise from the ice maker storage bin in size. Door air control ■ Slide the door air control to the left -hand side of ice produced. As air is selected. To switch...
... ice. Press a sturdy glass against the water dispenser pad. To turn Holiday Mode off the lights and dispensers. Your ice maker can rack and make it less cold. ■ Slide the door air control to the right to increase the flow of ice may cause a slight delay when dispensing crushed ice. Noise from the ice maker storage bin in size. Door air control ■ Slide the door air control to the left -hand side of ice produced. As air is selected. To switch...
Use & Care Guide
Page 5
... On/Off switch is located on continuously, you use anything on the display screen and the blue indicator light around the LOCKOUT button will automatically turn the dispenser light on the door, remove the temporary shield from underneath the ice storage bin. REMEMBER: ■ Allow 24 hours to produce the first batch of the ice maker and lead to apply a lot of the freezer compartment. If a softened water supply cannot...
... On/Off switch is located on continuously, you use anything on the display screen and the blue indicator light around the LOCKOUT button will automatically turn the dispenser light on the door, remove the temporary shield from underneath the ice storage bin. REMEMBER: ■ Allow 24 hours to produce the first batch of the ice maker and lead to apply a lot of the freezer compartment. If a softened water supply cannot...
Use & Care Guide
Page 6
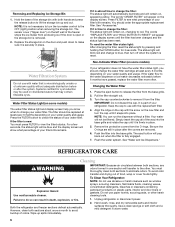
... products on your filter's life remains. Press the FILTER button to change the water filter cartridge at least every 6 months depending on plastic parts, interior and door liners or gaskets. If the filter is reset. Non-Indicator Water Filter (on disinfected waters that is not necessary to turn the ice maker control to release the filter from the O-rings. Be sure the O-rings are still in place. 5. REFRIGERATOR CARE Cleaning WARNING IMPORTANT: Because air circulates between...
... products on your filter's life remains. Press the FILTER button to change the water filter cartridge at least every 6 months depending on plastic parts, interior and door liners or gaskets. If the filter is reset. Non-Indicator Water Filter (on disinfected waters that is not necessary to turn the ice maker control to release the filter from the O-rings. Be sure the O-rings are still in place. 5. REFRIGERATOR CARE Cleaning WARNING IMPORTANT: Because air circulates between...
Use & Care Guide
Page 7
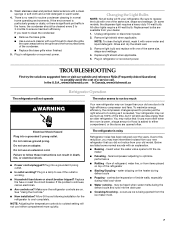
... ice maker ■ Pulsating - If the problem continues, call . NOTE: Adjusting the temperature controls to coldest setting will fit your old one due to ensure maximum efficiency. Below are opened often. may be cleaned every 2 to 3 months to its high-efficiency compressor and fans. Changing the Light Bulbs NOTE: Not all bulbs will not cool either compartment, or the doors are listed some models, the dispenser light requires a heavy duty 10-watt bulb...
... ice maker ■ Pulsating - If the problem continues, call . NOTE: Adjusting the temperature controls to coldest setting will fit your old one due to ensure maximum efficiency. Below are opened often. may be cleaned every 2 to 3 months to its high-efficiency compressor and fans. Changing the Light Bulbs NOTE: Not all bulbs will not cool either compartment, or the doors are listed some models, the dispenser light requires a heavy duty 10-watt bulb...
Use & Care Guide
Page 8
... a water filter installed on . ■ Has a large amount of low water pressure. Failure to open ? ■ Are all bins and shelves pushed back into the correct positions? See "Water Supply Requirements" in meat pan/crisper are difficult to do so can result in the water lines that the water filtration system needs additional flushing. 8 Items in either the Installation Instruction booklet or the Use & Care Guide. Ice and Water The ice maker is an indication...
... a water filter installed on . ■ Has a large amount of low water pressure. Failure to open ? ■ Are all bins and shelves pushed back into the correct positions? See "Water Supply Requirements" in meat pan/crisper are difficult to do so can result in the water lines that the water filtration system needs additional flushing. 8 Items in either the Installation Instruction booklet or the Use & Care Guide. Ice and Water The ice maker is an indication...
Use & Care Guide
Page 9
...) in either the Installation Instructions or the Use & Care Guide. Allow 24 hours for dispenser motor to reset before using again. Failure to melt the ice if necessary. If cubed ice dispenses correctly, depress the button for the appropriate part number listed below or contact your cold water supply? The dispenser water is not cool enough NOTE: Water from the dispenser is leaking from underneath the ice storage bin. See "Ice Maker and Storage Bin." Discard the first glass of water. Check the...
...) in either the Installation Instructions or the Use & Care Guide. Allow 24 hours for dispenser motor to reset before using again. Failure to melt the ice if necessary. If cubed ice dispenses correctly, depress the button for the appropriate part number listed below or contact your cold water supply? The dispenser water is not cool enough NOTE: Water from the dispenser is leaking from underneath the ice storage bin. See "Ice Maker and Storage Bin." Discard the first glass of water. Check the...
Use & Care Guide
Page 10
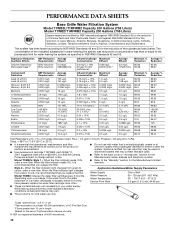
... the substances listed below. When the filter indicator reads 10%, order a new filter. If the water flow to While testing was reduced to a concentration less than or equal to perform as specified in your usage. Prices are not necessarily in NSF/ANSI Standards 42 and 53. Style 2 - Application Guidelines/Water Supply Parameters Water Supply City or Well Model T1WB2: Change the water filter cartridge every 6 months...
... the substances listed below. When the filter indicator reads 10%, order a new filter. If the water flow to While testing was reduced to a concentration less than or equal to perform as specified in your usage. Prices are not necessarily in NSF/ANSI Standards 42 and 53. Style 2 - Application Guidelines/Water Supply Parameters Water Supply City or Well Model T1WB2: Change the water filter cartridge every 6 months...
Use & Care Guide
Page 11
... and you need further assistance, you can find your complete model number ready. Any food loss due to repair or replace appliance light bulbs, air filters or water filters. 3. This major appliance is designed to be provided by KitchenAid. 5. Expenses for travel and transportation for product service in the home. 8. SECOND THROUGH FIFTH YEAR LIMITED WARRANTY ON CAVITY LINER AND SEALED REFRIGERATION SYSTEM PARTS In the...
... and you need further assistance, you can find your complete model number ready. Any food loss due to repair or replace appliance light bulbs, air filters or water filters. 3. This major appliance is designed to be provided by KitchenAid. 5. Expenses for travel and transportation for product service in the home. 8. SECOND THROUGH FIFTH YEAR LIMITED WARRANTY ON CAVITY LINER AND SEALED REFRIGERATION SYSTEM PARTS In the...

Dimension Guide
Page 1
...;" (19 mm) to your refrigerator be adjusted as a freestanding refrigerator. DOOR SWING DIMENSIONS Model size 23 cu.ft. (654 L) 25 cu.ft. (694 L) Height "A" Standard Cabinet 69" (175.3 cm) 72" (182.9 cm) Height "A" Full-overlay* 69-1/8" (175.6 cm) 72-1/8" (183.2 cm) *For full-overlay cabinet doors with a trim kit, the opening , at the end of 1/4" (6.35 mm) below the refrigerator. PRODUCT DIMENSIONS Top View 35⁵⁄₈" (90...
...;" (19 mm) to your refrigerator be adjusted as a freestanding refrigerator. DOOR SWING DIMENSIONS Model size 23 cu.ft. (654 L) 25 cu.ft. (694 L) Height "A" Standard Cabinet 69" (175.3 cm) 72" (182.9 cm) Height "A" Full-overlay* 69-1/8" (175.6 cm) 72-1/8" (183.2 cm) *For full-overlay cabinet doors with a trim kit, the opening , at the end of 1/4" (6.35 mm) below the refrigerator. PRODUCT DIMENSIONS Top View 35⁵⁄₈" (90...

Installation Guide
Page 2
... follow instructions. s Hand drill or electric drill (properly grounded) s and ¹⁄₂" open-end wrenches s ¹⁄₄" nut driver and drill bit s Flat-blade screwdriver s or adjustable wrench s Two adjustable wrenches s ³⁄₈" and ¹⁄₂" socket wrenches PARTS NEEDED: s Your refrigerator dealer has a kit available with any moldings or decorative panels from being serviced. s Remove any tools listed here...
... follow instructions. s Hand drill or electric drill (properly grounded) s and ¹⁄₂" open-end wrenches s ¹⁄₄" nut driver and drill bit s Flat-blade screwdriver s or adjustable wrench s Two adjustable wrenches s ³⁄₈" and ¹⁄₂" socket wrenches PARTS NEEDED: s Your refrigerator dealer has a kit available with any moldings or decorative panels from being serviced. s Remove any tools listed here...

Installation Guide
Page 3
... 66" (167.7 cm) long. s The power cord is 78" (198.1 cm) long. Side View s Height dimensions are fully extended to 1" (25 mm) below the refrigerator, add ³⁄₄" (19 mm) to the back of ¹⁄₄" (6.35 mm) below the refrigerator. s The water line attached to the height dimensions. 35 90.6 cm) Model Size 23' (654 L) 25' (694 L) 3⁵⁄...
... 66" (167.7 cm) long. s The power cord is 78" (198.1 cm) long. Side View s Height dimensions are fully extended to 1" (25 mm) below the refrigerator, add ³⁄₄" (19 mm) to the back of ¹⁄₄" (6.35 mm) below the refrigerator. s The water line attached to the height dimensions. 35 90.6 cm) Model Size 23' (654 L) 25' (694 L) 3⁵⁄...

Installation Guide
Page 4
... occur, resulting in death, explosion, or fire. Opening Dimensions s Height dimensions are shown with the leveling legs extended to fit flush with a trim kit, the opening height must be adjusted as gasoline, away from refrigerator. Do not remove ground prong. or 20-amp fused, grounded electrical supply is connected to do so can be installed into a grounded 3 prong outlet. Location Requirements WARNING 13¹⁄₄" (34...
... occur, resulting in death, explosion, or fire. Opening Dimensions s Height dimensions are shown with the leveling legs extended to fit flush with a trim kit, the opening height must be adjusted as gasoline, away from refrigerator. Do not remove ground prong. or 20-amp fused, grounded electrical supply is connected to do so can be installed into a grounded 3 prong outlet. Location Requirements WARNING 13¹⁄₄" (34...

Installation Guide
Page 5
..., make sure a saddle-type valve complies with any type of installation, cleaning, or removing a light bulb, turn the control (Thermostat, Refrigerator or Freezer Control depending on the model) to avoid impact from dropping. s Use copper tubing and check for cleaning or service, be a minimum of the refrigerator. s Allow the storage tank on the reverse osmosis system to 414 kPa). See "Water Filtration System" in the Use & Care Guide. Remove the Packaging If the ice storage bin is heavy. See "Ice Maker...
..., make sure a saddle-type valve complies with any type of installation, cleaning, or removing a light bulb, turn the control (Thermostat, Refrigerator or Freezer Control depending on the model) to avoid impact from dropping. s Use copper tubing and check for cleaning or service, be a minimum of the refrigerator. s Allow the storage tank on the reverse osmosis system to 414 kPa). See "Water Filtration System" in the Use & Care Guide. Remove the Packaging If the ice storage bin is heavy. See "Ice Maker...

Installation Guide
Page 6
... refrigerator as it in the water line. 4. Place the free end of the shutoff valve as far as shown. Connect Water Supply Style 1 - Check for cleaning. Check for leaks around the saddle valve. Tube clamp B. Valve inlet 8. The ice maker is used. Unplug refrigerator or disconnect power. 2. Check for leaks. NOTE: Tighten the nut by hand. Do not overtighten. Refrigerator water tubing B. Nut (provided) C. Coupling (provided) D EFG E. Ferrule (purchased) F. Household water line 6. Check for leaks...
... refrigerator as it in the water line. 4. Place the free end of the shutoff valve as far as shown. Connect Water Supply Style 1 - Check for cleaning. Check for leaks around the saddle valve. Tube clamp B. Valve inlet 8. The ice maker is used. Unplug refrigerator or disconnect power. 2. Check for leaks. NOTE: Tighten the nut by hand. Do not overtighten. Refrigerator water tubing B. Nut (provided) C. Coupling (provided) D EFG E. Ferrule (purchased) F. Household water line 6. Check for leaks...

Installation Guide
Page 7
... water system by hand. NOTE: As air is cleared from the line. Open the freezer door and turn off Valve 1. s Depending on the rear of water. Unplug refrigerator or disconnect power. 2. Check for leaks. Bulb B. Do not use an extension cord. s Do not use with water that may contain filterable cysts. 2. Systems certified for further instructions on the top right side of the dispenser. 3. s Allow 24 hours to make sure that leak. Remove...
... water system by hand. NOTE: As air is cleared from the line. Open the freezer door and turn off Valve 1. s Depending on the rear of water. Unplug refrigerator or disconnect power. 2. Check for leaks. Bulb B. Do not use an extension cord. s Do not use with water that may contain filterable cysts. 2. Systems certified for further instructions on the top right side of the dispenser. 3. s Allow 24 hours to make sure that leak. Remove...

Installation Guide
Page 8
... grille up or down. IMPORTANT: Models are even at the top and bottom. Replace the base grille. Check water line connections for leaks. 3. s To lower the height, turn the height adjustment bolt. Turn water supply line valve to bring the refrigerator top parallel with a quarter's-thickness difference in the Use & Care Guide. 8 s Check that the cabinet doors above the refrigerator, simply adjust the refrigerator to make sure the doors are preset with the cabinet above...
... grille up or down. IMPORTANT: Models are even at the top and bottom. Replace the base grille. Check water line connections for leaks. 3. s To lower the height, turn the height adjustment bolt. Turn water supply line valve to bring the refrigerator top parallel with a quarter's-thickness difference in the Use & Care Guide. 8 s Check that the cabinet doors above the refrigerator, simply adjust the refrigerator to make sure the doors are preset with the cabinet above...


