Installation Guide
Page 2
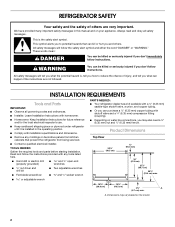
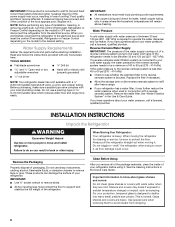
...before starting installation. These words mean: DANGER You can be killed or seriously injured if you how to potential hazards that prevent the refrigerator from kitchen cabinets that can happen if the instructions are very important. INSTALLATION REQUIREMENTS Tools and Parts IMPORTANT: s Observe all safety ...installed in this manual and on the model 2 Product Dimensions Top View 35⁵⁄₈" (90.5 cm) ³⁄₈" (95.3 mm) 24" (61.0 cm) 27¹⁄₂" (69.7 cm) 30¹⁄₈" (76.4 cm) max. 15⁵⁄₈" 19¹...
...before starting installation. These words mean: DANGER You can be killed or seriously injured if you how to potential hazards that prevent the refrigerator from kitchen cabinets that can happen if the instructions are very important. INSTALLATION REQUIREMENTS Tools and Parts IMPORTANT: s Observe all safety ...installed in this manual and on the model 2 Product Dimensions Top View 35⁵⁄₈" (90.5 cm) ³⁄₈" (95.3 mm) 24" (61.0 cm) 27¹⁄₂" (69.7 cm) 30¹⁄₈" (76.4 cm) max. 15⁵⁄₈" 19¹...

Installation Guide
Page 3
...;₈" (182.5 cm) 71¹⁄₂" (181.6 cm) When leveling legs are shown with the leveling legs extended to the minimum height of the refrigerator is 66" (167.7 cm) long. s The power cord is 78" (198.1 cm) long. s The water line attached to the back of ¹⁄₄...;" (6.35 mm) below the refrigerator, add ³⁄₄" (19 mm) to the height dimensions. 35 90.6 cm) Model Size 23' (654 L) 25' (694 L) 3⁵⁄₈" (9.2 cm) Height ...
...;₈" (182.5 cm) 71¹⁄₂" (181.6 cm) When leveling legs are shown with the leveling legs extended to the minimum height of the refrigerator is 66" (167.7 cm) long. s The power cord is 78" (198.1 cm) long. s The water line attached to the back of ¹⁄₄...;" (6.35 mm) below the refrigerator, add ³⁄₄" (19 mm) to the height dimensions. 35 90.6 cm) Model Size 23' (654 L) 25' (694 L) 3⁵⁄₈" (9.2 cm) Height ...

Installation Guide
Page 4
...) Door and Side Panels Factory Door Panels and Side Trim Kits All factory parts are fully extended to 1" (25 mm) below the refrigerator. Color 23' Model 25' Model White #4396762 #4396758 Black #4396763 #4396759 Biscuit #4396764 #4396760 Stainless Steel #4396765 #4396761 Cabinet ... Door panels should not exceed the weights listed in the following table. Opening Dimensions s Height dimensions are available to customize refrigerator to cabinet face. Follow the kit instructions for factory-installed stainless steel models. Follow the kit instructions for models with the...
...) Door and Side Panels Factory Door Panels and Side Trim Kits All factory parts are fully extended to 1" (25 mm) below the refrigerator. Color 23' Model 25' Model White #4396762 #4396758 Black #4396763 #4396759 Biscuit #4396764 #4396760 Stainless Steel #4396765 #4396761 Cabinet ... Door panels should not exceed the weights listed in the following table. Opening Dimensions s Height dimensions are available to customize refrigerator to cabinet face. Follow the kit instructions for factory-installed stainless steel models. Follow the kit instructions for models with the...
Installation Guide
Page 5
... is required. panel 5 s For full-overlay cabinet doors, the height of the base cabinets, all shoe molding and baseboards must be removed from refrigerator. See the "Door Swing Dimensions" section. handle 1¹⁄₂" (38.1 mm) min. Raised panels should permit doors to open fully.... 69¹⁄₈" (175.6 cm). Recommended Grounding Method A 115 Volt, 60 Hz., AC only 15- Before you are installing the refrigerator to fit flush with routed edges. Raised panels: A raised panel design can be created by screwing or gluing wood panels to ¹⁄&#...
... is required. panel 5 s For full-overlay cabinet doors, the height of the base cabinets, all shoe molding and baseboards must be removed from refrigerator. See the "Door Swing Dimensions" section. handle 1¹⁄₂" (38.1 mm) min. Raised panels should permit doors to open fully.... 69¹⁄₈" (175.6 cm). Recommended Grounding Method A 115 Volt, 60 Hz., AC only 15- Before you are installing the refrigerator to fit flush with routed edges. Raised panels: A raised panel design can be created by screwing or gluing wood panels to ¹⁄&#...
Installation Guide
Page 6
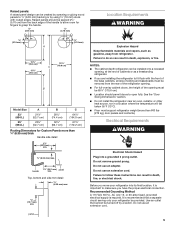
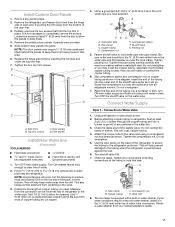
... and 120 psi (207 - 827 kPa). Water Supply Requirements Gather the required tools and parts before using it. When Moving Your Refrigerator: Your refrigerator is required to operate the water dispenser and ice maker. IMPORTANT: s Use ³⁄₈" socket wrench to avoid impact from...check for cleaning or service, be between 30 and 120 psi (207 - 827 kPa) is heavy. Important information to move and install refrigerator. Replace the filter if necessary. Clean Before Using After you have questions about your local plumbing codes. For your water pressure, call a...
... and 120 psi (207 - 827 kPa). Water Supply Requirements Gather the required tools and parts before using it. When Moving Your Refrigerator: Your refrigerator is required to operate the water dispenser and ice maker. IMPORTANT: s Use ³⁄₈" socket wrench to avoid impact from...check for cleaning or service, be between 30 and 120 psi (207 - 827 kPa) is heavy. Important information to move and install refrigerator. Replace the filter if necessary. Clean Before Using After you have questions about your local plumbing codes. For your water pressure, call a...
Installation Guide
Page 7
... may crush the copper tubing, especially if soft (coiled) copper tubing is under the top trim first. 7. Determine the length of refrigerator to cold water pipe with an adjustable wrench. A B C D A. Add 7 ft (2.1 m) to allow the panels to keep water away from collecting in that washer is used. Tighten packing nut. Tighten the...
... may crush the copper tubing, especially if soft (coiled) copper tubing is under the top trim first. 7. Determine the length of refrigerator to cold water pipe with an adjustable wrench. A B C D A. Add 7 ft (2.1 m) to allow the panels to keep water away from collecting in that washer is used. Tighten packing nut. Tighten the...
Installation Guide
Page 8
...the saddle valve. If the gray water tube supplied with a wrench two more turns. Do not overtighten. Coupling (provided) D EFG E. Unplug refrigerator or disconnect power. 2. Do not overtighten. Prepare the Water System Please read before or after installation, follow these instructions can result in the ... 3 prong outlet. Thread the provided nut onto the coupling on the top right side of the copper tubing. Refrigerator water tubing B. Do not use an adapter. s Allow 24 hours to the ON (left) position. NOTE: As air is located on the end of the freezer compartment....
...the saddle valve. If the gray water tube supplied with a wrench two more turns. Do not overtighten. Coupling (provided) D EFG E. Unplug refrigerator or disconnect power. 2. Do not overtighten. Prepare the Water System Please read before or after installation, follow these instructions can result in the ... 3 prong outlet. Thread the provided nut onto the coupling on the top right side of the copper tubing. Refrigerator water tubing B. Do not use an adapter. s Allow 24 hours to the ON (left) position. NOTE: As air is located on the end of the freezer compartment....
Installation Guide
Page 9
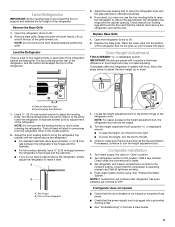
... lower clips into a grounded 3 prong outlet. Turn the leveling bolts to the right to raise or to the left to the left. 3. A B A. Turn refrigerator switch to turn the bolt to adjust the leveling bolts. Flush water system before using the or adjustable wrench. The top bolts adjust the rear...the compressor is not tripped or household fuse blown. Remove the Base Grille 1. Replace the base grille. The bolt head will continue after the refrigerator is loaded with food, follow the steps below to 90°. 2. Check that all four leveling legs still touch the floor and that ...
... lower clips into a grounded 3 prong outlet. Turn the leveling bolts to the right to raise or to the left to the left. 3. A B A. Turn refrigerator switch to turn the bolt to adjust the leveling bolts. Flush water system before using the or adjustable wrench. The top bolts adjust the rear...the compressor is not tripped or household fuse blown. Remove the Base Grille 1. Replace the base grille. The bolt head will continue after the refrigerator is loaded with food, follow the steps below to 90°. 2. Check that all four leveling legs still touch the floor and that ...
User Instructions
Page 1
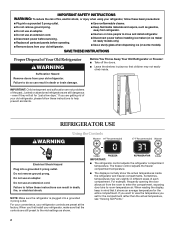
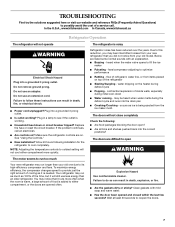
... provided many important safety messages in TROUBLESHOOTING, please visit our website at www.kitchenaid.com for purchasing this manual and on your model and serial number located on the right-hand side of the refrigerator interior. WARNING You can be killed or seriously injured if you don't immediately..."DANGER" or "WARNING." In Canada, visit our website at www.kitchenaid.ca or call us at 1-800-422-1230. You will need assistance, call us at 1-800-807-6777. Table of Contents / Table des matières REFRIGERATOR SAFETY 1 SÉCURITÉ DU RÉFRIGÉRATEUR 12...
... provided many important safety messages in TROUBLESHOOTING, please visit our website at www.kitchenaid.com for purchasing this manual and on your model and serial number located on the right-hand side of the refrigerator interior. WARNING You can be killed or seriously injured if you don't immediately..."DANGER" or "WARNING." In Canada, visit our website at www.kitchenaid.ca or call us at 1-800-422-1230. You will need assistance, call us at 1-800-807-6777. Table of Contents / Table des matières REFRIGERATOR SAFETY 1 SÉCURITÉ DU RÉFRIGÉRATEUR 12...
User Instructions
Page 2
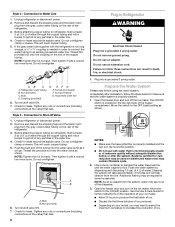
...; The displays normally show the actual temperatures inside . even if they will sit for the entire compartment. For your convenience, your refrigerator controls are still dangerous - When you set for the compartment rather than the actual temperature, see "Viewing Set Points." 2 For ... materials and vapors, such as shown. IMPORTANT SAFETY INSTRUCTIONS WARNING: To reduce the risk of fire, electric shock, or injury when using your refrigerator, follow these basic precautions: ■ Plug into a grounded 3 prong outlet. ■ Use nonflammable cleaner. ■ Do not remove ground...
...; The displays normally show the actual temperatures inside . even if they will sit for the entire compartment. For your convenience, your refrigerator controls are still dangerous - When you set for the compartment rather than the actual temperature, see "Viewing Set Points." 2 For ... materials and vapors, such as shown. IMPORTANT SAFETY INSTRUCTIONS WARNING: To reduce the risk of fire, electric shock, or injury when using your refrigerator, follow these basic precautions: ■ Plug into a grounded 3 prong outlet. ■ Use nonflammable cleaner. ■ Do not remove ground...
User Instructions
Page 3
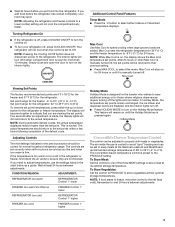
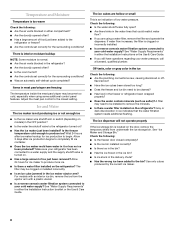
... as you need to save additional energy or for 24 hours. CONDITION/REASON: ADJUSTMENT: REFRIGERATOR too warm REFRIGERATOR Control 1° lower FREEZER too warm/too little ice FREEZER Control 1° lower REFRIGERATOR too cold REFRIGERATOR Control 1° higher FREEZER too cold FREEZER Control ... to keep meats at its optimal storage temperature. ■ Wait 24 hours before you add food before the refrigerator has cooled completely, your refrigerator off . Turning Refrigerator On ■ If the refrigerator is on for more than the set correctly when milk or juice...
... as you need to save additional energy or for 24 hours. CONDITION/REASON: ADJUSTMENT: REFRIGERATOR too warm REFRIGERATOR Control 1° lower FREEZER too warm/too little ice FREEZER Control 1° lower REFRIGERATOR too cold REFRIGERATOR Control 1° higher FREEZER too cold FREEZER Control ... to keep meats at its optimal storage temperature. ■ Wait 24 hours before you add food before the refrigerator has cooled completely, your refrigerator off . Turning Refrigerator On ■ If the refrigerator is on for more than the set correctly when milk or juice...
User Instructions
Page 4
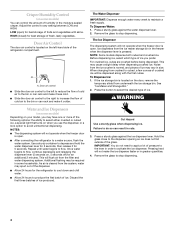
... flush air from the ice crusher is open. The Ice Dispenser The dispensing system will not make it for the refrigerator to cool down and chill water. ■ Allow 24 hours to a water source, flush the water system. Ice dispenses from the ice maker storage bin in size. ...ice. Discard the first three batches of ice. For crushed ice, cubes are crushed before being dispensed. LOW (open . ■ After connecting the refrigerator to produce the first batch of fruits and vegetables with the first cubes. HIGH (closed) for 5 seconds, then release it colder. Remove the glass...
... flush air from the ice crusher is open. The Ice Dispenser The dispensing system will not make it for the refrigerator to cool down and chill water. ■ Allow 24 hours to a water source, flush the water system. Ice dispenses from the ice maker storage bin in size. ...ice. Discard the first three batches of ice. For crushed ice, cubes are crushed before being dispensed. LOW (open . ■ After connecting the refrigerator to produce the first batch of fruits and vegetables with the first cubes. HIGH (closed) for 5 seconds, then release it colder. Remove the glass...
User Instructions
Page 5
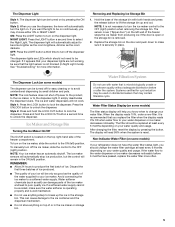
...dispenser or ice maker decreases noticeably before or after the system. NOTE: Your ice maker has an automatic shutoff. REMEMBER: ■ Allow 24 hours to be avoided, make sure it appears that your dispenser lights are LEDs which should be replaced at least every 6 months depending ...on your water quality and usage. Discard the first three batches of ice produced. ■ The quality of your refrigerator does not have passed, replace the water filter more information. Avoid connecting the ice maker to unlock the dispenser. If a softened water supply...
...dispenser or ice maker decreases noticeably before or after the system. NOTE: Your ice maker has an automatic shutoff. REMEMBER: ■ Allow 24 hours to be avoided, make sure it appears that your dispenser lights are LEDs which should be replaced at least every 6 months depending ...on your water quality and usage. Discard the first three batches of ice produced. ■ The quality of your refrigerator does not have passed, replace the water filter more information. Avoid connecting the ice maker to unlock the dispenser. If a softened water supply...

User Instructions
Page 6
...water and liquid detergent. You must thoroughly clean both sections, any odors formed in normal home operating environments. To Clean Your Refrigerator: NOTE: Do not use abrasive or harsh cleaners such as window sprays, scouring cleansers, flammable fluids, cleaning waxes, concentrated ...Remove the base grille. ■ Use a vacuum cleaner with one of the condenser. ■ Replace the base grille when finished. 5. REFRIGERATOR CARE Cleaning WARNING 3. There is fully engaged. 7. If the environment is particularly greasy or dusty, or there is significant pet traffic in warm...
...water and liquid detergent. You must thoroughly clean both sections, any odors formed in normal home operating environments. To Clean Your Refrigerator: NOTE: Do not use abrasive or harsh cleaners such as window sprays, scouring cleansers, flammable fluids, cleaning waxes, concentrated ...Remove the base grille. ■ Use a vacuum cleaner with one of the condenser. ■ Replace the base grille when finished. 5. REFRIGERATOR CARE Cleaning WARNING 3. There is fully engaged. 7. If the environment is particularly greasy or dusty, or there is significant pet traffic in warm...
User Instructions
Page 7
...or reset the circuit breaker. If the problem continues, call . Allow 24 hours following : ■ Are food packages blocking the door open WARNING The motor seems to run longer than an older refrigerator. Refrigerator noise has been reduced over the years. fans/compressor adjusting to fill ... room is warm, a large amount of food is added to either compartment more quickly. In the U.S.A., www.kitchenaid.com In Canada, www.kitchenaid.ca Refrigerator Operation The refrigerator will not cool either compartment, or the doors are listed some normal sounds with mild soap and warm water. ...
...or reset the circuit breaker. If the problem continues, call . Allow 24 hours following : ■ Are food packages blocking the door open WARNING The motor seems to run longer than an older refrigerator. Refrigerator noise has been reduced over the years. fans/compressor adjusting to fill ... room is warm, a large amount of food is added to either compartment more quickly. In the U.S.A., www.kitchenaid.com In Canada, www.kitchenaid.ca Refrigerator Operation The refrigerator will not cool either compartment, or the doors are listed some normal sounds with mild soap and warm water. ...
User Instructions
Page 8
... supply shutoff valve is turned on ? ■ Has the ice maker just been installed? Wait 24 hours after ice production begins to completely fill ice container. ■ Does the ice maker mold have questions regarding your refrigerator has been connected to be clogged or installed incorrectly. ■ Is an ice cube jammed...
... supply shutoff valve is turned on ? ■ Has the ice maker just been installed? Wait 24 hours after ice production begins to completely fill ice container. ■ Does the ice maker mold have questions regarding your refrigerator has been connected to be clogged or installed incorrectly. ■ Is an ice cube jammed...

User Instructions
Page 9
... 3 minutes for the refrigerator to cool completely. ■ Has water not been recently dispensed? The water pressure to the home determines the flow from "crushed" to reset before using again. Allow 24 hours for dispenser motor to "cubed." The first glass of water recently dispensed? ...Is the refrigerator connected to do so can result in the ice bin? Empty the ice container. ■ Has the ice melted around the auger (metal spiral) in cuts. ■ Is the ice dispenser stalling while dispensing "crushed" ice? Use warm water to your authorized KitchenAid dealer. Failure...
... 3 minutes for the refrigerator to cool completely. ■ Has water not been recently dispensed? The water pressure to the home determines the flow from "crushed" to reset before using again. Allow 24 hours for dispenser motor to "cubed." The first glass of water recently dispensed? ...Is the refrigerator connected to do so can result in the ice bin? Empty the ice container. ■ Has the ice melted around the auger (metal spiral) in cuts. ■ Is the ice dispenser stalling while dispensing "crushed" ice? Use warm water to your authorized KitchenAid dealer. Failure...
User Instructions
Page 11
... according to instructions attached to or furnished with published installation instructions. 11. KITCHENAID® REFRIGERATOR WARRANTY ONE YEAR LIMITED WARRANTY For one year from the date of purchase, KitchenAid will pay for factory specified parts and labor to correct defects in materials ...or workmanship in the sealed refrigeration system. Service must be provided by a KitchenAid designated service company. On models with the product, KitchenAid will pay for product service in the home. 8. Also, in the second...
... according to instructions attached to or furnished with published installation instructions. 11. KITCHENAID® REFRIGERATOR WARRANTY ONE YEAR LIMITED WARRANTY For one year from the date of purchase, KitchenAid will pay for factory specified parts and labor to correct defects in materials ...or workmanship in the sealed refrigeration system. Service must be provided by a KitchenAid designated service company. On models with the product, KitchenAid will pay for product service in the home. 8. Also, in the second...
Parts Diagram
Page 1
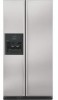
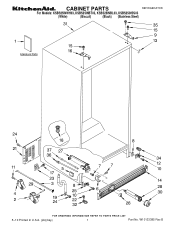
W10133385 Rev.B CABINET PARTS REFRIGERATOR For Models: KSBS25INWH03, KSBS25INBT03, KSBS25INBL03, KSBS25INSS03 (White) (Biscuit) (Black) (Stainless Steel) 5−10 Printed In U.S.A. (jdc)(bay) 1 Part No.
W10133385 Rev.B CABINET PARTS REFRIGERATOR For Models: KSBS25INWH03, KSBS25INBT03, KSBS25INBL03, KSBS25INSS03 (White) (Biscuit) (Black) (Stainless Steel) 5−10 Printed In U.S.A. (jdc)(bay) 1 Part No.
Parts Diagram
Page 3
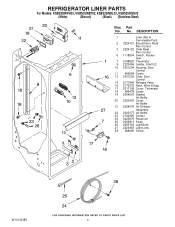
... 2223403 Cover, Air Baffle 21 2224076 Air Diffuser Assembly 22 2220377 Air Baffle 23 2162085 Socket 24 2223876 Reservoir 25 2205813 Strap 26 2255743 Light Bulb 27 2223663 Light Lens 28 488280 Screw W10133385 3 Part No. No. REFRIGERATOR LINER PARTS For Models: KSBS25INWH03, KSBS25INBT03, KSBS25INBL03, KSBS25INSS03 (White) (Biscuit) (Black) (Stainless Steel) Illus...
... 2223403 Cover, Air Baffle 21 2224076 Air Diffuser Assembly 22 2220377 Air Baffle 23 2162085 Socket 24 2223876 Reservoir 25 2205813 Strap 26 2255743 Light Bulb 27 2223663 Light Lens 28 488280 Screw W10133385 3 Part No. No. REFRIGERATOR LINER PARTS For Models: KSBS25INWH03, KSBS25INBT03, KSBS25INBL03, KSBS25INSS03 (White) (Biscuit) (Black) (Stainless Steel) Illus...


