
Quick Start Guide
Page 1
our quick start page has what you need to help you get the most from your new product. GET BLENDING DISCOVER MORE AT KITCHENAID.COM/QUICKSTART For exciting recipes, demo videos, product registration, and more - Used under license in Canada. RECIPES GUIDES VIDEOS SUPPORT REGISTER KitchenAid.com | KitchenAid.ca | USA: 1.800.541.6390 | Canada: 1.800.807.6777 W11333855B KSB40**, 7KSB40** 05/2019 ®/™ ©2019 KitchenAid. All rights reserved.
our quick start page has what you need to help you get the most from your new product. GET BLENDING DISCOVER MORE AT KITCHENAID.COM/QUICKSTART For exciting recipes, demo videos, product registration, and more - Used under license in Canada. RECIPES GUIDES VIDEOS SUPPORT REGISTER KitchenAid.com | KitchenAid.ca | USA: 1.800.541.6390 | Canada: 1.800.807.6777 W11333855B KSB40**, 7KSB40** 05/2019 ®/™ ©2019 KitchenAid. All rights reserved.
Quick Start Guide
Page 2
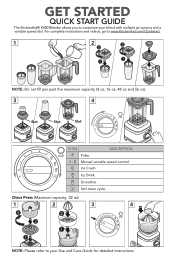
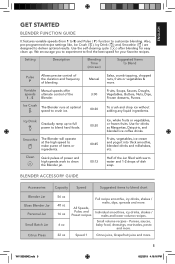
... (8 oz, 16 oz, 48 oz and 56 oz). 3 4 Slot Slot Slot 3 4 5 2 1 O P 3 4 5 2 1 o P ICON DESCRIPTION P Pulse. 1 - 5 Manual variable speed control. Ice Crush. Citrus Press (Maximum capacity: 32 oz) 1 2 3 4 3 2 2 1 3 4 5 2 1 o P 1 NOTE: Please refer to your blend with multiple jar options and a variable speed dial. GET STARTED QUICK START GUIDE The KitchenAid® K400 Blender allows you to customize your Use and Care Guide for detailed instructions. Icy Drink. Smoothie. Self...
... (8 oz, 16 oz, 48 oz and 56 oz). 3 4 Slot Slot Slot 3 4 5 2 1 O P 3 4 5 2 1 o P ICON DESCRIPTION P Pulse. 1 - 5 Manual variable speed control. Ice Crush. Citrus Press (Maximum capacity: 32 oz) 1 2 3 4 3 2 2 1 3 4 5 2 1 o P 1 NOTE: Please refer to your blend with multiple jar options and a variable speed dial. GET STARTED QUICK START GUIDE The KitchenAid® K400 Blender allows you to customize your Use and Care Guide for detailed instructions. Icy Drink. Smoothie. Self...

Owners Manual
Page 2
... 15 1 Lid Center Cap 2 Lid with Vent Well 3 Jar (56 oz capacity) 3.1 Glass Jar**** (48 oz capacity) 4 Base 5 Control Dial 6 Reamer* 7 Pulp Strainer/Basket* 8 Juice Container* (32 oz capacity) 9 Gear Assembly* 10 Personal Jar** (16 oz capacity) 11 Blade Assembly of Personal Jar** 12 Personal Jar Easy-Drink Lid** 13 Small Batch Jar*** (6 oz capacity) 14 Blade Assembly of Small Batch Jar*** 15 Small Batch Jar Lid*** 16 Tamper***** 17 START/STOP button ( ) with LED ring * Accessories only...
... 15 1 Lid Center Cap 2 Lid with Vent Well 3 Jar (56 oz capacity) 3.1 Glass Jar**** (48 oz capacity) 4 Base 5 Control Dial 6 Reamer* 7 Pulp Strainer/Basket* 8 Juice Container* (32 oz capacity) 9 Gear Assembly* 10 Personal Jar** (16 oz capacity) 11 Blade Assembly of Personal Jar** 12 Personal Jar Easy-Drink Lid** 13 Small Batch Jar*** (6 oz capacity) 14 Blade Assembly of Small Batch Jar*** 15 Small Batch Jar Lid*** 16 Tamper***** 17 START/STOP button ( ) with LED ring * Accessories only...
Owners Manual
Page 3
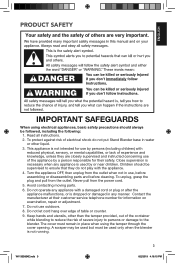
... are closely supervised and instructed concerning use of experience and knowledge, unless they do not put Stand Blender base in use, before assembling or disassembling parts and before cleaning. Avoid contacting moving parts. 6. Do not use outdoors. 8. Keep hands and utensils, other liquid. 3. W11333854E.indb 3 3 8/2/2019 4:16:15 PM This appliance is used by a person responsible for information on examination, repair or adjustment. 7. Close supervision...
... are closely supervised and instructed concerning use of experience and knowledge, unless they do not put Stand Blender base in use, before assembling or disassembling parts and before cleaning. Avoid contacting moving parts. 6. Do not use outdoors. 8. Keep hands and utensils, other liquid. 3. W11333854E.indb 3 3 8/2/2019 4:16:15 PM This appliance is used by a person responsible for information on examination, repair or adjustment. 7. Close supervision...
Owners Manual
Page 4
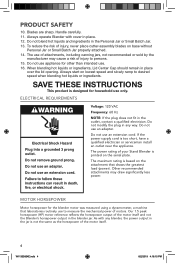
... plug does not fit in any blender, the power output in the jar is not the same as the horsepower of motors. If the power supply cord is printed on lowest speed and slowly ramp to persons. 15. Our 1.5 peak horsepower (HP) motor reference reflects the horsepower output of injury, never place cutter-assembly blades on the attachment that laboratories routinely use . 16. To reduce...
... plug does not fit in any blender, the power output in the jar is not the same as the horsepower of motors. If the power supply cord is printed on lowest speed and slowly ramp to persons. 15. Our 1.5 peak horsepower (HP) motor reference reflects the horsepower output of injury, never place cutter-assembly blades on the attachment that laboratories routinely use . 16. To reduce...
Owners Manual
Page 5
... chop ice without adding any liquid ingredients. Clean Quick pulses of power and high speeds work to crush ice. 3:00 00:30 Fruits, Soups, Sauces, Doughs, Vegetables, Butters, Nuts, Dips, Frozen desserts, Purees. Use for your favorite recipes. Ice Crush The Blender runs at the high speed to customize blending. BLENDER ACCESSORY GUIDE Accessories Capacity Speed Suggested items to blend hard foods. Manual Salsa, crumb topping, chopped nuts, fruits or vegetables & more . Smoothie The Blender will operate at optimal speed to clean the Blender jar...
... chop ice without adding any liquid ingredients. Clean Quick pulses of power and high speeds work to crush ice. 3:00 00:30 Fruits, Soups, Sauces, Doughs, Vegetables, Butters, Nuts, Dips, Frozen desserts, Purees. Use for your favorite recipes. Ice Crush The Blender runs at the high speed to customize blending. BLENDER ACCESSORY GUIDE Accessories Capacity Speed Suggested items to blend hard foods. Manual Salsa, crumb topping, chopped nuts, fruits or vegetables & more . Smoothie The Blender will operate at optimal speed to clean the Blender jar...
Owners Manual
Page 6
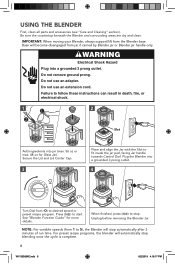
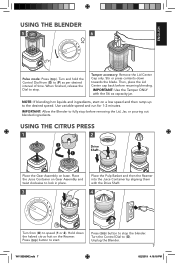
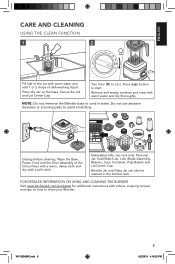
... and clean. See "Blender Function Guide" for Glass Jar). When finished, press ( ) to start. Do not remove ground prong. For preset recipe programs, the blender will stop . USING THE BLENDER First, clean all parts and accessories (see "Care and Cleaning" section). IMPORTANT: When moving your Blender, always support/lift from (O) to fit inside the jar pad, facing Jar handle towards Control Dial. Do not use an extension cord. Secure the Lid and Lid Center Cap. 3 Place...
... and clean. See "Blender Function Guide" for Glass Jar). When finished, press ( ) to start. Do not remove ground prong. For preset recipe programs, the blender will stop . USING THE BLENDER First, clean all parts and accessories (see "Care and Cleaning" section). IMPORTANT: When moving your Blender, always support/lift from (O) to fit inside the jar pad, facing Jar handle towards Control Dial. Do not use an extension cord. Secure the Lid and Lid Center Cap. 3 Place...
Owners Manual
Page 7
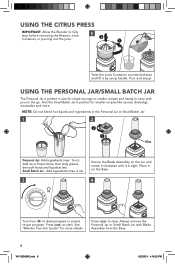
... on the Reamer. Unplug the Blender. 7 W11333854E.indb 7 8/2/2019 4:16:18 PM Tamper accessory: Remove the Lid Center Cap only. Place the Juice Container on base. Hold down towards the blade. When finished, release the Dial to (O). USING THE CITRUS PRESS 1 2 2 1 Drive Shaft Place the Gear Assembly on Gear Assembly and twist clockwise to the desired speed. Turn and hold the Control Dial from...
... on the Reamer. Unplug the Blender. 7 W11333854E.indb 7 8/2/2019 4:16:18 PM Tamper accessory: Remove the Lid Center Cap only. Place the Juice Container on base. Hold down towards the blade. When finished, release the Dial to (O). USING THE CITRUS PRESS 1 2 2 1 Drive Shaft Place the Gear Assembly on Gear Assembly and twist clockwise to the desired speed. Turn and hold the Control Dial from...
Owners Manual
Page 8
... tight. NOTE: Do not blend hot liquids and ingredients in size for single servings or smaller recipes and handy to desired speed or preset recipe program. Always remove the Personal Jar or Small Batch Jar with you on the go. Small Batch Jar : Add ingredients (max. 6 oz). 3 Secure the Blade Assembly on the Base. 4 3 4 5 2 1 0 P Turn from (O) to carry with Blade Assembly from the Base. 8 W11333854E.indb 8 8/2/2019 4:16...
... tight. NOTE: Do not blend hot liquids and ingredients in size for single servings or smaller recipes and handy to desired speed or preset recipe program. Always remove the Personal Jar or Small Batch Jar with you on the go. Small Batch Jar : Add ingredients (max. 6 oz). 3 Secure the Blade Assembly on the Base. 4 3 4 5 2 1 0 P Turn from (O) to carry with Blade Assembly from the Base. 8 W11333854E.indb 8 8/2/2019 4:16...
Owners Manual
Page 9
... immerse the Blender base or cord in the bottom rack. Remove and empty contents and rinse with videos, inspiring recipes, and tips on the base. Blender Jar and Glass Jar can also be washed in water. Dishwasher-safe, top rack only: Personal Jar, Small Batch Jar, Lids, Blade Assembly, Reamer, Juice Container, Pulp Basket and Lid Center Cap. FOR DETAILED INFORMATION ON USING AND CLEANING THE BLENDER Visit www.kitchenaid.com/quickstart for additional instructions...
... immerse the Blender base or cord in the bottom rack. Remove and empty contents and rinse with videos, inspiring recipes, and tips on the base. Blender Jar and Glass Jar can also be washed in water. Dishwasher-safe, top rack only: Personal Jar, Small Batch Jar, Lids, Blade Assembly, Reamer, Juice Container, Pulp Basket and Lid Center Cap. FOR DETAILED INFORMATION ON USING AND CLEANING THE BLENDER Visit www.kitchenaid.com/quickstart for additional instructions...
Owners Manual
Page 10
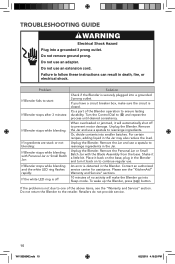
... Blender stops after 3 minutes: If Blender stops while blending: If ingredients are stuck or not blending: If Blender stops while blending with the Blade Assembly from the base. Unplug the Blender. For certain recipes, adding liquid in the Blender and turn it will make sure the circuit is detected in the Blender. Unplug the Blender. Remove the Personal Jar or Small Batch Jar with Personal Jar or Small Batch Jar: If Blender stops while blending and the white LED ring flashes...
... Blender stops after 3 minutes: If Blender stops while blending: If ingredients are stuck or not blending: If Blender stops while blending with the Blade Assembly from the base. Unplug the Blender. For certain recipes, adding liquid in the Blender and turn it will make sure the circuit is detected in the Blender. Unplug the Blender. Remove the Personal Jar or Small Batch Jar with Personal Jar or Small Batch Jar: If Blender stops while blending and the white LED ring flashes...
Owners Manual
Page 11
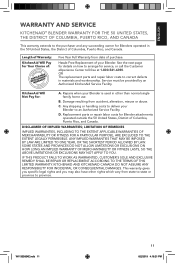
... how to the purchaser and any succeeding owner for Blenders operated in the 50 United States, the District of Columbia, Puerto Rico, and Canada. C. Replacement parts or repair labor costs for Blender attachments operated outside the 50 United States, District of your Blender. LIMITATION OF REMEDIES IMPLIED WARRANTIES, INCLUDING TO THE EXTENT APPLICABLE WARRANTIES OF MERCHANTABILITY OR FITNESS FOR A PARTICULAR PURPOSE, ARE EXCLUDED TO THE...
... how to the purchaser and any succeeding owner for Blenders operated in the 50 United States, the District of Columbia, Puerto Rico, and Canada. C. Replacement parts or repair labor costs for Blender attachments operated outside the 50 United States, District of your Blender. LIMITATION OF REMEDIES IMPLIED WARRANTIES, INCLUDING TO THE EXTENT APPLICABLE WARRANTIES OF MERCHANTABILITY OR FITNESS FOR A PARTICULAR PURPOSE, ARE EXCLUDED TO THE...
Owners Manual
Page 12
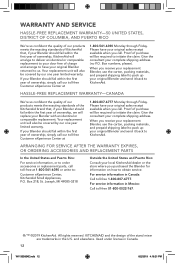
... service information, or to order accessories or replacement parts, call our toll-free Customer eXperience Center at 1-800-541-6390 or write to: Customer eXperience Center, KitchenAid Small Appliances, P.O. Please have your original sales receipt available when you receive your replacement Blender, use the carton, packing materials, and prepaid shipping label to pack up your Blender with an identical or comparable replacement. WARRANTY AND SERVICE HASSLE-FREE REPLACEMENT WARRANTY...
... service information, or to order accessories or replacement parts, call our toll-free Customer eXperience Center at 1-800-541-6390 or write to: Customer eXperience Center, KitchenAid Small Appliances, P.O. Please have your original sales receipt available when you receive your replacement Blender, use the carton, packing materials, and prepaid shipping label to pack up your Blender with an identical or comparable replacement. WARRANTY AND SERVICE HASSLE-FREE REPLACEMENT WARRANTY...


