Owners Manual
Page 2
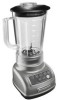
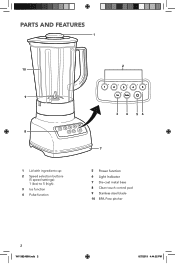
PARTS AND FEATURES 1 10 9 8 1 Lid with ingredient cup 2 Speed selection buttons (5 speed settings): 1 (low) to 5 (high). 3 Ice function 4 Pulse function 2 3 4 56 7 5 Power function 6 Light Indicator 7 Die-cast metal base 8 Clean touch control pad 9 Stainless steel blade 10 BPA Free pitcher 2 W11382496A.indb 2 8/7/2019 4:44:52 PM
PARTS AND FEATURES 1 10 9 8 1 Lid with ingredient cup 2 Speed selection buttons (5 speed settings): 1 (low) to 5 (high). 3 Ice function 4 Pulse function 2 3 4 56 7 5 Power function 6 Light Indicator 7 Die-cast metal base 8 Clean touch control pad 9 Stainless steel blade 10 BPA Free pitcher 2 W11382496A.indb 2 8/7/2019 4:44:52 PM
Owners Manual
Page 3
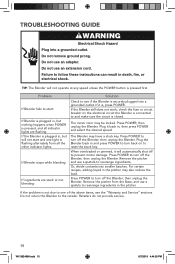
... assembling or disassembling parts and before cleaning. Do not let cord hang over edge of severe injury to persons or damage to the Blender. Blades are closely supervised and instructed concerning the use of electrical shock, do not play with the appliance. 4. Handle carefully. 11. Always operate Blender with cover in any appliance is used only when the Blender is not intended for information on examination, repair...
... assembling or disassembling parts and before cleaning. Do not let cord hang over edge of severe injury to persons or damage to the Blender. Blades are closely supervised and instructed concerning the use of electrical shock, do not play with the appliance. 4. Handle carefully. 11. Always operate Blender with cover in any appliance is used only when the Blender is not intended for information on examination, repair...

Owners Manual
Page 4
... with blades or moveable parts. PRODUCT SAFETY 12. When blending hot liquids, remove center piece of injury to operate - If the power supply cord is designed for household use of attachments, including canning jars, not recommended by KitchenAid may cause a risk of two-piece cover. 14. Do not modify the plug in the outlet, contact a qualified electrician. The use only. Do not use an extension cord. Flashing light indicates...
... with blades or moveable parts. PRODUCT SAFETY 12. When blending hot liquids, remove center piece of injury to operate - If the power supply cord is designed for household use of attachments, including canning jars, not recommended by KitchenAid may cause a risk of two-piece cover. 14. Do not modify the plug in the outlet, contact a qualified electrician. The use only. Do not use an extension cord. Flashing light indicates...
Owners Manual
Page 5
... ricotta or cottage cheese 1, 3 Streusel topping 2 Sweet crumb topping Pulse, 2 Sweet crunch topping Pulse, 2 Vegetable-based main dish sauce. . . . 1 Waffle batter 3 White sauce 1 W11382496A.indb 5 5 8/7/2019 4:44:53 PM Remove cup and add ingredients at higher speeds with a full pitcher or with hot contents, stop the Blender and then add ingredients. ENGLISH GETTING STARTED First, clean all parts and accessories (see "Care and Cleaning" section).
... ricotta or cottage cheese 1, 3 Streusel topping 2 Sweet crumb topping Pulse, 2 Sweet crunch topping Pulse, 2 Vegetable-based main dish sauce. . . . 1 Waffle batter 3 White sauce 1 W11382496A.indb 5 5 8/7/2019 4:44:53 PM Remove cup and add ingredients at higher speeds with a full pitcher or with hot contents, stop the Blender and then add ingredients. ENGLISH GETTING STARTED First, clean all parts and accessories (see "Care and Cleaning" section).
Owners Manual
Page 6
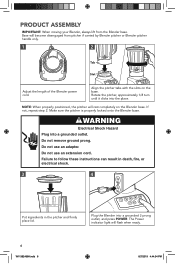
PRODUCT ASSEMBLY IMPORTANT: When moving your Blender, always lift from pitcher if carried by Blender pitcher or Blender pitcher handle only. 1 2 Tab Slot Adjust the length of the Blender power cord. NOTE: When properly positioned, the pitcher will flash when ready. 6 W11382496A.indb 6 8/7/2019 4:44:54 PM Do not remove ground prong. Do not use an adapter. Do not use an extension cord. Failure to follow these instructions can...
PRODUCT ASSEMBLY IMPORTANT: When moving your Blender, always lift from pitcher if carried by Blender pitcher or Blender pitcher handle only. 1 2 Tab Slot Adjust the length of the Blender power cord. NOTE: When properly positioned, the pitcher will flash when ready. 6 W11382496A.indb 6 8/7/2019 4:44:54 PM Do not remove ground prong. Do not use an adapter. Do not use an extension cord. Failure to follow these instructions can...
Owners Manual
Page 7
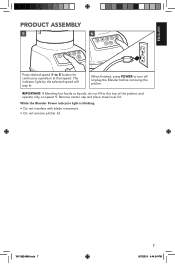
... PM IMPORTANT: If blending hot foods or liquids, do not fill to turn off. When finished, press POWER to the top of the pitcher, and operate only on speed 1. Remove center cap and place towel over lid. ENGLISH PRODUCT ASSEMBLY 5 6 Press desired speed (1 to 5) button for continuous operation at that speed. The indicator light by the selected speed will stay lit. While the Blender Power indicator light is blinking: • Do not...
... PM IMPORTANT: If blending hot foods or liquids, do not fill to turn off. When finished, press POWER to the top of the pitcher, and operate only on speed 1. Remove center cap and place towel over lid. ENGLISH PRODUCT ASSEMBLY 5 6 Press desired speed (1 to 5) button for continuous operation at that speed. The indicator light by the selected speed will stay lit. While the Blender Power indicator light is blinking: • Do not...
Owners Manual
Page 8
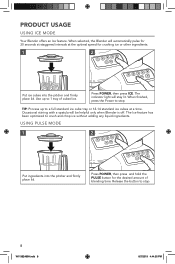
... PULSE button for crushing ice or other ingredients. 1 2 Put ice cubes into the pitcher and firmly place lid. The Ice feature has been optimized to stop . The indicator light will be helpful only when Blender is off. TIP: Process up to a full standard ice cube tray or 12-14 standard ice cubes at the optimal speed for the desired amount of cubed ice. Press POWER, then press ICE. Use...
... PULSE button for crushing ice or other ingredients. 1 2 Put ice cubes into the pitcher and firmly place lid. The Ice feature has been optimized to stop . The indicator light will be helpful only when Blender is off. TIP: Process up to a full standard ice cube tray or 12-14 standard ice cubes at the optimal speed for the desired amount of cubed ice. Press POWER, then press ICE. Use...
Owners Manual
Page 9
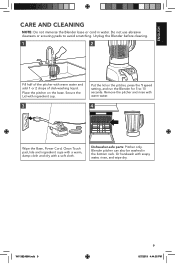
... wipe dry. Place the pitcher on the pitcher, press the 1 speed setting, and run the Blender for 5 to avoid scratching. Remove the pitcher and rinse with warm water. 4 Wipe the Base, Power Cord, Clean Touch pad, lids and ingredient cups with a warm, damp cloth and dry with ingredient cup. 3 Put the lid on the base. ENGLISH CARE AND CLEANING NOTE: Do not immerse the Blender base or cord in the bottom rack...
... wipe dry. Place the pitcher on the pitcher, press the 1 speed setting, and run the Blender for 5 to avoid scratching. Remove the pitcher and rinse with warm water. 4 Wipe the Base, Power Cord, Clean Touch pad, lids and ingredient cups with a warm, damp cloth and dry with ingredient cup. 3 Put the lid on the base. ENGLISH CARE AND CLEANING NOTE: Do not immerse the Blender base or cord in the bottom rack...
Owners Manual
Page 10
... speed unless the POWER button is pressed first. Press POWER to the retailer. Press POWER to turn off the Blender; Or, divide contents into a grounded outlet. Do not use a spatula to one light is , press POWER. The Blender may be locked. Remove the pitcher and use an extension cord. For certain recipes, adding liquid in ; If the problem is closed. The motor rotor may have a stuck key. Press POWER; Remove the pitcher...
... speed unless the POWER button is pressed first. Press POWER to the retailer. Press POWER to turn off the Blender; Or, divide contents into a grounded outlet. Do not use a spatula to one light is , press POWER. The Blender may be locked. Remove the pitcher and use an extension cord. For certain recipes, adding liquid in ; If the problem is closed. The motor rotor may have a stuck key. Press POWER; Remove the pitcher...
Owners Manual
Page 11
... an Authorized KitchenAid Service Center. LIMITATION OF REMEDIES IMPLIED WARRANTIES, INCLUDING TO THE EXTENT APPLICABLE WARRANTIES OF MERCHANTABILITY OR FITNESS FOR A PARTICULAR PURPOSE, ARE EXCLUDED TO THE EXTENT LEGALLY PERMISSIBLE. IF THIS PRODUCT FAILS TO WORK AS WARRANTED, CUSTOMER'S SOLE AND EXCLUSIVE REMEDY SHALL BE REPAIR OR REPLACEMENT ACCORDING TO THE TERMS OF THIS LIMITED WARRANTY. Replacement parts or repair labor costs for Blender operated outside...
... an Authorized KitchenAid Service Center. LIMITATION OF REMEDIES IMPLIED WARRANTIES, INCLUDING TO THE EXTENT APPLICABLE WARRANTIES OF MERCHANTABILITY OR FITNESS FOR A PARTICULAR PURPOSE, ARE EXCLUDED TO THE EXTENT LEGALLY PERMISSIBLE. IF THIS PRODUCT FAILS TO WORK AS WARRANTED, CUSTOMER'S SOLE AND EXCLUSIVE REMEDY SHALL BE REPAIR OR REPLACEMENT ACCORDING TO THE TERMS OF THIS LIMITED WARRANTY. Replacement parts or repair labor costs for Blender operated outside...

Owners Manual
Page 12
... ship collect to an Authorized KitchenAid Service Centre. Box numbers, please.) When you receive your replacement Blender, use the carton and packing materials to pack up your complete shipping address. (No P.O. Please follow these instructions to receive this quality service. If you are unable to obtain satisfactory service in this manner call our toll-free Customer eXperience Centre at 1-800-541...
... ship collect to an Authorized KitchenAid Service Centre. Box numbers, please.) When you receive your replacement Blender, use the carton and packing materials to pack up your complete shipping address. (No P.O. Please follow these instructions to receive this quality service. If you are unable to obtain satisfactory service in this manner call our toll-free Customer eXperience Centre at 1-800-541...


