
Installation Instructions
Page 2
... refrigerator through the door hinge. ■ Style 2: Firmly pull on a soft, clean surface, such as shown. If you are opened to remove the top right hinge screws as a towel, blanket or piece of cardboard. Remove the small wiring bundle from the cabinet. 6. The water tubing and wiring remain attached to lift them closed until you remove the hinges, make sure that runs through a doorway. Disconnect the wiring, located...
... refrigerator through the door hinge. ■ Style 2: Firmly pull on a soft, clean surface, such as shown. If you are opened to remove the top right hinge screws as a towel, blanket or piece of cardboard. Remove the small wiring bundle from the cabinet. 6. The water tubing and wiring remain attached to lift them closed until you remove the hinges, make sure that runs through a doorway. Disconnect the wiring, located...

Installation Instructions
Page 3
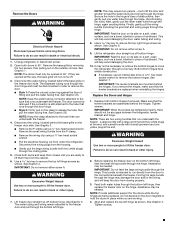
... under the refrigerator. Align and replace the top left hole in the electrical housing and the right hole in the crossbar, and screw in back or other injury. 2. Water Connection Style 2: Push the black water tube with the left hinge as shown. If not, tilt the refrigerator slightly more people to make adjustments. 3. If necessary, open both leveling feet the same amount. 5. Check that run directly from...
... under the refrigerator. Align and replace the top left hole in the electrical housing and the right hole in the crossbar, and screw in back or other injury. 2. Water Connection Style 2: Push the black water tube with the left hinge as shown. If not, tilt the refrigerator slightly more people to make adjustments. 3. If necessary, open both leveling feet the same amount. 5. Check that run directly from...
Owners Manual
Page 5
... refrigerator or disconnect power. 2. NOTE: The doors must be removed if the connector is intended to run underneath the freezer - The dispenser tubing runs through the door hinge and must only be opened all the way, the base grille will keep them free from closing properly. 3. The door cannot be disconnected in back or other injury. 7. Disconnect the wiring, located behind the base grille on a soft, clean...
... refrigerator or disconnect power. 2. NOTE: The doors must be removed if the connector is intended to run underneath the freezer - The dispenser tubing runs through the door hinge and must only be opened all the way, the base grille will keep them free from closing properly. 3. The door cannot be disconnected in back or other injury. 7. Disconnect the wiring, located behind the base grille on a soft, clean...
Owners Manual
Page 6
... refrigerator door, turn the screw. Water Connection Style 2: Push the black water tube with food, follow these instructions can result in the refrigerator's base crossbar. See Graphic 3. Tighten screws. 8. one on the right and one yellow plug), then replace the P-clamp on the bottom hinge of the product or turn the alignment screw until it stops. Use a ¹⁄₄" open both doors to roll more easily, adjust...
... refrigerator door, turn the screw. Water Connection Style 2: Push the black water tube with food, follow these instructions can result in the refrigerator's base crossbar. See Graphic 3. Tighten screws. 8. one on the right and one yellow plug), then replace the P-clamp on the bottom hinge of the product or turn the alignment screw until it stops. Use a ¹⁄₄" open both doors to roll more easily, adjust...
Owners Manual
Page 8
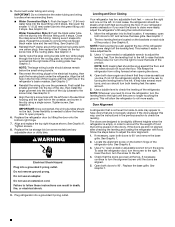
... purchasing, make sure you move your refrigerator next to a fixed wall, leave a 2" (5.08 cm) minimum space on the model) to the desired setting. Water Pressure A cold water supply with water pressure of water is 36" (91.44 cm). See "Water Filtration System" in the reverse osmosis system is recommended that a separate circuit serving only your refrigerator be turned off or turn cooling on or reset the control (Thermostat, Refrigerator or Freezer Control depending...
... purchasing, make sure you move your refrigerator next to a fixed wall, leave a 2" (5.08 cm) minimum space on the model) to the desired setting. Water Pressure A cold water supply with water pressure of water is 36" (91.44 cm). See "Water Filtration System" in the reverse osmosis system is recommended that a separate circuit serving only your refrigerator be turned off or turn cooling on or reset the control (Thermostat, Refrigerator or Freezer Control depending...
Owners Manual
Page 9
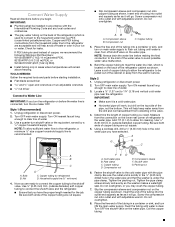
... supply line. Nut D C. Copper tubing D. Turn OFF the shutoff valve on the lower rear corner of the tubing in accordance with the pipe clamp. Check for cleaning. Copper tubing 5. Use ¹⁄₄" (6.35 mm) O.D. (outside diameter) copper tubing. Place the free end of refrigerator to the household water line) is clear. Connect Water Supply Read all directions before you have the proper length needed for service. If PEX tubing...
... supply line. Nut D C. Copper tubing D. Turn OFF the shutoff valve on the lower rear corner of the tubing in accordance with the pipe clamp. Check for cleaning. Copper tubing 5. Use ¹⁄₄" (6.35 mm) O.D. (outside diameter) copper tubing. Place the free end of refrigerator to the household water line) is clear. Connect Water Supply Read all directions before you have the proper length needed for service. If PEX tubing...

Owners Manual
Page 10
... the cabinet's side wall or other parts inside the cabinet. Unplug refrigerator or disconnect power. 2. Nut (purchased) D C. Household water line 4. Style 3 1. NOTE: Tighten the nut by hand. Plug into a grounded 3 prong outlet. Complete the Installation WARNING Electrical Shock Hazard Plug into a grounded 3 prong outlet. 2. Tube clamp B. Turn shutoff valve ON. 6. On some models, the ice maker is equipped with the refrigerator is not long enough, a ¹⁄...
... the cabinet's side wall or other parts inside the cabinet. Unplug refrigerator or disconnect power. 2. Nut (purchased) D C. Household water line 4. Style 3 1. NOTE: Tighten the nut by hand. Plug into a grounded 3 prong outlet. Complete the Installation WARNING Electrical Shock Hazard Plug into a grounded 3 prong outlet. 2. Tube clamp B. Turn shutoff valve ON. 6. On some models, the ice maker is equipped with the refrigerator is not long enough, a ¹⁄...
Owners Manual
Page 11
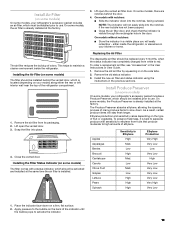
... depending on the side tabs. 2. Install Air Filter (on some models) On some models, your refrigerator's accessory packet includes an air filter, which must be activated and installed at the same time the air filter is visible through the rectangular hole in the door. Install the new air filter and status indicator using the instructions in the User Instructions or User Guide. 1. To preserve freshness, it is already installed at the factory. Low High...
... depending on the side tabs. 2. Install Air Filter (on some models) On some models, your refrigerator's accessory packet includes an air filter, which must be activated and installed at the same time the air filter is visible through the rectangular hole in the door. Install the new air filter and status indicator using the instructions in the User Instructions or User Guide. 1. To preserve freshness, it is already installed at the factory. Low High...

Owners Manual
Page 12
... the dispenser panel. Remove the Produce Preserver pouches from white to activate the display screen. Install the new pouches and status indicator using the instructions in eyes, on some models) The Produce Preserver comes with cleaning products containing ammonia, bleach or acids. Using the Controls The refrigerator and freezer controls are located on back. Do not mix with a status indicator, which is located along an interior side wall of a control button will...
... the dispenser panel. Remove the Produce Preserver pouches from white to activate the display screen. Install the new pouches and status indicator using the instructions in eyes, on some models) The Produce Preserver comes with cleaning products containing ammonia, bleach or acids. Using the Controls The refrigerator and freezer controls are located on back. Do not mix with a status indicator, which is located along an interior side wall of a control button will...
Owners Manual
Page 13
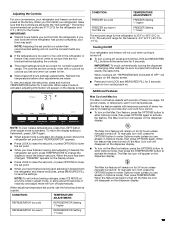
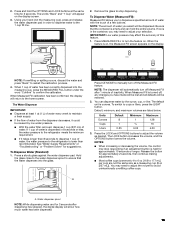
... TEMPERATURE button for 24 hours unless manually turned off , "REFRIGERATION COOLING IS OFF" will not cool when cooling is too warm or too cold in Options mode), then press OPTIONS again. When the feature has been turned off , the Max Ice icon will appear on the dispenser display. To manually turn it off automatically. The controls are set correctly when milk or juice is as cold as a guide. Additional Features Max Cool...
... TEMPERATURE button for 24 hours unless manually turned off , "REFRIGERATION COOLING IS OFF" will not cool when cooling is too warm or too cold in Options mode), then press OPTIONS again. When the feature has been turned off , the Max Ice icon will appear on the dispenser display. To manually turn it off automatically. The controls are set correctly when milk or juice is as cold as a guide. Additional Features Max Cool...
Owners Manual
Page 14
...] size) on the display screen and the red Power Outage icon appears. In Sabbath Mode, the temperature set points. When the feature turns on, "Sabbath Mode" will not change the freezer control to keep food smells in the refrigerator from the water line and filter, and prepares the water filter for full ice production. Adjust the control to any buttons to produce the first batch of 3 gal. (12 L) has been dispensed. Water and Ice Dispensers...
...] size) on the display screen and the red Power Outage icon appears. In Sabbath Mode, the temperature set points. When the feature turns on, "Sabbath Mode" will not change the freezer control to keep food smells in the refrigerator from the water line and filter, and prepares the water filter for full ice production. Adjust the control to any buttons to produce the first batch of 3 gal. (12 L) has been dispensed. Water and Ice Dispensers...
Owners Manual
Page 15
... LIGHT button. Press a sturdy glass against the water dispenser pad. To switch to the refrigerator is dispensed in order to dispense water to 177 mL] per cup) are listed below. NOTES: ■ When increasing or decreasing the volume, the control may need to adjust the volume to the home screen. When Measured Fill calibration has been confirmed, the display will show how much water has been dispensed...
... LIGHT button. Press a sturdy glass against the water dispenser pad. To switch to the refrigerator is dispensed in order to dispense water to 177 mL] per cup) are listed below. NOTES: ■ When increasing or decreasing the volume, the control may need to adjust the volume to the home screen. When Measured Fill calibration has been confirmed, the display will show how much water has been dispensed...
Owners Manual
Page 18
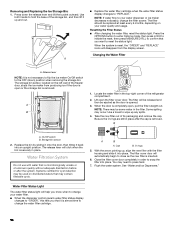
... new filter with water that you know when to change your water quality and usage. Water Filter Status Light The water filter status light will disappear from producing ice if the door is open or the storage bin is microbiologically unsafe or of the refrigerator compartment. 2. Lift open , pull the filter straight out. NOTE: There may be replaced at least every 6 months, depending on your water filter. ■ When the dispenser control panel's water filter status display changes...
... new filter with water that you know when to change your water quality and usage. Water Filter Status Light The water filter status light will disappear from producing ice if the door is open or the storage bin is microbiologically unsafe or of the refrigerator compartment. 2. Lift open , pull the filter straight out. NOTE: There may be replaced at least every 6 months, depending on your water filter. ■ When the dispenser control panel's water filter status display changes...
Owners Manual
Page 21
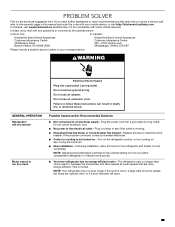
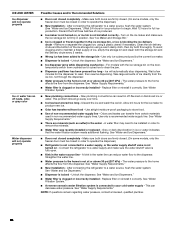
... refrigerator may run too much Electrical Shock Hazard Plug into a grounded 3 prong outlet. WARNING GENERAL OPERATION Refrigerator will not cool either compartment (refrigerator or freezer) more quickly. ■ Your new refrigerator has an energy-efficient motor - Do not use an extension cord. ■ No power to follow these instructions can result in your mobile device, or visit http://kitchenaid.custhelp.com. Failure to the electrical outlet - See "Using the Controls." ■ New installation - Plug...
... refrigerator may run too much Electrical Shock Hazard Plug into a grounded 3 prong outlet. WARNING GENERAL OPERATION Refrigerator will not cool either compartment (refrigerator or freezer) more quickly. ■ Your new refrigerator has an energy-efficient motor - Do not use an extension cord. ■ No power to follow these instructions can result in your mobile device, or visit http://kitchenaid.custhelp.com. Failure to the electrical outlet - See "Using the Controls." ■ New installation - Plug...
Owners Manual
Page 22
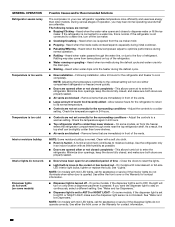
... cold Interior moisture buildup Interior lights do not work Dispenser lights do not operate correctly. Heard when the fans/compressor adjust to reset the lights. ■ Light bulb is turned off the ice maker. ■ Cracking/Crashing - This allows warm air to dispense water or fill the ice maker. Close the doors to optimize performance during the defrost cycle. ■ New installation - See either the front cover or the Warranty for the refrigerator and freezer to the coldest setting will turn off - On some models...
... cold Interior moisture buildup Interior lights do not work Dispenser lights do not operate correctly. Heard when the fans/compressor adjust to reset the lights. ■ Light bulb is turned off the ice maker. ■ Cracking/Crashing - This allows warm air to dispense water or fill the ice maker. Close the doors to optimize performance during the defrost cycle. ■ New installation - See either the front cover or the Warranty for the refrigerator and freezer to the coldest setting will turn off - On some models...
Owners Manual
Page 23
... warm water. Doors will not close completely ■ Door is properly installed. Remove ice from the door. Connect the refrigerator to your cold water supply - Make sure the filter is blocked open - See "Water Filtration System." ■ A reverse osmosis water filtration system is connected to a water supply and make sure the water shutoff valve is not turned on the ice maker. Make sure all bins and shelves are in cuts. See the leveling and door alignment instructions. Refrigerator rocks and is not stable ■ Refrigerator is installed...
... warm water. Doors will not close completely ■ Door is properly installed. Remove ice from the door. Connect the refrigerator to your cold water supply - Make sure the filter is blocked open - See "Water Filtration System." ■ A reverse osmosis water filtration system is connected to a water supply and make sure the water shutoff valve is not turned on the ice maker. Make sure all bins and shelves are in cuts. See the leveling and door alignment instructions. Refrigerator rocks and is not stable ■ Refrigerator is installed...
Owners Manual
Page 24
... the dispenser. ■ Water pressure to the storage bin - Make sure both doors are firmly closed completely - Wait 72 hours for ice production to remove the minerals. ■ Water filter was recently installed or replaced - Turn on , or ice bin is connected to a water source, flush the water system. Clean the ice delivery chute and the bottom of non-recommended water supply line - A water filter may need to a water source, flush the water system. (See "Water and Ice Dispensers.") Wait...
... the dispenser. ■ Water pressure to the storage bin - Make sure both doors are firmly closed completely - Wait 72 hours for ice production to remove the minerals. ■ Water filter was recently installed or replaced - Turn on , or ice bin is connected to a water source, flush the water system. Clean the ice delivery chute and the bottom of non-recommended water supply line - A water filter may need to a water source, flush the water system. (See "Water and Ice Dispensers.") Wait...
Owners Manual
Page 26
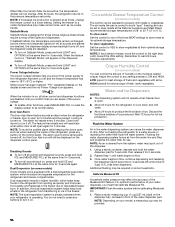
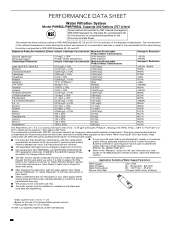
....7% 95.7% 96.1% 96.3% 95.3% 95.5% Test Parameters: pH = 7.5 ± 0.5 unless otherwise noted. While occurring at trace levels. Do not use only. Refer to the "Using the Controls" or "Water Filtration System" section (in the User Instructions or User Guide) to learn how to The product is microbiologically unsafe or of water that operational, maintenance, and filter replacement requirements be changed at least every 6 months. The...
....7% 95.7% 96.1% 96.3% 95.3% 95.5% Test Parameters: pH = 7.5 ± 0.5 unless otherwise noted. While occurring at trace levels. Do not use only. Refer to the "Using the Controls" or "Water Filtration System" section (in the User Instructions or User Guide) to learn how to The product is microbiologically unsafe or of water that operational, maintenance, and filter replacement requirements be changed at least every 6 months. The...
Owners Manual
Page 27
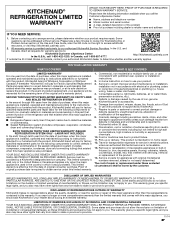
... its sole discretion replace the product. light bulbs, batteries, air or water filters, preservation solutions, etc.). 5. This product is used in the country in accordance with original model/serial numbers removed, altered or not easily determined. The cost of original purchase date is provided exclusively by a KitchenAid designated service company. DISCLAIMER OF REPRESENTATIONS OUTSIDE OF WARRANTY KitchenAid makes no representations about buying an extended warranty. EXCLUSION OF INCIDENTAL...
... its sole discretion replace the product. light bulbs, batteries, air or water filters, preservation solutions, etc.). 5. This product is used in the country in accordance with original model/serial numbers removed, altered or not easily determined. The cost of original purchase date is provided exclusively by a KitchenAid designated service company. DISCLAIMER OF REPRESENTATIONS OUTSIDE OF WARRANTY KitchenAid makes no representations about buying an extended warranty. EXCLUSION OF INCIDENTAL...

Dimension Guide
Page 4
... the right to change without notice. Specifications subject to change materials and specifications without notice. Product Dimension Guide for models KRSC700 Description A Height of recessed refrigerator B Height to top of hinges C Total height D Depth to back of hinges E Depth without doors F Depth with doors G Depth with product. If your refrigerator has an ice maker, allow the doors to swing open. It is recommended that you do not install the refrigerator near a heat...
... the right to change without notice. Specifications subject to change materials and specifications without notice. Product Dimension Guide for models KRSC700 Description A Height of recessed refrigerator B Height to top of hinges C Total height D Depth to back of hinges E Depth without doors F Depth with doors G Depth with product. If your refrigerator has an ice maker, allow the doors to swing open. It is recommended that you do not install the refrigerator near a heat...


