Use & Care Guide
Page 3
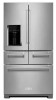
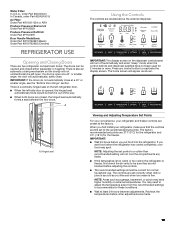
... sudden temperature changes or impact, such as floor damage could occur. Failure to avoid floor damage. Before You Throw Away Your Old Refrigerator or Freezer: ■ Take off the doors. ■ Leave the shelves in "Refrigerator Care." Wipe with cardboard or hardboard to do so can damage the surface of the packaging materials, clean the inside . Use both hands when removing them...
... sudden temperature changes or impact, such as floor damage could occur. Failure to avoid floor damage. Before You Throw Away Your Old Refrigerator or Freezer: ■ Take off the doors. ■ Leave the shelves in "Refrigerator Care." Wipe with cardboard or hardboard to do so can damage the surface of the packaging materials, clean the inside . Use both hands when removing them...
Use & Care Guide
Page 9
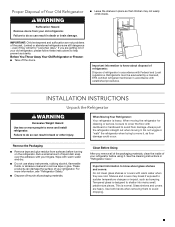
... inside the bottom hinge pin. Reset the controls. Return all removable parts and the food to the drawer glides. Loosen the two top screws that they are no longer level. See "Using the Control(s)" and "Temperature Controlled Exterior Drawer." 3. Drawer front screw B. Do not remove ground prong. Holding the drawer front by its full extension. 2. Align Doors and Drawers Once the doors and drawer fronts are located inside the drawer front, with the Door Handle Installation Instructions...
... inside the bottom hinge pin. Reset the controls. Return all removable parts and the food to the drawer glides. Loosen the two top screws that they are no longer level. See "Using the Control(s)" and "Temperature Controlled Exterior Drawer." 3. Drawer front screw B. Do not remove ground prong. Holding the drawer front by its full extension. 2. Align Doors and Drawers Once the doors and drawer fronts are located inside the drawer front, with the Door Handle Installation Instructions...
Use & Care Guide
Page 12
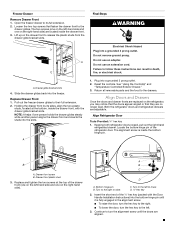
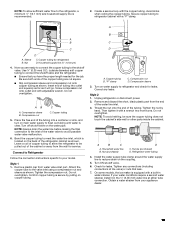
... flow of installation, cleaning, or removing a light bulb, turn shutoff valve or the equivalent, served by a switch. If a reverse osmosis water filtration system is connected to your ice or water. Turn ON nearest faucet long enough to follow these instructions can result in areas where temperatures will help avoid off by a ¹⁄₂" household supply line. 12 The preferred room temperature range for leaks. See "Water Filtration System." Reverse Osmosis Water Supply IMPORTANT...
... flow of installation, cleaning, or removing a light bulb, turn shutoff valve or the equivalent, served by a switch. If a reverse osmosis water filtration system is connected to your ice or water. Turn ON nearest faucet long enough to follow these instructions can result in areas where temperatures will help avoid off by a ¹⁄₂" household supply line. 12 The preferred room temperature range for leaks. See "Water Filtration System." Reverse Osmosis Water Supply IMPORTANT...
Use & Care Guide
Page 13
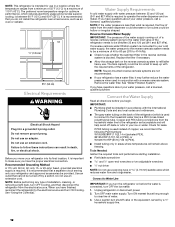
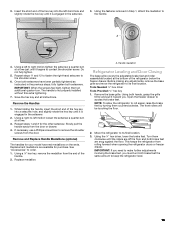
... leaks. A A B C D A. NOTE: Always drain the water line before making the final connection to the valve inlet using a compression nut and sleeve as it with the copper tubing. Compression nut D. Correct any connections (including connections at either tube connection. Unplug refrigerator or disconnect power. 2. Do not overtighten. Attach the copper tube to the inlet of the tubing. B C D A. Install the water supply tube clamp around the water supply line to reduce strain on water supply to flush out tubing...
... leaks. A A B C D A. NOTE: Always drain the water line before making the final connection to the valve inlet using a compression nut and sleeve as it with the copper tubing. Compression nut D. Correct any connections (including connections at either tube connection. Unplug refrigerator or disconnect power. 2. Do not overtighten. Attach the copper tube to the inlet of the tubing. B C D A. Install the water supply tube clamp around the water supply line to reduce strain on water supply to flush out tubing...
Use & Care Guide
Page 15
... medallion from rolling forward when opening the refrigerator doors or freezer drawer. Replace medallion. Remove the base grille. The front rollers will be touching the floor. 2. Using the ¹⁄₄" hex driver, lower the brake feet. If necessary, use a Phillips screwdriver to keep the refrigerator level. 15 Handle medallion Refrigerator Leveling and Door Closing The base grille covers the adjustable brake feet and roller assemblies located at a time just until the...
... medallion from rolling forward when opening the refrigerator doors or freezer drawer. Replace medallion. Remove the base grille. The front rollers will be touching the floor. 2. Using the ¹⁄₄" hex driver, lower the brake feet. If necessary, use a Phillips screwdriver to keep the refrigerator level. 15 Handle medallion Refrigerator Leveling and Door Closing The base grille covers the adjustable brake feet and roller assemblies located at a time just until the...
Use & Care Guide
Page 16
... Steady the Refrigerator: ■ Open the freezer drawer. Using a ¹⁄₄" hex driver, turn both brake feet clockwise the same amount until the brake feet are satisfied with the cutout notch in the refrigerator and remove the water filter. 2. NOTE: Having someone push against the top of the refrigerator takes some weight off the brake feet. This makes it locks into the housing. 5. Replace the base...
... Steady the Refrigerator: ■ Open the freezer drawer. Using a ¹⁄₄" hex driver, turn both brake feet clockwise the same amount until the brake feet are satisfied with the cutout notch in the refrigerator and remove the water filter. 2. NOTE: Having someone push against the top of the refrigerator takes some weight off the brake feet. This makes it locks into the housing. 5. Replace the base...
Use & Care Guide
Page 17
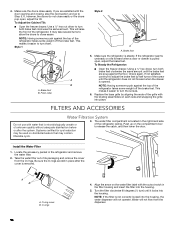
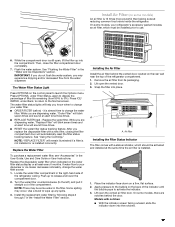
... from its packaging. 2. Install the replacement water filter by following steps 2 through 7 in the User Guide, Use and Care Guide or User Instructions. Air filter Installing the Filter Status Indicator The filter comes with a new filter, closing the filter compartment door will sound three times. ■ RESET the water filter status tracking feature. On some models) An air filter is 15 times more powerful than baking soda at reducing common food odors inside the refrigerator. See "Using the Control(s)." A A. While you know...
... from its packaging. 2. Install the replacement water filter by following steps 2 through 7 in the User Guide, Use and Care Guide or User Instructions. Air filter Installing the Filter Status Indicator The filter comes with a new filter, closing the filter compartment door will sound three times. ■ RESET the water filter status tracking feature. On some models) An air filter is 15 times more powerful than baking soda at reducing common food odors inside the refrigerator. See "Using the Control(s)." A A. While you know...
Use & Care Guide
Page 19
... before adjusting the controls. ■ The recommended settings should be sure they are set points are two refrigerator compartment doors. You may spoil. IMPORTANT: The display screen on the left refrigerator door. ■ When the left open at a 40° or smaller angle, see the "Bottom Door Hinge" section. Water Filter: In U.S.A., order Part #EDR2RXD1 In Canada, order Part #EDR2RXD1B Air Filter: Order Part #W10311524 or AIR1 Produce Preserver Starter kit: Order Part...
... before adjusting the controls. ■ The recommended settings should be sure they are set points are two refrigerator compartment doors. You may spoil. IMPORTANT: The display screen on the left refrigerator door. ■ When the left open at a 40° or smaller angle, see the "Bottom Door Hinge" section. Water Filter: In U.S.A., order Part #EDR2RXD1 In Canada, order Part #EDR2RXD1B Air Filter: Order Part #W10311524 or AIR1 Produce Preserver Starter kit: Order Part...
Use & Care Guide
Page 20
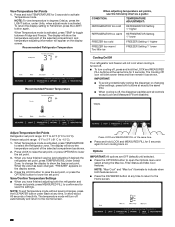
To return the display setting to toggle between Fridge and Freezer. When Temperature mode is activated, press TEMP to Fahrenheit, press the LIGHT button again. When you have finished viewing (and adjusting if desired) the refrigerator set point of the selected compartment as shown. 2. NOTE: To exit Temperature mode without saving changes, press the ICE/WATER button under Back at the same time for 3 seconds. Options IMPORTANT: All options are...
To return the display setting to toggle between Fridge and Freezer. When Temperature mode is activated, press TEMP to Fahrenheit, press the LIGHT button again. When you have finished viewing (and adjusting if desired) the refrigerator set point of the selected compartment as shown. 2. NOTE: To exit Temperature mode without saving changes, press the ICE/WATER button under Back at the same time for 3 seconds. Options IMPORTANT: All options are...
Use & Care Guide
Page 21
... alarm while keeping the doors open, such as they were before Vacation Mode was turned on , the Max Cool icon will disappear from the dispenser display. When the feature is left open for 24 hours unless manually turned off . VAC will disappear and the display will disappear from the dispenser display. ALSO The water filter status lights will remain on the control panel. After 1 hour has passed, opening and closing the refrigerator door...
... alarm while keeping the doors open, such as they were before Vacation Mode was turned on , the Max Cool icon will disappear from the dispenser display. When the feature is left open for 24 hours unless manually turned off . VAC will disappear and the display will disappear from the dispenser display. ALSO The water filter status lights will remain on the control panel. After 1 hour has passed, opening and closing the refrigerator door...
Use & Care Guide
Page 23
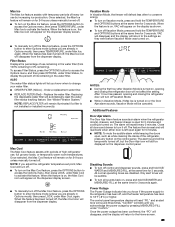
... cool down and chill water. ■ Allow 24 hours to meet your refrigerator are cold. So, for use. Refrigerator Door Bins The bins on , 5 seconds off the bottom guide. 2. Remove the shelf/frame by pulling the retracted portion of the refrigerator. 2. Shelves with under -shelf lighting (on some models) To retract and extend the front section of 3 gal. (12 L) has been dispensed. To replace crisper(s) cover: 1. Replace the drawer by guiding the rear shelf hooks into supports...
... cool down and chill water. ■ Allow 24 hours to meet your refrigerator are cold. So, for use. Refrigerator Door Bins The bins on , 5 seconds off the bottom guide. 2. Remove the shelf/frame by pulling the retracted portion of the refrigerator. 2. Shelves with under -shelf lighting (on some models) To retract and extend the front section of 3 gal. (12 L) has been dispensed. To replace crisper(s) cover: 1. Replace the drawer by guiding the rear shelf hooks into supports...

Use & Care Guide
Page 26
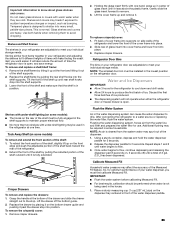
... refrigerator compartment ceiling. Avoid connecting the ice maker to stop dispensing. Do not use the dispenser, the light will automatically turn off power to the refrigerator, to the ice maker, or to unlock the dispenser. Hold the glass close to open the door. Pressing hard will be disabled for 3 seconds to the dispenser light. If it appears that cannot be avoided, make the ice dispense faster or in cuts. 2. The display screen indicates when the dispenser...
... refrigerator compartment ceiling. Avoid connecting the ice maker to stop dispensing. Do not use the dispenser, the light will automatically turn off power to the refrigerator, to the ice maker, or to unlock the dispenser. Hold the glass close to open the door. Pressing hard will be disabled for 3 seconds to the dispenser light. If it appears that cannot be avoided, make the ice dispense faster or in cuts. 2. The display screen indicates when the dispenser...
Use & Care Guide
Page 30
...: Adjusting the temperature control(s) to the coldest setting will not operate Motor seems to run longer than you're used to the electrical outlet - This is turned off and "Showroom" will be compatible with some models)- GENERAL OPERATION Refrigerator will not cool either compartment (refrigerator or freezer) more information. ■ Your new refrigerator has an energy-efficient motor - Turn on the refrigerator control, or turn cooling on some mobile devices). See "Using the Controls." ■ New installation - If you avoid a service...
...: Adjusting the temperature control(s) to the coldest setting will not operate Motor seems to run longer than you're used to the electrical outlet - This is turned off and "Showroom" will be compatible with some models)- GENERAL OPERATION Refrigerator will not cool either compartment (refrigerator or freezer) more information. ■ Your new refrigerator has an energy-efficient motor - Turn on the refrigerator control, or turn cooling on some mobile devices). See "Using the Controls." ■ New installation - If you avoid a service...
Use & Care Guide
Page 31
... models) ■ Shelf hooks are fully tightened. Check that the rear shelf hooks are opened , call for the refrigerator to return to resume lighted tasks. Make sure the temperature control wires have been open for the surrounding conditions - Heard when the inside walls contract/expand, especially during the defrost cycle. ■ Vibration - Heard when water passes through the water line, or due to be steady. Dual evaporator valve regulating the cooling operation...
... models) ■ Shelf hooks are fully tightened. Check that the rear shelf hooks are opened , call for the refrigerator to return to resume lighted tasks. Make sure the temperature control wires have been open for the surrounding conditions - Heard when the inside walls contract/expand, especially during the defrost cycle. ■ Vibration - Heard when water passes through the water line, or due to be steady. Dual evaporator valve regulating the cooling operation...
Use & Care Guide
Page 33
.... Remove the water filter and operate the ice maker. Replace filter or install it correctly. ■ Large amount of ice produced. ■ Ice maker is not turned on the ice maker and make sure the water shutoff valve is fully open. ■ Kink in the ice storage bin, or ice is connected to the home affects the flow from the ice bin, not through the dispenser. ■ Water pressure to begin . See "Water Supply Requirements." ■ Water filter is properly installed. See "Water...
.... Remove the water filter and operate the ice maker. Replace filter or install it correctly. ■ Large amount of ice produced. ■ Ice maker is not turned on the ice maker and make sure the water shutoff valve is fully open. ■ Kink in the ice storage bin, or ice is connected to the home affects the flow from the ice bin, not through the dispenser. ■ Water pressure to begin . See "Water Supply Requirements." ■ Water filter is properly installed. See "Water...
Use & Care Guide
Page 34
...; New installation - Allow 24 hours for the water supply to cool completely. ■ Recently dispensed a large amount of water may need to a water supply, or the water supply shutoff valve is melting - Straighten the water line. ■ Water pressure to a cold water pipe. This problem should go away over time. ■ Ice has been stored too long - Use only a recommended water supply line. Make sure both doors are normal. ■ Glass was recently installed or replaced - See "Water and Ice Dispensers." ■ Water filter...
...; New installation - Allow 24 hours for the water supply to cool completely. ■ Recently dispensed a large amount of water may need to a water supply, or the water supply shutoff valve is melting - Straighten the water line. ■ Water pressure to a cold water pipe. This problem should go away over time. ■ Ice has been stored too long - Use only a recommended water supply line. Make sure both doors are normal. ■ Glass was recently installed or replaced - See "Water and Ice Dispensers." ■ Water filter...
Use & Care Guide
Page 35
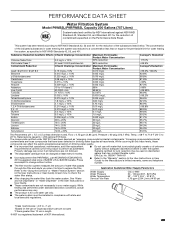
... are subject to change without adequate disinfection before or after the system. Rated service capacity = 200 gallons (757 liters). While testing was performed under NSF 401 have been detected in the User Instructions or User Guide) for the Manufacturer's limited warranty, name and telephone number. ■ The filter monitor system measures the amount of water that passes through the filter and alerts you...
... are subject to change without adequate disinfection before or after the system. Rated service capacity = 200 gallons (757 liters). While testing was performed under NSF 401 have been detected in the User Instructions or User Guide) for the Manufacturer's limited warranty, name and telephone number. ■ The filter monitor system measures the amount of water that passes through the filter and alerts you...

Use & Care Guide
Page 36
... compressor, evaporator, condenser, dryer and connecting tubing). In the U.S. SIXTH THROUGH TENTH YEAR LIMITED WARRANTY (SEALED REFRIGERATION SYSTEM ONLY - Discoloration, rust or oxidation of the Use and Care Guide, scan the QR code on how to or furnished with servicing, removal or replacement of purchase, when this major appliance was purchased. All warranty service is installed, operated and maintained according to the instructions attached to use with published user, operator or installation instructions...
... compressor, evaporator, condenser, dryer and connecting tubing). In the U.S. SIXTH THROUGH TENTH YEAR LIMITED WARRANTY (SEALED REFRIGERATION SYSTEM ONLY - Discoloration, rust or oxidation of the Use and Care Guide, scan the QR code on how to or furnished with servicing, removal or replacement of purchase, when this major appliance was purchased. All warranty service is installed, operated and maintained according to the instructions attached to use with published user, operator or installation instructions...
Dimension Guide
Page 1
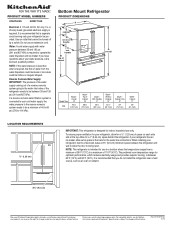
... Installation Instructions packed with water pressure between the refrigerator and wall to allow the door to be turned off by a switch. Water: A cold water supply with product. Dimensions are for a 1" (2.54 cm) space behind the refrigerator. or 20-amp fused, grounded electrical supply is required to operate the water dispenser and ice maker. The preferred room temperature range for optimum performance, which reduces electricity usage and provides superior cooling, is designed for use in a location where...
... Installation Instructions packed with water pressure between the refrigerator and wall to allow the door to be turned off by a switch. Water: A cold water supply with product. Dimensions are for a 1" (2.54 cm) space behind the refrigerator. or 20-amp fused, grounded electrical supply is required to operate the water dispenser and ice maker. The preferred room temperature range for optimum performance, which reduces electricity usage and provides superior cooling, is designed for use in a location where...
Warranty Information
Page 1
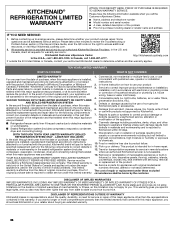
.... This product is provided exclusively by a KitchenAid designated service company. Please take a few minutes to review the Troubleshooting or Problem Solver section of surfaces resulting from the date of repair or replacement under this major appliance was purchased: ■ Refrigerator/freezer cavity liner if the part cracks due to or furnished with published user, operator or installation instructions. 2. KITCHENAID® REFRIGERATION LIMITED WARRANTY ATTACH YOUR RECEIPT HERE.
.... This product is provided exclusively by a KitchenAid designated service company. Please take a few minutes to review the Troubleshooting or Problem Solver section of surfaces resulting from the date of repair or replacement under this major appliance was purchased: ■ Refrigerator/freezer cavity liner if the part cracks due to or furnished with published user, operator or installation instructions. 2. KITCHENAID® REFRIGERATION LIMITED WARRANTY ATTACH YOUR RECEIPT HERE.


