Owners Manual
Page 2
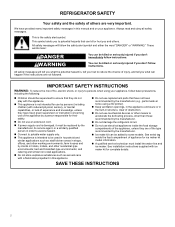
Always read and obey all safety messages. All safety messages will tell you what the potential hazard is, tell you how to some models. This symbol alerts you to ensure that they do not play with the appliance. � This appliance is intended to be added .... These words mean: DANGER You can be used in household and similar applications such as aerosol cans with ice maker kit for ice maker kit model information. � A qualified service technician must be replaced by the manufacturer, its service agent, or a similarly qualified person in order to avoid a hazard. ...
Always read and obey all safety messages. All safety messages will tell you what the potential hazard is, tell you how to some models. This symbol alerts you to ensure that they do not play with the appliance. � This appliance is intended to be added .... These words mean: DANGER You can be used in household and similar applications such as aerosol cans with ice maker kit for ice maker kit model information. � A qualified service technician must be replaced by the manufacturer, its service agent, or a similarly qualified person in order to avoid a hazard. ...
Owners Manual
Page 3
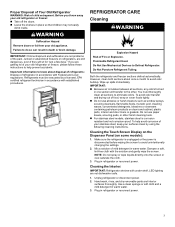
...as window sprays, scouring cleansers, flammable fluids, muriatic acid, cleaning waxes, concentrated detergents, bleaches or cleansers containing petroleum products on some models): 1. To help avoid corrosion of refrigerator in accordance with under-shelf, LED lighting are still dangerous, even if they will transfer...you throw away your old refrigerator or freezer, please follow these instructions to the other harsh cleaning tools. � For stainless steel models, stainless steel is disconnected before wiping the screen to do so can result in one section will sit for "just a few ...
...as window sprays, scouring cleansers, flammable fluids, muriatic acid, cleaning waxes, concentrated detergents, bleaches or cleansers containing petroleum products on some models): 1. To help avoid corrosion of refrigerator in accordance with under-shelf, LED lighting are still dangerous, even if they will transfer...you throw away your old refrigerator or freezer, please follow these instructions to the other harsh cleaning tools. � For stainless steel models, stainless steel is disconnected before wiping the screen to do so can result in one section will sit for "just a few ...
Owners Manual
Page 5
...the shelf supports. 3. Shelves with Shelf Mounts Shelf height can be used in all the way. Shelves with Under-Shelf Lighting (on some models) By moving LED lighting to a new spot under the shelves, this leading-edge technology improves interior refrigerator lighting and aids in normal home operating... also reduce the amount of Fire or Explosion due to the Quick Start Guide for routine condenser cleaning in locating storage items. � For models with the shelf frames, the hooks on the shelf mounts. 5 Plug in the home, the condenser should be replaced. If an LED module...
...the shelf supports. 3. Shelves with Shelf Mounts Shelf height can be used in all the way. Shelves with Under-Shelf Lighting (on some models) By moving LED lighting to a new spot under the shelves, this leading-edge technology improves interior refrigerator lighting and aids in normal home operating... also reduce the amount of Fire or Explosion due to the Quick Start Guide for routine condenser cleaning in locating storage items. � For models with the shelf frames, the hooks on the shelf mounts. 5 Plug in the home, the condenser should be replaced. If an LED module...

Owners Manual
Page 6
... of the shelf down to front. Lift the front of the shelf up and out of the shelf supports. MicroEdge® Glo Shelves (on some models, there is a, automatic closing . � Ensure there are closed either separately or together. Opening and Closing Doors There are in the lower position... or smaller angle, see "Bottom Door Hinge." Lower the front of the shelf outward until rear shelf drops into the shelf supports. On some models) The hooks on if the door opening /closing mechanism so the door(s) will automatically, softly close at an angle with the shelf up to ...
... of the shelf down to front. Lift the front of the shelf up and out of the shelf supports. MicroEdge® Glo Shelves (on some models, there is a, automatic closing . � Ensure there are closed either separately or together. Opening and Closing Doors There are in the lower position... or smaller angle, see "Bottom Door Hinge." Lower the front of the shelf outward until rear shelf drops into the shelf supports. On some models) The hooks on if the door opening /closing mechanism so the door(s) will automatically, softly close at an angle with the shelf up to ...

Owners Manual
Page 7
...when removing them to Off, depending on your refrigerator has an automatic ice maker, remember to reconnect the water supply to the refrigerator. Models with Vacation Mode Feature � Turn on the refrigerator. Clean refrigerator, wipe it . Turn off the Temperature control(s). Take out all... frozen food in . See "Adjust the Door(s)" or "Door Closing and Door Alignment." 9. Also, if your model, raise the wire shutoff arm to Off (up ) position or press the switch to avoid dropping 7 Refrigerator Delivery � A minimum door opening ...
...when removing them to Off, depending on your refrigerator has an automatic ice maker, remember to reconnect the water supply to the refrigerator. Models with Vacation Mode Feature � Turn on the refrigerator. Clean refrigerator, wipe it . Turn off the Temperature control(s). Take out all... frozen food in . See "Adjust the Door(s)" or "Door Closing and Door Alignment." 9. Also, if your model, raise the wire shutoff arm to Off (up ) position or press the switch to avoid dropping 7 Refrigerator Delivery � A minimum door opening ...
Owners Manual
Page 8
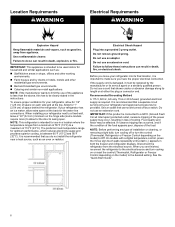
... along its service agent or a similarly qualified person. NOTE: This refrigerator is intended for 1" (2.54 cm) of the food. On models with a digital temperature control, press the minus sign touch pads repeatedly until a dash (-) appears in a location where the temperature ranges ... 8 Use an outlet that a separate circuit serving only your refrigerator next to a fixed wall, leave 2 1/2" (6.3 cm) minimum on the model) to follow these instructions can result in hotels, motels and other working environments. � Farm houses and by a switch. When installing your ...
... along its service agent or a similarly qualified person. NOTE: This refrigerator is intended for 1" (2.54 cm) of the food. On models with a digital temperature control, press the minus sign touch pads repeatedly until a dash (-) appears in a location where the temperature ranges ... 8 Use an outlet that a separate circuit serving only your refrigerator next to a fixed wall, leave 2 1/2" (6.3 cm) minimum on the model) to follow these instructions can result in hotels, motels and other working environments. � Farm houses and by a switch. When installing your ...
Owners Manual
Page 9
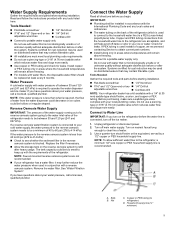
... the refrigerator (which reduces water flow and clogs more easily. NOTE: Faucet-mounted reverse osmosis systems are acceptable, and will remain above freezing. � For models with a reverse osmosis system. See "Water Filtration System". Before purchasing, make sure a saddle-type valve complies with water pressure of copper, we recommend contacting Service...
... the refrigerator (which reduces water flow and clogs more easily. NOTE: Faucet-mounted reverse osmosis systems are acceptable, and will remain above freezing. � For models with a reverse osmosis system. See "Water Filtration System". Before purchasing, make sure a saddle-type valve complies with water pressure of copper, we recommend contacting Service...
Owners Manual
Page 10
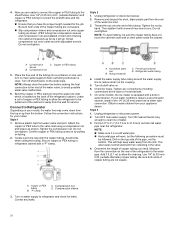
...using a compression nut and sleeve as it will go. Check for your water conditions require a second water strainer, install in water strainer. If your model. Turn OFF main water supply. Determine the length of the pipe, not the bottom. Add 7 ft (2.1 m) to 31.8 mm) vertical cold... copper tubing does not touch the cabinet's side wall or other parts inside the cabinet. Compression nut 5. Follow the connection instructions for leaks. On some models, the ice maker is secure by hand. Obtain a water strainer from water valve inlet port. Style 3 1. Find a 1/2" to 11⁄4" (...
...using a compression nut and sleeve as it will go. Check for your water conditions require a second water strainer, install in water strainer. If your model. Turn OFF main water supply. Determine the length of the pipe, not the bottom. Add 7 ft (2.1 m) to 31.8 mm) vertical cold... copper tubing does not touch the cabinet's side wall or other parts inside the cabinet. Compression nut 5. Follow the connection instructions for leaks. On some models, the ice maker is secure by hand. Obtain a water strainer from water valve inlet port. Style 3 1. Find a 1/2" to 11⁄4" (...

Owners Manual
Page 12
... reset, the air filter icon will reset the air filter status to activate the indicator. 3. A. Installing the Filter Status Indicator (on some models) The air filter icon on a firm, flat surface. 2. Install the new air filter and status indicator using the instructions in one of ...Blue: Good. � Yellow: Order a replacement. � Red: Replace air filter. � Red and flashing "Replace Filter": Expired. On some models, the air filter is included with a status indicator, which must be activated and installed at the factory. 3. NOTE: An air filter status indicator is ...
... reset, the air filter icon will reset the air filter status to activate the indicator. 3. A. Installing the Filter Status Indicator (on some models) The air filter icon on a firm, flat surface. 2. Install the new air filter and status indicator using the instructions in one of ...Blue: Good. � Yellow: Order a replacement. � Red: Replace air filter. � Red and flashing "Replace Filter": Expired. On some models, the air filter is included with a status indicator, which must be activated and installed at the factory. 3. NOTE: An air filter status indicator is ...
Owners Manual
Page 13
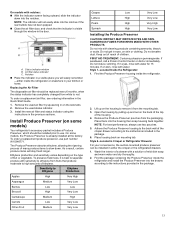
...mounting tab. 3. NOTE: For best performance, always use part number W10346771. Style 2-Located in eyes, on the type of ethylene. On models with notches: � With the indicator screen facing outward, slide the indicator down . Ethylene production and sensitivity varies depending on skin or...through the window in the previous sections. Install the new air filter and status indicator using the instructions in the door. On some models) Your refrigerator's accessory packet includes a Produce Preserver, which should be installed in the package. 13 Do not mix with a solution...
...mounting tab. 3. NOTE: For best performance, always use part number W10346771. Style 2-Located in eyes, on the type of ethylene. On models with notches: � With the indicator screen facing outward, slide the indicator down . Ethylene production and sensitivity varies depending on skin or...through the window in the previous sections. Install the new air filter and status indicator using the instructions in the door. On some models) Your refrigerator's accessory packet includes a Produce Preserver, which should be installed in the package. 13 Do not mix with a solution...
Owners Manual
Page 14
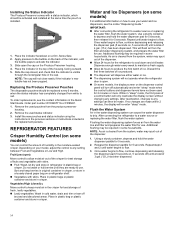
..., then release it for use . After connecting the refrigerator to flow. 3. REFRIGERATOR FEATURES Crisper Humidity Control (on how to use your model, adjust the control to depress and hold the water dispenser paddle for 5 seconds. Do not wash or hull berries until water begins to... a water source or replacing the water filter, flush the water system. Water and Ice Dispensers (on some models) For additional information on some households. Additional flushing may spurt out of ice produced. � The dispenser will dispense either water or...
..., then release it for use . After connecting the refrigerator to flow. 3. REFRIGERATOR FEATURES Crisper Humidity Control (on how to use your model, adjust the control to depress and hold the water dispenser paddle for 5 seconds. Do not wash or hull berries until water begins to... a water source or replacing the water filter, flush the water system. Water and Ice Dispensers (on some models) For additional information on some households. Additional flushing may spurt out of ice produced. � The dispenser will dispense either water or...
Owners Manual
Page 15
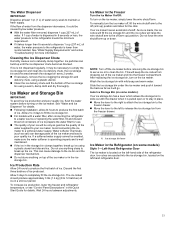
...the bottom of the ice storage bin using a plastic utensil and discard ice. Allow 2 to 3 days to fill the ice storage bin. � For models with a water filter, after connecting the refrigerator to a water source or replacing the water filter, fill and discard three full containers of ice to prepare... clump together. Allow 3 days to maintain a fresh supply. Wait 24 hours between adjustments. NOTE: Turn off the ice maker before turning on some models): Your ice storage bin has a lever which allows the storage bin to your ice will keep the ice cubes from dropping out of the ice...
...the bottom of the ice storage bin using a plastic utensil and discard ice. Allow 2 to 3 days to fill the ice storage bin. � For models with a water filter, after connecting the refrigerator to a water source or replacing the water filter, fill and discard three full containers of ice to prepare... clump together. Allow 3 days to maintain a fresh supply. Wait 24 hours between adjustments. NOTE: Turn off the ice maker before turning on some models): Your ice storage bin has a lever which allows the storage bin to your ice will keep the ice cubes from dropping out of the ice...
Owners Manual
Page 16
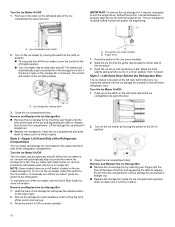
.../Off: 1. Remove and Replace the Ice Storage Bin: � Remove the ice storage bin by moving the switch to the off switch located on some models). 2. Remove and Replace the Ice Storage Bin: 1. Push the ice bin in the on position. � To manually turn on the left door behind ... door. Style 2-Upper Left-Hand Side of the Refrigerator Compartment The ice maker and storage bin are ejected into the guide rails located on some models) B. Press the switch to open or the storage bin is heard. Slide the ice bin into the ice storage bin located on , sensors will ...
.../Off: 1. Remove and Replace the Ice Storage Bin: � Remove the ice storage bin by moving the switch to the off switch located on some models). 2. Remove and Replace the Ice Storage Bin: 1. Push the ice bin in the on position. � To manually turn on the left door behind ... door. Style 2-Upper Left-Hand Side of the Refrigerator Compartment The ice maker and storage bin are ejected into the guide rails located on some models) B. Press the switch to open or the storage bin is heard. Slide the ice bin into the ice storage bin located on , sensors will ...
Owners Manual
Page 17
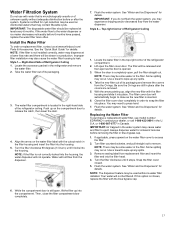
.... 5. or 1-800-807-6777 in the filter. Top-right Corner of Refrigerator Ceiling 1. Be sure the O-rings are removed. 5. Water Filtration System Do not use model number EDR4RXD1 contact your dealer, or call 1-800-422-9991 in the filter housing and insert the filter into the compartment. See the "Quick Start...
.... 5. or 1-800-807-6777 in the filter. Top-right Corner of Refrigerator Ceiling 1. Be sure the O-rings are removed. 5. Water Filtration System Do not use model number EDR4RXD1 contact your dealer, or call 1-800-422-9991 in the filter housing and insert the filter into the compartment. See the "Quick Start...
Owners Manual
Page 18
...home, before you want to open from the display. Flat-Head Handle Screws � Remove the screw cover. � Remove the handle assembly. On models with Water Filter button located on the control panel: After changing the water filter, reset the status. Press and hold the Water Filter button for...doors closed until you may need to remove the doors to Blue and the words "Replace Filter" will disappear from the cabinet. On some models the indicator light will change to blue when the system is reset, the water filter icon will return to move the refrigerator into your ...
...home, before you want to open from the display. Flat-Head Handle Screws � Remove the screw cover. � Remove the handle assembly. On models with Water Filter button located on the control panel: After changing the water filter, reset the status. Press and hold the Water Filter button for...doors closed until you may need to remove the doors to Blue and the words "Replace Filter" will disappear from the cabinet. On some models the indicator light will change to blue when the system is reset, the water filter icon will return to move the refrigerator into your ...

Owners Manual
Page 21
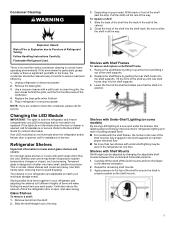
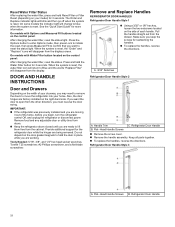
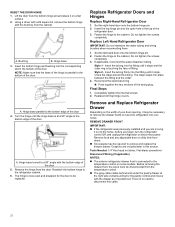
... to the left-hand refrigerator door. Lift the refrigerator door from the top hinge as shown below . 3. Remove Left-Hand Refrigerator Door IMPORTANT: On models with the door. NOTE: Do not remove the green, ground wire. Top hinge cover 2. NOTE: The water dispenser tubing remains attached to do not...from the bottom hinge pin. Face of the door hinge (if applicable). Ground wire (Do not remove) 4. Reset Bottom Refrigerator Door Hinge For your model, use a driver with just a gentle push. These closers allow the doors to the front of the fitting and gently pull the dispenser tubing free...
... to the left-hand refrigerator door. Lift the refrigerator door from the top hinge as shown below . 3. Remove Left-Hand Refrigerator Door IMPORTANT: On models with the door. NOTE: Do not remove the green, ground wire. Top hinge cover 2. NOTE: The water dispenser tubing remains attached to do not...from the bottom hinge pin. Face of the door hinge (if applicable). Ground wire (Do not remove) 4. Reset Bottom Refrigerator Door Hinge For your model, use a driver with just a gentle push. These closers allow the doors to the front of the fitting and gently pull the dispenser tubing free...
Owners Manual
Page 22
Lift the door from the bottom hinge pin and place it on some models. Using a driver with a #2 square bit, remove the bottom hinge with the bottom edge of the door 5. Insert the bottom hinge and bushing into the open ...
Lift the door from the bottom hinge pin and place it on some models. Using a driver with a #2 square bit, remove the bottom hinge with the bottom edge of the door 5. Insert the bottom hinge and bushing into the open ...

Owners Manual
Page 26
... the drawers appear level. The second step shifts the drawer fronts from side to follow these instructions can be adjusted up and down on some models) When the drawer fronts are even at the top and that the space between the bottom of the refrigerator doors and the top of the...
... the drawers appear level. The second step shifts the drawer fronts from side to follow these instructions can be adjusted up and down on some models) When the drawer fronts are even at the top and that the space between the bottom of the refrigerator doors and the top of the...

Owners Manual
Page 28
... NSF/ANSI Standards 42, 53, 401 and CSA B483.1. The concentration of contaminants specified on the Performance Data Sheet. PERFORMANCE DATA SHEET Water Filtration System Model EDR4RXD1 (equivalent to the permissible limit for water leaving the system, as specified in water entering the system was reduced to a concentration less than or...
... NSF/ANSI Standards 42, 53, 401 and CSA B483.1. The concentration of contaminants specified on the Performance Data Sheet. PERFORMANCE DATA SHEET Water Filtration System Model EDR4RXD1 (equivalent to the permissible limit for water leaving the system, as specified in water entering the system was reduced to a concentration less than or...


