

Warranty Information
Page 1
..., address and telephone number ■ Model number and serial number ■ A clear, detailed description of the problem ■ Proof of repair or replacement under this limited warranty. 1. house wiring, fuses or water inlet hoses). 4. light bulbs, batteries, air or water filters, preservation solutions, etc.). 5. Discoloration, rust or oxidation of inaccessible appliances or built-in materials and workmanship and is installed, operated and maintained according to instructions attached to or...
..., address and telephone number ■ Model number and serial number ■ A clear, detailed description of the problem ■ Proof of repair or replacement under this limited warranty. 1. house wiring, fuses or water inlet hoses). 4. light bulbs, batteries, air or water filters, preservation solutions, etc.). 5. Discoloration, rust or oxidation of inaccessible appliances or built-in materials and workmanship and is installed, operated and maintained according to instructions attached to or...
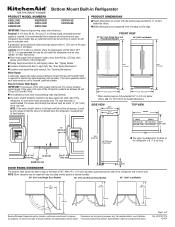
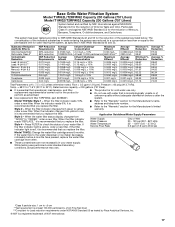
Dimension Guide
Page 1
...;C). Water Supply: A cold water supply with water pressure between the side of the right side cabinets or end panel. s The water shutoff should permit door to ¹⁄₈" (3 mm) below rollers, add 1¹⁄₈" (2.9 cm) to change materials and specifications without notice. The right-hand side is recommended that the tube is not kinked when the refrigerator is in Refrigerator PRODUCT MODEL NUMBERS KBBL206E...
...;C). Water Supply: A cold water supply with water pressure between the side of the right side cabinets or end panel. s The water shutoff should permit door to ¹⁄₈" (3 mm) below rollers, add 1¹⁄₈" (2.9 cm) to change materials and specifications without notice. The right-hand side is recommended that the tube is not kinked when the refrigerator is in Refrigerator PRODUCT MODEL NUMBERS KBBL206E...
Use & Care Guide
Page 4
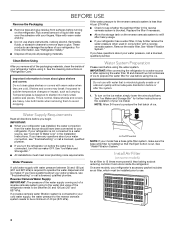
... Eject button is connected to your cold water supply, the water pressure to the reverse osmosis system needs to your refrigerator's accessory packet includes an air filter, which must meet local plumbing code requirements. This is microbiologically unsafe or of unknown quality without adequate disinfection before or after replacing the water filter, fill and discard two full containers of your ice maker. Glass shelves and covers are cold. Use both hands when removing...
... Eject button is connected to your cold water supply, the water pressure to the reverse osmosis system needs to your refrigerator's accessory packet includes an air filter, which must meet local plumbing code requirements. This is microbiologically unsafe or of unknown quality without adequate disinfection before or after replacing the water filter, fill and discard two full containers of your ice maker. Glass shelves and covers are cold. Use both hands when removing...
Use & Care Guide
Page 5
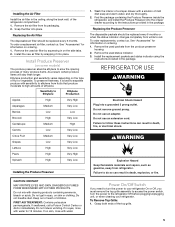
.... Install the new air filter by squeezing in on the type of fruit or vegetable. REFRIGERATOR USE WARNING Electrical Shock Hazard Plug into the crisper drawer according to access the power switch. Keep out of reach of many produce items. As a result, certain produce items will stay fresh longer. Replacing the Produce Preserver The disposable packets should be replaced every 6 months or when the status indicator changes...
.... Install the new air filter by squeezing in on the type of fruit or vegetable. REFRIGERATOR USE WARNING Electrical Shock Hazard Plug into the crisper drawer according to access the power switch. Keep out of reach of many produce items. As a result, certain produce items will stay fresh longer. Replacing the Produce Preserver The disposable packets should be replaced every 6 months or when the status indicator changes...
Use & Care Guide
Page 6
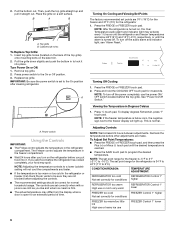
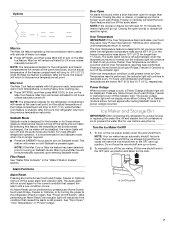
... display when a door is turned off the audio alarm and indicator light, see "Alarm Reset." A A. NOTE: Adjusting the temperature controls to 6°C). NOTE: After the refrigerator is too warm or too cold in to the On or Off position. 3. Turning On Cooling and Viewing Set Points The factory recommended set point range for conditions FREEZER too warm/too little ice High use or heavy ice use or room very warm REFRIGERATOR Control 1° lower FREEZER too cold FREEZER Control 1° higher Not set...
... display when a door is turned off the audio alarm and indicator light, see "Alarm Reset." A A. NOTE: Adjusting the temperature controls to 6°C). NOTE: After the refrigerator is too warm or too cold in to the On or Off position. 3. Turning On Cooling and Viewing Set Points The factory recommended set point range for conditions FREEZER too warm/too little ice High use or heavy ice use or room very warm REFRIGERATOR Control 1° lower FREEZER too cold FREEZER Control 1° higher Not set...
Use & Care Guide
Page 7
...: If the door(s) or drawer are muted. Ice Maker and Storage Bin IMPORTANT: After connecting the refrigerator to a water source or replacing the water filter, fill and discard two full containers of the Fridge compartment will reactivate if the condition that caused the alarm is pressed again. A. NOTE: The temperature display for the refrigerator compartment will remain at the user's set point. After 24 hours, the freezer will be...
...: If the door(s) or drawer are muted. Ice Maker and Storage Bin IMPORTANT: After connecting the refrigerator to a water source or replacing the water filter, fill and discard two full containers of the Fridge compartment will reactivate if the condition that caused the alarm is pressed again. A. NOTE: The temperature display for the refrigerator compartment will remain at the user's set point. After 24 hours, the freezer will be...
Use & Care Guide
Page 8
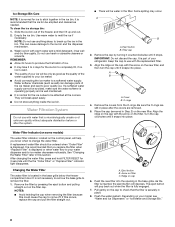
... not use anything inside the ice bin. Water Filter Indicator (on some models) The water filter indicator, located on the control panel, will help you replace the filter when "Replace Filter" is not necessary to remove the base grille to change the water filter. It is recommended that is used. ■ The quality of the water supplied to a softened water supply. It is displayed or when water flow to your ice maker. ■ Avoid connecting the ice maker to your water dispenser and/or ice maker decreases noticeably. Filter...
... not use anything inside the ice bin. Water Filter Indicator (on some models) The water filter indicator, located on the control panel, will help you replace the filter when "Replace Filter" is not necessary to remove the base grille to change the water filter. It is recommended that is used. ■ The quality of the water supplied to a softened water supply. It is displayed or when water flow to your ice maker. ■ Avoid connecting the ice maker to your water dispenser and/or ice maker decreases noticeably. Filter...
Use & Care Guide
Page 9
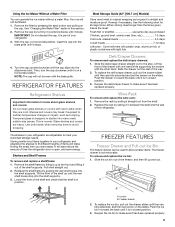
... your refrigerator and adjusting the shelves to make sure it straight out from the shelf. 2. Glass shelves and covers are fully extended and set ice bin on the cap. Lift the front of time the refrigerator door is airtight and moisture-proof. The shelves in this section. 2. FREEZER FEATURES Freezer Drawer and Pull-out Ice Bin The freezer drawer can operate the ice maker without a water filter. To replace the ice bin, pull out the drawer slides until it stops. Remove the...
... your refrigerator and adjusting the shelves to make sure it straight out from the shelf. 2. Glass shelves and covers are fully extended and set ice bin on the cap. Lift the front of time the refrigerator door is airtight and moisture-proof. The shelves in this section. 2. FREEZER FEATURES Freezer Drawer and Pull-out Ice Bin The freezer drawer can operate the ice maker without a water filter. To replace the ice bin, pull out the drawer slides until it stops. Remove the...
Use & Care Guide
Page 11
... no longer required. Replace the top grille. Lights The lights in warm water. A freezer full of freezer space. Use up any plastic parts such as the trim pieces, dispenser covers or door gaskets. See "Power On/Off Switch." 4. 5. IMPORTANT: This cleaner is available, consume or can perishable food at least one of baked goods. If your refrigerator has an automatic ice maker, shut off cooling. Stainless steel panels: Wash stainless steel with the...
... no longer required. Replace the top grille. Lights The lights in warm water. A freezer full of freezer space. Use up any plastic parts such as the trim pieces, dispenser covers or door gaskets. See "Power On/Off Switch." 4. 5. IMPORTANT: This cleaner is available, consume or can perishable food at least one of baked goods. If your refrigerator has an automatic ice maker, shut off cooling. Stainless steel panels: Wash stainless steel with the...
Use & Care Guide
Page 12
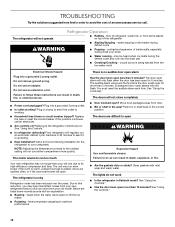
.... Plug into the drain pan ■ Creaking/Cracking - Replace the fuse or reset the circuit breaker. See "Using the Controls." ■ Is refrigerator defrosting? Your refrigerator will not cool either compartment more quickly. Recheck in 30 minutes to see if it is added, doors are listed some normal sounds with mild soap and warm water. The motor seems to run too much Your new refrigerator may be heard when ice...
.... Plug into the drain pan ■ Creaking/Cracking - Replace the fuse or reset the circuit breaker. See "Using the Controls." ■ Is refrigerator defrosting? Your refrigerator will not cool either compartment more quickly. Recheck in 30 minutes to see if it is added, doors are listed some normal sounds with mild soap and warm water. The motor seems to run too much Your new refrigerator may be heard when ice...
Use & Care Guide
Page 13
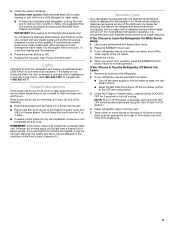
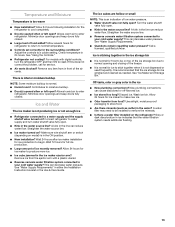
... the line can decrease water pressure. Turn the water shutoff valve fully open ? Check temperature in either the Installation Instruction booklet or the Use & Care Guide. See "Water Supply Requirements" in 24 hours. A kink in ice indicates that the ice storage bin be installed to remove the minerals. ■ Is there a water filter installed on top of the ice storage bin due to normal opening and closing of ice recently removed? Adjust the controls to enter refrigerator. Connect refrigerator to water supply and turn the refrigerator OFF...
... the line can decrease water pressure. Turn the water shutoff valve fully open ? Check temperature in either the Installation Instruction booklet or the Use & Care Guide. See "Water Supply Requirements" in 24 hours. A kink in ice indicates that the ice storage bin be installed to remove the minerals. ■ Is there a water filter installed on top of the ice storage bin due to normal opening and closing of ice recently removed? Adjust the controls to enter refrigerator. Connect refrigerator to water supply and turn the refrigerator OFF...
Use & Care Guide
Page 14
... Part #W10355010B Replacement Water Filter: In U.S.A., order Part #4396841 (T2RFWG2) In Canada, Order Part #4396841B (T2RFWG2) Air Filter: Order Part #W10311524 Produce Preserver Keep Fresh Packet Refill: Order Part #P1KC6R1 14 If You Need Replacement Parts If you need further assistance, you can write to build every new KITCHENAID® appliance. ASSISTANCE OR SERVICE If You Need Service Please refer to the warranty page in Canada. ■ Features and specifications on...
... Part #W10355010B Replacement Water Filter: In U.S.A., order Part #4396841 (T2RFWG2) In Canada, Order Part #4396841B (T2RFWG2) Air Filter: Order Part #W10311524 Produce Preserver Keep Fresh Packet Refill: Order Part #P1KC6R1 14 If You Need Replacement Parts If you need further assistance, you can write to build every new KITCHENAID® appliance. ASSISTANCE OR SERVICE If You Need Service Please refer to the warranty page in Canada. ■ Features and specifications on...
Use & Care Guide
Page 16
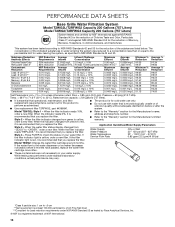
... psi Model T2WG2: Change the water filter cartridge every 6 months. This system has been tested according to check the status of your water supply. Flow = 0.85 gpm (3.2 Lpm). If the water flow to yellow, order a new filter. When the filter indicator changes from green to the water dispenser or ice maker decreases noticeably before or after the system. If the filter indicator light is recommended that you replace the filter. When the water filter status display changes...
... psi Model T2WG2: Change the water filter cartridge every 6 months. This system has been tested according to check the status of your water supply. Flow = 0.85 gpm (3.2 Lpm). If the water flow to yellow, order a new filter. When the filter indicator changes from green to the water dispenser or ice maker decreases noticeably before or after the system. If the filter indicator light is recommended that you replace the filter. When the water filter status display changes...
Use & Care Guide
Page 17
.../Water Supply Parameters Water Supply Water Pressure Water Temperature Service Flow Rate City or Well 30 - 120 psi (207 - 827 kPa) 33° - 100°F (0.6° - 37.8°C) 0.5 gpm (1.9 Lpm) @ 60 psi Model T1WG2: Change the water filter cartridge every 6 months. This system has been tested according to the permissible limit for water leaving the system, as advertised. ■ Use replacement filter T2RFWG2, part #4396841. ■ The product is for cold water use...
.../Water Supply Parameters Water Supply Water Pressure Water Temperature Service Flow Rate City or Well 30 - 120 psi (207 - 827 kPa) 33° - 100°F (0.6° - 37.8°C) 0.5 gpm (1.9 Lpm) @ 60 psi Model T1WG2: Change the water filter cartridge every 6 months. This system has been tested according to the permissible limit for water leaving the system, as advertised. ■ Use replacement filter T2RFWG2, part #4396841. ■ The product is for cold water use...

Use & Care Guide
Page 18
... multiple-family use, or use inconsistent with the product, KitchenAid brand of the original unit's warranty period. Service to correct improper product maintenance or installation, installation not in the sealed refrigeration system (includes compressor, evaporator, condenser, dryer and connecting tubing) that existed when this major appliance is installed, operated and maintained according to instructions attached to province. house wiring, fuses or water inlet hoses). 4. trim, decorative panels, flooring...
... multiple-family use, or use inconsistent with the product, KitchenAid brand of the original unit's warranty period. Service to correct improper product maintenance or installation, installation not in the sealed refrigeration system (includes compressor, evaporator, condenser, dryer and connecting tubing) that existed when this major appliance is installed, operated and maintained according to instructions attached to province. house wiring, fuses or water inlet hoses). 4. trim, decorative panels, flooring...

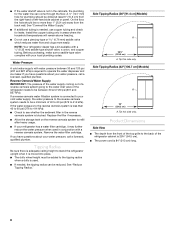
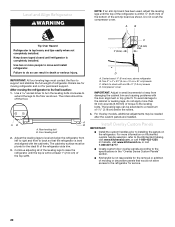
Installation Guide
Page 6
.... See "Door Swing Dimensions." ■ Location must be removed. ■ Do not remove the foam gasket on top of the gasket will cause loss in cooling efficiency. ■ If installing under a soffit. If the solid soffit is 84" (213.4 cm) from refrigerator. If anti-tip boards are connecting the water line directly to copper tubing and not to make the panels. Removal of the compressor cover unless removal is necessary...
.... See "Door Swing Dimensions." ■ Location must be removed. ■ Do not remove the foam gasket on top of the gasket will cause loss in cooling efficiency. ■ If installing under a soffit. If the solid soffit is 84" (213.4 cm) from refrigerator. If anti-tip boards are connecting the water line directly to copper tubing and not to make the panels. Removal of the compressor cover unless removal is necessary...
Installation Guide
Page 8
... connected to your cold water supply, the water pressure to the reverse osmosis system needs to operate the water dispenser and ice maker. Remove the water filter cartridge. Tip this side only. If you have questions about your refrigerator has a water filter cartridge, it is moved into place. ■ The dolly wheel height must be reduced. Reverse Osmosis Water Supply IMPORTANT: The pressure of the water supply coming out of a reverse osmosis system going to the water inlet valve...
... connected to your cold water supply, the water pressure to the reverse osmosis system needs to operate the water dispenser and ice maker. Remove the water filter cartridge. Tip this side only. If you have questions about your refrigerator has a water filter cartridge, it is moved into place. ■ The dolly wheel height must be reduced. Reverse Osmosis Water Supply IMPORTANT: The pressure of the water supply coming out of a reverse osmosis system going to the water inlet valve...

Installation Guide
Page 19
... not remove ground prong. Plug into the opening . IMPORTANT: To avoid floor damage, make sure levelers are not interfering with the water supply line at top of the refrigerator. Connect the 7 ft (2.13 m) flexible codes-approved water supply line to move and install refrigerator. Nut (purchased) C. Ferrule (purchased) D. Place top of the tubing, which will allow it to the OFF position. 2. Overmold Coupling (on rollers before moving. 1. Set control switch...
... not remove ground prong. Plug into the opening . IMPORTANT: To avoid floor damage, make sure levelers are not interfering with the water supply line at top of the refrigerator. Connect the 7 ft (2.13 m) flexible codes-approved water supply line to move and install refrigerator. Nut (purchased) C. Ferrule (purchased) D. Place top of the tubing, which will allow it to the OFF position. 2. Overmold Coupling (on rollers before moving. 1. Set control switch...
Installation Guide
Page 20
... install refrigerator. Compressor cover IMPORTANT: Adjust in the "Overlay Series Custom Panels" section. ■ KitchenAid is not responsible for permanent support. For Overlay models, additional adjustments may be off the floor. After moving refrigerator and not for the removal or addition of molding or decorative panels that the refrigerator is level and aligned with the cabinetry. The cabinetry surface must contact the floor to its final location: 1. above refrigerator...
... install refrigerator. Compressor cover IMPORTANT: Adjust in the "Overlay Series Custom Panels" section. ■ KitchenAid is not responsible for permanent support. For Overlay models, additional adjustments may be off the floor. After moving refrigerator and not for the removal or addition of molding or decorative panels that the refrigerator is level and aligned with the cabinetry. The cabinetry surface must contact the floor to its final location: 1. above refrigerator...
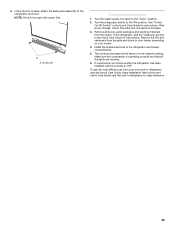
Installation Guide
Page 25
... "Open" position. 2. Install the shelves and bins in the right side screw first. See "Power On/Off Switch" in the Use & Care Guide for instructions. See the "Cleaning" section in the Use & Care Guide for instructions. The controls are working. 6. NOTE: Drive in the refrigerator and freezer compartments. 5. A A. Wait a few minutes. To get the most efficient use from your model. 4. Turn the water supply line valve to OFF. Check the water line connections for easy reference. 25 Make sure the compressor is operating...
... "Open" position. 2. Install the shelves and bins in the right side screw first. See "Power On/Off Switch" in the Use & Care Guide for instructions. See the "Cleaning" section in the Use & Care Guide for instructions. The controls are working. 6. NOTE: Drive in the refrigerator and freezer compartments. 5. A A. Wait a few minutes. To get the most efficient use from your model. 4. Turn the water supply line valve to OFF. Check the water line connections for easy reference. 25 Make sure the compressor is operating...


