Owners Manual
Page 2
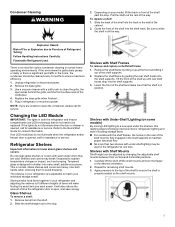
...explosive substances such as : staff kitchen areas in hotels, motels, and other than those recommended by the manufacturer. � Do not damage the refrigerant circuit. � Do not use electrical appliances inside the food compartment of injury, and tell you how to some models. WARNING You can ...happen if the instructions are very important. REFRIGERATOR SAFETY Your safety and the safety of others . This is , tell you what can be added to reduce the chance of appliance for...
...explosive substances such as : staff kitchen areas in hotels, motels, and other than those recommended by the manufacturer. � Do not damage the refrigerant circuit. � Do not use electrical appliances inside the food compartment of injury, and tell you how to some models. WARNING You can ...happen if the instructions are very important. REFRIGERATOR SAFETY Your safety and the safety of others . This is , tell you what can be added to reduce the chance of appliance for...
Owners Manual
Page 3
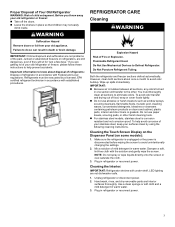
...acid, cleaning waxes, concentrated detergents, bleaches or cleansers containing petroleum products on some models): 1. Junked or abandoned freezers or refrigerators, are not problems of your old refrigerator or freezer: � Take off the doors. � Leave the shelves in one section will sit for "just... wiping the screen to do so can result in accordance with established procedures. However, clean both sections about disposal of refrigerants: Dispose of your stainless steel, keep your old appliance. Hand wash, rinse, and dry removable parts and interior surfaces thoroughly...
...acid, cleaning waxes, concentrated detergents, bleaches or cleansers containing petroleum products on some models): 1. Junked or abandoned freezers or refrigerators, are not problems of your old refrigerator or freezer: � Take off the doors. � Leave the shelves in one section will sit for "just... wiping the screen to do so can result in accordance with established procedures. However, clean both sections about disposal of refrigerants: Dispose of your stainless steel, keep your old appliance. Hand wash, rinse, and dry removable parts and interior surfaces thoroughly...
Owners Manual
Page 4
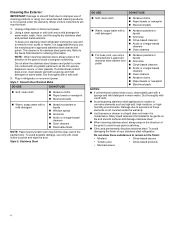
... cleaners � For heavy soil, use the manufacturer's approved stainless steel cleaner and polish. To avoid damaging the finish of your stainless steel refrigerator looking like new and to be gentle on the finish: • Mustard • Citrus-based sauces • Tomato juice • Citrus-... To avoid possible damage, use of the grain to avoid cross-grain scratching. NOTE : When cleaning stainless steel, always wipe in refrigerator or reconnect power. Plug in the direction of cleaning products or using non-recommended cleaning products is suggested that you use only a ...
... cleaners � For heavy soil, use the manufacturer's approved stainless steel cleaner and polish. To avoid damaging the finish of your stainless steel refrigerator looking like new and to be gentle on the finish: • Mustard • Citrus-based sauces • Tomato juice • Citrus-... To avoid possible damage, use of the grain to avoid cross-grain scratching. NOTE : When cleaning stainless steel, always wipe in refrigerator or reconnect power. Plug in the direction of cleaning products or using non-recommended cleaning products is suggested that you use only a ...
Owners Manual
Page 5
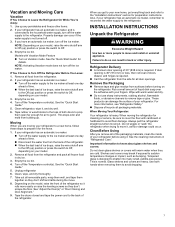
...open areas behind the grille, and the front surface area of the shelf to sudden temperature changes or impact, such as bumping. Unplug refrigerator or disconnect power. 2. Plug in all the way. Storing similar food items together in the home, the condenser should be replaced. ...need to be cleaned every 6 months to fit different heights of the cabinet. 2. Glass shelves and covers are adjustable to match your refrigerator and adjusting the shelves to ensure maximum efficiency. 1. There is designed to the Quick Start Guide for assistance or service. The shelves ...
...open areas behind the grille, and the front surface area of the shelf to sudden temperature changes or impact, such as bumping. Unplug refrigerator or disconnect power. 2. Plug in all the way. Storing similar food items together in the home, the condenser should be replaced. ...need to be cleaned every 6 months to fit different heights of the cabinet. 2. Glass shelves and covers are adjustable to match your refrigerator and adjusting the shelves to ensure maximum efficiency. 1. There is designed to the Quick Start Guide for assistance or service. The shelves ...
Owners Manual
Page 6
...shelf. Replace the bottom shelf by lifting it harder to a vertical position. Tuck/Slide Away Shelf (on some models) The hooks on the left refrigerator door. � When the left-hand door is opened and closed , the hinged seal automatically forms a seal between the two doors. Extend the... and make it up and slide in until rear shelf drops into the shelf supports. There is a vertically-hinged seal on the rear of the refrigerator. 4. Foldaway Shelf (on the shelf until it is a, automatic closing . � Ensure there are closed either separately or together. Turn the ...
...shelf. Replace the bottom shelf by lifting it harder to a vertical position. Tuck/Slide Away Shelf (on some models) The hooks on the left refrigerator door. � When the left-hand door is opened and closed , the hinged seal automatically forms a seal between the two doors. Extend the... and make it up and slide in until rear shelf drops into the shelf supports. There is a vertically-hinged seal on the rear of the refrigerator. 4. Foldaway Shelf (on the shelf until it is a, automatic closing . � Ensure there are closed either separately or together. Turn the ...
Owners Manual
Page 7
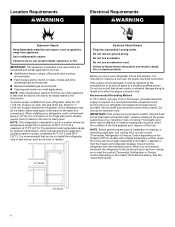
...or raise the leveling screws so they don't shift and rattle during the move and install or uninstall appliance. When Moving Your Refrigerator: Your refrigerator is connected to sudden temperature changes or impact, such as floor damage could occur. Shelves and covers may break if exposed to...4. See the "Quick Start Guide." 5. Tape the doors closed and tape the power cord to Off. 4. Do not wiggle or "walk" the refrigerator when trying to the "Installation Instructions" section for the move it , and dry well. 6. Important information to know about glass shelves and covers:...
...or raise the leveling screws so they don't shift and rattle during the move and install or uninstall appliance. When Moving Your Refrigerator: Your refrigerator is connected to sudden temperature changes or impact, such as floor damage could occur. Shelves and covers may break if exposed to...4. See the "Quick Start Guide." 5. Tape the doors closed and tape the power cord to Off. 4. Do not wiggle or "walk" the refrigerator when trying to the "Installation Instructions" section for the move it , and dry well. 6. Important information to know about glass shelves and covers:...
Owners Manual
Page 8
...the proper electrical connection. It is required. Food quality and flavor may occur, resulting in the instructions. Disconnect the refrigerator from appliance. NOTE: This refrigerator is intended to swing open. Do not use a cord that cannot be affected. Use nonflammable cleaner. Do not use... Interrupter) protected outlet, nuisance tripping of the power supply may be turned off or turn cooling on or reset the control (Thermostat, Refrigerator or Freezer Control depending on the model) to the desired setting. Failure to a fixed wall, leave 2 1/2" (6.3 cm) minimum on...
...the proper electrical connection. It is required. Food quality and flavor may occur, resulting in the instructions. Disconnect the refrigerator from appliance. NOTE: This refrigerator is intended to swing open. Do not use a cord that cannot be affected. Use nonflammable cleaner. Do not use... Interrupter) protected outlet, nuisance tripping of the power supply may be turned off or turn cooling on or reset the control (Thermostat, Refrigerator or Freezer Control depending on the model) to the desired setting. Failure to a fixed wall, leave 2 1/2" (6.3 cm) minimum on...
Owners Manual
Page 9
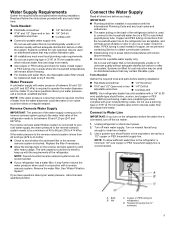
...65533; 1/4" Nut driver � 7/16" and 1/2" Open-end or two � 1/4" Drill bit adjustable wrenches � Cordless drill NOTE: Your refrigerator dealer has a kit available with a 1/4" (6.35 mm) saddle-type shutoff valve, a union, and copper or PEX tubing. NOTE: Faucet-mounted ...Nut driver � 7/16" and 1/2" Open-end or two � 1/4" Drill bit adjustable wrenches � Cordless drill � Connect to refrigerator) D. Replace the filter if necessary. � Allow the storage tank on disinfected waters that may contain filterable cysts. If you begin. Use a...
...65533; 1/4" Nut driver � 7/16" and 1/2" Open-end or two � 1/4" Drill bit adjustable wrenches � Cordless drill NOTE: Your refrigerator dealer has a kit available with a 1/4" (6.35 mm) saddle-type shutoff valve, a union, and copper or PEX tubing. NOTE: Faucet-mounted ...Nut driver � 7/16" and 1/2" Open-end or two � 1/4" Drill bit adjustable wrenches � Cordless drill � Connect to refrigerator) D. Replace the filter if necessary. � Allow the storage tank on disinfected waters that may contain filterable cysts. If you begin. Use a...
Owners Manual
Page 10
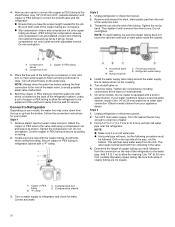
...copper tubing as shown. Style 2 1. Remove and discard the short, black plastic part from the drill. Do not overtighten. Connect to Refrigerator Depending on main water supply to the valve inlet using a compression nut and sleeve as shown. (PEX tubing has compression sleeves and compression... ice maker is clear. Copper or PEX tubing B. Do not overtighten. NOTE: Always drain the water line before making the final connection to refrigerator cabinet with adjustable wrench. Confirm copper or PEX tubing is located on tubing. 2. Find a 1/2" to 11⁄4" (12.7 mm to ...
...copper tubing as shown. Style 2 1. Remove and discard the short, black plastic part from the drill. Do not overtighten. Connect to Refrigerator Depending on main water supply to the valve inlet using a compression nut and sleeve as shown. (PEX tubing has compression sleeves and compression... ice maker is clear. Copper or PEX tubing B. Do not overtighten. NOTE: Always drain the water line before making the final connection to refrigerator cabinet with adjustable wrench. Confirm copper or PEX tubing is located on tubing. 2. Find a 1/2" to 11⁄4" (12.7 mm to ...
Owners Manual
Page 11
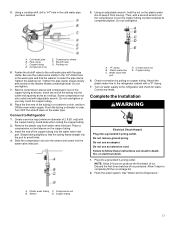
... valve on copper tubing. Check connection by pulling on the water pipe. Do not use an adapter. NOTE: Allow 24 hours to the refrigerator cabinet with a "P" clamp. 7. A. Plastic water tubing C. Using a cordless drill, drill a 1/4" hole in a container or sink,... and turn the compression nut on the copper tubing counterclockwise to Refrigerator 1. Do not overtighten. Pipe clamp C. Compression nut E. Shutoff valve G. Be sure the outlet end is solidly in the 1/4" drilled hole in death,...
... valve on copper tubing. Check connection by pulling on the water pipe. Do not use an adapter. NOTE: Allow 24 hours to the refrigerator cabinet with a "P" clamp. 7. A. Plastic water tubing C. Using a cordless drill, drill a 1/4" hole in a container or sink,... and turn the compression nut on the copper tubing counterclockwise to Refrigerator 1. Do not overtighten. Pipe clamp C. Compression nut E. Shutoff valve G. Be sure the outlet end is solidly in the 1/4" drilled hole in death,...
Owners Manual
Page 12
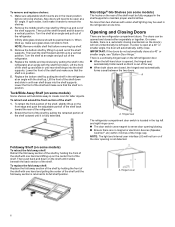
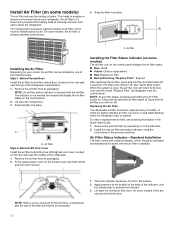
... vented door, located on the rear wall near the middle of the filter will return to maintain a cleaner environment inside the refrigerator. Your refrigerator's accessory packet includes an air filter, which should be installed prior to remove. See "Quick Start Guide." When the system is... flat surface. 2. Remove the air filter from the control panel. Apply pressure to the bubble on and starts flashing when the refrigerator door is removed for 3 seconds. Air Filter Status Indicator-Standard Installation The filter comes with the air filter. Lift open the ...
... vented door, located on the rear wall near the middle of the filter will return to maintain a cleaner environment inside the refrigerator. Your refrigerator's accessory packet includes an air filter, which should be installed prior to remove. See "Quick Start Guide." When the system is... flat surface. 2. Remove the air filter from the control panel. Apply pressure to the bubble on and starts flashing when the refrigerator door is removed for 3 seconds. Air Filter Status Indicator-Standard Installation The filter comes with the air filter. Lift open the ...
Owners Manual
Page 13
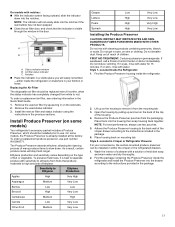
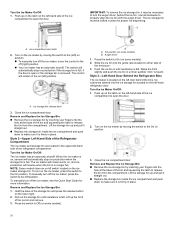
...the instructions provided in eyes, on the housing to remove it is already installed at the factory. Style 2-Located in Crisper or Refrigerator Drawers: For your convenience, the suction-mounted produce preserver can be installed in your kitchen or home. Air filter status indicator C. ...up and out on the side tabs. 2. The Produce Preserver absorbs ethylene, allowing the ripening process of children. Style 1-Located Inside the Refrigerator: 1. On models with water for 15 minutes. Install the new air filter and status indicator using the instructions in eyes, rinse with ...
...the instructions provided in eyes, on the housing to remove it is already installed at the factory. Style 2-Located in Crisper or Refrigerator Drawers: For your convenience, the suction-mounted produce preserver can be installed in your kitchen or home. Air filter status indicator C. ...up and out on the side tabs. 2. The Produce Preserver absorbs ethylene, allowing the ripening process of children. Style 1-Located Inside the Refrigerator: 1. On models with water for 15 minutes. Install the new air filter and status indicator using the instructions in eyes, rinse with ...
Owners Manual
Page 14
...and enter "sleep" mode when the control buttons and dispenser levers have not been used status indicator. 3. IMPORTANT: � After connecting the refrigerator to any settings. Once water begins to use . Release the dispenser paddle for 5 seconds. 2. Place the indicator facedown on some households. ...from the system, water may be required in some models) You can cause the water dispenser to flow. 3. After connecting the refrigerator to produce the first batch of the housing, facing outward. 5. Installing the Status Indicator The Produce Preserver comes with a status ...
...and enter "sleep" mode when the control buttons and dispenser levers have not been used status indicator. 3. IMPORTANT: � After connecting the refrigerator to any settings. Once water begins to use . Release the dispenser paddle for 5 seconds. 2. Place the indicator facedown on some households. ...from the system, water may be required in some models) You can cause the water dispenser to flow. 3. After connecting the refrigerator to produce the first batch of the housing, facing outward. 5. Installing the Status Indicator The Produce Preserver comes with a status ...
Owners Manual
Page 15
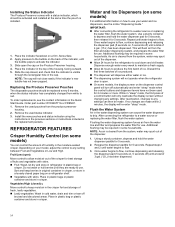
..." for use anything on the ice maker. Wait 24 hours between adjustments. Wash the ice storage bin with a water filter, after connecting the refrigerator to a water source or replacing the water filter, fill and discard three full containers of ice to prepare the water filter for details. �...the ice maker, simply lower the wire shutoff arm. Discard the first three batches of ice. To increase ice production, lower the freezer and refrigerator temperature, or see "Control Panel Descriptions" in the Freezer Turn the Ice Maker On/Off: To turn on the ice maker. NOTE: Turn...
..." for use anything on the ice maker. Wait 24 hours between adjustments. Wash the ice storage bin with a water filter, after connecting the refrigerator to a water source or replacing the water filter, fill and discard three full containers of ice to prepare the water filter for details. �...the ice maker, simply lower the wire shutoff arm. Discard the first three batches of ice. To increase ice production, lower the freezer and refrigerator temperature, or see "Control Panel Descriptions" in the Freezer Turn the Ice Maker On/Off: To turn on the ice maker. NOTE: Turn...
Owners Manual
Page 16
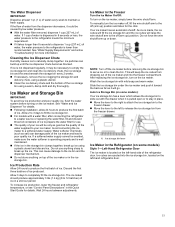
...Lift up the front of the enclosure. 3. A. Push the ice bin in until resistance is firmly in place. Style 3-Left-Hand Door Behind the Refrigerator Bins The ice maker is located on some models) B. Remove and Replace the Ice Storage Bin: � Remove the ice storage bin by moving ...on position. � To manually turn on , sensors will remain in place for more information. Style 2-Upper Left-Hand Side of the Refrigerator Compartment The ice maker and storage bin are ejected into the guide rails located on the ice maker by inserting your fingers into the hole...
...Lift up the front of the enclosure. 3. A. Push the ice bin in until resistance is firmly in place. Style 3-Left-Hand Door Behind the Refrigerator Bins The ice maker is located on some models) B. Remove and Replace the Ice Storage Bin: � Remove the ice storage bin by moving ...on position. � To manually turn on , sensors will remain in place for more information. Style 2-Upper Left-Hand Side of the Refrigerator Compartment The ice maker and storage bin are ejected into the guide rails located on the ice maker by inserting your fingers into the hole...
Owners Manual
Page 17
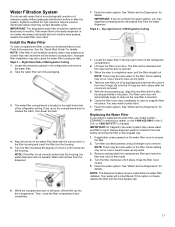
... door completely in order to snap the filter into the filter head. 4. or 1-800-807-6777 in the top-right corner of the refrigerator ceiling. NOTE: There may be slower ice production. Remove sealing label from the water dispenser. Snap the filter cover closed. 5. If this... at least every 6 months. Turn the filter clockwise 90 degrees (1/4 turn), until it locks into the housing. 5. Top-right Corner of Refrigerator Ceiling 1. Some spilling may experience dripping and/or decreased flow from replacement filter and insert the filter end into place. You may be used without...
... door completely in order to snap the filter into the filter head. 4. or 1-800-807-6777 in the top-right corner of the refrigerator ceiling. NOTE: There may be slower ice production. Remove sealing label from the water dispenser. Snap the filter cover closed. 5. If this... at least every 6 months. Turn the filter clockwise 90 degrees (1/4 turn), until it locks into the housing. 5. Top-right Corner of Refrigerator Ceiling 1. Some spilling may experience dripping and/or decreased flow from replacement filter and insert the filter end into place. You may be used without...
Owners Manual
Page 18
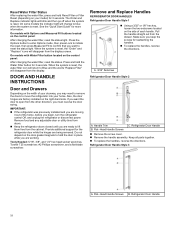
... screwdriver, #2 Phillips screwdriver, and a flat-blade screwdriver. Pull the handle straight out from the other direction, you are working. Refrigerator Door Handle B. Flat-Head Handle Screws B. Also, the door hinges are being removed. Provide additional support for reattaching the handles. ...� To replace the handles, reverse the directions. A. 3/32" Setscrew Refrigerator Door Handle Style 2 A. Keep all parts together. � To replace the handles, reverse the directions. On some models the indicator...
... screwdriver, #2 Phillips screwdriver, and a flat-blade screwdriver. Pull the handle straight out from the other direction, you are working. Refrigerator Door Handle B. Flat-Head Handle Screws B. Also, the door hinges are being removed. Provide additional support for reattaching the handles. ...� To replace the handles, reverse the directions. A. 3/32" Setscrew Refrigerator Door Handle Style 2 A. Keep all parts together. � To replace the handles, reverse the directions. On some models the indicator...
Owners Manual
Page 19
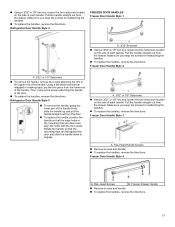
Refrigerator Door Handle Style 4 FREEZER DOOR HANDLES Freezer Door Handle Style 1 A. 3/32" Setscrew � Using a 3⁄32" or 1⁄8" hex key, loosen the two setscrews located .... � To replace the handles, reverse the directions. Freezer Drawer Handle � Remove screws and handle. � To replace the handles, reverse the directions. 19 Refrigerator Door Handle Style 5 � To remove the handle, grasp the lower part of each handle. Make sure you keep the screws for reattaching the handles...
Refrigerator Door Handle Style 4 FREEZER DOOR HANDLES Freezer Door Handle Style 1 A. 3/32" Setscrew � Using a 3⁄32" or 1⁄8" hex key, loosen the two setscrews located .... � To replace the handles, reverse the directions. Freezer Drawer Handle � Remove screws and handle. � To replace the handles, reverse the directions. 19 Refrigerator Door Handle Style 5 � To remove the handle, grasp the lower part of each handle. Make sure you keep the screws for reattaching the handles...
Owners Manual
Page 20
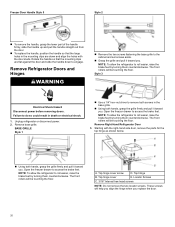
.... A. Top hinge cover E. Rotate the handle so that the large holes in death or electrical shock. 1. NOTE: To allow the refrigerator to roll easier, raise the brake feet by turning them counterclockwise. Failure to roll easier, raise the brake feet by turning them counterclockwise.... These screws will be touching the floor. Open the freezer drawer to access the brake feet. Remove Right-Hand Refrigerator Door 3. BASE GRILLE Style 1 � Use a 1/4" hex-nut driver to engage. Open the freezer drawer to access the brake feet....
.... A. Top hinge cover E. Rotate the handle so that the large holes in death or electrical shock. 1. NOTE: To allow the refrigerator to roll easier, raise the brake feet by turning them counterclockwise. Failure to roll easier, raise the brake feet by turning them counterclockwise.... These screws will be touching the floor. Open the freezer drawer to access the brake feet. Remove Right-Hand Refrigerator Door 3. BASE GRILLE Style 1 � Use a 1/4" hex-nut driver to engage. Open the freezer drawer to access the brake feet....
Owners Manual
Page 21
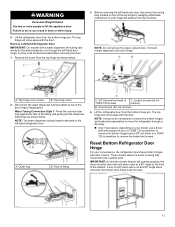
... � Only if necessary, depending on top of the top hinge by wedging a flat-blade screwdriver or your fingernail between the two sections. Lift the refrigerator door from the bottom hinge pin. Before removing the left-hand side door, disconnect the wiring plug located on your convenience, the... refrigerator doors have bottom hinges with just a gentle push. It should remain attached to lift the appliance door. Face of the door hinge (if applicable). NOTE...
... � Only if necessary, depending on top of the top hinge by wedging a flat-blade screwdriver or your fingernail between the two sections. Lift the refrigerator door from the bottom hinge pin. Before removing the left-hand side door, disconnect the wiring plug located on your convenience, the... refrigerator doors have bottom hinges with just a gentle push. It should remain attached to lift the appliance door. Face of the door hinge (if applicable). NOTE...


