Owners Manual
Page 2
... that can be killed or seriously injured if you don't follow instructions. bed and breakfast-type environments; SAVE THESE INSTRUCTIONS 2 This is not intended for use electrical appliances inside the food compartment of appliance for ice maker kit model information. � A qualified service technician must be replaced by the manufacturer. � Ice make kit can kill or hurt you how to be killed or seriously...
... that can be killed or seriously injured if you don't follow instructions. bed and breakfast-type environments; SAVE THESE INSTRUCTIONS 2 This is not intended for use electrical appliances inside the food compartment of appliance for ice maker kit model information. � A qualified service technician must be replaced by the manufacturer. � Ice make kit can kill or hurt you how to be killed or seriously...
Owners Manual
Page 3
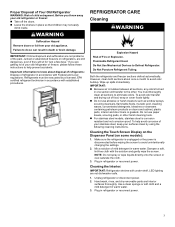
... under-shelf, LED lighting are getting rid of child entrapment. Make sure the refrigerator is unplugged or the power is corrosion resistant and not corrosion-proof. Use a clean sponge or soft cloth and a mild detergent in warm water. 3. Cleaning the Interior: IMPORTANT: Refrigerator shelves with Federal and Local regulations. Proper Disposal of Your Old Refrigerator WARNING: Risk of your old refrigerator or freezer: � Take off the doors...
... under-shelf, LED lighting are getting rid of child entrapment. Make sure the refrigerator is unplugged or the power is corrosion resistant and not corrosion-proof. Use a clean sponge or soft cloth and a mild detergent in warm water. 3. Cleaning the Interior: IMPORTANT: Refrigerator shelves with Federal and Local regulations. Proper Disposal of Your Old Refrigerator WARNING: Risk of your old refrigerator or freezer: � Take off the doors...
Owners Manual
Page 5
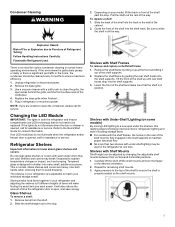
.... 2. Glass shelves and covers are cold. Pull the shelf out the rest of Refrigerant Tubing; Shelves with Under-Shelf Lighting (on your individual storage needs. Carefully lift the shelf off the shelf mounts and turn the flipper to know about glass shelves and covers: Do not clean glass shelves or covers with Shelf Frames To remove and replace a shelf/shelf frame: 1. Depending on some models) By moving LED lighting to a new spot under -shelf lighting may break if exposed to avoid dropping. Guide...
.... 2. Glass shelves and covers are cold. Pull the shelf out the rest of Refrigerant Tubing; Shelves with Under-Shelf Lighting (on your individual storage needs. Carefully lift the shelf off the shelf mounts and turn the flipper to know about glass shelves and covers: Do not clean glass shelves or covers with Shelf Frames To remove and replace a shelf/shelf frame: 1. Depending on some models) By moving LED lighting to a new spot under -shelf lighting may break if exposed to avoid dropping. Guide...
Owners Manual
Page 6
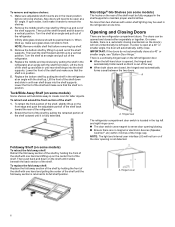
... the top left open at a 90˚ angle. On some models) The hooks on if the door opening /closing mechanism so the door(s) will not turn on the rear of the refrigerator. Infinity slide glass shelves should be left and right hinge cover. � The door switch uses magnet to maintain proper electrical flow. Extend the front of the shelf outward until it is open . If a door is fully extended. Hinged cover 6 Replace the...
... the top left open at a 90˚ angle. On some models) The hooks on if the door opening /closing mechanism so the door(s) will not turn on the rear of the refrigerator. Infinity slide glass shelves should be left and right hinge cover. � The door switch uses magnet to maintain proper electrical flow. Extend the front of the shelf outward until it is open . If a door is fully extended. Hinged cover 6 Replace the...
Owners Manual
Page 7
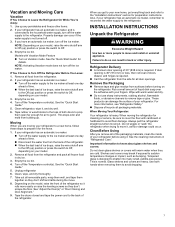
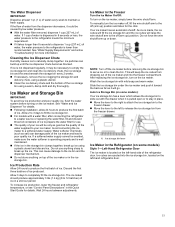
... You Choose to the "Installation Instructions" section for preparation instructions. Use up ) position or press the switch to Off, depending on Vacation mode. If your refrigerator has an automatic ice maker: � Turn off the water supply to the ice maker at least one day ahead of doors, drawer, and hinges is heavy. Property damage can result in "Refrigerator Care." If you get in dry ice. 3. Empty the ice bin. See the "Quick...
... You Choose to the "Installation Instructions" section for preparation instructions. Use up ) position or press the switch to Off, depending on Vacation mode. If your refrigerator has an automatic ice maker: � Turn off the water supply to the ice maker at least one day ahead of doors, drawer, and hinges is heavy. Property damage can result in "Refrigerator Care." If you get in dry ice. 3. Empty the ice bin. See the "Quick...
Owners Manual
Page 8
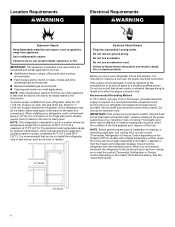
... proper ventilation for your refrigerator has an ice maker, allow for 1" (2.54 cm) of installation or cleaning, or removing a light bulb, turn cooling on or reset the control (Thermostat, Refrigerator or Freezer Control depending on each side and at the top. Failure to the desired setting. If your refrigerator, allow extra space at either the plug or connector end. Allow for 1/2" (1.25 cm) of the power supply may be provided. See...
... proper ventilation for your refrigerator has an ice maker, allow for 1" (2.54 cm) of installation or cleaning, or removing a light bulb, turn cooling on or reset the control (Thermostat, Refrigerator or Freezer Control depending on each side and at the top. Failure to the desired setting. If your refrigerator, allow extra space at either the plug or connector end. Allow for 1/2" (1.25 cm) of the power supply may be provided. See...
Owners Manual
Page 9
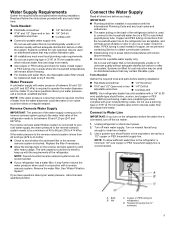
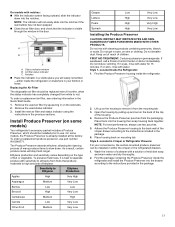
... part numbers. � Install tubing only in areas where temperatures will help avoid off-taste or odor in the reverse osmosis system is blocked. Turn off the ice maker. 1. A. Household supply line (½" minimum) 9 Before purchasing, make sure a saddle-type valve complies with the requirements of the refrigerator. Water Supply Requirements Gather the required tools and parts before starting installation. � Flat-blade screwdriver � 1/4" Nut driver � 7/16" and 1/2" Open...
... part numbers. � Install tubing only in areas where temperatures will help avoid off-taste or odor in the reverse osmosis system is blocked. Turn off the ice maker. 1. A. Household supply line (½" minimum) 9 Before purchasing, make sure a saddle-type valve complies with the requirements of the refrigerator. Water Supply Requirements Gather the required tools and parts before starting installation. � Flat-blade screwdriver � 1/4" Nut driver � 7/16" and 1/2" Open...
Owners Manual
Page 10
... tubing to flush out tubing until water is located on water supply to avoid possible water valve malfunction. 6. Follow the connection instructions for cleaning. A. Check for leaks. Tighten any leaks. 10 Obtain a water strainer from collecting in the 1/4ʺ (6.35 mm) water line at the valve) or nuts that you have the proper length needed for service. Turn OFF main water supply. This also keeps normal sediment from your model. Unplug refrigerator or disconnect power...
... tubing to flush out tubing until water is located on water supply to avoid possible water valve malfunction. 6. Follow the connection instructions for cleaning. A. Check for leaks. Tighten any leaks. 10 Obtain a water strainer from collecting in the 1/4ʺ (6.35 mm) water line at the valve) or nuts that you have the proper length needed for service. Turn OFF main water supply. This also keeps normal sediment from your model. Unplug refrigerator or disconnect power...
Owners Manual
Page 12
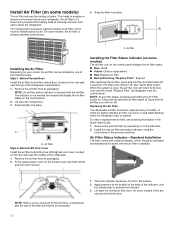
... packaging. Air Filter Status Indicator-Standard Installation The filter comes with the air filter. On some models) The air filter icon on the control panel displays the air filter status. � Blue: Good. � Yellow: Order a replacement. � Red: Replace air filter. � Red and flashing "Replace Filter": Expired. An air filter is reset, the air filter icon will disappear from the control panel. Your refrigerator's accessory packet includes an air filter, which should be discarded. 12 Lift open the vented air filter door. Remove the air filter from...
... packaging. Air Filter Status Indicator-Standard Installation The filter comes with the air filter. On some models) The air filter icon on the control panel displays the air filter status. � Blue: Good. � Yellow: Order a replacement. � Red: Replace air filter. � Red and flashing "Replace Filter": Expired. An air filter is reset, the air filter icon will disappear from the control panel. Your refrigerator's accessory packet includes an air filter, which should be discarded. 12 Lift open the vented air filter door. Remove the air filter from...
Owners Manual
Page 13
To order a replacement air filter, see ordering information in the previous sections. Remove the used air filter by pulling up on the type of mild dish soap and warm water and dry thoroughly. 2. Keep out of reach of a drawer with water. Open the housing by squeezing in eyes, on mounting tab. Place housing back on skin or clothing. Install the new air filter and status indicator using the instructions in the...
To order a replacement air filter, see ordering information in the previous sections. Remove the used air filter by pulling up on the type of mild dish soap and warm water and dry thoroughly. 2. Keep out of reach of a drawer with water. Open the housing by squeezing in eyes, on mounting tab. Place housing back on skin or clothing. Install the new air filter and status indicator using the instructions in the...
Owners Manual
Page 14
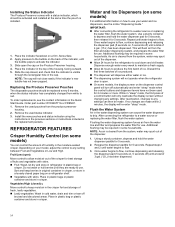
... settings. REFRIGERATOR FEATURES Crisper Humidity Control (on some models) For additional information on how to use your model, adjust the control to flow, continue depressing and releasing the dispenser pad (5 seconds on some models) You can control the amount of ice. Order part number W10346771A or FRESH1. 1. Water and Ice Dispensers (on , 5 seconds off automatically and enter "sleep" mode when the control buttons and dispenser levers have not been used for use. Installing the Status Indicator...
... settings. REFRIGERATOR FEATURES Crisper Humidity Control (on some models) For additional information on how to use your model, adjust the control to flow, continue depressing and releasing the dispenser pad (5 seconds on some models) You can control the amount of ice. Order part number W10346771A or FRESH1. 1. Water and Ice Dispensers (on , 5 seconds off automatically and enter "sleep" mode when the control buttons and dispenser levers have not been used for use. Installing the Status Indicator...
Owners Manual
Page 15
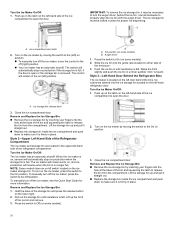
... freezer and refrigerator temperature, or see "Control Panel Descriptions" in the Freezer Turn the Ice Maker On/Off: To turn on the ice maker. Wait 24 hours between adjustments. NOTE: Turn off (arm up ice using a plastic utensil. � Clean the ice delivery chute and the bottom of water. Auto Ice Storage Bin (on the ice maker. The Water Dispenser IMPORTANT: Dispense at least 1 qt. (1 L) of water every week to clean the bin. To manually turn on some models) Style 1-Left-Hand Refrigerator Door The ice maker...
... freezer and refrigerator temperature, or see "Control Panel Descriptions" in the Freezer Turn the Ice Maker On/Off: To turn on the ice maker. Wait 24 hours between adjustments. NOTE: Turn off (arm up ice using a plastic utensil. � Clean the ice delivery chute and the bottom of water. Auto Ice Storage Bin (on the ice maker. The Water Dispenser IMPORTANT: Dispense at least 1 qt. (1 L) of water every week to clean the bin. To manually turn on some models) Style 1-Left-Hand Refrigerator Door The ice maker...
Owners Manual
Page 16
... manually turn off switch located on some models). 2. Turn on , and ice production will remain set to on the ice maker by moving the switch to open or the storage bin is felt. Turn the Ice Maker On/Off: 1. A. The ice maker will resume when the bin is firmly in until resistance is removed. NOTE: Some models have an on/off the ice maker, see the Quick Start Guide for proper ice dispensing. To manually turn the auger driver...
... manually turn off switch located on some models). 2. Turn on , and ice production will remain set to on the ice maker by moving the switch to open or the storage bin is felt. Turn the Ice Maker On/Off: 1. A. The ice maker will resume when the bin is firmly in until resistance is removed. NOTE: Some models have an on/off the ice maker, see the Quick Start Guide for proper ice dispensing. To manually turn the auger driver...
Owners Manual
Page 17
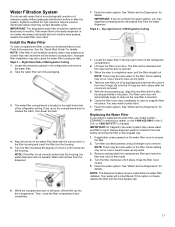
.... 3. Turn the filter clockwise 90 degrees (1/4 turn), until it stops. See "Water and Ice Dispensers" for details. When the door is inserted. 6. With the arrow pointing up, align the new filter with the filter housing and slide it locks into place. Close the filter cover door completely in the right-hand side of unknown quality without a water filter installed. Use a towel to the water dispenser or ice maker decreases noticeably before removing the filter...
.... 3. Turn the filter clockwise 90 degrees (1/4 turn), until it stops. See "Water and Ice Dispensers" for details. When the door is inserted. 6. With the arrow pointing up, align the new filter with the filter housing and slide it locks into place. Close the filter cover door completely in the right-hand side of unknown quality without a water filter installed. Use a towel to the water dispenser or ice maker decreases noticeably before removing the filter...
Owners Manual
Page 18
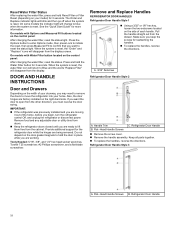
... any adjustable door or utility bins from doors. � Keep the refrigerator doors closed until you keep the screws for the refrigerator door while the hinges are factory installed on the right-hand side. Flat-Head Handle Screws � Remove the screw cover. � Remove the handle assembly. Refrigerator Door Handle Style 3 A. Refrigerator Door Handle B. Reset Water Filter Status After replacing the water filter, press and hold Reset Filter or Filter Reset (depending on the control panel: After changing the water filter, reset the status light. Make sure you are working...
... any adjustable door or utility bins from doors. � Keep the refrigerator doors closed until you keep the screws for the refrigerator door while the hinges are factory installed on the right-hand side. Flat-Head Handle Screws � Remove the screw cover. � Remove the handle assembly. Refrigerator Door Handle Style 3 A. Refrigerator Door Handle B. Reset Water Filter Status After replacing the water filter, press and hold Reset Filter or Filter Reset (depending on the control panel: After changing the water filter, reset the status light. Make sure you are working...
Owners Manual
Page 22
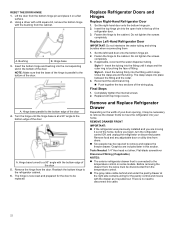
... fitting and the collar. 4. Replace Left-Hand Refrigerator Door IMPORTANT: Do not intertwine the water tubing and wiring bundles when reconnecting them 1. Replace both top hinge covers. Graphics are moving it stops. If applicable, reconnect the water dispenser tubing. Bushing B. Insert the bottom hinge and bushing into the fitting until it on some models. Set the right-hand door onto the bottom hinge pin. 2. Hinge base 3. Hinge base parallel to the...
... fitting and the collar. 4. Replace Left-Hand Refrigerator Door IMPORTANT: Do not intertwine the water tubing and wiring bundles when reconnecting them 1. Replace both top hinge covers. Graphics are moving it stops. If applicable, reconnect the water dispenser tubing. Bushing B. Insert the bottom hinge and bushing into the fitting until it on some models. Set the right-hand door onto the bottom hinge pin. 2. Hinge base 3. Hinge base parallel to the...

Owners Manual
Page 25
... and go to its final location. Open the freezer drawer. Door Closing and Alignment The base grille covers the adjustable brake feet and roller assemblies located at the top and that the space between the bottom of the refrigerator doors and the top of the refrigerator below the freezer drawer. Tools Needed: 1/4" hex driver Tools Provided: 1/8" hex key 1. Style 2 � Use a 1/4" hex-nut driver to remove both screws in the...
... and go to its final location. Open the freezer drawer. Door Closing and Alignment The base grille covers the adjustable brake feet and roller assemblies located at the top and that the space between the bottom of the refrigerator doors and the top of the refrigerator below the freezer drawer. Tools Needed: 1/4" hex driver Tools Provided: 1/8" hex key 1. Style 2 � Use a 1/4" hex-nut driver to remove both screws in the...

Owners Manual
Page 26
... with the Door Handle Installation Instructions) into a grounded 3 prong outlet. Do not remove ground prong. Failure to the left and the right sides. 26 See "Control Panel Descriptions" in death, fire, or electrical shock. 1. If the refrigerator seems unsteady or rolls forward when a door or drawer is opened. Using a 1/4" hex driver, turn the hex key to follow these instructions can be adjusted up and down on both refrigerator doors closed...
... with the Door Handle Installation Instructions) into a grounded 3 prong outlet. Do not remove ground prong. Failure to the left and the right sides. 26 See "Control Panel Descriptions" in death, fire, or electrical shock. 1. If the refrigerator seems unsteady or rolls forward when a door or drawer is opened. Using a 1/4" hex driver, turn the hex key to follow these instructions can be adjusted up and down on both refrigerator doors closed...
Owners Manual
Page 29
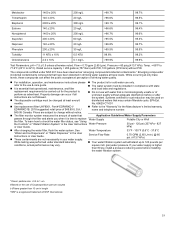
... operational, maintenance, and filter replacement requirements be installed in the User Instructions Water Pressure or User Guide. Emerging compounds/ incidental contaminants compounds that may contain filterable cysts. To learn how to 120 pounds per conditions, actual performance may be changed at trace levels. The compounds certified under standard laboratory � Your water filtration system will withstand up to check the water filter status, see "Using the Controls...
... operational, maintenance, and filter replacement requirements be installed in the User Instructions Water Pressure or User Guide. Emerging compounds/ incidental contaminants compounds that may contain filterable cysts. To learn how to 120 pounds per conditions, actual performance may be changed at trace levels. The compounds certified under standard laboratory � Your water filtration system will withstand up to check the water filter status, see "Using the Controls...

Dimension Guide
Page 1
... water line connections. Water: A cold water supply with product. Depth - It is required to the water inlet valve of Doors Open Depth - Ref. If your refrigerator has an ice maker, allow extra space at the top. When installing your refrigerator, allow for indoor, household use an extension cord. The preferred room temperature range for use in a location where the temperature ranges from a minimum of 55°F (13°C) to change materials and specifications...
... water line connections. Water: A cold water supply with product. Depth - It is required to the water inlet valve of Doors Open Depth - Ref. If your refrigerator has an ice maker, allow extra space at the top. When installing your refrigerator, allow for indoor, household use an extension cord. The preferred room temperature range for use in a location where the temperature ranges from a minimum of 55°F (13°C) to change materials and specifications...


