Dimension Guide
Page 1
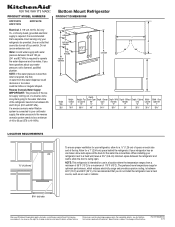
... Doors Open Depth - Without Depth - W10668651A 3/15 NOTE: If the water pressure is less than what is connected to a maximum of Cabinet 90° Open Handles Handles Only Cabinet Open 90° Size "A" "B" "C" "D" "E" "F" "G" "H" "I C 90˚ 90˚ D Depth - Height - Width - Door Model Overall of 110°F (43°C). or 20-amp fused...
... Doors Open Depth - Without Depth - W10668651A 3/15 NOTE: If the water pressure is less than what is connected to a maximum of Cabinet 90° Open Handles Handles Only Cabinet Open 90° Size "A" "B" "C" "D" "E" "F" "G" "H" "I C 90˚ 90˚ D Depth - Height - Width - Door Model Overall of 110°F (43°C). or 20-amp fused...
Use & Care Guide
Page 2
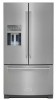
... Ice Dispenser 24 - Drawer Divider 28 - Condenser Cleaning 30 Lights 30 Vacation and Moving Care 30 - Your new KitchenAid® French Door Refrigerator combines advanced cooling technology with simple operation and high efficiency. Final Steps 9 Electrical Requirements 10...3 PARTS AND FEATURES 4 What's New Behind the Doors 4 INSTALLATION INSTRUCTIONS 5 Unpack the Refrigerator 5 - Vacations 30 - Install Handles 12 - Replacing the Air Filter 17 Install Produce Preserver 17 - Ice Maker in the Freezer 25 REFRIGERATOR FEATURES 26 Refrigerator Shelves 26 ...
... Ice Dispenser 24 - Drawer Divider 28 - Condenser Cleaning 30 Lights 30 Vacation and Moving Care 30 - Your new KitchenAid® French Door Refrigerator combines advanced cooling technology with simple operation and high efficiency. Final Steps 9 Electrical Requirements 10...3 PARTS AND FEATURES 4 What's New Behind the Doors 4 INSTALLATION INSTRUCTIONS 5 Unpack the Refrigerator 5 - Vacations 30 - Install Handles 12 - Replacing the Air Filter 17 Install Produce Preserver 17 - Ice Maker in the Freezer 25 REFRIGERATOR FEATURES 26 Refrigerator Shelves 26 ...
Use & Care Guide
Page 12
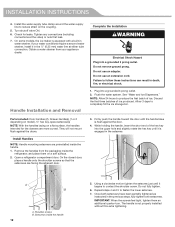
.... Plug into a grounded 3 prong outlet. Flush the water system. NOTE: Allow 24 hours to contact the shoulder screw. While holding the handle, insert the short end of the hex key into the upper hole and slightly rotate the hex key until it in water strainer. Setscrews inside...mm) water line at the valve) or nuts that the setscrews are facing the adjacent door. 3. Check for the drawers are preinstalled inside the handle 12 5. Discard the first three batches of ice. Obtain a water strainer from the packaging inside the refrigerator, and place them an additional quarter...
.... Plug into a grounded 3 prong outlet. Flush the water system. NOTE: Allow 24 hours to contact the shoulder screw. While holding the handle, insert the short end of the hex key into the upper hole and slightly rotate the hex key until it in water strainer. Setscrews inside...mm) water line at the valve) or nuts that the setscrews are facing the adjacent door. 3. Check for the drawers are preinstalled inside the handle 12 5. Discard the first three batches of ice. Obtain a water strainer from the packaging inside the refrigerator, and place them an additional quarter...

Use & Care Guide
Page 13
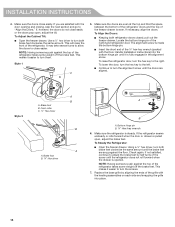
.... Do not fully tighten. 13. Lower the brake feet, by turning them counterclockwise. For some models, repeat steps 9 through 7 to the handle. A 12. NOTE: To allow the refrigerator to right motion tighten the setscrew a quarter-turn both brake feet are facing down toward you must...setscrew hole and slightly rotate the hex key until the rollers are off the floor and both brake feet the same amount to install a handle on the ends. Insert the short end of the refrigerator below the freezer drawer. INSTALLATION INSTRUCTIONS 8. If necessary, use a Phillips screwdriver ...
.... Do not fully tighten. 13. Lower the brake feet, by turning them counterclockwise. For some models, repeat steps 9 through 7 to the handle. A 12. NOTE: To allow the refrigerator to right motion tighten the setscrew a quarter-turn both brake feet are facing down toward you must...setscrew hole and slightly rotate the hex key until the rollers are off the floor and both brake feet the same amount to install a handle on the ends. Insert the short end of the refrigerator below the freezer drawer. INSTALLATION INSTRUCTIONS 8. If necessary, use a Phillips screwdriver ...
Use & Care Guide
Page 14
... the Doors." Style 2 A B A. Front roller C. ¹⁄₄" Hex driver B A A. INSTALLATION INSTRUCTIONS 4. NOTE: Having someone push against the top of the grille with the Door Handle Installation Instructions) into place. 14 Brake foot B. If not satisfied, continue to close easily. This makes it is even. If, however, the doors do not...
... the Doors." Style 2 A B A. Front roller C. ¹⁄₄" Hex driver B A A. INSTALLATION INSTRUCTIONS 4. NOTE: Having someone push against the top of the grille with the Door Handle Installation Instructions) into place. 14 Brake foot B. If not satisfied, continue to close easily. This makes it is even. If, however, the doors do not...

Use & Care Guide
Page 18
... and Produce Preserver Bundle Pack: Order Part # W10413643BL Door Handle Medallions: Order Part #W10762987 (Black) Order Part #W10762993 (Chrome) 18 Remove the used status indicator. 3. In the U.S.A., visit our webpage www.kitchenaid.com/ accessories or call 1-800-807-6777. Remove the used... status indicator using the instructions in the cap. Accessories The following accessories are installed. 1. In Canada, visit our webpage www.kitchenaid.ca or call 1-800-901-2042. FILTERS AND ACCESSORIES Installing the Status Indicator The produce preserver comes with a status indicator, ...
... and Produce Preserver Bundle Pack: Order Part # W10413643BL Door Handle Medallions: Order Part #W10762987 (Black) Order Part #W10762993 (Chrome) 18 Remove the used status indicator. 3. In the U.S.A., visit our webpage www.kitchenaid.com/ accessories or call 1-800-807-6777. Remove the used... status indicator using the instructions in the cap. Accessories The following accessories are installed. 1. In Canada, visit our webpage www.kitchenaid.ca or call 1-800-901-2042. FILTERS AND ACCESSORIES Installing the Status Indicator The produce preserver comes with a status indicator, ...


