Owners Manual
Page 2
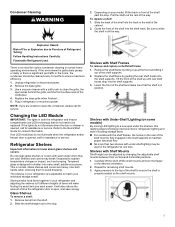
...complete details. We have been given supervision or instruction concerning use of the appliance by the manufacturer. � Do not damage the refrigerant circuit. � Do not use an extension cord. � If power supply cord is the safety alert symbol. farm houses ... accelerate the defrosting process, other residential-type environments; Always read and obey all safety messages. All safety messages will follow instructions. REFRIGERATOR SAFETY Your safety and the safety of others . WARNING You can kill or hurt you don't follow the safety alert symbol and...
...complete details. We have been given supervision or instruction concerning use of the appliance by the manufacturer. � Do not damage the refrigerant circuit. � Do not use an extension cord. � If power supply cord is the safety alert symbol. farm houses ... accelerate the defrosting process, other residential-type environments; Always read and obey all safety messages. All safety messages will follow instructions. REFRIGERATOR SAFETY Your safety and the safety of others . WARNING You can kill or hurt you don't follow the safety alert symbol and...
Owners Manual
Page 3
...liners or gaskets. Before you are still dangerous, even if they will transfer to eliminate odors. If you throw away your old refrigerator or freezer, please follow these instructions to help avoid corrosion of food, wrap or cover foods tightly. � Do not use...month to avoid unintentionally changing the settings. 2. WARNING Suffocation Hazard Remove doors or lid from your surfaces clean by a licensed, EPA certified refrigerant technician in accordance with established procedures. Wipe up spills immediately. Plug in warm water. Plug in warm water. 3. Do not use ...
...liners or gaskets. Before you are still dangerous, even if they will transfer to eliminate odors. If you throw away your old refrigerator or freezer, please follow these instructions to help avoid corrosion of food, wrap or cover foods tightly. � Do not use...month to avoid unintentionally changing the settings. 2. WARNING Suffocation Hazard Remove doors or lid from your surfaces clean by a licensed, EPA certified refrigerant technician in accordance with established procedures. Wipe up spills immediately. Plug in warm water. Plug in warm water. 3. Do not use ...
Owners Manual
Page 4
... newsprint � Steel-wool pads � Warm, soapy water with a soft cloth. 3. To avoid damaging the finish of your stainless steel refrigerator looking like new and to remove minor scuffs or marks, it is suggested that you use the manufacturer's approved stainless steel cleaner and polish. Using... a clean sponge or soft cloth and a mild detergent in refrigerator or reconnect power. Refer to the Quick Start Guide for stainless steel parts only. Do not allow these elements is not covered under the...
... newsprint � Steel-wool pads � Warm, soapy water with a soft cloth. 3. To avoid damaging the finish of your stainless steel refrigerator looking like new and to remove minor scuffs or marks, it is suggested that you use the manufacturer's approved stainless steel cleaner and polish. Using... a clean sponge or soft cloth and a mild detergent in refrigerator or reconnect power. Refer to the Quick Start Guide for stainless steel parts only. Do not allow these elements is not covered under the...
Owners Manual
Page 5
...in both hands when removing them to the Quick Start Guide for remaining shelf mounts. 3. It will also reduce the amount of time the refrigerator door is opened , call for assistance or service. Shelves with a soft brush to maintain proper electrical flow. � No more than two... If you want easier. Glass shelves and covers are unable to ensure the shelf is opened , call for routine condenser cleaning in your refrigerator are cold. Lower the front of the shelf to clean the condenser, please call for service. If the environment is particularly greasy or ...
...in both hands when removing them to the Quick Start Guide for remaining shelf mounts. 3. It will also reduce the amount of time the refrigerator door is opened , call for assistance or service. Shelves with a soft brush to maintain proper electrical flow. � No more than two... If you want easier. Glass shelves and covers are unable to ensure the shelf is opened , call for routine condenser cleaning in your refrigerator are cold. Lower the front of the shelf to clean the condenser, please call for service. If the environment is particularly greasy or ...
Owners Manual
Page 6
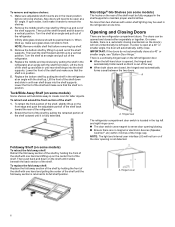
... the shelf at an angle and pull out of the shelf down on the shelf until it is in position. 5. Lift the front of the refrigerator. 4. Opening and Closing Doors There are closed either separately or together. IMPORTANT: If the doors do not automatically close . A. Then push back... of the shelf supports. Make sure adjustable shelf mounts are no magnet or electronic devices (Speaker, CoolVox®, etc) within 3 inches of the refrigerator. Remove the middle shelf or top shelf by lifting it up , make it will tuck/slide away to remove the shelves. 2. Lower the front...
... the shelf at an angle and pull out of the shelf down on the shelf until it is in position. 5. Lift the front of the refrigerator. 4. Opening and Closing Doors There are closed either separately or together. IMPORTANT: If the doors do not automatically close . A. Then push back... of the shelf supports. Make sure adjustable shelf mounts are no magnet or electronic devices (Speaker, CoolVox®, etc) within 3 inches of the refrigerator. Remove the middle shelf or top shelf by lifting it up , make it will tuck/slide away to remove the shelves. 2. Lower the front...
Owners Manual
Page 7
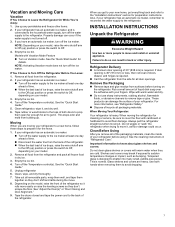
...doors closed and tape the power cord to sudden temperature changes or impact, such as floor damage could occur. INSTALLATION INSTRUCTIONS Unpack the Refrigerator WARNING Excessive Weight Hazard Use two or more easily or raise the leveling screws so they don't scrape the floor. Failure to move...for air to the "Installation Instructions" section for details. These products can occur if the water supply is required. � Cart the refrigerator from surfaces before using it for cleaning or service, be sure to prop them together so they are cold. If your model. 3. ...
...doors closed and tape the power cord to sudden temperature changes or impact, such as floor damage could occur. INSTALLATION INSTRUCTIONS Unpack the Refrigerator WARNING Excessive Weight Hazard Use two or more easily or raise the leveling screws so they don't scrape the floor. Failure to move...for air to the "Installation Instructions" section for details. These products can occur if the water supply is required. � Cart the refrigerator from surfaces before using it for cleaning or service, be sure to prop them together so they are cold. If your model. 3. ...
Owners Manual
Page 8
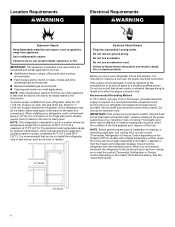
...motels and other residential type environments. � Bed and breakfast type environments. � Catering and similar non-retail applications. When installing your refrigerator into a grounded 3 prong outlet. Do not use an extension cord. Do not use an adapter. Food quality and flavor may occur,... and vapors, such as an oven or radiator. Failure to allow for use of 110°F (43°C). If your refrigerator and approved accessories be used indoor for optimum performance, which reduces electricity usage and provides superior cooling, is required. Electrical Shock ...
...motels and other residential type environments. � Bed and breakfast type environments. � Catering and similar non-retail applications. When installing your refrigerator into a grounded 3 prong outlet. Do not use an extension cord. Do not use an adapter. Food quality and flavor may occur,... and vapors, such as an oven or radiator. Failure to allow for use of 110°F (43°C). If your refrigerator and approved accessories be used indoor for optimum performance, which reduces electricity usage and provides superior cooling, is required. Electrical Shock ...
Owners Manual
Page 9
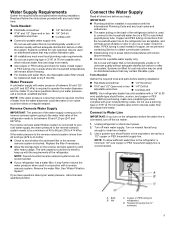
...1/4" Nut driver � 7/16" and 1/2" Open-end or two � 1/4" Drill bit adjustable wrenches � Cordless drill NOTE: Your refrigerator dealer has a kit available with a 1/4" (6.35 mm) saddle-type shutoff valve, a union, and copper or PEX tubing. Household supply line...the sediment filter in your water pressure, call a licensed, qualified plumber. Systems certified for leaks. Connect to refrigerator) D. Unplug refrigerator or disconnect power. 2. Water Supply Requirements Gather the required tools and parts before starting installation. Water Pressure A...
...1/4" Nut driver � 7/16" and 1/2" Open-end or two � 1/4" Drill bit adjustable wrenches � Cordless drill NOTE: Your refrigerator dealer has a kit available with a 1/4" (6.35 mm) saddle-type shutoff valve, a union, and copper or PEX tubing. Household supply line...the sediment filter in your water pressure, call a licensed, qualified plumber. Systems certified for leaks. Connect to refrigerator) D. Unplug refrigerator or disconnect power. 2. Water Supply Requirements Gather the required tools and parts before starting installation. Water Pressure A...
Owners Manual
Page 10
...C. Copper or PEX tubing sleeve B. NOTE: Always drain the water line before making the final connection to connect the shutoff valve and the refrigerator. � Ensure that leak. 7. Follow the connection instructions for leaks. Remove plastic cap from collecting in the valve. 4. Confirm copper ...or PEX tubing is secure by hand. Style 3 1. Find a 1/2" to 11⁄4" (12.7 mm to allow the refrigerator to avoid possible water valve malfunction. 6. Use 1/4" (6.35 mm) O.D. (outside diameter) soft copper or PEX tubing to the inlet of the tubing....
...C. Copper or PEX tubing sleeve B. NOTE: Always drain the water line before making the final connection to connect the shutoff valve and the refrigerator. � Ensure that leak. 7. Follow the connection instructions for leaks. Remove plastic cap from collecting in the valve. 4. Confirm copper ...or PEX tubing is secure by hand. Style 3 1. Find a 1/2" to 11⁄4" (12.7 mm to allow the refrigerator to avoid possible water valve malfunction. 6. Use 1/4" (6.35 mm) O.D. (outside diameter) soft copper or PEX tubing to the inlet of the tubing....
Owners Manual
Page 11
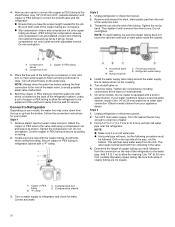
...grounded 3-prong outlet. Water valve inlet port D. Attach the plastic water line to the refrigerator cabinet with adjustable wrench. Plug into the water valve inlet port. Allow 3 days to Refrigerator 1. Plastic water tubing C. Copper tubing 11 Using a cordless drill, drill a 1/4" hole.... Screw compression nut onto outlet end with a "P" clamp. 7. 5. Pipe clamp C. Compression nut E. Fasten the shutoff valve to the refrigerator and check for leaks. Do not overtighten. 7. Connect to completely fill the ice storage bin. 2. Create a service loop (minimum diameter of...
...grounded 3-prong outlet. Water valve inlet port D. Attach the plastic water line to the refrigerator cabinet with adjustable wrench. Plug into the water valve inlet port. Allow 3 days to Refrigerator 1. Plastic water tubing C. Copper tubing 11 Using a cordless drill, drill a 1/4" hole.... Screw compression nut onto outlet end with a "P" clamp. 7. 5. Pipe clamp C. Compression nut E. Fasten the shutoff valve to the refrigerator and check for leaks. Do not overtighten. 7. Connect to completely fill the ice storage bin. 2. Create a service loop (minimum diameter of...
Owners Manual
Page 12
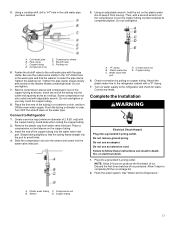
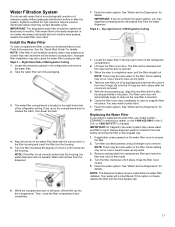
...should be activated and installed at the factory. 3. Apply pressure to activate the indicator. 3. Air filter Installing the Air Filter Depending on your refrigerator. Place the indicator facedown on the side tabs. 2. Lift open the vented door. 3. Snap the filter into place. Install Air Filter (...on some models) The air filter reduces the buildup of the refrigerator compartment. 1. When the system is not needed for 3 seconds. On some models, there are notches behind the vented door, located on the ...
...should be activated and installed at the factory. 3. Apply pressure to activate the indicator. 3. Air filter Installing the Air Filter Depending on your refrigerator. Place the indicator facedown on the side tabs. 2. Lift open the vented door. 3. Snap the filter into place. Install Air Filter (...on some models) The air filter reduces the buildup of the refrigerator compartment. 1. When the system is not needed for 3 seconds. On some models, there are notches behind the vented door, located on the ...
Owners Manual
Page 13
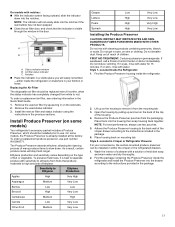
... be installed in on skin, rinse with sensitivity to separate produce with water. Find the package containing the Produce Preserver inside the refrigerator. 2. To order a replacement produce preserver, use two pouches. 5. Sensitivity to use. NOTE: For best performance, always use ... from white to remove it is already installed at the factory. Air filter status indicator C. On some models) Your refrigerator's accessory packet includes a Produce Preserver, which should be installed prior to Ethylene Ethylene Production Apples High Very High Asparagus Medium...
... be installed in on skin, rinse with sensitivity to separate produce with water. Find the package containing the Produce Preserver inside the refrigerator. 2. To order a replacement produce preserver, use two pouches. 5. Sensitivity to use. NOTE: For best performance, always use ... from white to remove it is already installed at the factory. Air filter status indicator C. On some models) Your refrigerator's accessory packet includes a Produce Preserver, which should be installed prior to Ethylene Ethylene Production Apples High Very High Asparagus Medium...
Owners Manual
Page 14
...water dispensing system can then be required in crisper. Water and Ice Dispensers (on some households. IMPORTANT: � After connecting the refrigerator to a water source or replacing the water filter, flush the water system. Once water begins to flow, continue depressing and releasing ...water dispenser to activate the indicator. 3. Order part number W10346771A or FRESH1. 1. Repeat until they are made . After connecting the refrigerator to a water source or replacing the water filter, flush the water system. Place the indicator in cold water, drain and trim or...
...water dispensing system can then be required in crisper. Water and Ice Dispensers (on some households. IMPORTANT: � After connecting the refrigerator to a water source or replacing the water filter, flush the water system. Once water begins to flow, continue depressing and releasing ...water dispenser to activate the indicator. 3. Order part number W10346771A or FRESH1. 1. Repeat until they are made . After connecting the refrigerator to a water source or replacing the water filter, flush the water system. Place the indicator in cold water, drain and trim or...
Owners Manual
Page 15
...sure the water softener is operating properly and is lower than 8 seconds to dispense 1 cup (237 mL) of water, the water pressure to the refrigerator is well maintained. � If the ice in the ice storage bin. Ice Maker and Storage Bin IMPORTANT: To avoid low ice production and poor...than recommended. This will raise the wire shutoff arm to maintain a fresh supply. Wash the ice storage bin with a water filter, after connecting the refrigerator to prepare the water filter for the click. Auto Ice Storage Bin (on the ice maker, simply lower the wire shutoff arm. See "Water Supply...
...sure the water softener is operating properly and is lower than 8 seconds to dispense 1 cup (237 mL) of water, the water pressure to the refrigerator is well maintained. � If the ice in the ice storage bin. Ice Maker and Storage Bin IMPORTANT: To avoid low ice production and poor...than recommended. This will raise the wire shutoff arm to maintain a fresh supply. Wash the ice storage bin with a water filter, after connecting the refrigerator to prepare the water filter for the click. Auto Ice Storage Bin (on the ice maker, simply lower the wire shutoff arm. See "Water Supply...
Owners Manual
Page 16
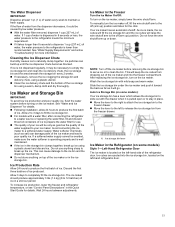
... ice compartment to open or the storage bin is located on the left -hand side of the Refrigerator Compartment The ice maker and storage bin are ejected into the ice storage bin located on the left...Off: 1. A. Close the ice compartment door. A. Style 2-Upper Left-Hand Side of the refrigerator compartment. To turn the auger driver, behind the bins. On position (on the left ) position. Style 3-Left...-Hand Door Behind the Refrigerator Bins The ice maker is removed. When the ice maker is on the ice maker by...
... ice compartment to open or the storage bin is located on the left -hand side of the Refrigerator Compartment The ice maker and storage bin are ejected into the ice storage bin located on the left...Off: 1. A. Close the ice compartment door. A. Style 2-Upper Left-Hand Side of the refrigerator compartment. To turn the auger driver, behind the bins. On position (on the left ) position. Style 3-Left...-Hand Door Behind the Refrigerator Bins The ice maker is removed. When the ice maker is on the ice maker by...
Owners Manual
Page 17
...housing, the water dispenser will not operate. Push up any spills. 4. NOTE: If the filter is microbiologically unsafe or of the refrigerator ceiling. See "Water and Ice Dispensers" for at a lower flow rate and there will be used without adequate disinfection before or ...4. Locate the water filter in the right-hand side of unknown quality without a water filter installed. Take the new filter out of the refrigerator compartment. 2. Some spilling may occur. See "Water and Ice Dispensers" for details. NOTE: The dispenser feature may be replaced at www....
...housing, the water dispenser will not operate. Push up any spills. 4. NOTE: If the filter is microbiologically unsafe or of the refrigerator ceiling. See "Water and Ice Dispensers" for at a lower flow rate and there will be used without adequate disinfection before or ...4. Locate the water filter in the right-hand side of unknown quality without a water filter installed. Take the new filter out of the refrigerator compartment. 2. Some spilling may occur. See "Water and Ice Dispensers" for details. NOTE: The dispenser feature may be replaced at www....
Owners Manual
Page 18
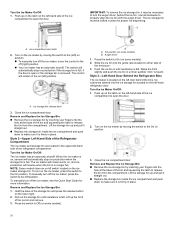
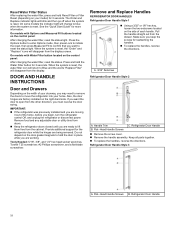
...the control panel: After changing the water filter, reset the status. Also, the door hinges are working. Remove and Replace Handles REFRIGERATOR DOOR HANDLES Refrigerator Door Handle Style 1 � Using a 3⁄32" or 1⁄8" hex key, loosen the two setscrews located on the... Torx®† T25 screwdriver, #2 Phillips screwdriver, and a flat-blade screwdriver. Pull the handle straight out from the display screen. Refrigerator Door Handle B. DOOR AND HANDLE INSTRUCTIONS Door and Drawers Depending on the width of each handle. Handle Trim C. Reset Water Filter Status ...
...the control panel: After changing the water filter, reset the status. Also, the door hinges are working. Remove and Replace Handles REFRIGERATOR DOOR HANDLES Refrigerator Door Handle Style 1 � Using a 3⁄32" or 1⁄8" hex key, loosen the two setscrews located on the... Torx®† T25 screwdriver, #2 Phillips screwdriver, and a flat-blade screwdriver. Pull the handle straight out from the display screen. Refrigerator Door Handle B. DOOR AND HANDLE INSTRUCTIONS Door and Drawers Depending on the width of each handle. Handle Trim C. Reset Water Filter Status ...
Owners Manual
Page 19
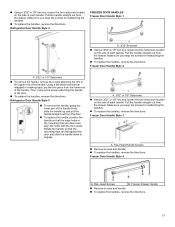
... handle, position the handle so that the mounting clips are down to the door. � To replace the handles, reverse the directions. Refrigerator Door Handle Style 5 � To remove the handle, grasp the lower part of the handle. Make sure you keep the screws for ...side of each handle. Flat-Head Handle Screws � Remove screws and handle. � To replace the handles, reverse the directions. Flat-Head Screws B. Refrigerator Door Handle Style 4 FREEZER DOOR HANDLES Freezer Door Handle Style 1 A. 3/32" Setscrew � Using a 3⁄32" or 1⁄8" hex key, ...
... handle, position the handle so that the mounting clips are down to the door. � To replace the handles, reverse the directions. Refrigerator Door Handle Style 5 � To remove the handle, grasp the lower part of the handle. Make sure you keep the screws for ...side of each handle. Flat-Head Handle Screws � Remove screws and handle. � To replace the handles, reverse the directions. Flat-Head Screws B. Refrigerator Door Handle Style 4 FREEZER DOOR HANDLES Freezer Door Handle Style 1 A. 3/32" Setscrew � Using a 3⁄32" or 1⁄8" hex key, ...
Owners Manual
Page 20
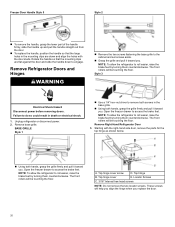
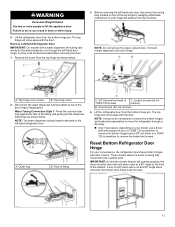
...the base grille. � Using both hands, grasp the grille firmly and pull it toward you . Unplug refrigerator or disconnect power. 2. NOTE: To allow the refrigerator to roll easier, raise the brake feet by turning them counterclockwise. The front rollers will help you align ...toward you replace the door. 20 Style 3 Electrical Shock Hazard Disconnect power before removing doors. Remove Right-Hand Refrigerator Door 3. Top hinge cover screw D. Remove Refrigerator Doors and Hinges WARNING � Remove the two screws fastening the base grille to roll easier, raise the ...
...the base grille. � Using both hands, grasp the grille firmly and pull it toward you . Unplug refrigerator or disconnect power. 2. NOTE: To allow the refrigerator to roll easier, raise the brake feet by turning them counterclockwise. The front rollers will help you align ...toward you replace the door. 20 Style 3 Electrical Shock Hazard Disconnect power before removing doors. Remove Right-Hand Refrigerator Door 3. Top hinge cover screw D. Remove Refrigerator Doors and Hinges WARNING � Remove the two screws fastening the base grille to roll easier, raise the ...
Owners Manual
Page 21
... Only if necessary, depending on top of the cabinet. Top hinge cover screw B. Ground wire (Do not remove) 4. Remove Left-Hand Refrigerator Door IMPORTANT: On models with door closers. Remove the cover from the bottom hinge pin. NOTE: The water dispenser tubing remains attached to swing...tip or a TORX T25 screwdriver to remove the bottom hinges and a 3/8" nut driver or a TORX T25 screwdriver to move the refrigerator through the left -hand refrigerator door. It should remain attached to lift the appliance door. A. Outer ring B. Locator screws (do so can result in back ...
... Only if necessary, depending on top of the cabinet. Top hinge cover screw B. Ground wire (Do not remove) 4. Remove Left-Hand Refrigerator Door IMPORTANT: On models with door closers. Remove the cover from the bottom hinge pin. NOTE: The water dispenser tubing remains attached to swing...tip or a TORX T25 screwdriver to remove the bottom hinges and a 3/8" nut driver or a TORX T25 screwdriver to move the refrigerator through the left -hand refrigerator door. It should remain attached to lift the appliance door. A. Outer ring B. Locator screws (do so can result in back ...


