
Instruction Manual
Page 3
INTRODUCTION P R O L I N E™ S E R I E S MODEL KPFP850 FOOD PROCESSOR Introduction Section Contents Table of Contents 3 Food Processor Safety 5 Important Safeguards 6 Proof of Purchase & Registration.........7 Electrical Requirements 8 1
INTRODUCTION P R O L I N E™ S E R I E S MODEL KPFP850 FOOD PROCESSOR Introduction Section Contents Table of Contents 3 Food Processor Safety 5 Important Safeguards 6 Proof of Purchase & Registration.........7 Electrical Requirements 8 1
Instruction Manual
Page 4
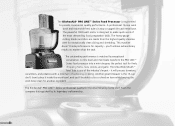
... powerful 1000-watt motor is designed to provide commercial quality performance. From the company distinguished by exceptional convenience. The KitchenAid® PRO LINE™ Series Food Processor is engineered to make quick work of the most demanding food preparation tasks. The heavy-gauge cutting blades and discs are made from the highest quality stainless steel for the...
... powerful 1000-watt motor is designed to provide commercial quality performance. From the company distinguished by exceptional convenience. The KitchenAid® PRO LINE™ Series Food Processor is engineered to make quick work of the most demanding food preparation tasks. The heavy-gauge cutting blades and discs are made from the highest quality stainless steel for the...
Instruction Manual
Page 5
... 5 Important Safeguards 6 Proof of Purchase & Product Registration 7 Electrical Requirements 8 FEATURES AND OPERATION Food Processor Features 10 Preparing the Food Processor for Use Before First Use 12 Work Bowl Assembly 12 Multipurpose Blade & Dough Blade Assembly 13 Slicing &... & Use 15 Using the Food Processor Before Use 17 Food Pusher Interlock 17 Maximum Liquid Level 17 Turning the Food Processor On and Off 18 Using the Pulse Control 18 2-Piece Food Pusher 18 Disassembling the Food Processor 19 Care and Cleaning 21 Troubleshooting 22 FOOD PROCESSING TIPS AND RECIPES Using...
... 5 Important Safeguards 6 Proof of Purchase & Product Registration 7 Electrical Requirements 8 FEATURES AND OPERATION Food Processor Features 10 Preparing the Food Processor for Use Before First Use 12 Work Bowl Assembly 12 Multipurpose Blade & Dough Blade Assembly 13 Slicing &... & Use 15 Using the Food Processor Before Use 17 Food Pusher Interlock 17 Maximum Liquid Level 17 Turning the Food Processor On and Off 18 Using the Pulse Control 18 2-Piece Food Pusher 18 Disassembling the Food Processor 19 Care and Cleaning 21 Troubleshooting 22 FOOD PROCESSING TIPS AND RECIPES Using...

Instruction Manual
Page 7
... and either the word "DANGER" or "WARNING." INTRODUCTION 5 Always read and obey all safety messages. This symbol alerts you to reduce the chance of others . FOOD PROCESSOR SAFETY Your safety and the safety of injury, and tell you what the potential hazard is the safety alert symbol. All safety messages will follow...
... and either the word "DANGER" or "WARNING." INTRODUCTION 5 Always read and obey all safety messages. This symbol alerts you to reduce the chance of others . FOOD PROCESSOR SAFETY Your safety and the safety of injury, and tell you what the potential hazard is the safety alert symbol. All safety messages will follow...
Instruction Manual
Page 8
...cause fire, electric shock, or injury. 8. To reduce the risk of electrical shock, do not put Food Processor in water or other literature included in this packaging referring to the Food Processor. Be certain cover is designed for examination, repair, or electrical or mechanical adjustment. 7. Read all instructions... is securely locked in place before putting on base without first putting bowl properly in any appliance is used only when the Food Processor is necessary when any manner. Do not operate any appliance with a damaged cord or plug, or after the appliance malfunctions ...
...cause fire, electric shock, or injury. 8. To reduce the risk of electrical shock, do not put Food Processor in water or other literature included in this packaging referring to the Food Processor. Be certain cover is designed for examination, repair, or electrical or mechanical adjustment. 7. Read all instructions... is securely locked in place before putting on base without first putting bowl properly in any appliance is used only when the Food Processor is necessary when any manner. Do not operate any appliance with a damaged cord or plug, or after the appliance malfunctions ...

Instruction Manual
Page 9
... records: Model Number: KPFP850 Serial Number Date Purchased Store Name INTRODUCTION 7 This card will assure you use your Food Processor, please fill out and mail your product registration card packed with the provisions of your Food Processor. PROOF OF PURCHASE & PRODUCT REGISTRATION Always keep a copy of the sales receipt showing the date of purchase...
... records: Model Number: KPFP850 Serial Number Date Purchased Store Name INTRODUCTION 7 This card will assure you use your Food Processor, please fill out and mail your product registration card packed with the provisions of your Food Processor. PROOF OF PURCHASE & PRODUCT REGISTRATION Always keep a copy of the sales receipt showing the date of purchase...
Instruction Manual
Page 10
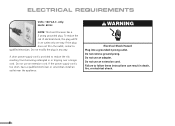
... use an extension cord. WARNING Electrical Shock Hazard Plug into a grounded 3 prong outlet. Do not use an extension cord. only. Hertz: 60 Hz NOTE: This Food Processor has a 3 prong grounded plug. If the plug does not fit in or tripping over a longer cord. Do not use an adapter.
... use an extension cord. WARNING Electrical Shock Hazard Plug into a grounded 3 prong outlet. Do not use an extension cord. only. Hertz: 60 Hz NOTE: This Food Processor has a 3 prong grounded plug. If the plug does not fit in or tripping over a longer cord. Do not use an adapter.

Instruction Manual
Page 11
FEATURES AND OPERATION P R O L I N E™ S E R I E S FEATURES AND OPERATION Features and Operation Section Contents Food Processor Features 10 Preparing for Use 12 Using the Food Processor 17 Disassembling the Food Processor.....19 Care and Cleaning 21 Troubleshooting 22 9
FEATURES AND OPERATION P R O L I N E™ S E R I E S FEATURES AND OPERATION Features and Operation Section Contents Food Processor Features 10 Preparing for Use 12 Using the Food Processor 17 Disassembling the Food Processor.....19 Care and Cleaning 21 Troubleshooting 22 9
Instruction Manual
Page 12
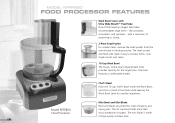
...cup bowl holds more than most standalone choppers. Mini Bowl and Mini Blade Bowl and blade are perfect for small chopping and Model KPFP850 Food Processor mixing jobs. with Ultra Wide Mouth™ Feed Tube One of the industry's largest feed tubes accommodates large items - The mini ...blade is made of high quality stainless steel. 10 MODEL KPFP850 FOOD PROCESSOR FEATURES Work Bowl Cover with a minimum of sectioning or slicing. 2-Piece Food Pusher For smaller items, remove the small pusher from the central tube in the large pusher.
...cup bowl holds more than most standalone choppers. Mini Bowl and Mini Blade Bowl and blade are perfect for small chopping and Model KPFP850 Food Processor mixing jobs. with Ultra Wide Mouth™ Feed Tube One of the industry's largest feed tubes accommodates large items - The mini ...blade is made of high quality stainless steel. 10 MODEL KPFP850 FOOD PROCESSOR FEATURES Work Bowl Cover with a minimum of sectioning or slicing. 2-Piece Food Pusher For smaller items, remove the small pusher from the central tube in the large pusher.
Instruction Manual
Page 14
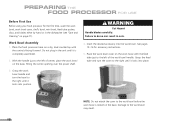
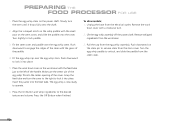
... bowl cover on a dry, level countertop with the feed tube just to the left of center, place the work bowl may result. 12 Place the food processor base on the work bowl handle. PREPARING THE FOOD PROCESSOR FOR USE Before First Use Before using your food processor for accessory instructions. 5. Work Bowl Assembly 1.
... bowl cover on a dry, level countertop with the feed tube just to the left of center, place the work bowl may result. 12 Place the food processor base on the work bowl handle. PREPARING THE FOOD PROCESSOR FOR USE Before First Use Before using your food processor for accessory instructions. 5. Work Bowl Assembly 1.
Instruction Manual
Page 15
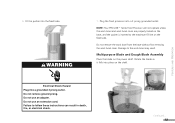
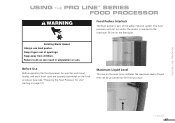
Plug the food processor into the feed tube. Damage to the work bowl cover are properly locked on the feed tube. Do not use an adapter. Failure to the maximum fill line on the base, and the pusher is inserted to follow these instructions can result in death, fire, or ...Place the blade on the shaft. FEATURES AND OPERATION Electrical Shock Hazard Plug into place on the power shaft. WARNING 7. NOTE: Your PRO LINE™ Series Food Processor will not operate unless the work bowl and work bowl may result. Do not remove the work bowl from the base without first ...
Plug the food processor into the feed tube. Damage to the work bowl cover are properly locked on the feed tube. Do not use an adapter. Failure to the maximum fill line on the base, and the pusher is inserted to follow these instructions can result in death, fire, or ...Place the blade on the shaft. FEATURES AND OPERATION Electrical Shock Hazard Plug into place on the power shaft. WARNING 7. NOTE: Your PRO LINE™ Series Food Processor will not operate unless the work bowl and work bowl may result. Do not remove the work bowl from the base without first ...

Instruction Manual
Page 16
... the mini bowl until it falls into place. Fit the mini blade on the power shaft. When properly seated in a similar manner. 14 PREPARING THE FOOD PROCESSOR FOR USE Slicing and Shredding Disc Assembly Place the disc stem on the power shaft. Fit the disc over the power shaft.
... the mini bowl until it falls into place. Fit the mini blade on the power shaft. When properly seated in a similar manner. 14 PREPARING THE FOOD PROCESSOR FOR USE Slicing and Shredding Disc Assembly Place the disc stem on the power shaft. Fit the disc over the power shaft.
Instruction Manual
Page 18
PREPARING THE FOOD PROCESSOR FOR USE 1. Fit the egg whip cap over the egg whip stem. Make sure the center pin of the egg whip fits into place. Pull ...
PREPARING THE FOOD PROCESSOR FOR USE 1. Fit the egg whip cap over the egg whip stem. Make sure the center pin of the egg whip fits into place. Pull ...
Instruction Manual
Page 19
... pusher is part of the safety interlock system. Keep away from children. Rotating Blade Hazard Always use food pusher. Failure to the maximum fill line on the feed tube. USING THE PRO LINE™ SERIES FOOD PROCESSOR WARNING Food Pusher Interlock The food pusher is inserted to do so can be sure the work bowl, blades, and work bowl...
... pusher is part of the safety interlock system. Keep away from children. Rotating Blade Hazard Always use food pusher. Failure to the maximum fill line on the feed tube. USING THE PRO LINE™ SERIES FOOD PROCESSOR WARNING Food Pusher Interlock The food pusher is inserted to do so can be sure the work bowl, blades, and work bowl...

Instruction Manual
Page 20
... and cover are properly locked on the feed tube (see "Preparing the Food Processor for jobs which require a light touch. Wait until the blade or disk comes to the maximum fill line on the base, and the food pusher is running. When not using the small feed tube, lock the...Pulse Control The pulse control allows precise control of the duration and frequency of the blade or disk within seconds. 3. USING THE PRO LINE™ SERIES FOOD PROCESSOR Turning the Food Processor On and Off 1. Just press and hold the Pulse Button to stop before unplugging the unit. The blue indicator light will ...
... and cover are properly locked on the feed tube (see "Preparing the Food Processor for jobs which require a light touch. Wait until the blade or disk comes to the maximum fill line on the base, and the food pusher is running. When not using the small feed tube, lock the...Pulse Control The pulse control allows precise control of the duration and frequency of the blade or disk within seconds. 3. USING THE PRO LINE™ SERIES FOOD PROCESSOR Turning the Food Processor On and Off 1. Just press and hold the Pulse Button to stop before unplugging the unit. The blue indicator light will ...

Instruction Manual
Page 21
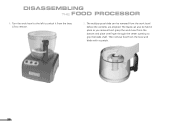
... cover to do so can result in cuts. Failure to the left and remove. 2. Place two fingers under each side of the bowl. DISASSEMBLING THE FOOD PROCESSOR WARNING Cut Hazard Handle blades carefully. If using the finger grips located along the top edge of the disc and lift it is likely that...
... cover to do so can result in cuts. Failure to the left and remove. 2. Place two fingers under each side of the bowl. DISASSEMBLING THE FOOD PROCESSOR WARNING Cut Hazard Handle blades carefully. If using the finger grips located along the top edge of the disc and lift it is likely that...
Instruction Manual
Page 22
The multipurpose blade can also be removed from the bottom and place one finger through the center opening to remove. 5. Lift to grip the blade shaft. The blade can be held in place as you remove food: grasp the work bowl from the work bowl to the left to unlock it from the bowl and blade with a spatula. 20 Then remove food from the base. Turn the work bowl before the contents are emptied. DISASSEMBLING THE FOOD PROCESSOR 4.
The multipurpose blade can also be removed from the bottom and place one finger through the center opening to remove. 5. Lift to grip the blade shaft. The blade can be held in place as you remove food: grasp the work bowl from the work bowl to the left to unlock it from the bowl and blade with a spatula. 20 Then remove food from the base. Turn the work bowl before the contents are emptied. DISASSEMBLING THE FOOD PROCESSOR 4.
Instruction Manual
Page 23
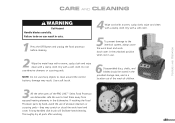
Use a soft brush. 4 Wipe cord with a damp cloth. Thoroughly dry all parts after washing. 21 Do not use of the PRO LINE™ Series Food Processor are dishwasher safe. wipe cord clean with a warm, sudsy cloth; Dry with a soft cloth. 5 To prevent damage to clean around the control buttons;...in the provided storage case, and in the dishwasher. Be sure to do so can result in cuts. 1 Press the Off Button and unplug the food processor before cleaning. 2 Wipe the metal base with a warm, sudsy cloth and wipe clean with a damp cloth. CARE AND CLEANING FEATURES AND OPERATION ...
Use a soft brush. 4 Wipe cord with a damp cloth. Thoroughly dry all parts after washing. 21 Do not use of the PRO LINE™ Series Food Processor are dishwasher safe. wipe cord clean with a warm, sudsy cloth; Dry with a soft cloth. 5 To prevent damage to clean around the control buttons;...in the provided storage case, and in the dishwasher. Be sure to do so can result in cuts. 1 Press the Off Button and unplug the food processor before cleaning. 2 Wipe the metal base with a warm, sudsy cloth and wipe clean with a damp cloth. CARE AND CLEANING FEATURES AND OPERATION ...
Instruction Manual
Page 24
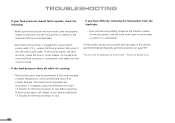
...the maximum fill line on page 93*. * Do not return the food processor to and make sure the circuit is running: - If it is plugged into the same outlet again. See if the food processor is , unplug the food processor, then plug it in this section, see the KitchenAid Warranty and ...Service section on the feed tube. - The food processor may be corrected with the steps in a dishwasher. - This should fail ...
...the maximum fill line on page 93*. * Do not return the food processor to and make sure the circuit is running: - If it is plugged into the same outlet again. See if the food processor is , unplug the food processor, then plug it in this section, see the KitchenAid Warranty and ...Service section on the feed tube. - The food processor may be corrected with the steps in a dishwasher. - This should fail ...
Instruction Manual
Page 34
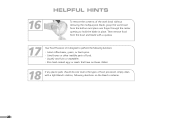
...the contents of the work bowl without removing the multipurpose blade, grasp the work bowl from the bowl and blade with a spatula. 17 Your Food Processor isn't designed to perform the following functions: • Grind coffee beans, grains, or hard spices. • Grind bones or other inedible parts of... food. • Liquefy raw fruits or vegetables. • Slice hard-cooked eggs or meats that have not been chilled. 18 If any plastic parts ...
...the contents of the work bowl without removing the multipurpose blade, grasp the work bowl from the bowl and blade with a spatula. 17 Your Food Processor isn't designed to perform the following functions: • Grind coffee beans, grains, or hard spices. • Grind bones or other inedible parts of... food. • Liquefy raw fruits or vegetables. • Slice hard-cooked eggs or meats that have not been chilled. 18 If any plastic parts ...


