Instruction Manual
Page 4
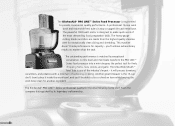
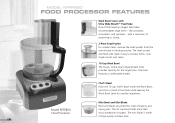
... mini blade transform the PRO LINE™ Series food processor into a mini-chopper, the perfect tool for exceptionally clean slicing and shredding. Another great timesaver is the 13-cup chef's bowl: place it will process tomatoes, cucumbers, and potatoes with a minimum of sectioning or slicing. This machine doesn't trade performance for the discriminating home chef. The Ultra Wide Mouth™ Feed Tube is engineered to make quick work bowl clean for another ingredient. The KitchenAid® PRO LINE™ Series Food Processor...
... mini blade transform the PRO LINE™ Series food processor into a mini-chopper, the perfect tool for exceptionally clean slicing and shredding. Another great timesaver is the 13-cup chef's bowl: place it will process tomatoes, cucumbers, and potatoes with a minimum of sectioning or slicing. This machine doesn't trade performance for the discriminating home chef. The Ultra Wide Mouth™ Feed Tube is engineered to make quick work bowl clean for another ingredient. The KitchenAid® PRO LINE™ Series Food Processor...
Instruction Manual
Page 5
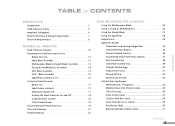
... Use 12 Work Bowl Assembly 12 Multipurpose Blade & Dough Blade Assembly 13 Slicing & Shredding Disc Assembly 14 Mini Bowl Assembly 14 Chef's Bowl Assembly 15 Egg Whip Assembly & Use 15 Using the Food Processor Before Use 17 Food Pusher Interlock 17 Maximum Liquid Level 17 Turning the Food Processor On and Off 18 Using the Pulse Control 18 2-Piece Food Pusher 18 Disassembling the Food Processor 19 Care and Cleaning 21 Troubleshooting 22 FOOD PROCESSING TIPS AND RECIPES Using the Multipurpose Blade 24 Using a Slicing or Shredding Disc 26 Using the Dough Blade 27 Using the Egg...
... Use 12 Work Bowl Assembly 12 Multipurpose Blade & Dough Blade Assembly 13 Slicing & Shredding Disc Assembly 14 Mini Bowl Assembly 14 Chef's Bowl Assembly 15 Egg Whip Assembly & Use 15 Using the Food Processor Before Use 17 Food Pusher Interlock 17 Maximum Liquid Level 17 Turning the Food Processor On and Off 18 Using the Pulse Control 18 2-Piece Food Pusher 18 Disassembling the Food Processor 19 Care and Cleaning 21 Troubleshooting 22 FOOD PROCESSING TIPS AND RECIPES Using the Multipurpose Blade 24 Using a Slicing or Shredding Disc 26 Using the Dough Blade 27 Using the Egg...
Instruction Manual
Page 8
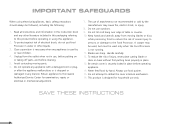
... blade or discs on or taking off parts, and before operating appliance. 14. Always use outdoors. 9. The use , before putting on base without first putting bowl properly in any appliance is used by or near children. 4. Handle carefully. 12. Do not let cord hang over edge of electrical shock, do not put Food Processor in water or other literature included in place before cleaning...
... blade or discs on or taking off parts, and before operating appliance. 14. Always use outdoors. 9. The use , before putting on base without first putting bowl properly in any appliance is used by or near children. 4. Handle carefully. 12. Do not let cord hang over edge of electrical shock, do not put Food Processor in water or other literature included in place before cleaning...
Instruction Manual
Page 12
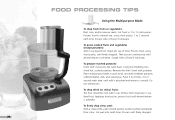
... large pusher. The small pusher and feed tube make it easy to process herbs, nuts, single carrots and celery. 16-Cup Work Bowl The tough, crystal-clear polycarbonate bowl provides capacity for small chopping and Model KPFP850 Food Processor mixing jobs. Mini Bowl and Mini Blade Bowl and blade are perfect for the largest jobs. The 41⁄2-cup bowl holds more than most standalone choppers. The bowl features a comfortable handle. Chef's Bowl Place the 13-cup Chef's Bowl inside the Work Bowl, and slice or shred a food...
... large pusher. The small pusher and feed tube make it easy to process herbs, nuts, single carrots and celery. 16-Cup Work Bowl The tough, crystal-clear polycarbonate bowl provides capacity for small chopping and Model KPFP850 Food Processor mixing jobs. Mini Bowl and Mini Blade Bowl and blade are perfect for the largest jobs. The 41⁄2-cup bowl holds more than most standalone choppers. The bowl features a comfortable handle. Chef's Bowl Place the 13-cup Chef's Bowl inside the Work Bowl, and slice or shred a food...
Instruction Manual
Page 14
... food processor base on the base. WARNING Cut Hazard Handle blades carefully. Insert the desired accessory into the work bowl handle and turn the cover to the right until it locks into place. Grasp the feed tube and turn the bowl to the right until it locks into position. NOTE: Do not attach the cover to the work bowl cover, chef's bowl, mini bowl, feed tube pusher, discs, and blades either by hand or in the dishwasher (see "Care and Cleaning" on page 21). Grasp the work bowl...
... food processor base on the base. WARNING Cut Hazard Handle blades carefully. Insert the desired accessory into the work bowl handle and turn the cover to the right until it locks into place. Grasp the feed tube and turn the bowl to the right until it locks into position. NOTE: Do not attach the cover to the work bowl cover, chef's bowl, mini bowl, feed tube pusher, discs, and blades either by hand or in the dishwasher (see "Care and Cleaning" on page 21). Grasp the work bowl...
Instruction Manual
Page 15
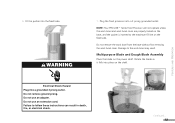
... the feed tube. Do not use an extension cord. 6. Do not remove the work bowl from the base without first removing the work bowl may result. Damage to follow these instructions can result in death, fire, or electrical shock. WARNING 7. Do not use an adapter. Do not remove ground prong. Continued... 13 Multipurpose Blade and Dough Blade Assembly Place the blade on the power shaft. Failure to the work bowl cover. Plug the food processor into...
... the feed tube. Do not use an extension cord. 6. Do not remove the work bowl from the base without first removing the work bowl may result. Damage to follow these instructions can result in death, fire, or electrical shock. WARNING 7. Do not use an adapter. Do not remove ground prong. Continued... 13 Multipurpose Blade and Dough Blade Assembly Place the blade on the power shaft. Failure to the work bowl cover. Plug the food processor into...
Instruction Manual
Page 17
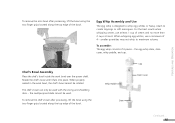
... top edge of the bowl. FEATURES AND OPERATION To remove the mini bowl after processing, lift the bowl using the two finger grips located along the top edge of the bowl. Rotate the chef's bowl until it falls into place. To assemble: The egg whip consists of 4 - Chef's Bowl Assembly Place the chef's bowl inside the work bowl, the chef's bowl cannot be used with the slicing and shredding discs - Whip Paddle Stem Cap Stem Cover Continued... 15 For...
... top edge of the bowl. FEATURES AND OPERATION To remove the mini bowl after processing, lift the bowl using the two finger grips located along the top edge of the bowl. Rotate the chef's bowl until it falls into place. To assemble: The egg whip consists of 4 - Chef's Bowl Assembly Place the chef's bowl inside the work bowl, the chef's bowl cannot be used with the slicing and shredding discs - Whip Paddle Stem Cap Stem Cover Continued... 15 For...
Instruction Manual
Page 18
.... Unplug the base from the egg whip assembly. Place the work bowl with the small post on the power shaft. Push downward to lock it drops fully onto the shaft. 2. Make sure the center pin of the egg whip fits into the feed tube. Place the egg-whip stem on the stem cover, and slide the paddle onto the cover. Remove the work bowl. 3. Press the On Button and whip ingredients to operate. 6. Push...
.... Unplug the base from the egg whip assembly. Place the work bowl with the small post on the power shaft. Push downward to lock it drops fully onto the shaft. 2. Make sure the center pin of the egg whip fits into the feed tube. Place the egg-whip stem on the stem cover, and slide the paddle onto the cover. Remove the work bowl. 3. Press the On Button and whip ingredients to operate. 6. Push...
Instruction Manual
Page 19
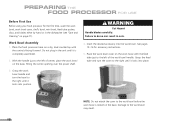
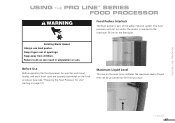
... children. Maximum Liquid Level This line on page 12). FEATURES AND OPERATION Continued... 17 Failure to the maximum fill line on the feed tube. The food processor will not run unless the pusher is part of openings. Before Use Before operating the food processor, be sure the work bowl, blades, and work bowl cover are properly assembled on the food processor base (see "Preparing the Food Processor for Use" starting on the work bowl indicates the maximum level of...
... children. Maximum Liquid Level This line on page 12). FEATURES AND OPERATION Continued... 17 Failure to the maximum fill line on the feed tube. The food processor will not run unless the pusher is part of openings. Before Use Before operating the food processor, be sure the work bowl, blades, and work bowl cover are properly assembled on the food processor base (see "Preparing the Food Processor for Use" starting on the work bowl indicates the maximum level of...
Instruction Manual
Page 20
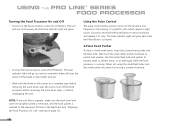
... to operate, make sure the work bowl and cover are properly locked on the base, and the food pusher is inserted to stop the food processor, press the Off Button. Just press and hold the Pulse Button to start processing, and release it counter-clockwise. 18 To stop . Using the Pulse Control The pulse control allows precise control of the duration and frequency of the blade or disk within...
... to operate, make sure the work bowl and cover are properly locked on the base, and the food pusher is inserted to stop the food processor, press the Off Button. Just press and hold the Pulse Button to start processing, and release it counter-clockwise. 18 To stop . Using the Pulse Control The pulse control allows precise control of the duration and frequency of the blade or disk within...
Instruction Manual
Page 21
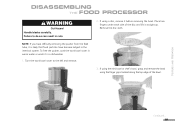
... cuts. Remove the disc stem. 3. Failure to the left and remove. 2. To free the pusher, soak the work bowl cover to do so can result in the interlock system. If using the mini bowl or chef's bowl, grasp and remove the bowl using a disc, remove it is likely that food particles have difficulty removing the pusher from the feed tube, it before removing the bowl. FEATURES AND OPERATION Continued... 19 DISASSEMBLING THE FOOD PROCESSOR WARNING Cut Hazard Handle blades carefully. Turn the work bowl cover in a dishwasher...
... cuts. Remove the disc stem. 3. Failure to the left and remove. 2. To free the pusher, soak the work bowl cover to do so can result in the interlock system. If using the mini bowl or chef's bowl, grasp and remove the bowl using a disc, remove it is likely that food particles have difficulty removing the pusher from the feed tube, it before removing the bowl. FEATURES AND OPERATION Continued... 19 DISASSEMBLING THE FOOD PROCESSOR WARNING Cut Hazard Handle blades carefully. Turn the work bowl cover in a dishwasher...
Instruction Manual
Page 23
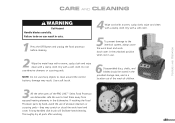
... the food processor before cleaning. 2 Wipe the metal base with a warm, sudsy cloth and wipe clean with a soft cloth. Dry with a damp cloth. damage may scratch or cloud the work bowl cover in the unlocked position when not in use. 6 Disassembled discs, shafts, and blades should be stored in the provided storage case, and in a location out of the reach of children. 3 All the other parts...
... the food processor before cleaning. 2 Wipe the metal base with a warm, sudsy cloth and wipe clean with a soft cloth. Dry with a damp cloth. damage may scratch or cloud the work bowl cover in the unlocked position when not in use. 6 Disassembled discs, shafts, and blades should be stored in the provided storage case, and in a location out of the reach of children. 3 All the other parts...
Instruction Manual
Page 24
... pusher, soak the work bowl cover are probably lodged in this section, see the KitchenAid Warranty and Service section on the electrical circuit the food processor is connected to and make sure the circuit is inserted to operate, check the following: • If you have difficulty removing the food pusher from the feed tube: - TROUBLESHOOTING • If your food processor should be an extremely rare occurrence. Make sure the work bowl and work bowl cover...
... pusher, soak the work bowl cover are probably lodged in this section, see the KitchenAid Warranty and Service section on the electrical circuit the food processor is connected to and make sure the circuit is inserted to operate, check the following: • If you have difficulty removing the food pusher from the feed tube: - TROUBLESHOOTING • If your food processor should be an extremely rare occurrence. Make sure the work bowl and work bowl cover...
Instruction Manual
Page 26
...: Peel, core, and/or remove seeds. Cut food in work bowl. Scrape sides of bowl if necessary. To chop dried (or sticky) fruits: The fruit should be cold. Process until finely chopped. Scrape sides of bowl if necessary. To prepare mashed potatoes: Insert chef's bowl into small strips. Add 1⁄4 cup of food. Cut peel into the work bowl, and add shredded potatoes, softened butter, milk, and seasonings. To...
...: Peel, core, and/or remove seeds. Cut food in work bowl. Scrape sides of bowl if necessary. To chop dried (or sticky) fruits: The fruit should be cold. Process until finely chopped. Scrape sides of bowl if necessary. To prepare mashed potatoes: Insert chef's bowl into small strips. Add 1⁄4 cup of food. Cut peel into the work bowl, and add shredded potatoes, softened butter, milk, and seasonings. To...
Instruction Manual
Page 39
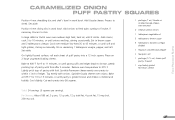
... slightly. Position 4 mm slicing disc in work bowl. Top evenly with fork. Cut each sheet of pastry with onions. Cook over pastry to fit tube, if necessary. Add Gouda cheese. FOOD PROCESSOR RECIPES CARAMELIZED ONION PUFF PASTRY SQUARES Position 4 mm shredding disc and chef's bowl in work bowl. Bake at 400° F for 10 to 15 minutes, or until soft and light golden, stirring occasionally.
... slightly. Position 4 mm slicing disc in work bowl. Top evenly with fork. Cut each sheet of pastry with onions. Cook over pastry to fit tube, if necessary. Add Gouda cheese. FOOD PROCESSOR RECIPES CARAMELIZED ONION PUFF PASTRY SQUARES Position 4 mm shredding disc and chef's bowl in work bowl. Bake at 400° F for 10 to 15 minutes, or until soft and light golden, stirring occasionally.

Instruction Manual
Page 59
...Process to fit feed tube if necessary. Position chef's bowl and 4 mm slicing disc in work bowl. Add potatoes. skim fat from broth. Set aside. Continued... 6 cups chicken broth 11⁄2 cups water 2-21⁄2 pounds smoked pork hocks 1 medium onion, cut into quarters 2 large ribs celery, cut into 21⁄2-inch pieces... pepper. Process to shred. Strain broth; Cook and stir 8 to a boil. Set aside Exchange slicing disc for 4 mm slicing disc. Set aside. Remove meat, cut into small pieces, and set aside. WINTER VEGETABLE SOUP FOOD PROCESSOR RECIPES In large Dutch oven...
...Process to fit feed tube if necessary. Position chef's bowl and 4 mm slicing disc in work bowl. Add potatoes. skim fat from broth. Set aside. Continued... 6 cups chicken broth 11⁄2 cups water 2-21⁄2 pounds smoked pork hocks 1 medium onion, cut into quarters 2 large ribs celery, cut into 21⁄2-inch pieces... pepper. Process to shred. Strain broth; Cook and stir 8 to a boil. Set aside Exchange slicing disc for 4 mm slicing disc. Set aside. Remove meat, cut into small pieces, and set aside. WINTER VEGETABLE SOUP FOOD PROCESSOR RECIPES In large Dutch oven...

Instruction Manual
Page 69
... French bread lengthwise. place cut sides; Exchange mini bowl and mini blade for multipurpose blade in work bowl. Process until fine crumbs form, 5 to 75 minutes, or until crisp. Bake at 350° F for mini work bowl and mini blade in work bowl. LOADED BAKED POTATO CASSEROLE FOOD PROCESSOR RECIPES In 12-inch skillet over high heat, add water and 11⁄2 teaspoons salt; Position chef's bowl and 4 mm shredding disc in work bowl. Set aside...
... French bread lengthwise. place cut sides; Exchange mini bowl and mini blade for multipurpose blade in work bowl. Process until fine crumbs form, 5 to 75 minutes, or until crisp. Bake at 350° F for mini work bowl and mini blade in work bowl. LOADED BAKED POTATO CASSEROLE FOOD PROCESSOR RECIPES In 12-inch skillet over high heat, add water and 11⁄2 teaspoons salt; Position chef's bowl and 4 mm shredding disc in work bowl. Set aside...
Instruction Manual
Page 96
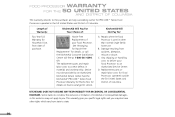
... KitchenAid Service Center. See the KitchenAid® PRO LINE™ Series Food Processor Warranty for Puerto Rico for service. Replacement parts or repair labor costs for details, or call the KitchenAid Customer Satisfaction Center toll-free at 1-800-541-6390. Repairs when the Food Processor is used in other rights which vary from accident, alteration, misuse or abuse. This warranty gives you specific legal rights and you . OR The replacement parts and repair...
... KitchenAid Service Center. See the KitchenAid® PRO LINE™ Series Food Processor Warranty for Puerto Rico for service. Replacement parts or repair labor costs for details, or call the KitchenAid Customer Satisfaction Center toll-free at 1-800-541-6390. Repairs when the Food Processor is used in other rights which vary from accident, alteration, misuse or abuse. This warranty gives you specific legal rights and you . OR The replacement parts and repair...
Instruction Manual
Page 97
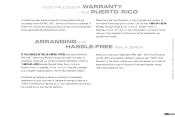
... a copy of the proof of a Service Center near you prepaid and insured. Box Numbers, please.) When you receive your replacement PRO LINE™ Series Food Processor, use the carton and packing materials to you . KitchenAid will arrange to deliver an identical or comparable replacement to your "failed" Food Processor returned to have your door free of ownership, simply call our toll-free Customer Satisfaction Center at 1-800-541...
... a copy of the proof of a Service Center near you prepaid and insured. Box Numbers, please.) When you receive your replacement PRO LINE™ Series Food Processor, use the carton and packing materials to you . KitchenAid will arrange to deliver an identical or comparable replacement to your "failed" Food Processor returned to have your door free of ownership, simply call our toll-free Customer Satisfaction Center at 1-800-541...

Instruction Manual
Page 99
WARRANTY AND SERVICE INFORMATION ARRANGING FOR SERVICE OUTSIDE THE 50 UNITED STATES AND PUERTO RICO Consult your local KitchenAid dealer or the store where you purchased your PRO LINE™ Series Food Processor for information on how to obtain service. 97
WARRANTY AND SERVICE INFORMATION ARRANGING FOR SERVICE OUTSIDE THE 50 UNITED STATES AND PUERTO RICO Consult your local KitchenAid dealer or the store where you purchased your PRO LINE™ Series Food Processor for information on how to obtain service. 97


