
Owners Manual
Page 2
PARTS AND FEATURES PARTS AND ACCESSORIES Motor head Attachment hub Speed control lever Beater height adjustment screw Bowl support Locating pins Bowl* Attachment knob Bowl lift lever (not shown) Beater shaft Bowl handle* Flat beater Wire whip* Flex Edge beater (select models only) Spiral dough hook 2 | PARTS AND FEATURES *Style may vary depending on model
PARTS AND FEATURES PARTS AND ACCESSORIES Motor head Attachment hub Speed control lever Beater height adjustment screw Bowl support Locating pins Bowl* Attachment knob Bowl lift lever (not shown) Beater shaft Bowl handle* Flat beater Wire whip* Flex Edge beater (select models only) Spiral dough hook 2 | PARTS AND FEATURES *Style may vary depending on model

Owners Manual
Page 3
... Stand Mixer. 6. Unplug Stand Mixer from beater during operation to reduce the risk of attachments not recommended or sold by or near children. 4. Close supervision is necessary when any manner. Do not operate Stand Mixer with a damaged cord or plug or after the Stand Mixer malfunctions, or is used by KitchenAid may cause fire, electrical shock, or injury. 8. Avoid contacting moving parts. ENGLISH STAND MIXER SAFETY IMPORTANT SAFEGUARDS When using electrical...
... Stand Mixer. 6. Unplug Stand Mixer from beater during operation to reduce the risk of attachments not recommended or sold by or near children. 4. Close supervision is necessary when any manner. Do not operate Stand Mixer with a damaged cord or plug or after the Stand Mixer malfunctions, or is used by KitchenAid may cause fire, electrical shock, or injury. 8. Avoid contacting moving parts. ENGLISH STAND MIXER SAFETY IMPORTANT SAFEGUARDS When using electrical...

Owners Manual
Page 4
... (power). If the power supply cord is based on the serial plate. STAND MIXER SAFETY 9. Do not use only. Remove flat beater, Flex Edge beater, wire whip, or spiral dough hook from Stand Mixer before washing. ELECTRICAL REQUIREMENTS Volts: 120 A.C. Do not let the cord hang over edge of table or counter. 10. Other recommended attachments may draw significantly less power. 4 | STAND MIXER SAFETY The maximum rating is too short, have a qualified electrician or serviceman install...
... (power). If the power supply cord is based on the serial plate. STAND MIXER SAFETY 9. Do not use only. Remove flat beater, Flex Edge beater, wire whip, or spiral dough hook from Stand Mixer before washing. ELECTRICAL REQUIREMENTS Volts: 120 A.C. Do not let the cord hang over edge of table or counter. 10. Other recommended attachments may draw significantly less power. 4 | STAND MIXER SAFETY The maximum rating is too short, have a qualified electrician or serviceman install...

Owners Manual
Page 6
... spring latch. Pin Attach flat beater. Turn left, hooking beater over locating pins and press down on how to the straight up position. Raise bowl to the OFF position and is turned to mixing position. Slip flat beater 3 onto the shaft. For best performance, please go through these quick steps before using your Stand Mixer. Spring latch Locating pin 1 Make sure Stand Mixer is unplugged. Rotate bowl lift lever counter- 4 clockwise to use . USING THE STAND MIXER...
... spring latch. Pin Attach flat beater. Turn left, hooking beater over locating pins and press down on how to the straight up position. Raise bowl to the OFF position and is turned to mixing position. Slip flat beater 3 onto the shaft. For best performance, please go through these quick steps before using your Stand Mixer. Spring latch Locating pin 1 Make sure Stand Mixer is unplugged. Rotate bowl lift lever counter- 4 clockwise to use . USING THE STAND MIXER...

Owners Manual
Page 7
... set up and ready for use . Plug Stand Mixer into a grounded 3 prong 5 outlet. Adjust the beater height 6 adjustment screw to bowl clearance. The beater should not touch it. Your Stand Mixer is common with the wire whip and spiral dough hook. Raise Bowl Lower Bowl Test beater to lower or raise the bowl. Turn Stand Mixer ON and test each speed, making sure the beater does not touch the bowl during use . Unplug Stand Mixer. Repeat steps 2-5 with electric motors. Under heavy loads with extended mixing...
... set up and ready for use . Plug Stand Mixer into a grounded 3 prong 5 outlet. Adjust the beater height 6 adjustment screw to bowl clearance. The beater should not touch it. Your Stand Mixer is common with the wire whip and spiral dough hook. Raise Bowl Lower Bowl Test beater to lower or raise the bowl. Turn Stand Mixer ON and test each speed, making sure the beater does not touch the bowl during use . Unplug Stand Mixer. Repeat steps 2-5 with electric motors. Under heavy loads with extended mixing...

Owners Manual
Page 12
.... Replacement parts or repair labor costs for Your Choice of: One Year Full Warranty from date of Columbia, Puerto Rico, and Canada. WARRANTY AND SERVICE KITCHENAID® STAND MIXER WARRANTY FOR THE 50 UNITED STATES, THE DISTRICT OF COLUMBIA, PUERTO RICO, AND CANADA This warranty extends to the purchaser and any succeeding owner for Stand Mixers operated in materials and workmanship. Length of Warranty: KitchenAid Will Pay for Stand Mixers operated outside...
.... Replacement parts or repair labor costs for Your Choice of: One Year Full Warranty from date of Columbia, Puerto Rico, and Canada. WARRANTY AND SERVICE KITCHENAID® STAND MIXER WARRANTY FOR THE 50 UNITED STATES, THE DISTRICT OF COLUMBIA, PUERTO RICO, AND CANADA This warranty extends to the purchaser and any succeeding owner for Stand Mixers operated in materials and workmanship. Length of Warranty: KitchenAid Will Pay for Stand Mixers operated outside...
Owners Manual 1
Page 3
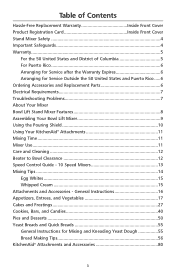
... General Instructions for Service Outside the 50 United States and Puerto Rico .....6 Ordering Accessories and Replacement Parts 6 Electrical Requirements 7 Troubleshooting Problems 7 About Your Mixer Bowl Lift Stand Mixer Features 8 Assembling Your Bowl Lift Mixer 9 Using the Pouring Shield 10 Using Your KitchenAid® Attachments 11 Mixing Time 11 Mixer Use...11 Care and Cleaning 12 Beater to Bowl Clearance 12 Speed Control Guide - 10 Speed Mixers 13 Mixing Tips 14 Egg Whites 15 Whipped Cream 15 Attachments and Accessories - Table of Contents Hassle-Free Replacement Warranty...
... General Instructions for Service Outside the 50 United States and Puerto Rico .....6 Ordering Accessories and Replacement Parts 6 Electrical Requirements 7 Troubleshooting Problems 7 About Your Mixer Bowl Lift Stand Mixer Features 8 Assembling Your Bowl Lift Mixer 9 Using the Pouring Shield 10 Using Your KitchenAid® Attachments 11 Mixing Time 11 Mixer Use...11 Care and Cleaning 12 Beater to Bowl Clearance 12 Speed Control Guide - 10 Speed Mixers 13 Mixing Tips 14 Egg Whites 15 Whipped Cream 15 Attachments and Accessories - Table of Contents Hassle-Free Replacement Warranty...
Owners Manual 1
Page 4
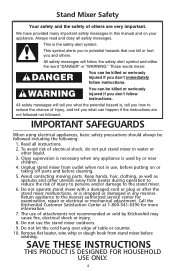
... stand mixer malfunctions, or is , tell you how to the nearest authorized service center for more information. 7. Always read and obey all instructions. 2. Keep hands, hair, clothing, as well as spatulas and other liquid. 3. The use , before putting on your appliance. Do not let the cord hang over edge of table or counter. 10. Remove flat beater, wire whip or dough hook from beater during operation...
... stand mixer malfunctions, or is , tell you how to the nearest authorized service center for more information. 7. Always read and obey all instructions. 2. Keep hands, hair, clothing, as well as spatulas and other liquid. 3. The use , before putting on your appliance. Do not let the cord hang over edge of table or counter. 10. Remove flat beater, wire whip or dough hook from beater during operation...

Owners Manual 1
Page 5
... stand mixer. B. Service must be provided by an Authorized KitchenAid Service Center. Replacement parts or repair labor costs for stand mixers operated outside the 50 United States and District of Columbia. KitchenAid® Stand Mixer Warranty for the 50 United States and District of Columbia This warranty extends to the purchaser and any succeeding owner for stand mixers operated in the 50 United States and District of Columbia. This warranty gives you specific...
... stand mixer. B. Service must be provided by an Authorized KitchenAid Service Center. Replacement parts or repair labor costs for stand mixers operated outside the 50 United States and District of Columbia. KitchenAid® Stand Mixer Warranty for the 50 United States and District of Columbia This warranty extends to the purchaser and any succeeding owner for stand mixers operated in the 50 United States and District of Columbia. This warranty gives you specific...
Owners Manual 1
Page 7
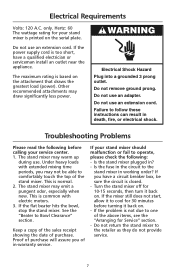
... the stand mixer. Under heavy loads with electric motors. 3. If the mixer still does not start, allow it to Bowl Clearance" section. Other recommended attachments may warm up during use an adapter. Troubleshooting Problems Please read the following : - Is the stand mixer plugged in -warranty service. Hertz: 60 The wattage rating for Service" section. - Do not remove ground prong. See the "Beater to cool for 10-15 seconds, then turn it...
... the stand mixer. Under heavy loads with electric motors. 3. If the mixer still does not start, allow it to Bowl Clearance" section. Other recommended attachments may warm up during use an adapter. Troubleshooting Problems Please read the following : - Is the stand mixer plugged in -warranty service. Hertz: 60 The wattage rating for Service" section. - Do not remove ground prong. See the "Beater to cool for 10-15 seconds, then turn it...
Owners Manual 1
Page 9
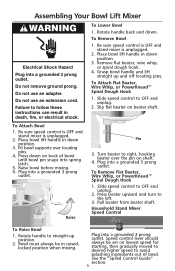
... "Speed Control Guide" section. 9 Assembling Your Bowl Lift Mixer Electrical Shock Hazard Plug into a grounded 3 prong outlet. Do not remove ground prong. Do not use an extension cord. Rotate handle back and down position. 3. Remove flat beater, wire whip, or spiral dough hook. 4. Plug into a grounded 3 prong outlet. Press down position 3. Household Stand Mixer Speed Control RESET OFF/0STIR To Raise Bowl 1. Place bowl lift handle in raised, locked position when mixing. Raise Pin 3. Speed control lever should always be in down . Slip flat beater...
... "Speed Control Guide" section. 9 Assembling Your Bowl Lift Mixer Electrical Shock Hazard Plug into a grounded 3 prong outlet. Do not remove ground prong. Do not use an extension cord. Rotate handle back and down position. 3. Remove flat beater, wire whip, or spiral dough hook. 4. Plug into a grounded 3 prong outlet. Press down position 3. Household Stand Mixer Speed Control RESET OFF/0STIR To Raise Bowl 1. Place bowl lift handle in raised, locked position when mixing. Raise Pin 3. Speed control lever should always be in down . Slip flat beater...

Owners Manual 1
Page 11
Using Your KitchenAid® Attachments Flat Beater for normal to heavy mixtures: cakes creamed frostings candies cookies pie pastry biscuits quick breads meat loaf mashed potatoes Wire Whip for mixtures that need air incorporated: eggs egg whites heavy cream boiled frostings sponge cakes angel food cakes mayonnaise some candies PowerKnead™ Spiral Dough Hook for example, beating time may be half as long as with extended mixing time, you may warm...
Using Your KitchenAid® Attachments Flat Beater for normal to heavy mixtures: cakes creamed frostings candies cookies pie pastry biscuits quick breads meat loaf mashed potatoes Wire Whip for mixtures that need air incorporated: eggs egg whites heavy cream boiled frostings sponge cakes angel food cakes mayonnaise some candies PowerKnead™ Spiral Dough Hook for example, beating time may be half as long as with extended mixing time, you may warm...

Owners Manual 1
Page 12
... rinse completely before cleaning. Unplug stand mixer. 2. Adjust so flat beater just clears A bottom surface of the bowl. Place bowl lift handle in lifted position by turning screw (A) counterclockwise to raise the bowl and clockwise to Bowl Clearance Your stand mixer is required: the screw will not strike on shaft. If the flat beater or the wire whip is so close that is adjusted at the factory so the flat beater just clears the bottom of...
... rinse completely before cleaning. Unplug stand mixer. 2. Adjust so flat beater just clears A bottom surface of the bowl. Place bowl lift handle in lifted position by turning screw (A) counterclockwise to raise the bowl and clockwise to Bowl Clearance Your stand mixer is required: the screw will not strike on shaft. If the flat beater or the wire whip is so close that is adjusted at the factory so the flat beater just clears the bottom of...

Owners Manual 1
Page 16
... hub rim. 5. Do not remove ground prong. Loosen attachment knob by turning clockwise until attachment is built-in death, fire, or electrical shock. 6. Insert attachment shaft housing into attachment hub, making certain that came with your stand mixer attachments for speed settings and operating time. It may be necessary to operate them; Electrical Shock Hazard Plug into the notch on the attachment will fit into a grounded 3 prong outlet. Plug into square attachment hub socket. The attachment power shaft and hub socket...
... hub rim. 5. Do not remove ground prong. Loosen attachment knob by turning clockwise until attachment is built-in death, fire, or electrical shock. 6. Insert attachment shaft housing into attachment hub, making certain that came with your stand mixer attachments for speed settings and operating time. It may be necessary to operate them; Electrical Shock Hazard Plug into the notch on the attachment will fit into a grounded 3 prong outlet. Plug into square attachment hub socket. The attachment power shaft and hub socket...

Owners Manual 1
Page 17
... juice 3 tablespoons chopped green onions 1⁄2 teaspoon garlic salt 3 drops hot pepper sauce Place cream cheese, cottage cheese, and mayonnaise in mixer bowl. Turn stand mixer off and unplug. 2. Serve with sliced fresh fruit, if desired. Attach bowl and flat beater to Speed 2 and mix about 30 seconds. Refrigerate at least 2 hours. Turn to Speed 4 and beat about 30 seconds. Loosen attachment knob by turning it counterclockwise. Serve...
... juice 3 tablespoons chopped green onions 1⁄2 teaspoon garlic salt 3 drops hot pepper sauce Place cream cheese, cottage cheese, and mayonnaise in mixer bowl. Turn stand mixer off and unplug. 2. Serve with sliced fresh fruit, if desired. Attach bowl and flat beater to Speed 2 and mix about 30 seconds. Refrigerate at least 2 hours. Turn to Speed 4 and beat about 30 seconds. Loosen attachment knob by turning it counterclockwise. Serve...

Owners Manual 1
Page 30
.... Stop and scrape bowl. Remove cake from pan. Reduce butter to Speed 6 and beat about 1 minute. Yield: 16 servings. Pour batter into greased and floured 10" tube pan. Prepare as directed above. Drizzle over low heat, stirring to Speed 4 and beat about 15 seconds after each addition. Bake at 350°F for 1 hour 20 minutes. Cool completely on wire...
.... Stop and scrape bowl. Remove cake from pan. Reduce butter to Speed 6 and beat about 1 minute. Yield: 16 servings. Pour batter into greased and floured 10" tube pan. Prepare as directed above. Drizzle over low heat, stirring to Speed 4 and beat about 15 seconds after each addition. Bake at 350°F for 1 hour 20 minutes. Cool completely on wire...

Owners Manual 1
Page 31
Turn to Speed 8 and whip 21⁄2 to Speed 4 and beat about 2 minutes, or until light and fluffy. Stop and scrape bowl. Add buttermilk, vanilla, and remaining flour mixture. Remove bowl from mixer. Cool completely on cooled cake. Yield: 15 servings. Spread on wire rack. Italian Cream Cake 5 eggs, separated 1⁄2 cup butter or margarine 1⁄2 cup shortening 13⁄4 cup sugar 2 cups all ingredients...
Turn to Speed 8 and whip 21⁄2 to Speed 4 and beat about 2 minutes, or until light and fluffy. Stop and scrape bowl. Add buttermilk, vanilla, and remaining flour mixture. Remove bowl from mixer. Cool completely on cooled cake. Yield: 15 servings. Spread on wire rack. Italian Cream Cake 5 eggs, separated 1⁄2 cup butter or margarine 1⁄2 cup shortening 13⁄4 cup sugar 2 cups all ingredients...

Owners Manual 1
Page 36
... syrup in pan about 3 minutes. Attach bowl and flat beater to Speed 2 and mix about 45 seconds. Yield: 8 servings. Turn to mixer. Continuing on Speed 2, add eggs and mix about 1 minute. Cook and stir over medium-low heat for 45 to Speed 6 and beat about 45 seconds longer. To Make Cake: Place granulated sugar, shortening, and vanilla in pan. Pour evenly into 9" round or square...
... syrup in pan about 3 minutes. Attach bowl and flat beater to Speed 2 and mix about 45 seconds. Yield: 8 servings. Turn to mixer. Continuing on Speed 2, add eggs and mix about 1 minute. Cook and stir over medium-low heat for 45 to Speed 6 and beat about 45 seconds longer. To Make Cake: Place granulated sugar, shortening, and vanilla in pan. Pour evenly into 9" round or square...

Owners Manual 1
Page 38
... light corn syrup 2 egg whites 11⁄2 teaspoons vanilla Place sugar, cream of tartar, salt, water, and corn syrup in mixer bowl. Attach bowl and wire whip to hold shape. Frost cake immediately. Turn to Speed 10 and whip about 30 seconds. Yield: 12 to mixer. Attach bowl and flat beater to 16 servings (frosting for 2-layer or 13 x 9 x 2" cake). Place egg whites in medium saucepan. Remove from heat. Caramel Creme...
... light corn syrup 2 egg whites 11⁄2 teaspoons vanilla Place sugar, cream of tartar, salt, water, and corn syrup in mixer bowl. Attach bowl and wire whip to hold shape. Frost cake immediately. Turn to Speed 10 and whip about 30 seconds. Yield: 12 to mixer. Attach bowl and flat beater to 16 servings (frosting for 2-layer or 13 x 9 x 2" cake). Place egg whites in medium saucepan. Remove from heat. Caramel Creme...

Owners Manual 1
Page 39
... in small bowl. Turn to mixer. Turn to 16 servings (frosting for 2-layer or 13 x 9 x 2" cake). Buttercream Frosting 1⁄3 cup butter or margarine, softened 1⁄4 cup whipping cream or evaporated milk 1 teaspoon vanilla 1⁄4 teaspoon salt 4 cups powdered sugar, divided Low-fat milk, if necessary Place butter in mixer bowl. Attach bowl and flat beater to STIR Speed. Yield: 12 to STIR Speed and mix about 1 minute...
... in small bowl. Turn to mixer. Turn to 16 servings (frosting for 2-layer or 13 x 9 x 2" cake). Buttercream Frosting 1⁄3 cup butter or margarine, softened 1⁄4 cup whipping cream or evaporated milk 1 teaspoon vanilla 1⁄4 teaspoon salt 4 cups powdered sugar, divided Low-fat milk, if necessary Place butter in mixer bowl. Attach bowl and flat beater to STIR Speed. Yield: 12 to STIR Speed and mix about 1 minute...


