Use & Care Guide
Page 2
... these instructions to arrange for your "failed" stand mixer returned to pack up your "failed" stand mixer. For a detailed explanation of warranty terms and conditions, including how to receive this quality service. Before you receive your replacement stand mixer, use your stand mixer, please fill out and mail your KitchenAid® stand mixer should fail within the first year of ownership, simply call our toll-free Customer Satisfaction...
... these instructions to arrange for your "failed" stand mixer returned to pack up your "failed" stand mixer. For a detailed explanation of warranty terms and conditions, including how to receive this quality service. Before you receive your replacement stand mixer, use your stand mixer, please fill out and mail your KitchenAid® stand mixer should fail within the first year of ownership, simply call our toll-free Customer Satisfaction...
Use & Care Guide
Page 3
...and Desserts 50 Yeast Breads and Quick Breads 55 General Instructions for Service Outside the 50 United States and Puerto Rico .....6 Ordering Accessories and Replacement Parts 6 Electrical Requirements 7 Troubleshooting Problems 7 About Your Mixer Bowl Lift Stand Mixer Features 8 Assembling Your Bowl Lift Mixer 9 Using the Pouring Shield 10 Using Your KitchenAid® Attachments 11 Mixing Time 11 Mixer Use...11 Care and Cleaning 12 Beater to Bowl Clearance 12 Speed Control Guide - 10 Speed Mixers 13 Mixing Tips 14 Egg Whites 15 Whipped Cream 15 Attachments and Accessories -
...and Desserts 50 Yeast Breads and Quick Breads 55 General Instructions for Service Outside the 50 United States and Puerto Rico .....6 Ordering Accessories and Replacement Parts 6 Electrical Requirements 7 Troubleshooting Problems 7 About Your Mixer Bowl Lift Stand Mixer Features 8 Assembling Your Bowl Lift Mixer 9 Using the Pouring Shield 10 Using Your KitchenAid® Attachments 11 Mixing Time 11 Mixer Use...11 Care and Cleaning 12 Beater to Bowl Clearance 12 Speed Control Guide - 10 Speed Mixers 13 Mixing Tips 14 Egg Whites 15 Whipped Cream 15 Attachments and Accessories -
Use & Care Guide
Page 4
... how to reduce the chance of electrical shock, do not put stand mixer in use, before putting on your appliance. Return appliance to the nearest authorized service center for more information. 7. Read all safety messages. Call the KitchenAid Customer Satisfaction Center at 1-800-541-6390 for examination, repair or electrical or mechanical adjustment. Remove flat beater, wire whip or dough hook from outlet when not in...
... how to reduce the chance of electrical shock, do not put stand mixer in use, before putting on your appliance. Return appliance to the nearest authorized service center for more information. 7. Read all safety messages. Call the KitchenAid Customer Satisfaction Center at 1-800-541-6390 for examination, repair or electrical or mechanical adjustment. Remove flat beater, wire whip or dough hook from outlet when not in...
Use & Care Guide
Page 5
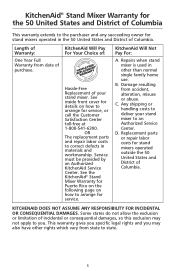
... OR CONSEQUENTIAL DAMAGES. Any shipping or handling costs to deliver your stand mixer. Some states do not allow the exclusion or limitation of Columbia. C. Replacement parts or repair labor costs for service. KitchenAid Will Not Pay For: A. D. This warranty gives you specific legal rights and you . KitchenAid Will Pay For Your Choice of: Hassle-Free Replacement of your stand mixer to you may not apply to an...
... OR CONSEQUENTIAL DAMAGES. Any shipping or handling costs to deliver your stand mixer. Some states do not allow the exclusion or limitation of Columbia. C. Replacement parts or repair labor costs for service. KitchenAid Will Not Pay For: A. D. This warranty gives you specific legal rights and you . KitchenAid Will Pay For Your Choice of: Hassle-Free Replacement of your stand mixer to you may not apply to an...

Use & Care Guide
Page 7
... -warranty service. If the mixer still does not start, allow it back on the attachment that draws the greatest load (power). If the flat beater hits the bowl, stop the stand mixer. If your stand mixer is not due to follow these instructions can result in working order? Do not use an extension cord. Electrical Shock Hazard Plug into a grounded 3 prong outlet. Do not use . Electrical Requirements Volts: 120 A.C. Do not remove...
... -warranty service. If the mixer still does not start, allow it back on the attachment that draws the greatest load (power). If the flat beater hits the bowl, stop the stand mixer. If your stand mixer is not due to follow these instructions can result in working order? Do not use an extension cord. Electrical Shock Hazard Plug into a grounded 3 prong outlet. Do not use . Electrical Requirements Volts: 120 A.C. Do not remove...
Use & Care Guide
Page 8
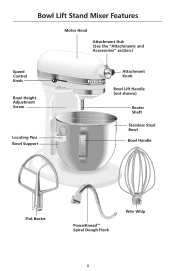
Bowl Lift Stand Mixer Features Motor Head Attachment Hub (See the "Attachments and Accessories" section.) Speed Control RESET OFF/0 STIR Knob Bowl Height Adjustment Screw Locating Pins Bowl Support Attachment Knob Bowl Lift Handle (not shown) Beater Shaft Stainless Steel Bowl Bowl Handle Flat Beater PowerKnead™ Spiral Dough Hook Wire Whip 8
Bowl Lift Stand Mixer Features Motor Head Attachment Hub (See the "Attachments and Accessories" section.) Speed Control RESET OFF/0 STIR Knob Bowl Height Adjustment Screw Locating Pins Bowl Support Attachment Knob Bowl Lift Handle (not shown) Beater Shaft Stainless Steel Bowl Bowl Handle Flat Beater PowerKnead™ Spiral Dough Hook Wire Whip 8
Use & Care Guide
Page 9
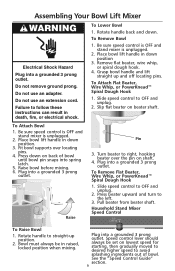
... sure speed control is OFF and stand mixer is unplugged. 2. Press down . Rotate handle to OFF and unplug. 2. Slide speed control to straight-up and off locating pins. Rotate handle back and down on beater shaft. To Attach Flat Beater, Wire Whip, or PowerKnead™ Spiral Dough Hook 1. Plug into a grounded 3 prong outlet. To Remove Flat Beater, Wire Whip, or PowerKnead™ Spiral Dough Hook 1. Assembling Your Bowl Lift Mixer Electrical Shock Hazard Plug into a grounded 3 prong outlet. Fit bowl supports over...
... sure speed control is OFF and stand mixer is unplugged. 2. Press down . Rotate handle to OFF and unplug. 2. Slide speed control to straight-up and off locating pins. Rotate handle back and down on beater shaft. To Attach Flat Beater, Wire Whip, or PowerKnead™ Spiral Dough Hook 1. Plug into a grounded 3 prong outlet. To Remove Flat Beater, Wire Whip, or PowerKnead™ Spiral Dough Hook 1. Assembling Your Bowl Lift Mixer Electrical Shock Hazard Plug into a grounded 3 prong outlet. Fit bowl supports over...
Use & Care Guide
Page 10
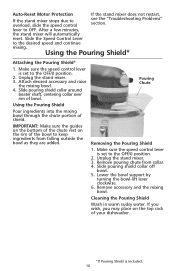
... of shield. Remove accessory and the mixing bowl. After a few minutes, the stand mixer will automatically reset. Slide the Speed Control Lever to OFF. Unplug the stand mixer. 3. Using the Pouring Shield* Attaching the Pouring Shield* 1. Attach desired accessory and raise the mixing bowl. 4. If you wish, you may place on the rim of your dishwasher. *If Pouring Shield is set to overload, slide the speed control see the "Troubleshooting Problems" section. Slide pouring shield collar off bowl. 5. Lower the bowl support by turning the bowl-lift lever clockwise...
... of shield. Remove accessory and the mixing bowl. After a few minutes, the stand mixer will automatically reset. Slide the Speed Control Lever to OFF. Unplug the stand mixer. 3. Using the Pouring Shield* Attaching the Pouring Shield* 1. Attach desired accessory and raise the mixing bowl. 4. If you wish, you may place on the rim of your dishwasher. *If Pouring Shield is set to overload, slide the speed control see the "Troubleshooting Problems" section. Slide pouring shield collar off bowl. 5. Lower the bowl support by turning the bowl-lift lever clockwise...
Use & Care Guide
Page 11
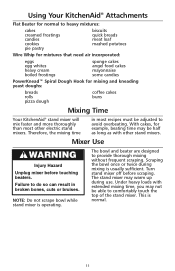
... stand mixer may not be adjusted to comfortably touch the top of the stand mixer. Failure to provide thorough mixing without frequent scraping. Turn stand mixer off before touching beaters. Using Your KitchenAid® Attachments Flat Beater for normal to heavy mixtures: cakes creamed frostings candies cookies pie pastry biscuits quick breads meat loaf mashed potatoes Wire Whip for mixtures that need air incorporated: eggs egg whites heavy cream boiled frostings sponge cakes angel food cakes mayonnaise...
... stand mixer may not be adjusted to comfortably touch the top of the stand mixer. Failure to provide thorough mixing without frequent scraping. Turn stand mixer off before touching beaters. Using Your KitchenAid® Attachments Flat Beater for normal to heavy mixtures: cakes creamed frostings candies cookies pie pastry biscuits quick breads meat loaf mashed potatoes Wire Whip for mixtures that need air incorporated: eggs egg whites heavy cream boiled frostings sponge cakes angel food cakes mayonnaise...
Use & Care Guide
Page 12
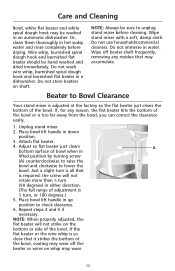
... position to unplug stand mixer before drying. Care and Cleaning Bowl, white flat beater and white spiral dough hook may wear. 12 Unplug stand mixer. 2. Repeat steps 4 and 5 if necessary. Wire whip, burnished spiral dough hook and burnished flat beater should be sure to check clearance. 6. Place bowl lift handle in water. NOTE: Always be hand washed and dried immediately. NOTE: When properly adjusted, the flat beater will not rotate more than 1⁄4 turn (90 degrees) in...
... position to unplug stand mixer before drying. Care and Cleaning Bowl, white flat beater and white spiral dough hook may wear. 12 Unplug stand mixer. 2. Repeat steps 4 and 5 if necessary. Wire whip, burnished spiral dough hook and burnished flat beater should be sure to check clearance. 6. Place bowl lift handle in water. NOTE: Always be hand washed and dried immediately. NOTE: When properly adjusted, the flat beater will not rotate more than 1⁄4 turn (90 degrees) in...
Use & Care Guide
Page 13
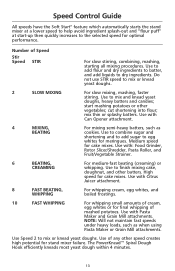
... yeast dough within 4 minutes. 13 Number of mashed potatoes. mix thin or splashy batters. Use with Pasta Maker and Grain Mill attachments. Use to finish mixing cake, doughnut, and other speed creates high potential for meringues. Use of any other batters. cut shortening into flour; Use with : Food Grinder, Rotor Slicer/Shredder, Pasta Roller, and Fruit/Vegetable Strainer. 6 BEATING, CREAMING For medium-fast beating (creaming) or whipping. Speed Control Guide All speeds have...
... yeast dough within 4 minutes. 13 Number of mashed potatoes. mix thin or splashy batters. Use with Pasta Maker and Grain Mill attachments. Use to finish mixing cake, doughnut, and other speed creates high potential for meringues. Use of any other batters. cut shortening into flour; Use with : Food Grinder, Rotor Slicer/Shredder, Pasta Roller, and Fruit/Vegetable Strainer. 6 BEATING, CREAMING For medium-fast beating (creaming) or whipping. Speed Control Guide All speeds have...
Use & Care Guide
Page 14
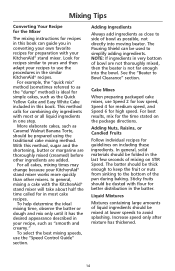
... cakes, such as possible, not directly into the bowl. The Pouring Shield can guide you in the similar KitchenAid® recipes. Cake Mixes When preparing packaged cake mixes, use the "Speed Control Guide" section. Adding Nuts, Raisins, or Candied Fruits Follow individual recipes for guidelines on the package directions. Liquid Mixtures Mixtures containing large amounts of mixing on STIR Speed. To help determine the ideal mixing time, observe the batter or dough and mix...
... cakes, such as possible, not directly into the bowl. The Pouring Shield can guide you in the similar KitchenAid® recipes. Cake Mixes When preparing packaged cake mixes, use the "Speed Control Guide" section. Adding Nuts, Raisins, or Candied Fruits Follow individual recipes for guidelines on the package directions. Liquid Mixtures Mixtures containing large amounts of mixing on STIR Speed. To help determine the ideal mixing time, observe the batter or dough and mix...
Use & Care Guide
Page 15
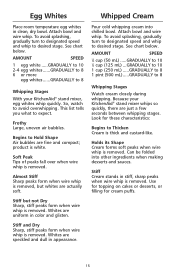
... in clean, dry bowl. Whipped Cream Pour cold whipping cream into other ingredients when making desserts and sauces. Attach bowl and wire whip. Because your KitchenAid® stand mixer, egg whites whip quickly. Stiff Cream stands in appearance. Begins to desired stage. product is removed. Stiff and Dry Sharp, stiff peaks form when wire whip is white. To avoid splashing, gradually turn to designated speed and whip to 8 Whipping Stages Watch cream closely during whipping. Whites are speckled and...
... in clean, dry bowl. Whipped Cream Pour cold whipping cream into other ingredients when making desserts and sauces. Attach bowl and wire whip. Because your KitchenAid® stand mixer, egg whites whip quickly. Stiff Cream stands in appearance. Begins to desired stage. product is removed. Stiff and Dry Sharp, stiff peaks form when wire whip is white. To avoid splashing, gradually turn to designated speed and whip to 8 Whipping Stages Watch cream closely during whipping. Whites are speckled and...
Use & Care Guide
Page 16
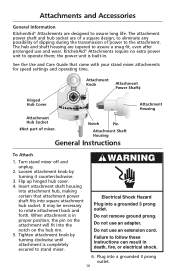
... shaft housing into attachment hub, making certain that came with your stand mixer attachments for speed settings and operating time. Do not use an adapter. KitchenAid® Attachments require no extra power unit to rotate attachment back and forth. Do not use an extension cord. Notch Pin Attachment Shaft Housing General Instructions Attachment Housing To Attach 1. Flip up hinged hub cover. 4. Tighten attachment knob by turning it counterclockwise. 3. See the Use and Care Guide that attachment power shaft fits into the notch on the hub rim. 5. Attachments and Accessories...
... shaft housing into attachment hub, making certain that came with your stand mixer attachments for speed settings and operating time. Do not use an adapter. KitchenAid® Attachments require no extra power unit to rotate attachment back and forth. Do not use an extension cord. Notch Pin Attachment Shaft Housing General Instructions Attachment Housing To Attach 1. Flip up hinged hub cover. 4. Tighten attachment knob by turning it counterclockwise. 3. See the Use and Care Guide that attachment power shaft fits into the notch on the hub rim. 5. Attachments and Accessories...
Use & Care Guide
Page 17
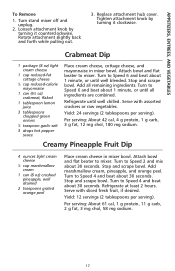
...: 24 servings (2 tablespoons per serving). Stop and scrape bowl. Serve with assorted crackers or raw vegetables. Replace attachment hub cover. Per serving: About 42 cal, 4 g protein, 1 g carb, 3 g fat, 12 mg chol, 180 mg sodium. Attach bowl and flat beater to Speed 2 and mix about 30 seconds. Stop and scrape bowl. Turn to Speed 4 and beat about 1 minute, or until well blended. Turn to Speed 4 and beat about 1 minute...
...: 24 servings (2 tablespoons per serving). Stop and scrape bowl. Serve with assorted crackers or raw vegetables. Replace attachment hub cover. Per serving: About 42 cal, 4 g protein, 1 g carb, 3 g fat, 12 mg chol, 180 mg sodium. Attach bowl and flat beater to Speed 2 and mix about 30 seconds. Stop and scrape bowl. Turn to Speed 4 and beat about 1 minute, or until well blended. Turn to Speed 4 and beat about 1 minute...
Use & Care Guide
Page 30
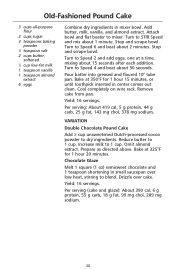
... over cake. Attach bowl and flat beater to dry ingredients. Bake at 350°F for 1 hour 20 minutes. Cool completely on wire rack. Remove cake from pan. Per serving: About 419 cal, 5 g protein, 44 g carb, 25 g fat, 143 mg chol, 378 mg sodium. VARIATION Double Chocolate Pound Cake Add 1⁄2 cup unsweetened Dutch-processed cocoa powder to mixer. Prepare as directed...
... over cake. Attach bowl and flat beater to dry ingredients. Bake at 350°F for 1 hour 20 minutes. Cool completely on wire rack. Remove cake from pan. Per serving: About 419 cal, 5 g protein, 44 g carb, 25 g fat, 143 mg chol, 378 mg sodium. VARIATION Double Chocolate Pound Cake Add 1⁄2 cup unsweetened Dutch-processed cocoa powder to mixer. Prepare as directed...
Use & Care Guide
Page 31
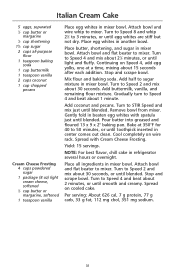
... mixer bowl. Italian Cream Cake 5 eggs, separated 1⁄2 cup butter or margarine 1⁄2 cup shortening 13⁄4 cup sugar 2 cups all ingredients in refrigerator several hours or overnight. Attach bowl and flat beater to mixer. Turn to 3 minutes, or until blended. Remove bowl from mixer. Spread with spatula just until light and fluffy. Attach bowl and flat beater to mixer. Spread on wire rack. Turn to Speed 8 and whip 21⁄2 to Speed 2 and mix...
... mixer bowl. Italian Cream Cake 5 eggs, separated 1⁄2 cup butter or margarine 1⁄2 cup shortening 13⁄4 cup sugar 2 cups all ingredients in refrigerator several hours or overnight. Attach bowl and flat beater to mixer. Turn to 3 minutes, or until blended. Remove bowl from mixer. Spread with spatula just until light and fluffy. Attach bowl and flat beater to mixer. Spread on wire rack. Turn to Speed 8 and whip 21⁄2 to Speed 2 and mix...
Use & Care Guide
Page 39
..., 7 mg chol, 107 mg sodium. 39 Stop and scrape bowl. Turn to Speed 4 and beat about 11⁄2 minutes, or until blended. Turn to mixer. Attach bowl and flat beater to Speed 2 and mix about 1 minute, or until creamy. Yield: 12 to mixer. Gradually add remaining 3 cups powdered sugar and mix until well blended. Attach bowl and flat beater to 16 servings (frosting for 2-layer or 13 x 9 x 2" cake). Turn to STIR...
..., 7 mg chol, 107 mg sodium. 39 Stop and scrape bowl. Turn to Speed 4 and beat about 11⁄2 minutes, or until blended. Turn to mixer. Attach bowl and flat beater to Speed 2 and mix about 1 minute, or until creamy. Yield: 12 to mixer. Gradually add remaining 3 cups powdered sugar and mix until well blended. Attach bowl and flat beater to 16 servings (frosting for 2-layer or 13 x 9 x 2" cake). Turn to STIR...
Use & Care Guide
Page 51
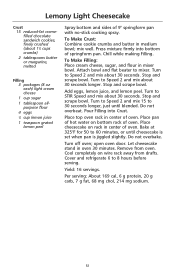
.... Stop and scrape bowl. Turn to Speed 2 and mix 15 to mixer. Turn off oven; Remove from drafts. Per serving: About 169 cal, 6 g protein, 20 g carb, 7 g fat, 68 mg chol, 214 mg sodium. 51 Attach bowl and flat beater to 30 seconds longer, just until cheesecake is set when pan is jiggled slightly. Turn to 8 hours before serving. Stop and scrape bowl. open oven door. Let cheesecake stand...
.... Stop and scrape bowl. Turn to Speed 2 and mix 15 to mixer. Turn off oven; Remove from drafts. Per serving: About 169 cal, 6 g protein, 20 g carb, 7 g fat, 68 mg chol, 214 mg sodium. 51 Attach bowl and flat beater to 30 seconds longer, just until cheesecake is set when pan is jiggled slightly. Turn to 8 hours before serving. Stop and scrape bowl. open oven door. Let cheesecake stand...

Parts List
Page 7
Part No. DESCRIPTION 1 Literature Parts Use & Care Guide 9708307 U.S. 9708308 Canada 8212278 Repair Parts List 2 9709924 Shield, Pouring 3 W10245251 Bowl, 6 Qt. 4 240185 Pin, Bowl Locating 5 9703474 Latch, Bowl Spring 6 3400018 Screw 7 Bowl Support 8 Base and Foot Assembly 9 9708649 Foot, Rubber 10 9703307 Clip 11 9706787 Rod, Bowl Lift 12 9237 Spring 13 9703439 Washer 14 8533907 Nut 15 Column Assembly 16 9703485 Beater, Flat 17 9703655 Hook, Dough 18 9706885 Arm, Bowl Lift 19 9703491 Whip, Wire 20 9703426 Cam, Adjusting 21...
Part No. DESCRIPTION 1 Literature Parts Use & Care Guide 9708307 U.S. 9708308 Canada 8212278 Repair Parts List 2 9709924 Shield, Pouring 3 W10245251 Bowl, 6 Qt. 4 240185 Pin, Bowl Locating 5 9703474 Latch, Bowl Spring 6 3400018 Screw 7 Bowl Support 8 Base and Foot Assembly 9 9708649 Foot, Rubber 10 9703307 Clip 11 9706787 Rod, Bowl Lift 12 9237 Spring 13 9703439 Washer 14 8533907 Nut 15 Column Assembly 16 9703485 Beater, Flat 17 9703655 Hook, Dough 18 9706885 Arm, Bowl Lift 19 9703491 Whip, Wire 20 9703426 Cam, Adjusting 21...


