

Use & Care Guide
Page 2
... 30 Seconds 7 Stop Cancel 7 Tones 7 Clock 7 Timer 7 Control Lock 7 MICROWAVE OVEN USE 8 Food Characteristics 8 Cooking Guidelines 8 Cookware and Dinnerware 9 Aluminum Foil and Metal 9 Microwave Cooking Power 9 Manual Cooking 10 Cooking in Stages 10 Favorite 10 Sensor Cooking 10 Quick Touch Menu (sensor... and non-sensor 11 Weight Defrost / Timed Defrost 12 MICROWAVE OVEN CARE 13 General Cleaning 13 TROUBLESHOOTING...
... 30 Seconds 7 Stop Cancel 7 Tones 7 Clock 7 Timer 7 Control Lock 7 MICROWAVE OVEN USE 8 Food Characteristics 8 Cooking Guidelines 8 Cookware and Dinnerware 9 Aluminum Foil and Metal 9 Microwave Cooking Power 9 Manual Cooking 10 Cooking in Stages 10 Favorite 10 Sensor Cooking 10 Quick Touch Menu (sensor... and non-sensor 11 Weight Defrost / Timed Defrost 12 MICROWAVE OVEN CARE 13 General Cleaning 13 TROUBLESHOOTING...

Use & Care Guide
Page 3
... keep oven door closed glass jars - IMPORTANT SAFETY INSTRUCTIONS When using the microwave oven. ■ To reduce the risk of oven is the safety alert symbol. See "GROUNDING INSTRUCTIONS" found in this manual and on your appliance. If materials inside the oven to facilitate cooking. &#... SAVE THESE INSTRUCTIONS 3 This symbol alerts you how to reduce the chance of electric shock. This type of fire in this manual. Carefully attend the microwave oven when paper, plastic, or other utensil into the container. ■ Oversized foods or oversized metal utensils should not be ...
... keep oven door closed glass jars - IMPORTANT SAFETY INSTRUCTIONS When using the microwave oven. ■ To reduce the risk of oven is the safety alert symbol. See "GROUNDING INSTRUCTIONS" found in this manual and on your appliance. If materials inside the oven to facilitate cooking. &#... SAVE THESE INSTRUCTIONS 3 This symbol alerts you how to reduce the chance of electric shock. This type of fire in this manual. Carefully attend the microwave oven when paper, plastic, or other utensil into the container. ■ Oversized foods or oversized metal utensils should not be ...

Use & Care Guide
Page 6
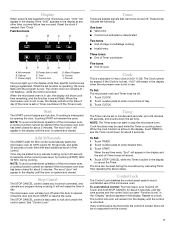
...spokes of the hub. Place the support on the support. Place the turntable on the microwave oven cavity bottom. 2. MICROWAVE OVEN CONTROL Oz lbs 6 PARTS AND FEATURES This manual may have some or all of the features shown here. Removable turntable support J. Glass turntable...differ slightly from the illustrations in place. Window C. Turntable B. For best cooking results, do not operate the microwave oven without having the turntable in this manual. Microwave oven light E. The rollers on the support should fit inside the turntable bottom ridge. Door open push button...
...spokes of the hub. Place the support on the support. Place the turntable on the microwave oven cavity bottom. 2. MICROWAVE OVEN CONTROL Oz lbs 6 PARTS AND FEATURES This manual may have some or all of the features shown here. Removable turntable support J. Glass turntable...differ slightly from the illustrations in place. Window C. Turntable B. For best cooking results, do not operate the microwave oven without having the turntable in this manual. Microwave oven light E. The rollers on the support should fit inside the turntable bottom ridge. Door open push button...
Use & Care Guide
Page 7
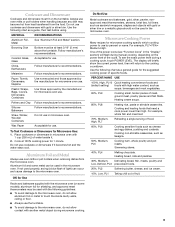
...use , the display will show cook time remaining, and the function icons will appear in the display. Display When power is first supplied to the microwave oven, "0:00" will resume the cycle. Control lock G. While the set function is operating, the icons flash until the tone sounds and the ... display until the door is opened and closed for about 5 minutes. Stop Cancel The STOP CANCEL control clears any incorrect command, and cancels any manual cooking cycle in the display and the end-of-Timer tones will show the time of day. 3. Reset the clock if needed. Pounds The...
...use , the display will show cook time remaining, and the function icons will appear in the display. Display When power is first supplied to the microwave oven, "0:00" will resume the cycle. Control lock G. While the set function is operating, the icons flash until the tone sounds and the ... display until the door is opened and closed for about 5 minutes. Stop Cancel The STOP CANCEL control clears any incorrect command, and cancels any manual cooking cycle in the display and the end-of-Timer tones will show the time of day. 3. Reset the clock if needed. Pounds The...
Use & Care Guide
Page 9
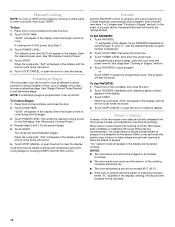
...stays cool. For example, PL7=70%= Medium-High. The display will briefly show the current power level, then will flash during manual cooking, depending on some metal can occur and cause damage to the cooking countdown. Cooking and heating foods that need a cook ... power level during a cooking cycle, touch POWER LEVEL. Simmering stews. 40%, PL4 Melting chocolate. Melamine Follow manufacturer's recommendations. OK for microwave cooking specify which cooking power to use . One of meat, ground meat, poultry pieces and fish fillets. Always use oven mitts or pot...
...stays cool. For example, PL7=70%= Medium-High. The display will briefly show the current power level, then will flash during manual cooking, depending on some metal can occur and cause damage to the cooking countdown. Cooking and heating foods that need a cook ... power level during a cooking cycle, touch POWER LEVEL. Simmering stews. 40%, PL4 Melting chocolate. Melamine Follow manufacturer's recommendations. OK for microwave cooking specify which cooking power to use . One of meat, ground meat, poultry pieces and fish fillets. Always use oven mitts or pot...
Use & Care Guide
Page 10
... plugged in for at least 3 minutes. ■ The microwave oven cavity and the exterior of the cooking container should not exceed 95°F (35°C). ■ If the door is opened while the sensor is displayed. 2. Manual Cooking NOTE: To cook at different cooking powers for various... or steamers with plastic wrap, be saved. To Use: 1. Place food on the turntable and close the door. 2. To Set FAVORITE: 1. See "Microwave Cooking Power." 4. "00:00" will appear in the display. Many sensor cycles require the covering of -cycle tones will appear in Stages" section). "SC...
... plugged in for at least 3 minutes. ■ The microwave oven cavity and the exterior of the cooking container should not exceed 95°F (35°C). ■ If the door is opened while the sensor is displayed. 2. Manual Cooking NOTE: To cook at different cooking powers for various... or steamers with plastic wrap, be saved. To Use: 1. Place food on the turntable and close the door. 2. To Set FAVORITE: 1. See "Microwave Cooking Power." 4. "00:00" will appear in the display. Many sensor cycles require the covering of -cycle tones will appear in Stages" section). "SC...
Use & Care Guide
Page 12
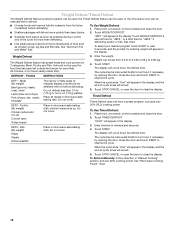
..., and the end-of irregular shaped cuts should not be manually set from fruit juice containers) before defrosting. Touch TIMED DEFROST. The display will sound. 5. Close the door and touch START to clear the display. See "Microwave Cooking Power" chart. 12 "dEF1" will sound. 5. FOODS... -cycle tones will count down the defrost time. Weight can be used , or the microwave oven can be shielded with foil before defrosting. To Defrost Manually: Follow direction in microwave-safe baking dish. Touch WEIGHT DEFROST. ■ Separate food pieces as soon as possible ...
..., and the end-of irregular shaped cuts should not be manually set from fruit juice containers) before defrosting. Touch TIMED DEFROST. The display will sound. 5. Close the door and touch START to clear the display. See "Microwave Cooking Power" chart. 12 "dEF1" will sound. 5. FOODS... -cycle tones will count down the defrost time. Weight can be used , or the microwave oven can be shielded with foil before defrosting. To Defrost Manually: Follow direction in microwave-safe baking dish. Touch WEIGHT DEFROST. ■ Separate food pieces as soon as possible ...

Installation Guide
Page 1
... Contents / Table des matières MICROWAVE OVEN SAFETY 1 INSTALLATION INSTRUCTIONS 2 Tools and Parts 2 Location Requirements 2...Cutout Dimensions 2 Trim Kit Frame Dimensions 3 Electrical Requirements 3 Prepare Microwave Oven 3 Prepare Cutout/Cabinet Opening 4 Install the Microwave Oven 5 Install Trim Kit Frame 6 SÉCURITÉ DU...11 Installation du cadre de la trousse de garniture 12 MICROWAVE OVEN SAFETY Your safety and the safety of injury, ...potential hazard is the safety alert symbol. W10532204A MICROWAVE OVEN BUILT-IN TRIM KIT INSTALLATION INSTRUCTIONS Built...
... Contents / Table des matières MICROWAVE OVEN SAFETY 1 INSTALLATION INSTRUCTIONS 2 Tools and Parts 2 Location Requirements 2...Cutout Dimensions 2 Trim Kit Frame Dimensions 3 Electrical Requirements 3 Prepare Microwave Oven 3 Prepare Cutout/Cabinet Opening 4 Install the Microwave Oven 5 Install Trim Kit Frame 6 SÉCURITÉ DU...11 Installation du cadre de la trousse de garniture 12 MICROWAVE OVEN SAFETY Your safety and the safety of injury, ...potential hazard is the safety alert symbol. W10532204A MICROWAVE OVEN BUILT-IN TRIM KIT INSTALLATION INSTRUCTIONS Built...


