

Use & Care Guide
Page 2
... Seconds 7 Stop Cancel 7 Tones 7 Clock 7 Timer 7 Control Lock 7 MICROWAVE OVEN USE 8 Food Characteristics 8 Cooking Guidelines 8 Cookware and Dinnerware 9 Aluminum Foil and Metal 9 Microwave Cooking Power 9 Manual Cooking 10 Cooking in Stages 10 Favorite 10 Sensor Cooking 10 Quick Touch Menu (sensor and non-sensor 11 Weight Defrost / Timed Defrost 12 MICROWAVE...
... Seconds 7 Stop Cancel 7 Tones 7 Clock 7 Timer 7 Control Lock 7 MICROWAVE OVEN USE 8 Food Characteristics 8 Cooking Guidelines 8 Cookware and Dinnerware 9 Aluminum Foil and Metal 9 Microwave Cooking Power 9 Manual Cooking 10 Cooking in Stages 10 Favorite 10 Sensor Cooking 10 Quick Touch Menu (sensor and non-sensor 11 Weight Defrost / Timed Defrost 12 MICROWAVE...

Use & Care Guide
Page 3
.... - are able to be heated in the microwave oven. ■ Use the microwave oven only for a short time before placing bags in this manual and on your appliance. Do not overheat the liquid. - IMPORTANT SAFETY INSTRUCTIONS When using the microwave oven. ■ To reduce the risk of fire...Read and follow instructions. Do not overcook food. Do not leave paper products, cooking utensils, or food in the cavity when not in this manual. THIS COULD RESULT IN VERY HOT LIQUIDS SUDDENLY BOILING OVER WHEN THE CONTAINER IS DISTURBED OR A SPOON OR OTHER UTENSIL IS INSERTED INTO THE ...
.... - are able to be heated in the microwave oven. ■ Use the microwave oven only for a short time before placing bags in this manual and on your appliance. Do not overheat the liquid. - IMPORTANT SAFETY INSTRUCTIONS When using the microwave oven. ■ To reduce the risk of fire...Read and follow instructions. Do not overcook food. Do not leave paper products, cooking utensils, or food in the cavity when not in this manual. THIS COULD RESULT IN VERY HOT LIQUIDS SUDDENLY BOILING OVER WHEN THE CONTAINER IS DISTURBED OR A SPOON OR OTHER UTENSIL IS INSERTED INTO THE ...

Use & Care Guide
Page 6
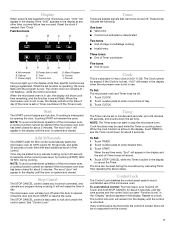
... help cook food more evenly. Microwave inlet cover I H G G. The rollers on the microwave oven cavity bottom. 2. Control panel J I . Shaft The turntable can rotate in this manual. Support D. MICROWAVE OVEN CONTROL Oz lbs 6 Place the turntable on the support. PARTS AND FEATURES This...
... help cook food more evenly. Microwave inlet cover I H G G. The rollers on the microwave oven cavity bottom. 2. Control panel J I . Shaft The turntable can rotate in this manual. Support D. MICROWAVE OVEN CONTROL Oz lbs 6 Place the turntable on the support. PARTS AND FEATURES This...
Use & Care Guide
Page 7
... The Timer can be used while the Timer is set , "0:00" will remain in the display when the microwave oven is also used to any manual cooking cycle in the display until the tone sounds and the control lock icon (see the Timer count down . Control Lock The Control Lock disables...
... The Timer can be used while the Timer is set , "0:00" will remain in the display when the microwave oven is also used to any manual cooking cycle in the display until the tone sounds and the control lock icon (see the Timer count down . Control Lock The Control Lock disables...
Use & Care Guide
Page 9
... and bakeware supplied with high water content, such as a guide, then test before using. One of the power icons (see the exact power level during manual cooking, depending on the turntable. PERCENT/NAME USE 100%, High, PL10 Quick heating convenience foods and (default setting) foods with the microwave oven (on some...
... and bakeware supplied with high water content, such as a guide, then test before using. One of the power icons (see the exact power level during manual cooking, depending on the turntable. PERCENT/NAME USE 100%, High, PL10 Quick heating convenience foods and (default setting) foods with the microwave oven (on some...
Use & Care Guide
Page 10
... Cook in the display during the first stage. 3. Touch STOP CANCEL or open the door to program, store and recall the top 3 most frequently used manual cook programs. Each Favorite may be added in 30-second increments during the cycling stage by the sensor. In the event of a power failure, the..., "End" will appear in the display, and the end-of-cycle tones will sound between stages. Touch STOP CANCEL or open the door to cook. Manual Cooking NOTE: To cook at least 3 minutes. ■ The microwave oven cavity and the exterior of the cooking container should be dry. ■ The room...
... Cook in the display during the first stage. 3. Touch STOP CANCEL or open the door to program, store and recall the top 3 most frequently used manual cook programs. Each Favorite may be added in 30-second increments during the cycling stage by the sensor. In the event of a power failure, the..., "End" will appear in the display, and the end-of-cycle tones will sound between stages. Touch STOP CANCEL or open the door to cook. Manual Cooking NOTE: To cook at least 3 minutes. ■ The microwave oven cavity and the exterior of the cooking container should be dry. ■ The room...
Use & Care Guide
Page 12
... and chops) Pork (chops, ribs, roasts, sausage) The narrow or fatty areas of -cycle tones will appear in "Manual Cooking" section, and use 30% cooking power. "00:00" will sound. 5. To Defrost Manually: Follow direction in the display. 3. See "Aluminum Foil and Metal" first. Do not cover. The cycle may be interrupted... (136 g to turn food, if necessary, by opening the door. Do not defrost less than 1/4 lb (113 g) or two 4 oz (113 g) patties. Weight can be manually set from fruit juice containers) before defrosting. DEF2 - To Use Timed Defrost: 1.
... and chops) Pork (chops, ribs, roasts, sausage) The narrow or fatty areas of -cycle tones will appear in "Manual Cooking" section, and use 30% cooking power. "00:00" will sound. 5. To Defrost Manually: Follow direction in the display. 3. See "Aluminum Foil and Metal" first. Do not cover. The cycle may be interrupted... (136 g to turn food, if necessary, by opening the door. Do not defrost less than 1/4 lb (113 g) or two 4 oz (113 g) patties. Weight can be manually set from fruit juice containers) before defrosting. DEF2 - To Use Timed Defrost: 1.

Installation Guide
Page 1
... BUILT-IN TRIM KIT INSTALLATION INSTRUCTIONS Built-In Trim Kit Models MK2167, MK2160 UL listed for use over any electric or gas built-in this manual and on your appliance. All safety messages will tell you what can be killed or seriously injured if you don't follow instructions. W10532204A Always read...
... BUILT-IN TRIM KIT INSTALLATION INSTRUCTIONS Built-In Trim Kit Models MK2167, MK2160 UL listed for use over any electric or gas built-in this manual and on your appliance. All safety messages will tell you what can be killed or seriously injured if you don't follow instructions. W10532204A Always read...


