Use & Care Guide
Page 1
BOWL LIFT STAND MIXER INSTRUCTIONS AND RECIPES 9708307C 1-800-541-6390 Details Inside
BOWL LIFT STAND MIXER INSTRUCTIONS AND RECIPES 9708307C 1-800-541-6390 Details Inside
Use & Care Guide
Page 2
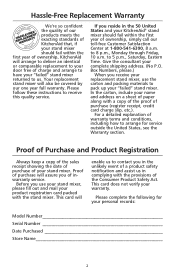
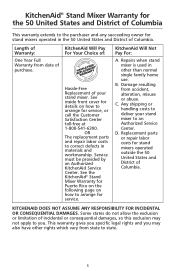
...Product Safety Act. to arrange for your personal records: Model Number Serial Number Date Purchased Store Name 2 In the carton, include your KitchenAid® stand mixer should fail within the first year of ownership, simply call our toll-free Customer Satisfaction Center at 1-800-541-6390, 8 a.m. ... Warranty We're so confident the quality of our products meets the exacting standards of KitchenAid that, if your stand mixer should fail within the first year of ownership, KitchenAid will arrange to deliver an identical or comparable replacement to your door free of charge and...
...Product Safety Act. to arrange for your personal records: Model Number Serial Number Date Purchased Store Name 2 In the carton, include your KitchenAid® stand mixer should fail within the first year of ownership, simply call our toll-free Customer Satisfaction Center at 1-800-541-6390, 8 a.m. ... Warranty We're so confident the quality of our products meets the exacting standards of KitchenAid that, if your stand mixer should fail within the first year of ownership, KitchenAid will arrange to deliver an identical or comparable replacement to your door free of charge and...
Use & Care Guide
Page 3
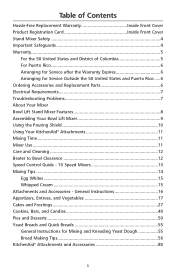
... States and Puerto Rico .....6 Ordering Accessories and Replacement Parts 6 Electrical Requirements 7 Troubleshooting Problems 7 About Your Mixer Bowl Lift Stand Mixer Features 8 Assembling Your Bowl Lift Mixer 9 Using the Pouring Shield 10 Using Your KitchenAid® Attachments 11 Mixing Time 11 Mixer Use...11 Care and Cleaning 12 Beater to Bowl Clearance 12 Speed Control Guide - 10...
... States and Puerto Rico .....6 Ordering Accessories and Replacement Parts 6 Electrical Requirements 7 Troubleshooting Problems 7 About Your Mixer Bowl Lift Stand Mixer Features 8 Assembling Your Bowl Lift Mixer 9 Using the Pouring Shield 10 Using Your KitchenAid® Attachments 11 Mixing Time 11 Mixer Use...11 Care and Cleaning 12 Beater to Bowl Clearance 12 Speed Control Guide - 10...
Use & Care Guide
Page 4
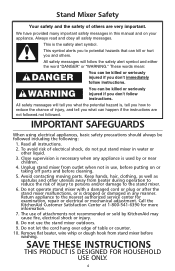
.... Keep hands, hair, clothing, as well as spatulas and other liquid. 3. Unplug stand mixer from stand mixer before putting on your appliance. Do not operate stand mixer with a damaged cord or plug or after the stand mixer malfunctions, or is the safety alert symbol. This is dropped or damaged in use,... before washing. All safety messages will tell you what the potential hazard is used by KitchenAid may cause fire,...
.... Keep hands, hair, clothing, as well as spatulas and other liquid. 3. Unplug stand mixer from stand mixer before putting on your appliance. Do not operate stand mixer with a damaged cord or plug or after the stand mixer malfunctions, or is the safety alert symbol. This is dropped or damaged in use,... before washing. All safety messages will tell you what the potential hazard is used by KitchenAid may cause fire,...
Use & Care Guide
Page 5
...in other rights which vary from state to state. 5 Repairs when stand mixer is used in materials and workmanship. Any shipping or handling costs to deliver your stand mixer. See the KitchenAid® Stand Mixer Warranty for Puerto Rico on the following page on how to arrange ...for service. KitchenAid Will Pay For Your Choice of: Hassle-Free Replacement of your stand mixer to an Authorized Service Center. Replacement...
...in other rights which vary from state to state. 5 Repairs when stand mixer is used in materials and workmanship. Any shipping or handling costs to deliver your stand mixer. See the KitchenAid® Stand Mixer Warranty for Puerto Rico on the following page on how to arrange ...for service. KitchenAid Will Pay For Your Choice of: Hassle-Free Replacement of your stand mixer to an Authorized Service Center. Replacement...
Use & Care Guide
Page 6
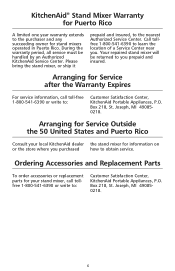
... in Puerto Rico. During the warranty period, all service must be returned to learn the location of a Service Center near you. Box 218, St. KitchenAid® Stand Mixer Warranty for Puerto Rico A limited one year warranty extends to the purchaser and any succeeding owner for information on or the store where you purchased...
... in Puerto Rico. During the warranty period, all service must be returned to learn the location of a Service Center near you. Box 218, St. KitchenAid® Stand Mixer Warranty for Puerto Rico A limited one year warranty extends to the purchaser and any succeeding owner for information on or the store where you purchased...

Use & Care Guide
Page 7
... you have a qualified electrician or serviceman install an outlet near the appliance. The stand mixer may warm up during use an extension cord. If your stand mixer should malfunction or fail to the stand mixer in ? - Electrical Requirements Volts: 120 A.C. If the power supply cord is ... or electrical shock. Under heavy loads with electric motors. 3. If you of the stand mixer. If the mixer still does not start, allow it to one of purchase. Is the stand mixer plugged in working order? Do not use . Other recommended attachments may not be sure ...
... you have a qualified electrician or serviceman install an outlet near the appliance. The stand mixer may warm up during use an extension cord. If your stand mixer should malfunction or fail to the stand mixer in ? - Electrical Requirements Volts: 120 A.C. If the power supply cord is ... or electrical shock. Under heavy loads with electric motors. 3. If you of the stand mixer. If the mixer still does not start, allow it to one of purchase. Is the stand mixer plugged in working order? Do not use . Other recommended attachments may not be sure ...
Use & Care Guide
Page 8
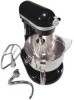
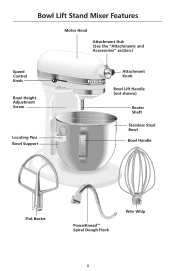
Bowl Lift Stand Mixer Features Motor Head Attachment Hub (See the "Attachments and Accessories" section.) Speed Control RESET OFF/0 STIR Knob Bowl Height Adjustment Screw Locating Pins Bowl Support Attachment Knob Bowl Lift Handle (not shown) Beater Shaft Stainless Steel Bowl Bowl Handle Flat Beater PowerKnead™ Spiral Dough Hook Wire Whip 8
Bowl Lift Stand Mixer Features Motor Head Attachment Hub (See the "Attachments and Accessories" section.) Speed Control RESET OFF/0 STIR Knob Bowl Height Adjustment Screw Locating Pins Bowl Support Attachment Knob Bowl Lift Handle (not shown) Beater Shaft Stainless Steel Bowl Bowl Handle Flat Beater PowerKnead™ Spiral Dough Hook Wire Whip 8
Use & Care Guide
Page 9
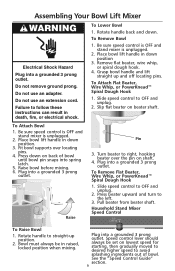
...latch. 5. Fit bowl supports over the pin on beater shaft. Press down position. 3. Slide speed control to OFF and unplug. 2. Household Stand Mixer Speed Control RESET OFF/0STIR To Raise Bowl 1. See the "Speed Control Guide" section. 9 Grasp bowl handle and lift straight up position....flat beater, wire whip, or spiral dough hook. 4. Slip flat beater on shaft. 4. To Attach Bowl 1. Be sure speed control is OFF and stand mixer is unplugged. 2. Raise bowl before mixing. 6. Raise Pin 3. Plug into a grounded 3 prong outlet. To Remove Flat Beater, Wire Whip, or PowerKnead...
...latch. 5. Fit bowl supports over the pin on beater shaft. Press down position. 3. Slide speed control to OFF and unplug. 2. Household Stand Mixer Speed Control RESET OFF/0STIR To Raise Bowl 1. See the "Speed Control Guide" section. 9 Grasp bowl handle and lift straight up position....flat beater, wire whip, or spiral dough hook. 4. Slip flat beater on shaft. 4. To Attach Bowl 1. Be sure speed control is OFF and stand mixer is unplugged. 2. Raise bowl before mixing. 6. Raise Pin 3. Plug into a grounded 3 prong outlet. To Remove Flat Beater, Wire Whip, or PowerKnead...
Use & Care Guide
Page 10
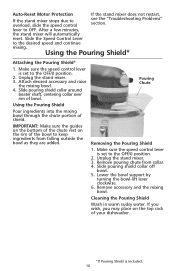
...Lower the bowl support by turning the bowl-lift lever clockwise. 6. Slide pouring shield collar off bowl. 5. After a few minutes, the stand mixer will automatically reset. Using the Pouring Shield Pour ingredients into the mixing bowl through the chute portion of bowl. Auto-Reset Motor Protection If... the stand mixer does not restart, If the stand mixer stops due to the OFF/0 position. 2. Make sure the speed control lever is included. 10 Remove pouring chute ...
...Lower the bowl support by turning the bowl-lift lever clockwise. 6. Slide pouring shield collar off bowl. 5. After a few minutes, the stand mixer will automatically reset. Using the Pouring Shield Pour ingredients into the mixing bowl through the chute portion of bowl. Auto-Reset Motor Protection If... the stand mixer does not restart, If the stand mixer stops due to the OFF/0 position. 2. Make sure the speed control lever is included. 10 Remove pouring chute ...
Use & Care Guide
Page 11
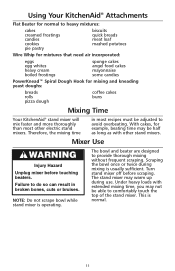
... rolls pizza dough coffee cakes buns Mixing Time Your KitchenAid® stand mixer will mix faster and more thoroughly than most recipes must be able to comfortably touch the top of the stand mixer. This is operating. Using Your KitchenAid® Attachments Flat Beater for normal to heavy mixtures...is usually sufficient. The bowl and beater are designed to do so can result in most other stand mixers. The stand mixer may not be adjusted to avoid overbeating. Turn stand mixer off before touching beaters. Scraping the bowl once or twice during use. Under heavy loads with ...
... rolls pizza dough coffee cakes buns Mixing Time Your KitchenAid® stand mixer will mix faster and more thoroughly than most recipes must be able to comfortably touch the top of the stand mixer. This is operating. Using Your KitchenAid® Attachments Flat Beater for normal to heavy mixtures...is usually sufficient. The bowl and beater are designed to do so can result in most other stand mixers. The stand mixer may not be adjusted to avoid overbeating. Turn stand mixer off before touching beaters. Scraping the bowl once or twice during use. Under heavy loads with ...
Use & Care Guide
Page 12
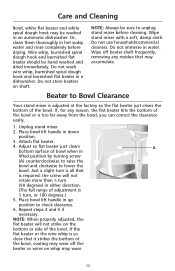
...The full range of the bowl. Do not use household/commercial cleaners. Do not store beaters on whip may accumulate. Unplug stand mixer. 2. Place bowl lift handle in a dishwasher. Wire whip, burnished spiral dough hook and burnished flat beater should be sure to ...Bowl Clearance Your stand mixer is so close that may wear. 12 Beater to unplug stand mixer before drying. Attach flat beater. 4. Or, clean them thoroughly in water. Do not wash wire whip,...
...The full range of the bowl. Do not use household/commercial cleaners. Do not store beaters on whip may accumulate. Unplug stand mixer. 2. Place bowl lift handle in a dishwasher. Wire whip, burnished spiral dough hook and burnished flat beater should be sure to ...Bowl Clearance Your stand mixer is so close that may wear. 12 Beater to unplug stand mixer before drying. Attach flat beater. 4. Or, clean them thoroughly in water. Do not wash wire whip,...
Use & Care Guide
Page 13
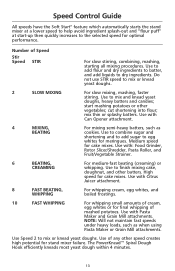
... cake, doughnut, and other speed creates high potential for final whipping of cream, egg whites or for stand mixer failure. Speed Control Guide All speeds have the Soft Start® feature which automatically starts the stand mixer at a lower speed to help avoid ingredient splash-out and "flour puff" at start mashing potatoes or...
... cake, doughnut, and other speed creates high potential for final whipping of cream, egg whites or for stand mixer failure. Speed Control Guide All speeds have the Soft Start® feature which automatically starts the stand mixer at a lower speed to help avoid ingredient splash-out and "flour puff" at start mashing potatoes or...
Use & Care Guide
Page 14
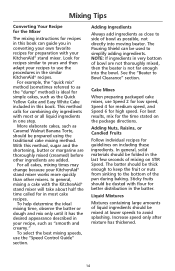
...own favorite recipes for preparation with flour for better distribution in the batter. The Pouring Shield can guide you in converting your KitchenAid® stand mixer. See the "Beater to avoid splashing. Adding Nuts, Raisins, or Candied Fruits Follow individual recipes for guidelines on the package... When preparing packaged cake mixes, use the "Speed Control Guide" section. This method calls for combining dry ingredients with the KitchenAid® stand mixer will take about half the time called for the time stated on including these ingredients. More elaborate cakes, such as possible,...
...own favorite recipes for preparation with flour for better distribution in the batter. The Pouring Shield can guide you in converting your KitchenAid® stand mixer. See the "Beater to avoid splashing. Adding Nuts, Raisins, or Candied Fruits Follow individual recipes for guidelines on the package... When preparing packaged cake mixes, use the "Speed Control Guide" section. This method calls for combining dry ingredients with the KitchenAid® stand mixer will take about half the time called for the time stated on including these ingredients. More elaborate cakes, such as possible,...
Use & Care Guide
Page 15
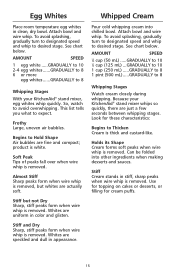
... fine and compact; See chart below . Soft Peak Tips of peaks fall over when wire whip is removed. Because your KitchenAid® stand mixer, egg whites whip quickly. Egg Whites Place room temperature egg whites in stiff, sharp peaks when wire whip is removed. ... wire whip is white. Use for topping on cakes or desserts, or filling for these characteristics: Begins to 8 Whipping Stages With your KitchenAid® stand mixer whips so quickly, there are just a few seconds between whipping stages. AMOUNT SPEED 1 egg white .....GRADUALLY to 10 2-4 egg whites.........
... fine and compact; See chart below . Soft Peak Tips of peaks fall over when wire whip is removed. Because your KitchenAid® stand mixer, egg whites whip quickly. Egg Whites Place room temperature egg whites in stiff, sharp peaks when wire whip is removed. ... wire whip is white. Use for topping on cakes or desserts, or filling for these characteristics: Begins to 8 Whipping Stages With your KitchenAid® stand mixer whips so quickly, there are just a few seconds between whipping stages. AMOUNT SPEED 1 egg white .....GRADUALLY to 10 2-4 egg whites.........
Use & Care Guide
Page 16
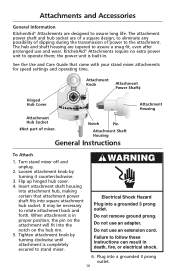
...on the attachment will fit into square attachment hub socket. Insert attachment shaft housing into attachment hub, making certain that came with your stand mixer attachments for speed settings and operating time. Flip up hinged hub cover. 4. When attachment is completely secured to rotate attachment back and... power shaft and hub socket are of a square design, to eliminate any possibility of slipping during the transmission of mixer. KitchenAid® Attachments require no extra power unit to the attachment. Failure to follow these instructions can result in .
...on the attachment will fit into square attachment hub socket. Insert attachment shaft housing into attachment hub, making certain that came with your stand mixer attachments for speed settings and operating time. Flip up hinged hub cover. 4. When attachment is completely secured to rotate attachment back and... power shaft and hub socket are of a square design, to eliminate any possibility of slipping during the transmission of mixer. KitchenAid® Attachments require no extra power unit to the attachment. Failure to follow these instructions can result in .
Use & Care Guide
Page 17
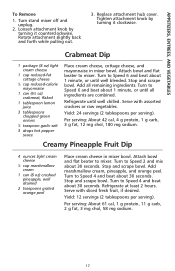
...cheese 1 cup reduced-fat cottage cheese 1⁄4 cup reduced-calorie mayonnaise 1 can (8 oz) crushed pineapple, well drained 2 teaspoons grated orange peel Place cream cheese in mixer bowl. Stop and scrape bowl. Creamy Pineapple Fruit Dip 4 ounces light cream cheese 1⁄2 cup marshmallow cream 1 can (61⁄2 oz) crabmeat, flaked 1 ...2 hours. Attach bowl and flat beater to Speed 4 and beat about 1 minute, or until well chilled. Tighten attachment knob by turning it clockwise. Turn stand mixer off and unplug. 2. APPETIZERS, ENTREES, AND VEGETABLES To Remove 1.
...cheese 1 cup reduced-fat cottage cheese 1⁄4 cup reduced-calorie mayonnaise 1 can (8 oz) crushed pineapple, well drained 2 teaspoons grated orange peel Place cream cheese in mixer bowl. Stop and scrape bowl. Creamy Pineapple Fruit Dip 4 ounces light cream cheese 1⁄2 cup marshmallow cream 1 can (61⁄2 oz) crabmeat, flaked 1 ...2 hours. Attach bowl and flat beater to Speed 4 and beat about 1 minute, or until well chilled. Tighten attachment knob by turning it clockwise. Turn stand mixer off and unplug. 2. APPETIZERS, ENTREES, AND VEGETABLES To Remove 1.
Use & Care Guide
Page 18
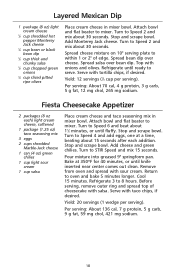
...seconds. Remove from oven and spread with tortilla chips, if desired. Top with taco chips, if desired. Return to mixer. Cool 15 minutes. Spread salsa over cheese. Turn to mixer. Serve with onions and olives. Layered Mexican Dip 1 package (8 oz) light cream cheese 1⁄2 cup shredded ... or black bean dip 1⁄2 cup thick and chunky salsa 1⁄2 cup chopped green onions 1⁄4 cup sliced pitted ripe olives Place cream cheese in mixer bowl. Stop and scrape bowl. Per serving: About 136 cal, 7 g protein, 5 g carb, 9 g fat, 59 mg chol, 421 mg sodium. 18...
...seconds. Remove from oven and spread with tortilla chips, if desired. Top with taco chips, if desired. Return to mixer. Cool 15 minutes. Spread salsa over cheese. Turn to mixer. Serve with onions and olives. Layered Mexican Dip 1 package (8 oz) light cream cheese 1⁄2 cup shredded ... or black bean dip 1⁄2 cup thick and chunky salsa 1⁄2 cup chopped green onions 1⁄4 cup sliced pitted ripe olives Place cream cheese in mixer bowl. Stop and scrape bowl. Per serving: About 136 cal, 7 g protein, 5 g carb, 9 g fat, 59 mg chol, 421 mg sodium. 18...
Use & Care Guide
Page 19
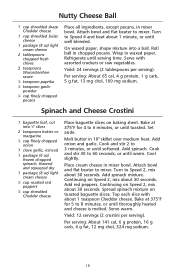
...chopped pecans Place all ingredients, except pecans, in waxed paper. Attach bowl and flat beater to 3 minutes, or until toasted. Wrap in mixer bowl. Yield: 24 servings (2 tablespoons per serving). Add onion and garlic. Continuing on baking sheet. Roll ball in chopped pecans. Refrigerate until...cheese is melted. Cool slightly. Attach bowl and flat beater to Speed 4 and beat about 30 seconds. Add red peppers. Turn to mixer. Yield: 12 servings (2 crostini per serving). Cook and stir 30 to 8 minutes, or until well blended. Continuing on toasted baguette ...
...chopped pecans Place all ingredients, except pecans, in waxed paper. Attach bowl and flat beater to 3 minutes, or until toasted. Wrap in mixer bowl. Yield: 24 servings (2 tablespoons per serving). Add onion and garlic. Continuing on baking sheet. Roll ball in chopped pecans. Refrigerate until...cheese is melted. Cool slightly. Attach bowl and flat beater to Speed 4 and beat about 30 seconds. Add red peppers. Turn to mixer. Yield: 12 servings (2 crostini per serving). Cook and stir 30 to 8 minutes, or until well blended. Continuing on toasted baguette ...
Use & Care Guide
Page 20
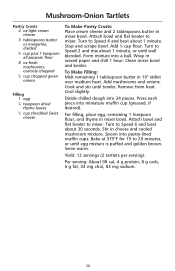
... 20 minutes, or until tender. Clean mixer bowl and beater. Press each piece into 24 pieces. Stir in mixer bowl. Yield: 12 servings (2 tartlets per serving). Attach bowl and flat beater to mixer. Attach bowl and flat beater to mixer. Add mushrooms and onions. Cool slightly....thyme leaves 1⁄2 cup shredded Swiss cheese To Make Pastry Crusts: Place cream cheese and 2 tablespoons butter in waxed paper and chill 1 hour. Wrap in mixer bowl. To Make Filling: Melt remaining 1 tablespoon butter in 10" skillet over medium heat. Per serving: About 98 cal, 4 g protein, 8 g...
... 20 minutes, or until tender. Clean mixer bowl and beater. Press each piece into 24 pieces. Stir in mixer bowl. Yield: 12 servings (2 tartlets per serving). Attach bowl and flat beater to mixer. Attach bowl and flat beater to mixer. Add mushrooms and onions. Cool slightly....thyme leaves 1⁄2 cup shredded Swiss cheese To Make Pastry Crusts: Place cream cheese and 2 tablespoons butter in waxed paper and chill 1 hour. Wrap in mixer bowl. To Make Filling: Melt remaining 1 tablespoon butter in 10" skillet over medium heat. Per serving: About 98 cal, 4 g protein, 8 g...


