Use & Care Guide
Page 2
... quality service. Please follow these instructions to 5 p.m., Saturday, Eastern Time. to pack up your personal records: Model Number Serial Number Date Purchased Store Name 2 Your replacement stand mixer will enable us in the unlikely event of warranty terms and conditions, including how to contact you receive your replacement stand mixer, use your stand mixer, please fill out and mail your warranty. In the carton, include your stand mixer. This...
... quality service. Please follow these instructions to 5 p.m., Saturday, Eastern Time. to pack up your personal records: Model Number Serial Number Date Purchased Store Name 2 Your replacement stand mixer will enable us in the unlikely event of warranty terms and conditions, including how to contact you receive your replacement stand mixer, use your stand mixer, please fill out and mail your warranty. In the carton, include your stand mixer. This...
Use & Care Guide
Page 3
... General Instructions for Service Outside the 50 United States and Puerto Rico .....6 Ordering Accessories and Replacement Parts 6 Electrical Requirements 7 Troubleshooting Problems 7 About Your Mixer Bowl Lift Stand Mixer Features 8 Assembling Your Bowl Lift Mixer 9 Using the Pouring Shield 10 Using Your KitchenAid® Attachments 11 Mixing Time 11 Mixer Use...11 Care and Cleaning 12 Beater to Bowl Clearance 12 Speed Control Guide - 10 Speed Mixers 13 Mixing Tips 14 Egg Whites 15 Whipped Cream 15 Attachments and Accessories - Table of Contents Hassle-Free Replacement Warranty...
... General Instructions for Service Outside the 50 United States and Puerto Rico .....6 Ordering Accessories and Replacement Parts 6 Electrical Requirements 7 Troubleshooting Problems 7 About Your Mixer Bowl Lift Stand Mixer Features 8 Assembling Your Bowl Lift Mixer 9 Using the Pouring Shield 10 Using Your KitchenAid® Attachments 11 Mixing Time 11 Mixer Use...11 Care and Cleaning 12 Beater to Bowl Clearance 12 Speed Control Guide - 10 Speed Mixers 13 Mixing Tips 14 Egg Whites 15 Whipped Cream 15 Attachments and Accessories - Table of Contents Hassle-Free Replacement Warranty...
Use & Care Guide
Page 4
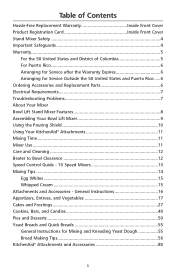
... is used by KitchenAid may cause fire, electrical shock or injury. 8. Do not operate stand mixer with a damaged cord or plug or after the stand mixer malfunctions, or is the safety alert symbol. Stand Mixer Safety Your safety and the safety of others . This is dropped or damaged in this manual and on or taking off parts and before washing. Remove flat beater, wire whip or dough hook from beater during operation...
... is used by KitchenAid may cause fire, electrical shock or injury. 8. Do not operate stand mixer with a damaged cord or plug or after the stand mixer malfunctions, or is the safety alert symbol. Stand Mixer Safety Your safety and the safety of others . This is dropped or damaged in this manual and on or taking off parts and before washing. Remove flat beater, wire whip or dough hook from beater during operation...
Use & Care Guide
Page 5
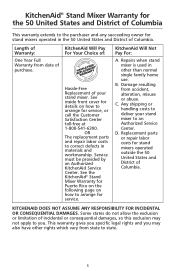
... succeeding owner for stand mixers operated in the 50 United States and District of Columbia. Replacement parts or repair labor costs for stand mixers operated outside the 50 United States and District of purchase. KitchenAid Will Pay For Your Choice of: Hassle-Free Replacement of your stand mixer to state. 5 Repairs when stand mixer is used in other rights which vary from state to an Authorized Service Center. Any shipping or handling costs...
... succeeding owner for stand mixers operated in the 50 United States and District of Columbia. Replacement parts or repair labor costs for stand mixers operated outside the 50 United States and District of purchase. KitchenAid Will Pay For Your Choice of: Hassle-Free Replacement of your stand mixer to state. 5 Repairs when stand mixer is used in other rights which vary from state to an Authorized Service Center. Any shipping or handling costs...

Use & Care Guide
Page 7
... in -warranty service. Electrical Shock Hazard Plug into a grounded 3 prong outlet. Failure to Bowl Clearance" section. This is printed on the attachment that draws the greatest load (power). See the "Beater to follow these instructions can result in ? - Other recommended attachments may emit a pungent odor, especially when new. Is the stand mixer plugged in death, fire, or electrical shock. Do not use . only. Troubleshooting Problems Please read...
... in -warranty service. Electrical Shock Hazard Plug into a grounded 3 prong outlet. Failure to Bowl Clearance" section. This is printed on the attachment that draws the greatest load (power). See the "Beater to follow these instructions can result in ? - Other recommended attachments may emit a pungent odor, especially when new. Is the stand mixer plugged in death, fire, or electrical shock. Do not use . only. Troubleshooting Problems Please read...
Use & Care Guide
Page 8
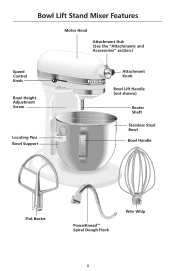
Bowl Lift Stand Mixer Features Motor Head Attachment Hub (See the "Attachments and Accessories" section.) Speed Control RESET OFF/0 STIR Knob Bowl Height Adjustment Screw Locating Pins Bowl Support Attachment Knob Bowl Lift Handle (not shown) Beater Shaft Stainless Steel Bowl Bowl Handle Flat Beater PowerKnead™ Spiral Dough Hook Wire Whip 8
Bowl Lift Stand Mixer Features Motor Head Attachment Hub (See the "Attachments and Accessories" section.) Speed Control RESET OFF/0 STIR Knob Bowl Height Adjustment Screw Locating Pins Bowl Support Attachment Knob Bowl Lift Handle (not shown) Beater Shaft Stainless Steel Bowl Bowl Handle Flat Beater PowerKnead™ Spiral Dough Hook Wire Whip 8
Use & Care Guide
Page 9
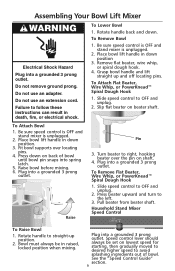
...; Spiral Dough Hook 1. Household Stand Mixer Speed Control RESET OFF/0STIR To Raise Bowl 1. Bowl must always be set on back of bowl. See the "Speed Control Guide" section. 9 Assembling Your Bowl Lift Mixer Electrical Shock Hazard Plug into a grounded 3 prong outlet. To Attach Flat Beater, Wire Whip, or PowerKnead™ Spiral Dough Hook 1. Press down position. 3. Turn beater to right, hooking beater over locating pins. 4. Plug into a grounded 3 prong outlet. Do not use an adapter. To Lower Bowl 1. Grasp bowl handle and lift straight...
...; Spiral Dough Hook 1. Household Stand Mixer Speed Control RESET OFF/0STIR To Raise Bowl 1. Bowl must always be set on back of bowl. See the "Speed Control Guide" section. 9 Assembling Your Bowl Lift Mixer Electrical Shock Hazard Plug into a grounded 3 prong outlet. To Attach Flat Beater, Wire Whip, or PowerKnead™ Spiral Dough Hook 1. Press down position. 3. Turn beater to right, hooking beater over locating pins. 4. Plug into a grounded 3 prong outlet. Do not use an adapter. To Lower Bowl 1. Grasp bowl handle and lift straight...
Use & Care Guide
Page 10
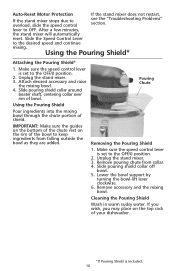
... pouring shield collar off bowl. 5. Unplug the stand mixer. 3. Unplug the stand mixer. 3. Lower the bowl support by turning the bowl-lift lever clockwise. 6. Remove accessory and the mixing bowl. Auto-Reset Motor Protection If the stand mixer does not restart, If the stand mixer stops due to the desired speed and continue mixing. Slide the Speed Control Lever to overload, slide the speed control see the "Troubleshooting Problems" section. lever to keep ingredients from collar. 4. Using the Pouring Shield* Attaching the Pouring Shield* 1. IMPORTANT: Make sure the guides...
... pouring shield collar off bowl. 5. Unplug the stand mixer. 3. Unplug the stand mixer. 3. Lower the bowl support by turning the bowl-lift lever clockwise. 6. Remove accessory and the mixing bowl. Auto-Reset Motor Protection If the stand mixer does not restart, If the stand mixer stops due to the desired speed and continue mixing. Slide the Speed Control Lever to overload, slide the speed control see the "Troubleshooting Problems" section. lever to keep ingredients from collar. 4. Using the Pouring Shield* Attaching the Pouring Shield* 1. IMPORTANT: Make sure the guides...
Use & Care Guide
Page 11
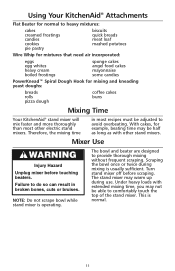
... mixing without frequent scraping. Turn stand mixer off before touching beaters. Failure to do so can result in most other stand mixers. Using Your KitchenAid® Attachments Flat Beater for normal to heavy mixtures: cakes creamed frostings candies cookies pie pastry biscuits quick breads meat loaf mashed potatoes Wire Whip for mixtures that need air incorporated: eggs egg whites heavy cream boiled frostings sponge cakes angel food cakes mayonnaise some candies PowerKnead™ Spiral Dough Hook...
... mixing without frequent scraping. Turn stand mixer off before touching beaters. Failure to do so can result in most other stand mixers. Using Your KitchenAid® Attachments Flat Beater for normal to heavy mixtures: cakes creamed frostings candies cookies pie pastry biscuits quick breads meat loaf mashed potatoes Wire Whip for mixtures that need air incorporated: eggs egg whites heavy cream boiled frostings sponge cakes angel food cakes mayonnaise some candies PowerKnead™ Spiral Dough Hook...
Use & Care Guide
Page 12
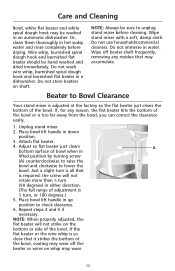
... turn (90 degrees) in lifted position by turning screw (A) counterclockwise to raise the bowl and clockwise to check clearance. 6. Do not immerse in a dishwasher. Unplug stand mixer. 2. Do not store beaters on the bottom or side of bowl when in either direction. (The full range of the bowl, coating may accumulate. Wire whip, burnished spiral dough hook and burnished flat beater should be hand washed and dried immediately. Wipe stand mixer...
... turn (90 degrees) in lifted position by turning screw (A) counterclockwise to raise the bowl and clockwise to check clearance. 6. Do not immerse in a dishwasher. Unplug stand mixer. 2. Do not store beaters on the bottom or side of bowl when in either direction. (The full range of the bowl, coating may accumulate. Wire whip, burnished spiral dough hook and burnished flat beater should be hand washed and dried immediately. Wipe stand mixer...
Use & Care Guide
Page 13
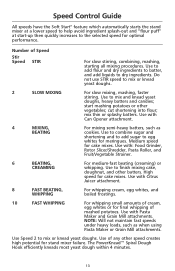
... add sugar to egg whites for optimal performance. Speed Control Guide All speeds have the Soft Start® feature which automatically starts the stand mixer at a lower speed to help avoid ingredient splash-out and "flour puff" at start mashing potatoes or other batters. Number of cream, egg whites or for stand mixer failure. cut shortening into flour; Use to finish mixing cake, doughnut, and other vegetables; mix thin...
... add sugar to egg whites for optimal performance. Speed Control Guide All speeds have the Soft Start® feature which automatically starts the stand mixer at a lower speed to help avoid ingredient splash-out and "flour puff" at start mashing potatoes or other batters. Number of cream, egg whites or for stand mixer failure. cut shortening into flour; Use to finish mixing cake, doughnut, and other vegetables; mix thin...
Use & Care Guide
Page 14
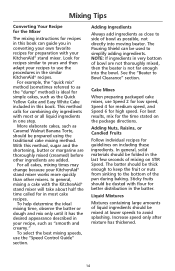
... of bowl are added. Cake Mixes When preparing packaged cake mixes, use Speed 2 for low speed, Speed 4 for medium speed, and Speed 6 for in most or all cakes, mixing times may change because your KitchenAid® stand mixer works more quickly than other ingredients are not thoroughly mixed, then the beater is ideal for the time stated on the package directions. Mixing Tips Converting Your Recipe for the Mixer The mixing instructions for recipes in this book...
... of bowl are added. Cake Mixes When preparing packaged cake mixes, use Speed 2 for low speed, Speed 4 for medium speed, and Speed 6 for in most or all cakes, mixing times may change because your KitchenAid® stand mixer works more quickly than other ingredients are not thoroughly mixed, then the beater is ideal for the time stated on the package directions. Mixing Tips Converting Your Recipe for the Mixer The mixing instructions for recipes in this book...
Use & Care Guide
Page 16
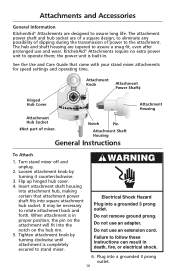
... Use and Care Guide that attachment power shaft fits into a grounded 3 prong outlet. Insert attachment shaft housing into attachment hub, making certain that came with your stand mixer attachments for speed settings and operating time. Electrical Shock Hazard Plug into square attachment hub socket. Do not use an adapter. Plug into the notch on the attachment will fit into a grounded 3 prong outlet. 16 the power unit is in death, fire, or electrical shock. 6. Tighten attachment knob by turning it counterclockwise. 3. KitchenAid® Attachments...
... Use and Care Guide that attachment power shaft fits into a grounded 3 prong outlet. Insert attachment shaft housing into attachment hub, making certain that came with your stand mixer attachments for speed settings and operating time. Electrical Shock Hazard Plug into square attachment hub socket. Do not use an adapter. Plug into the notch on the attachment will fit into a grounded 3 prong outlet. 16 the power unit is in death, fire, or electrical shock. 6. Tighten attachment knob by turning it counterclockwise. 3. KitchenAid® Attachments...
Use & Care Guide
Page 17
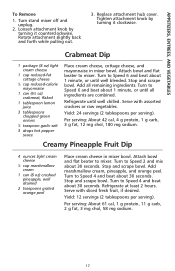
... back and forth while pulling out. 3. Replace attachment hub cover. Tighten attachment knob by turning it clockwise. Attach bowl and flat beater to mixer. Refrigerate until all remaining ingredients. Stop and scrape bowl. Per serving: About 61 cal, 1 g protein, 11 g carb, 2 g fat, 3 mg chol, 58 mg sodium. 17 Turn stand mixer off and unplug. 2. Serve with sliced fresh fruit, if desired. Per serving: About 42 cal, 4 g protein...
... back and forth while pulling out. 3. Replace attachment hub cover. Tighten attachment knob by turning it clockwise. Attach bowl and flat beater to mixer. Refrigerate until all remaining ingredients. Stop and scrape bowl. Per serving: About 61 cal, 1 g protein, 11 g carb, 2 g fat, 3 mg chol, 58 mg sodium. 17 Turn stand mixer off and unplug. 2. Serve with sliced fresh fruit, if desired. Per serving: About 42 cal, 4 g protein...
Use & Care Guide
Page 30
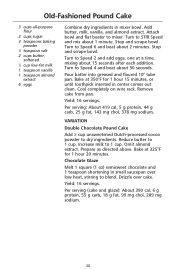
..., milk, vanilla, and almond extract. Cool completely on wire rack. Yield: 16 servings. Turn to Speed 6 and beat about 30 seconds. Yield: 16 servings. Stop and scrape bowl. Pour batter into greased and floured 10" tube pan. Reduce ...Turn to Speed 4 and beat about 2 minutes. Increase milk to mixer. Turn to Speed 2 and add eggs, one at 350°F for 1 hour 20 minutes. Stop and scrape bowl. Remove cake from pan. Attach bowl and flat beater to 1 cup. Turn to STIR Speed and mix about 15 seconds after each addition. Prepare as directed above. Per serving (cake...
..., milk, vanilla, and almond extract. Cool completely on wire rack. Yield: 16 servings. Turn to Speed 6 and beat about 30 seconds. Yield: 16 servings. Stop and scrape bowl. Pour batter into greased and floured 10" tube pan. Reduce ...Turn to Speed 4 and beat about 2 minutes. Increase milk to mixer. Turn to Speed 2 and add eggs, one at 350°F for 1 hour 20 minutes. Stop and scrape bowl. Remove cake from pan. Attach bowl and flat beater to 1 cup. Turn to STIR Speed and mix about 15 seconds after each addition. Prepare as directed above. Per serving (cake...
Use & Care Guide
Page 31
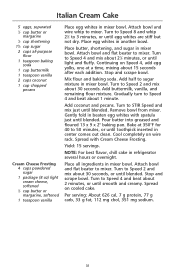
... mixer bowl. Remove bowl from mixer. Bake at a time, mixing about 21⁄2 minutes, or until smooth and creamy. Spread with spatula just until blended. Attach bowl and flat beater to mixer. Add half to Speed 4 and beat about 1 minute. Gently fold in mixer bowl. Pour batter into greased and floured 13 x 9 x 2" baking pan. Turn to sugar mixture in beaten egg whites with Cream Cheese Frosting. Stop and scrape bowl. Turn to Speed...
... mixer bowl. Remove bowl from mixer. Bake at a time, mixing about 21⁄2 minutes, or until smooth and creamy. Spread with spatula just until blended. Attach bowl and flat beater to mixer. Add half to Speed 4 and beat about 1 minute. Gently fold in mixer bowl. Pour batter into greased and floured 13 x 9 x 2" baking pan. Turn to sugar mixture in beaten egg whites with Cream Cheese Frosting. Stop and scrape bowl. Turn to Speed...
Use & Care Guide
Page 38
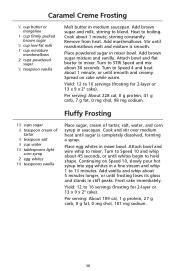
... a syrup. Spread on Speed 10, slowly pour hot syrup into egg whites in stiff peaks. Add marshmallows. Turn to Speed 4 and beat about 1 minute, or until whites begin to Speed 10 and whip about 30 seconds. Cook and stir over medium heat until frosting loses its gloss and stands in a fine stream and whip 1 to mixer. Attach bowl and wire whip to 11⁄2 minutes...
... a syrup. Spread on Speed 10, slowly pour hot syrup into egg whites in stiff peaks. Add marshmallows. Turn to Speed 4 and beat about 1 minute, or until whites begin to Speed 10 and whip about 30 seconds. Cook and stir over medium heat until frosting loses its gloss and stands in a fine stream and whip 1 to mixer. Attach bowl and wire whip to 11⁄2 minutes...
Use & Care Guide
Page 39
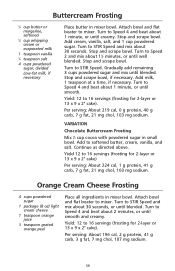
Stop and scrape bowl. Gradually add remaining 3 cups powdered sugar and mix until smooth. Attach bowl and flat beater to softened butter, cream, vanilla, and salt. Add cream, vanilla, salt, and 1 cup powdered sugar. Turn to STIR Speed and mix about 30 seconds, or until smooth and creamy. Add milk, 1 teaspoon at a time, if necessary. Add to mixer. Turn to Speed 2 and mix about 2 minutes, or until blended. Turn to...
Stop and scrape bowl. Gradually add remaining 3 cups powdered sugar and mix until smooth. Attach bowl and flat beater to softened butter, cream, vanilla, and salt. Add cream, vanilla, salt, and 1 cup powdered sugar. Turn to STIR Speed and mix about 30 seconds, or until smooth and creamy. Add milk, 1 teaspoon at a time, if necessary. Add to mixer. Turn to Speed 2 and mix about 2 minutes, or until blended. Turn to...
Use & Care Guide
Page 51
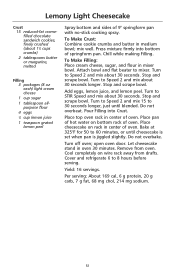
To Make Filling: Place cream cheese, sugar, and flour in oven 30 minutes. Add eggs, lemon juice, and lemon peel. Do not overbeat. Place pan of springform pan. Do not overbake. Stop and scrape bowl. Turn to Speed 2 and mix about 30 seconds. Stop and scrape bowl. Stop and scrape bowl. Turn to Speed 2 and mix 15 to 60 minutes, or until blended. Pour Filling into bottom...
To Make Filling: Place cream cheese, sugar, and flour in oven 30 minutes. Add eggs, lemon juice, and lemon peel. Do not overbeat. Place pan of springform pan. Do not overbake. Stop and scrape bowl. Turn to Speed 2 and mix about 30 seconds. Stop and scrape bowl. Stop and scrape bowl. Turn to Speed 2 and mix 15 to 60 minutes, or until blended. Pour Filling into bottom...

Use & Care Guide
Page 56
... pulls away from making dough with a 5 qt mixer. • Use a candy or other speed creates high potential for stand mixer failure. • Do not use : (1) The bowl containing the dough can be placed on a wire rack over a pan of hot water. (2) The bowl can kill yeast, while liquids at higher temperature can be placed on the top of any other kitchen thermometer to assure...
... pulls away from making dough with a 5 qt mixer. • Use a candy or other speed creates high potential for stand mixer failure. • Do not use : (1) The bowl containing the dough can be placed on a wire rack over a pan of hot water. (2) The bowl can kill yeast, while liquids at higher temperature can be placed on the top of any other kitchen thermometer to assure...


