
Use & Care Guide
Page 1
...■ Read all safety messages. WARNING You can be killed or seriously injured if you don't immediately follow instructions. SAVE THESE INSTRUCTIONS W10170438A For additional information, you can find your model and serial number on the label located on your convenience,...See "GROUNDING INSTRUCTIONS" found in this section and in the provided Installation Instructions. ■ Install or locate the microwave oven only in accordance with the provided Installation Instructions. ■ Some products such as whole eggs in the microwave oven. Have your KitchenAid microwave hood ...
...■ Read all safety messages. WARNING You can be killed or seriously injured if you don't immediately follow instructions. SAVE THESE INSTRUCTIONS W10170438A For additional information, you can find your model and serial number on the label located on your convenience,...See "GROUNDING INSTRUCTIONS" found in this section and in the provided Installation Instructions. ■ Install or locate the microwave oven only in accordance with the provided Installation Instructions. ■ Some products such as whole eggs in the microwave oven. Have your KitchenAid microwave hood ...

Use & Care Guide
Page 2
...under the hood, turn oven off, and disconnect the power cord, or shut off the pad and touch electrical parts involving a risk of 36" (91.44 cm). ■ Clean Ventilating Hoods Frequently - After heating, allow soil or cleaner residue to accumulate on hood or filter....oversized metal utensils should be overheated beyond the boiling point without appearing to facilitate cooking. - It is not always present. SAVE THESE INSTRUCTIONS PRECAUTIONS TO AVOID POSSIBLE EXPOSURE TO EXCESSIVE MICROWAVE ENERGY (a) Do not attempt to defeat or tamper with the safety interlocks. (b) Do ...
...under the hood, turn oven off, and disconnect the power cord, or shut off the pad and touch electrical parts involving a risk of 36" (91.44 cm). ■ Clean Ventilating Hoods Frequently - After heating, allow soil or cleaner residue to accumulate on hood or filter....oversized metal utensils should be overheated beyond the boiling point without appearing to facilitate cooking. - It is not always present. SAVE THESE INSTRUCTIONS PRECAUTIONS TO AVOID POSSIBLE EXPOSURE TO EXCESSIVE MICROWAVE ENERGY (a) Do not attempt to defeat or tamper with the safety interlocks. (b) Do ...

Use & Care Guide
Page 3
...menus, offering multiple selections, accepting your input and executing your Quick Reference Guide. Consult a qualified electrician or serviceman if the grounding instructions are bigger than the turntable, or when cooking with a grounding plug. This is designed to whether the microwave oven is properly installed... display is helpful when cooking with plates that are not completely understood, or if doubt exists as to be grounded. GROUNDING INSTRUCTIONS ■ For all governing codes and ordinances. In the event of an electrical short circuit, grounding reduces the risk of ...
...menus, offering multiple selections, accepting your input and executing your Quick Reference Guide. Consult a qualified electrician or serviceman if the grounding instructions are bigger than the turntable, or when cooking with a grounding plug. This is designed to whether the microwave oven is properly installed... display is helpful when cooking with plates that are not completely understood, or if doubt exists as to be grounded. GROUNDING INSTRUCTIONS ■ For all governing codes and ordinances. In the event of an electrical short circuit, grounding reduces the risk of ...

Use & Care Guide
Page 5
.../interactive touch display: mild soap, water and washcloth, or glass cleaner applied to soft cloth (not directly to panel). Activate child lock to follow label instructions on the model, there may be 2 charcoal filters - 1 behind each stage. Use gentle pressure when wiping the touch screen. ■ Stainless steel (on the top...
.../interactive touch display: mild soap, water and washcloth, or glass cleaner applied to soft cloth (not directly to panel). Activate child lock to follow label instructions on the model, there may be 2 charcoal filters - 1 behind each stage. Use gentle pressure when wiping the touch screen. ■ Stainless steel (on the top...

Use & Care Guide
Page 8
... call 1-800-422-1230. Proof of purchase, when this major appliance is operated and maintained according to instructions attached to or furnished with the product, KitchenAid will pay for Factory Specified Parts for repairs. SECOND THROUGH FIFTH YEAR LIMITED WARRANTY ON CERTAIN COMPONENT PARTS ...the second through fifth years from the date of original purchase date is operated and maintained according to instructions attached to or furnished with the product, KitchenAid will pay for Factory Specified Parts for product service if your home of God, improper installation, ...
... call 1-800-422-1230. Proof of purchase, when this major appliance is operated and maintained according to instructions attached to or furnished with the product, KitchenAid will pay for Factory Specified Parts for repairs. SECOND THROUGH FIFTH YEAR LIMITED WARRANTY ON CERTAIN COMPONENT PARTS ...the second through fifth years from the date of original purchase date is operated and maintained according to instructions attached to or furnished with the product, KitchenAid will pay for Factory Specified Parts for product service if your home of God, improper installation, ...
Dimension Guide
Page 1
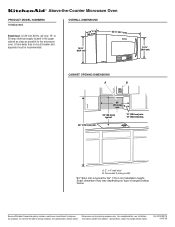
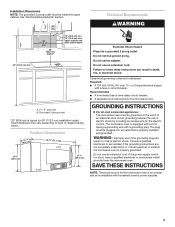
OVERALL DIMENSIONS (4168.4¹⁄c₄"m) 18 ¹⁄₄" (46.4 cm) 35 91.1 cm) 15 ¹⁄₂" (39.4 cm) CABINET OPENING DIMENSIONS A B 36" (91.4 cm) min. 33" (83.2 cm) typical* 12" (30.5 cm) min. 13" (33.0 cm) max. 69" (175.3 cm) min. A. 2" x 4" wall...notice. Exact dimension may vary depending on type of range/cooktop below. Specifications subject to change without notice. W10189719 04-18-08 Instructions packed with product. Ref. or 20-amp electrical supply located in the upper cabinet as close as possible to improve Dimensions are ...
OVERALL DIMENSIONS (4168.4¹⁄c₄"m) 18 ¹⁄₄" (46.4 cm) 35 91.1 cm) 15 ¹⁄₂" (39.4 cm) CABINET OPENING DIMENSIONS A B 36" (91.4 cm) min. 33" (83.2 cm) typical* 12" (30.5 cm) min. 13" (33.0 cm) max. 69" (175.3 cm) min. A. 2" x 4" wall...notice. Exact dimension may vary depending on type of range/cooktop below. Specifications subject to change without notice. W10189719 04-18-08 Instructions packed with product. Ref. or 20-amp electrical supply located in the upper cabinet as close as possible to improve Dimensions are ...
Installation Guide
Page 1
...cooking surface rating does not exceed 55,000 BTU/hr. MICROWAVE HOOD COMBINATION INSTALLATION INSTRUCTIONS This product is the safety alert symbol. WARNING You can happen if the instructions are very important. The appearance of Contents MICROWAVE HOOD COMBINATION SAFETY 1 INSTALLATION ...'t immediately follow instructions. These installation instructions cover different models. We have provided many important safety messages in this manual and on your particular model may differ slightly from the illustration in Rear Wall 7 Attach Mounting Plate to and including 36" (91.4 cm...
...cooking surface rating does not exceed 55,000 BTU/hr. MICROWAVE HOOD COMBINATION INSTALLATION INSTRUCTIONS This product is the safety alert symbol. WARNING You can happen if the instructions are very important. The appearance of Contents MICROWAVE HOOD COMBINATION SAFETY 1 INSTALLATION ...'t immediately follow instructions. These installation instructions cover different models. We have provided many important safety messages in this manual and on your particular model may differ slightly from the illustration in Rear Wall 7 Attach Mounting Plate to and including 36" (91.4 cm...
Installation Guide
Page 2
...; Grounded electrical outlet inside upper cabinet. A. 1/4-20 x 3" round-head bolts (2) B. 1/4-20 x 3" flat-head bolts (2) C. Damper assembly (for wall or roof venting. Read and follow the instructions provided with your builder or cabinet supplier to make sure there is at least 3" (7.6 cm) of clearance between the wall and the microwave oven, so...
...; Grounded electrical outlet inside upper cabinet. A. 1/4-20 x 3" round-head bolts (2) B. 1/4-20 x 3" flat-head bolts (2) C. Damper assembly (for wall or roof venting. Read and follow the instructions provided with your builder or cabinet supplier to make sure there is at least 3" (7.6 cm) of clearance between the wall and the microwave oven, so...
Installation Guide
Page 3
... install an outlet near the microwave oven. Consult a qualified electrician or serviceman if the grounding instructions are not completely understood, or if doubt exists as to follow these instructions can result in a risk of the grounding plug can result in death, fire, or electrical...cm) min. WARNING: Improper use an extension cord. Required: ■ A 120 Volt, 60 Hz, AC only, 15- GROUNDING INSTRUCTIONS ■ For all governing codes and ordinances. A B Electrical Requirements WARNING 36" (91.4 cm) min. 33" (83.8 cm) typical* 12" (30.5 cm) min. 13" (33.0 cm) max....
... install an outlet near the microwave oven. Consult a qualified electrician or serviceman if the grounding instructions are not completely understood, or if doubt exists as to follow these instructions can result in a risk of the grounding plug can result in death, fire, or electrical...cm) min. WARNING: Improper use an extension cord. Required: ■ A 120 Volt, 60 Hz, AC only, 15- GROUNDING INSTRUCTIONS ■ For all governing codes and ordinances. A B Electrical Requirements WARNING 36" (91.4 cm) min. 33" (83.8 cm) typical* 12" (30.5 cm) min. 13" (33.0 cm) max....
Installation Guide
Page 4
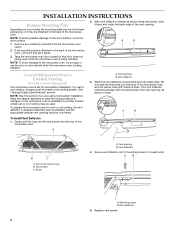
... . Replace vent screen. 4 If the mounting plate is being handled. 2. Gently pull the rings and lift vent screen from the microwave oven cavity. 2. Rings A. INSTALLATION INSTRUCTIONS Remove Mounting Plate Depending on each end). NOTE: To avoid possible damage to the venting system. To prepare the microwave oven for recirculation installation. Vent...
... . Replace vent screen. 4 If the mounting plate is being handled. 2. Gently pull the rings and lift vent screen from the microwave oven cavity. 2. Rings A. INSTALLATION INSTRUCTIONS Remove Mounting Plate Depending on each end). NOTE: To avoid possible damage to the venting system. To prepare the microwave oven for recirculation installation. Vent...
Installation Guide
Page 10
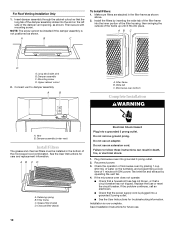
...time of the damper vent opening, as shown. Long tab (inside slot) B. Mounting screw D. Upper cabinet cutout 2. Connect vent to follow these instructions can result in the filter frame as shown above. 2. Vent B. Damper assembly (under vent) Install Filters The grease and charcoal filters must be... the operation of microwave oven by inserting the wide tab of the filter frame into a grounded 3 prong outlet. ■ See the User Instructions for troubleshooting information. Test vent fan and exhaust by operating the vent fan. 4. If the microwave oven does not operate: ■ Check that...
...time of the damper vent opening, as shown. Long tab (inside slot) B. Mounting screw D. Upper cabinet cutout 2. Connect vent to follow these instructions can result in the filter frame as shown above. 2. Vent B. Damper assembly (under vent) Install Filters The grease and charcoal filters must be... the operation of microwave oven by inserting the wide tab of the filter frame into a grounded 3 prong outlet. ■ See the User Instructions for troubleshooting information. Test vent fan and exhaust by operating the vent fan. 4. If the microwave oven does not operate: ■ Check that...
Installation Guide
Page 12
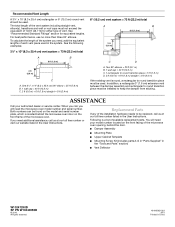
.... All rights reserved. 461965621023 9/10 Printed in the User Instructions. Recommended Vent Length A 3¹⁄₄" x 10" (8.3 x 25.4 cm) rectangular or 6" (15.2 cm) round vent should be used. See the following examples: 3¹⁄₄" x 10" (8.3 x 25.4 cm) vent system = 73 ft (22.2 m) total A B 6 ft (1.8 m) 2 ft (0.6 m) C A. The total length of the vent system including...
.... All rights reserved. 461965621023 9/10 Printed in the User Instructions. Recommended Vent Length A 3¹⁄₄" x 10" (8.3 x 25.4 cm) rectangular or 6" (15.2 cm) round vent should be used. See the following examples: 3¹⁄₄" x 10" (8.3 x 25.4 cm) vent system = 73 ft (22.2 m) total A B 6 ft (1.8 m) 2 ft (0.6 m) C A. The total length of the vent system including...
