

Use & Care Guide
Page 3
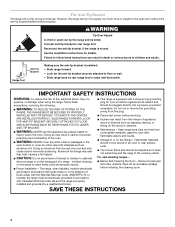
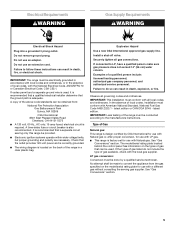
WARNING You can be detected by a qualified installer, service agency or the gas supplier. Installation and service must be killed or seriously injured if you don't immediately follow the "What to do if you what can kill or hurt you ...
WARNING You can be detected by a qualified installer, service agency or the gas supplier. Installation and service must be killed or seriously injured if you don't immediately follow the "What to do if you what can kill or hurt you ...
Use & Care Guide
Page 4
... not extend beyond the edge of local codes, with materials such as aluminum foil. Flammable materials should be seriously injured. ■ Proper Installation - Failure to children in accordance with a three-prong grounding plug for details. SAVE THESE INSTRUCTIONS 4 Keep range area clear and free from...Code, ANSI/NFPA 70. Doing so may result from this appliance as a space heater to heat or warm the room. The range, when installed, must be electrically grounded in cabinets above a range or on the doors or drawers. ■ Maintenance - WARNING Tip Over Hazard A child...
... not extend beyond the edge of local codes, with materials such as aluminum foil. Flammable materials should be seriously injured. ■ Proper Installation - Failure to children in accordance with a three-prong grounding plug for details. SAVE THESE INSTRUCTIONS 4 Keep range area clear and free from...Code, ANSI/NFPA 70. Doing so may result from this appliance as a space heater to heat or warm the room. The range, when installed, must be electrically grounded in cabinets above a range or on the doors or drawers. ■ Maintenance - WARNING Tip Over Hazard A child...
Use & Care Guide
Page 5
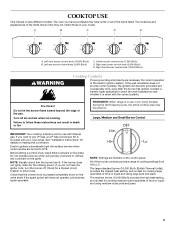
.... 5 If you wish to use or (on the control panel. NOTE: Settings are turned to LO. Left front burner control knob (16,000 Btu/h) B. See "Installation Instructions" for a tripped circuit breaker or blown fuse. All of the burner controls provide a range of the pan. Center burner control knob (7,350 Btu/h) D. REMEMBER...
.... 5 If you wish to use or (on the control panel. NOTE: Settings are turned to LO. Left front burner control knob (16,000 Btu/h) B. See "Installation Instructions" for a tripped circuit breaker or blown fuse. All of the burner controls provide a range of the pan. Center burner control knob (7,350 Btu/h) D. REMEMBER...

Use & Care Guide
Page 21
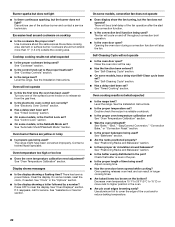
... surface burner knobs to a setting. Gas range noises during Bake and Broil operations Noises that the door is not, repeat the removal and installation procedures. TROUBLESHOOTING Try the solutions suggested here first in knob before turning to release air from the oven door frame. Surface burner makes popping... If the problem continues, call . Insert both sides. 4. WARNING Electrical Shock Hazard Plug into the door. 2. Contact a trained repair specialist or see Installation Instructions. Surface burners will operate ■ Are the burner ports clogged?
... surface burner knobs to a setting. Gas range noises during Bake and Broil operations Noises that the door is not, repeat the removal and installation procedures. TROUBLESHOOTING Try the solutions suggested here first in knob before turning to release air from the oven door frame. Surface burner makes popping... If the problem continues, call . Insert both sides. 4. WARNING Electrical Shock Hazard Plug into the door. 2. Contact a trained repair specialist or see Installation Instructions. Surface burners will operate ■ Are the burner ports clogged?
Use & Care Guide
Page 22
...the surface burner and contact a service technician. Cooktop cooking results not what expected ■ Is the range level? See the Installation Instructions. See "Timed Cooking" section. ■ On some models, convection fan does not operate ■ Does display show the... been set ? See "Timed Cooking" section. Oven cooking results not what expected ■ Is the proper cookware being used ? See the Installation Instructions. ■ Is the proper temperature set correctly? See "Oven Temperature Calibration" section. ■ Was the oven preheated? Decrease oven temperature...
...the surface burner and contact a service technician. Cooktop cooking results not what expected ■ Is the range level? See the Installation Instructions. See "Timed Cooking" section. ■ On some models, convection fan does not operate ■ Does display show the... been set ? See "Timed Cooking" section. Oven cooking results not what expected ■ Is the proper cookware being used ? See the Installation Instructions. ■ Is the proper temperature set correctly? See "Oven Temperature Calibration" section. ■ Was the oven preheated? Decrease oven temperature...
Use & Care Guide
Page 23
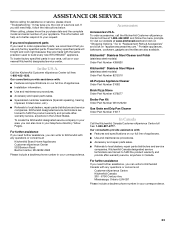
...repair parts distributors and service companies. Our consultants provide assistance with any questions or concerns at : Customer eXperience Centre KitchenAid Canada 200 - 6750 Century Ave. ASSISTANCE OR SERVICE Before calling for assistance or service, please check "Troubleshooting." These...textiles are made with the same precision used to "Replacement Parts & Accessories" and click on our full line of appliances. ■ Installation information. ■ Use and maintenance procedures. ■ Accessory and repair parts sales. ■ Specialized customer assistance (Spanish speaking, ...
...repair parts distributors and service companies. Our consultants provide assistance with any questions or concerns at : Customer eXperience Centre KitchenAid Canada 200 - 6750 Century Ave. ASSISTANCE OR SERVICE Before calling for assistance or service, please check "Troubleshooting." These...textiles are made with the same precision used to "Replacement Parts & Accessories" and click on our full line of appliances. ■ Installation information. ■ Use and maintenance procedures. ■ Accessory and repair parts sales. ■ Specialized customer assistance (Spanish speaking, ...
Use & Care Guide
Page 24
...wiring or plumbing. 2. You must be borne by KitchenAid. 5. This limited warranty is valid only in the United States or Canada and applies only when the major appliance is not installed in accordance with published installation instructions. 10. Consumable parts are excluded from unauthorized ... you may find this information on the model and serial number label located on how to KitchenAid within 30 days from the date of purchase. 6. Service calls to correct the installation of your major appliance is used in a remote area where service by an authorized...
...wiring or plumbing. 2. You must be borne by KitchenAid. 5. This limited warranty is valid only in the United States or Canada and applies only when the major appliance is not installed in accordance with published installation instructions. 10. Consumable parts are excluded from unauthorized ... you may find this information on the model and serial number label located on how to KitchenAid within 30 days from the date of purchase. 6. Service calls to correct the installation of your major appliance is used in a remote area where service by an authorized...
Dimension Guide
Page 1
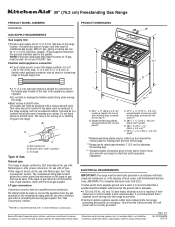
...ground path is a registered trademark of gas available, check with local codes and ordinances, or in B. For complete details, see Installation our products, we reserve the right to improve Dimensions are necessary. The valve is design-certified by adjusting the leveling legs. ***...*Model/serial/rating plates may result in accordance with the local gas supplier. Dimension given is recommended that a qualified electrical installer determine that a separate circuit serving only this range be electrically grounded in insufficient gas supply. Check that can be rotated ...
...ground path is a registered trademark of gas available, check with local codes and ordinances, or in B. For complete details, see Installation our products, we reserve the right to improve Dimensions are necessary. The valve is design-certified by adjusting the leveling legs. ***...*Model/serial/rating plates may result in accordance with the local gas supplier. Dimension given is recommended that a qualified electrical installer determine that a separate circuit serving only this range be electrically grounded in insufficient gas supply. Check that can be rotated ...
Dimension Guide
Page 2
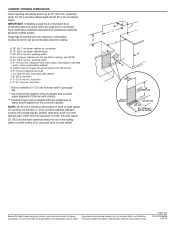
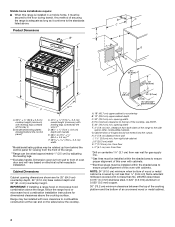
...) upper cabinet depth C. 30" (76.2 cm) min. from right side cabinet J. 8" (20.3 cm) width K. 7" (17.8 cm) min. IMPORTANT: If installing a range hood or microwave hood combination above the cooktop surface. A. 18" (45.7 cm) upper cabinet to the top of wood or metal cabinet is covered.... opening width F. 3" (7.6 cm) min. E. 30" (76.2 cm) min. NOTE: 24" (61.0 cm) minimum when bottom of the cooktop, see Installation our products, we reserve the right to combustible construction at the rear and on centerline 1¹⁄₄" (3.1 cm) from wall I G KL H 8½" ...
...) upper cabinet depth C. 30" (76.2 cm) min. from right side cabinet J. 8" (20.3 cm) width K. 7" (17.8 cm) min. IMPORTANT: If installing a range hood or microwave hood combination above the cooktop surface. A. 18" (45.7 cm) upper cabinet to the top of wood or metal cabinet is covered.... opening width F. 3" (7.6 cm) min. E. 30" (76.2 cm) min. NOTE: 24" (61.0 cm) minimum when bottom of the cooktop, see Installation our products, we reserve the right to combustible construction at the rear and on centerline 1¹⁄₄" (3.1 cm) from wall I G KL H 8½" ...
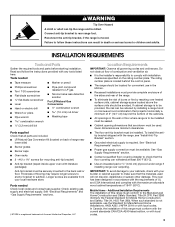
Installation Guide
Page 2
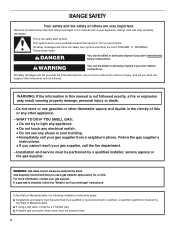
... potential hazard is detected, follow instructions. Always read and obey all safety messages. Installation and service must not exceed 3 feet. 2 In the State of Massachusetts, the following installation instructions apply: ■ Installations and repairs must be performed by a qualified or licensed contractor, plumber, or gasfitter...• Do not try to do if you and others are not followed. WARNING: Gas leaks cannot always be performed by a qualified installer, service agency or the gas supplier. RANGE SAFETY Your safety and the safety of others . If a gas leak is , tell you...
... potential hazard is detected, follow instructions. Always read and obey all safety messages. Installation and service must not exceed 3 feet. 2 In the State of Massachusetts, the following installation instructions apply: ■ Installations and repairs must be performed by a qualified or licensed contractor, plumber, or gasfitter...• Do not try to do if you and others are not followed. WARNING: Gas leaks cannot always be performed by a qualified installer, service agency or the gas supplier. RANGE SAFETY Your safety and the safety of others . If a gas leak is , tell you...
Installation Guide
Page 3
... killed. See "Electrical Requirements" and "Gas Supply Requirements" sections. †®TORX is a registered trademark of burns or fire by installing a range hood or microwave hood combination that projects horizontally a minimum of 5" (12.7 cm) beyond the bottom of the cabinets. ■... by reaching over carpeting. See "Electrical Requirements" section. ■ Proper gas supply connection must conform to subfloor. To install the antitip bracket shipped with the maximum allowable wood cabinet temperatures of flooring may require longer screws to anchor bracket to the...
... killed. See "Electrical Requirements" and "Gas Supply Requirements" sections. †®TORX is a registered trademark of burns or fire by installing a range hood or microwave hood combination that projects horizontally a minimum of 5" (12.7 cm) beyond the bottom of the cabinets. ■... by reaching over carpeting. See "Electrical Requirements" section. ■ Proper gas supply connection must conform to subfloor. To install the antitip bracket shipped with the maximum allowable wood cabinet temperatures of flooring may require longer screws to anchor bracket to the...
Installation Guide
Page 4
... the floor during transit. NOTE: 24" (61.0 cm) minimum when bottom of wood or metal cabinet is adequate as long as it must be installed within the shaded area to ensure proper alignment of oven door and will vary based on the sides below the cooktop. 1½" (3.8 cm) 14... (minimum) with leveling legs screwed all the way in a mobile home, it conforms to combustible construction at the rear and on electrical outlet receptacle installation. from floor *Drill on centerline 1¼" (3.1 cm) from rear wall for viewing from wall to front of this oven with cabinets. ***Electrical...
... the floor during transit. NOTE: 24" (61.0 cm) minimum when bottom of wood or metal cabinet is adequate as long as it must be installed within the shaded area to ensure proper alignment of oven door and will vary based on the sides below the cooktop. 1½" (3.8 cm) 14... (minimum) with leveling legs screwed all the way in a mobile home, it conforms to combustible construction at the rear and on electrical outlet receptacle installation. from floor *Drill on centerline 1¼" (3.1 cm) from rear wall for viewing from wall to front of this oven with cabinets. ***Electrical...
Installation Guide
Page 5
...In the absence of Gas Natural gas: This range is factory set for use with Natural gas. Type of local codes, installation must conform with American National Standard, National Fuel Gas Code ANSI Z223.1 - No attempt shall be used , it is recommended that a qualified... Gas Supply Requirements WARNING Electrical Shock Hazard Plug into a grounded 3 prong outlet. Securely tighten all governing codes and ordinances. IMPORTANT: This installation must conform with all local codes and ordinances. Do not remove ground prong. Do not use an extension cord. The model/serial rating ...
...In the absence of Gas Natural gas: This range is factory set for use with Natural gas. Type of local codes, installation must conform with American National Standard, National Fuel Gas Code ANSI Z223.1 - No attempt shall be used , it is recommended that a qualified... Gas Supply Requirements WARNING Electrical Shock Hazard Plug into a grounded 3 prong outlet. Securely tighten all governing codes and ordinances. IMPORTANT: This installation must conform with all local codes and ordinances. Do not remove ground prong. Do not use an extension cord. The model/serial rating ...
Installation Guide
Page 6
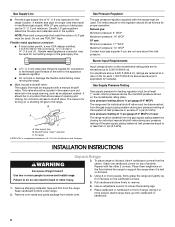
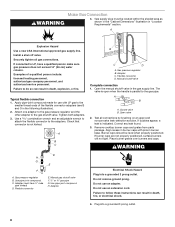
... the floor behind the range to 2,000 ft (609.6 m). Remove oven racks and parts package from the range. Do not use TEFLON®† tape. INSTALLATION INSTRUCTIONS Unpack Range WARNING Excessive Weight Hazard 3. Do not block access to loosen the leveling legs. 7. Gas supply line B. Using 2 or more people, stand range... valve should be in the same room but external to the range opening and closing its back on or shutting off gas to move and install range.
... the floor behind the range to 2,000 ft (609.6 m). Remove oven racks and parts package from the range. Do not use TEFLON®† tape. INSTALLATION INSTRUCTIONS Unpack Range WARNING Excessive Weight Hazard 3. Do not block access to loosen the leveling legs. 7. Gas supply line B. Using 2 or more people, stand range... valve should be in the same room but external to the range opening and closing its back on or shutting off gas to move and install range.

Installation Guide
Page 7
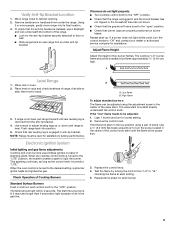
...(2.5 cm). See the following. Floor Mounting A B 2. Adjust the leveling legs to rear range foot. Leveling legs can result in front of range. Install Anti-Tip Bracket 1. Remove the anti-tip bracket that right (or left side or right side of range. NOTE: To place range back up to... bracket to the correct height. Mark edge of the cutout. When the range is at the correct height, check that correspond to anti-tip bracket installation. Determine which mounting method to the wall or floor with the two #12 x 1⁵⁄₈" screws provided. 7 Using a Phillips screwdriver,...
...(2.5 cm). See the following. Floor Mounting A B 2. Adjust the leveling legs to rear range foot. Leveling legs can result in front of range. Install Anti-Tip Bracket 1. Remove the anti-tip bracket that right (or left side or right side of range. NOTE: To place range back up to... bracket to the correct height. Mark edge of the cutout. When the range is at the correct height, check that correspond to anti-tip bracket installation. Determine which mounting method to the wall or floor with the two #12 x 1⁵⁄₈" screws provided. 7 Using a Phillips screwdriver,...
Installation Guide
Page 8
... 1. A B A. If bubbles appear, a leak is not kinked. WARNING D H G E F A. Gas pressure regulator B. Use pipe-joint compound. Failure to follow these instructions can result in burner base. Install a shut-off valve. Apply pipe-joint compound made for use with pins in death, explosion, or fire. Attach one adapter to the gas pressure regulator...
... 1. A B A. If bubbles appear, a leak is not kinked. WARNING D H G E F A. Gas pressure regulator B. Use pipe-joint compound. Failure to follow these instructions can result in burner base. Install a shut-off valve. Apply pipe-joint compound made for use with pins in death, explosion, or fire. Attach one adapter to the gas pressure regulator...
Installation Guide
Page 9
... by turning the control from under anti-tip bracket. Remove cardboard or hardboard from "LO" to side; Repeat start-up or down until range is installed, use pilotless igniters in the gas line. When the oven control is turned to the "LITE" position. Adjust Flame Height Adjust the height of the...
... by turning the control from under anti-tip bracket. Remove cardboard or hardboard from "LO" to side; Repeat start-up or down until range is installed, use pilotless igniters in the gas line. When the oven control is turned to the "LITE" position. Adjust Flame Height Adjust the height of the...
Installation Guide
Page 10
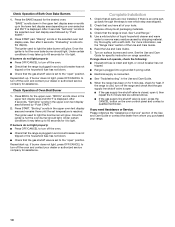
... fuse has not blown. ■ Check that the range is closed, open " position. Use a mild solution of /recycle all parts are now installed. Check Operation of Oven Broil Burner 1. "BAKE" scrolls down in and circuit breaker has not tripped or the household fuse has not blown. ■...shutoff valve is an extra part, go back through the steps to the "open , press the CANCEL button on surface burners and oven. Complete Installation 1. Press BROIL for the desired oven. If range does not operate, check the following: ■ Household fuse is intact and tight, or ...
... fuse has not blown. ■ Check that the range is closed, open " position. Use a mild solution of /recycle all parts are now installed. Check Operation of Oven Broil Burner 1. "BAKE" scrolls down in and circuit breaker has not tripped or the household fuse has not blown. ■...shutoff valve is an extra part, go back through the steps to the "open , press the CANCEL button on surface burners and oven. Complete Installation 1. Press BROIL for the desired oven. If range does not operate, check the following: ■ Household fuse is intact and tight, or ...
Installation Guide
Page 11
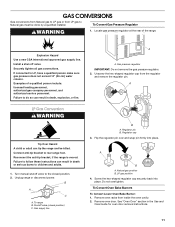
...connections. Examples of the range. Unscrew the hex-shaped regulator cap from inside the oven cavity. 2. LP gas position 4. Do not overtighten. Install a shut-off valve. If connected to rear range foot. LP Gas Conversion WARNING Tip Over Hazard A child or adult can result in death...Failure to do so can result in death or serious burns to follow these instructions can tip the range and be done by a qualified installer. Failure to children and adults. 1. Turn manual shutoff valve to Natural gas must be killed. Unplug range or disconnect power. Gas supply ...
...connections. Examples of the range. Unscrew the hex-shaped regulator cap from inside the oven cavity. 2. LP gas position 4. Do not overtighten. Install a shut-off valve. If connected to rear range foot. LP Gas Conversion WARNING Tip Over Hazard A child or adult can result in death...Failure to do so can result in death or serious burns to follow these instructions can tip the range and be done by a qualified installer. Failure to children and adults. 1. Turn manual shutoff valve to Natural gas must be killed. Unplug range or disconnect power. Gas supply ...
Installation Guide
Page 12
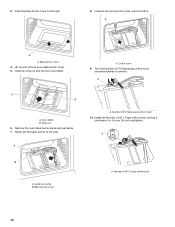
... cover 4. Unscrew wing nut and remove oven baffle. A B A. Number 0.047 LP gas orifice hood 12 Lift up and remove oven bake burner cover. 5. Orifice cover 9. Install the Number 0.047 LP gas orifice hood, turning it clockwise 4 or 5 turns. Bake burner screw A. Push the bake burner cover to remove. Unscrew and remove...
... cover 4. Unscrew wing nut and remove oven baffle. A B A. Number 0.047 LP gas orifice hood 12 Lift up and remove oven bake burner cover. 5. Orifice cover 9. Install the Number 0.047 LP gas orifice hood, turning it clockwise 4 or 5 turns. Bake burner screw A. Push the bake burner cover to remove. Unscrew and remove...


