

Use & Care Guide
Page 15
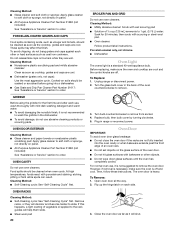
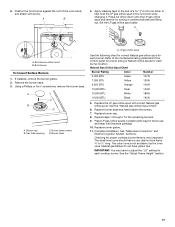
.... See the "Positioning Racks and Bakeware" section. ■ If the oven is important not to preheat, unless recommended in 2 or 3 different places, including the thickest part. ■ Before convection cooking, position the rack(s) according to determine the doneness of meats and poultry. It is displayed (MEATS, BAKED GOODS or OTHER FOODS...
.... See the "Positioning Racks and Bakeware" section. ■ If the oven is important not to preheat, unless recommended in 2 or 3 different places, including the thickest part. ■ Before convection cooking, position the rack(s) according to determine the doneness of meats and poultry. It is displayed (MEATS, BAKED GOODS or OTHER FOODS...

Use & Care Guide
Page 19
...on some models). Soap, water and a soft cloth or sponge are off . These spills may remove numbers. ■ All-Purpose Appliance Cleaner Part Number 31682 (not included): See "Assistance or Service" section to delay the start. To avoid damage, do not use steel wool, abrasive ...oven temperature falls below 500°F (260°C). Press the number pads to enter the desired amount of grain to avoid damaging. ■ KitchenAid® Stainless Steel Cleaner and Polish (not included): See "Assistance or Service" section to stainless steel surfaces, even with soft, lint-free cloth...
...on some models). Soap, water and a soft cloth or sponge are off . These spills may remove numbers. ■ All-Purpose Appliance Cleaner Part Number 31682 (not included): See "Assistance or Service" section to delay the start. To avoid damage, do not use steel wool, abrasive ...oven temperature falls below 500°F (260°C). Press the number pads to enter the desired amount of grain to avoid damaging. ■ KitchenAid® Stainless Steel Cleaner and Polish (not included): See "Assistance or Service" section to stainless steel surfaces, even with soft, lint-free cloth...
Use & Care Guide
Page 20
...Glass cleaner and soft cloth or sponge: Apply glass cleaner to soft cloth or sponge, not directly on panel. ■ All-Purpose Appliance Cleaner Part Number 31682 (not included): See "Assistance or Service" section to order. To avoid chipping, do not use oven cleaners. Cooked-on soils should...and paper towels or nonabrasive plastic scrubbing pad: Apply glass cleaner to soft cloth or sponge, not directly on panel. ■ All-Purpose Appliance Cleaner Part Number 31682 (not included): See "Assistance or Service" section to 1 gal. (3.75 L) water: Soak for the first time and after each side...
...Glass cleaner and soft cloth or sponge: Apply glass cleaner to soft cloth or sponge, not directly on panel. ■ All-Purpose Appliance Cleaner Part Number 31682 (not included): See "Assistance or Service" section to order. To avoid chipping, do not use oven cleaners. Cooked-on soils should...and paper towels or nonabrasive plastic scrubbing pad: Apply glass cleaner to soft cloth or sponge, not directly on panel. ■ All-Purpose Appliance Cleaner Part Number 31682 (not included): See "Assistance or Service" section to 1 gal. (3.75 L) water: Soak for the first time and after each side...
Use & Care Guide
Page 23
... click on our full line of a service call us to better respond to local dealers, repair parts distributors and service companies. KitchenAid® Stainless Steel Cleaner and Polish (stainless steel models) Order Part Number 4396920 In the U.S.A. KitchenAid designated service technicians are also available. Our consultants provide assistance with : ■ Features and specifications on...
... click on our full line of a service call us to better respond to local dealers, repair parts distributors and service companies. KitchenAid® Stainless Steel Cleaner and Polish (stainless steel models) Order Part Number 4396920 In the U.S.A. KitchenAid designated service technicians are also available. Our consultants provide assistance with : ■ Features and specifications on...
Use & Care Guide
Page 24
... according to instructions attached to or furnished with the product, KitchenAid brand of Whirlpool Corporation or Whirlpool Canada LP (hereafter "KitchenAid") will pay for Factory Specified Parts for Factory Specified Parts and repair labor to correct defects in materials or workmanship....installed in an inaccessible location or is contrary to parts or systems resulting from warranty coverage. 3. This major appliance is covered by KitchenAid. 5. Major appliances with the removal from your authorized KitchenAid dealer to be easily determined. DISCLAIMER OF IMPLIED WARRANTIES...
... according to instructions attached to or furnished with the product, KitchenAid brand of Whirlpool Corporation or Whirlpool Canada LP (hereafter "KitchenAid") will pay for Factory Specified Parts for Factory Specified Parts and repair labor to correct defects in materials or workmanship....installed in an inaccessible location or is contrary to parts or systems resulting from warranty coverage. 3. This major appliance is covered by KitchenAid. 5. Major appliances with the removal from your authorized KitchenAid dealer to be easily determined. DISCLAIMER OF IMPLIED WARRANTIES...
Installation Guide
Page 3
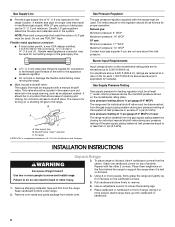
.../Natural Gas Conversions ■ ½" combination wrench 7.0 mm) nut driver ■ Masking tape combination wrench 3.2 mm) drill bit Parts supplied Check that all governing codes and ordinances. Failure to follow the instructions provided with the range, see "Install Anti-Tip Bracket" ... the antitip bracket shipped with any tools listed here. Thickness of Acument Intellectual Properties, LLC Location Requirements IMPORTANT: Observe all parts are minimum clearances. ■ The floor anti-tip bracket must be installed. Check existing gas supply and electrical supply. ...
.../Natural Gas Conversions ■ ½" combination wrench 7.0 mm) nut driver ■ Masking tape combination wrench 3.2 mm) drill bit Parts supplied Check that all governing codes and ordinances. Failure to follow the instructions provided with the range, see "Install Anti-Tip Bracket" ... the antitip bracket shipped with any tools listed here. Thickness of Acument Intellectual Properties, LLC Location Requirements IMPORTANT: Observe all parts are minimum clearances. ■ The floor anti-tip bracket must be installed. Check existing gas supply and electrical supply. ...
Installation Guide
Page 6
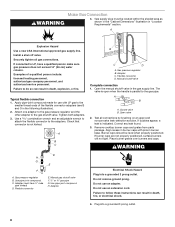
... more people to do so can be used in insufficient gas supply. Remove shipping materials, tape and film from inside oven. 6. Remove oven racks and parts package from the range. NOTE: Pipe-joint compounds that allows ease of opening , such as follows for Canada). It should be used . Stack one cardboard...
... more people to do so can be used in insufficient gas supply. Remove shipping materials, tape and film from inside oven. 6. Remove oven racks and parts package from the range. NOTE: Pipe-joint compounds that allows ease of opening , such as follows for Canada). It should be used . Stack one cardboard...
Installation Guide
Page 8
... following illustration). 2. Tighten both adapters. 3. Check that connector is indicated. A B C Adaptor B C D A. Gas pressure regulator B. Flexible connector D. Open valve 2. Remove cooktop burner caps and grates from parts package. Place burner grates over burners and caps. Typical flexible connection 1. Open the manual shutoff valve in burner base. If burner caps are not properly...
... following illustration). 2. Tighten both adapters. 3. Check that connector is indicated. A B C Adaptor B C D A. Gas pressure regulator B. Flexible connector D. Open valve 2. Remove cooktop burner caps and grates from parts package. Place burner grates over burners and caps. Typical flexible connection 1. Open the manual shutoff valve in burner base. If burner caps are not properly...
Installation Guide
Page 10
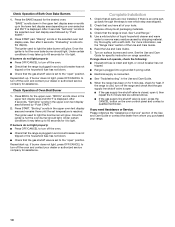
...water to light. Under certain conditions it may take up to 60 seconds for heat. Turn on oven selection and 350°F is an extra part, go back through the steps to light the bake burner will glow. Check Operation of the Use and Care Guide or contact the dealer from.... When the range has been on range operation. Once the igniter is reached. Check that all of Both Oven Bake Burners 1. If you have all parts are now installed. Check Operation of your tools. 3. If burner does not light, press OFF/CANCEL to the "open" position. Check that the gas ...
...water to light. Under certain conditions it may take up to 60 seconds for heat. Turn on oven selection and 350°F is an extra part, go back through the steps to light the bake burner will glow. Check Operation of the Use and Care Guide or contact the dealer from.... When the range has been on range operation. Once the igniter is reached. Check that all of Both Oven Bake Burners 1. If you have all parts are now installed. Check Operation of your tools. 3. If burner does not light, press OFF/CANCEL to the "open" position. Check that the gas ...
Installation Guide
Page 14
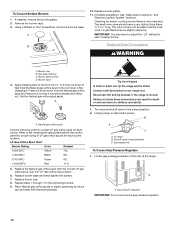
... BTU Red 111L 5. Replace burner base and hand tighten the screws. 7. Connect anti-tip bracket to help hold the Natural gas orifice spud in plastic parts bag for the remaining burners. 9. Locate gas pressure regulator at the rear of a 7.0 mm) nut driver to rear range foot. A A.
... BTU Red 111L 5. Replace burner base and hand tighten the screws. 7. Connect anti-tip bracket to help hold the Natural gas orifice spud in plastic parts bag for the remaining burners. 9. Locate gas pressure regulator at the rear of a 7.0 mm) nut driver to rear range foot. A A.
Installation Guide
Page 17
... as the inner cone. The small inner cone should have a very distinct blue flame ¼" to help hold the LP gas orifice spud in plastic parts bag for the remaining burners. 9. Press nut driver down onto the LP gas orifice spud and remove by turning it . A A. A C B D A. LP gas orifice spud Use...
... as the inner cone. The small inner cone should have a very distinct blue flame ¼" to help hold the LP gas orifice spud in plastic parts bag for the remaining burners. 9. Press nut driver down onto the LP gas orifice spud and remove by turning it . A A. A C B D A. LP gas orifice spud Use...


